Corrosion and fatigue in micro-sized Ni cantilever beams
来源期刊:中国有色金属学报(英文版)2007年增刊第1期
论文作者:张强 郭兴蓬 刘昱 戴能利 陆培祥
文章页码:213 - 217
Key words:cantilever beam; corrosion fatigue; nickel; micro-system
Abstract: The Ni microcantilevers were fabricated by femtosecond laser. The corrosion behavior of the micro-sized Ni cantilever beams was studied by electrochemical noise and a newly developed fatigue testing method. The results show that the micro-sized specimens exhibit general corrosion behavior under the studied corrosion condition, whereas the ordinary-sized plates exhibit the localized corrosion behavior. The critical load amplitude of the micro-sized Ni specimens under corrosion fatigue status was determined to be 15 mN. The maximum bending loads, which were measured by fatigue tests, decrease gradually prior to final fracture. Corrosion fracture first occurs in the range of notch with a higher tensile bending stress, and exhibits clear evidence of trans-columnar fracture. The variation of maximum bending loads with time agrees with that creep deformation of the micro-sized Ni specimens can easily occur at room temperature, which implies that the micro-sized Ni specimens appear to have an improved resistance towards total crack as compared with the ordinary-sized Ni specimens.
基金信息:the National Natural Science Foundation of China; Project(2006CB806006) supported by the National Basic Research Program of China

ZHANG Qiang(张强)1, GUO Xing-peng(郭兴蓬)1, LIU Yu(刘昱)1,
DAI Neng-li(戴能利)2, LU Pei-xiang(陆培祥)2
1. Department of Chemistry and Chemical Engineering, Huazhong University of Science and Technology,
Key Laboratory of Materials Chemistry & Service Failure of Hubei Province, Wuhan 430074, China;
2. Wuhan National Laboratory for Optoelectronics, School of Optoelectronics Science and Engineering,
Huazhong University of Science and Technology, Wuhan 430074, China
Received 15 July 2007; accepted 10 September 2007
Abstract: The Ni microcantilevers were fabricated by femtosecond laser. The corrosion behavior of the micro-sized Ni cantilever beams was studied by electrochemical noise and a newly developed fatigue testing method. The results show that the micro-sized specimens exhibit general corrosion behavior under the studied corrosion condition, whereas the ordinary-sized plates exhibit the localized corrosion behavior. The critical load amplitude of the micro-sized Ni specimens under corrosion fatigue status was determined to be 15 mN. The maximum bending loads, which were measured by fatigue tests, decrease gradually prior to final fracture. Corrosion fracture first occurs in the range of notch with a higher tensile bending stress, and exhibits clear evidence of trans-columnar fracture. The variation of maximum bending loads with time agrees with that creep deformation of the micro-sized Ni specimens can easily occur at room temperature, which implies that the micro-sized Ni specimens appear to have an improved resistance towards total crack as compared with the ordinary-sized Ni specimens.
Key words: cantilever beam; corrosion fatigue; nickel; micro-system
1 Introduction
The size of the components used in micro-system devices is considered to be in order of microns, and the mechanical properties of such micro-sized materials are considered to be different from those of bulk (ordinary-sized) materials, as surface effects on the deformation of mechanisms are prominent[1-3]. To achieve long-term reliability in various micro-system devices, it is necessary to understand the mechanical properties of thin films, including their fracture, fatigue, elastic and plastic properties. Fatigue properties and long-term reliability of micro-sized materials are extremely important to reliable design of actual micro-system, since many micro-sized moving components involved in bio-micro-system (diagnosis and treatment devices in human body) and inspection devices are subjected to cyclic loading and corrosion environments as they move[4]. In resent years, the breadth of materials available to micro-system designers is rapidly expending. It is to be expected that the range of materials should ultimately exceed that available to the designer of device at the macroscale[5]. With the demand for microelectromechanical systems (MEMS) and micromachines used in various fields, the research interest in micromaterials is now extending from silicon to non-silicon materials, such as metallic thin films.
Ni and Ni-based alloys have been found to have good mechanical properties that can be exploited to realize moveable structures in micro-system devices. Moreover, the magnetic of Ni has been widely used in magnetic micro-system[6]. The mechanical properties of Ni micro-system structures have been studied[7-8], but few reports on their corrosion and fatigue behavior are available in the literature. Femtosecond lasers provide the unique property to micro-machine a wide range of materials, such as dielectrics[9], semiconductors[10] and metals[11]. As a continuous non-perturbing measurement method, electrochemical noise (EN) has received considerable attention for providing important information about localized corrosion, such as corrosion type[12] and mechanism[13-14]. EN measurement was considered a good method of discriminating general corrosion and localized corrosion. In this work, EN and corrosion fatigue tests were performed for micro-sized specimens in a 3.0% NaCl aqueous solution and the size effects on the corrosion and fatigue of micro-sized specimens were investigated.
2 Experimental methods
2.1 Materials and specimens
The as-received 99.95% pure nickel thin film was fabricated to micro-cantilever beam type specimens with laser processing as shown in Fig.1(a). The dimensions and shape of micro-sized beam are illustrated in Fig.1(b). The distance from the loading point to the fixed end of the micro-sized beam was 60 μm. A notch was introduced in some specimens with a depth of about 12 μm. The notch position was 20 μm from the root of the specimen. The width of the notch was 3 μm, and the notch radius was thus deduced to be 1.5 μm.
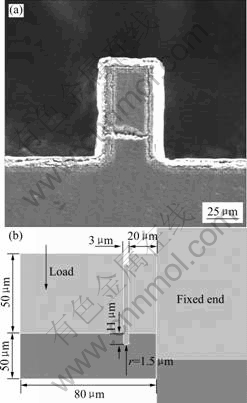
Fig.1 Notched micro-sized cantilever specimen prepared by femtosecond laser processing (a) and schematic of cantilever beam geometry used (b)
2.2 Fatigue testing setup
As shown in Fig.2, a 3D magnetostrictive device was used as an actuator that imparts a small amount of displacement to a specimen. The magnetostrictive material used was TERFENOL-D (TbDyFe), which was able to produce displacement up to 220 μm in X, Y directions and 160 μm in Z direction with an accuracy of 0.1 μm. In this testing machine, the end of the 3D magnetostrictive device was connected to a stainless steel shaft and a diamond tip of 5 μm in radius was attached to the other end of the shaft. A CCD camera was set near the specimen holder to monitor the specimen appearance during fatigue testing. A micro-sized specimen was set in a specimen holder and the holder was placed on a load cell as shown in Fig.2. A strain gauge type load cell with a resolution of 10-5 N was used to measure the load on the specimen.
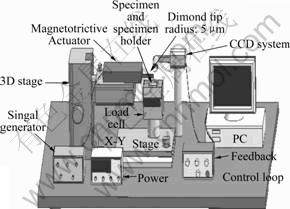
Fig.2 Block diagram of fatigue testing machine for micro-sized specimens used
2.3 Electrochemical noise experiments
Two identical micro-sized cantilever beam electrodes were used as working electrodes (WE1 and WE2) and a saturated calomel electrode (SCE) as reference electrode (RE). The current noise between WE1 and WE2 and the potential noise between the coupled WEs and SCE were measured simultaneously by the home-made EN measurement system (ZRA, current sensitivity >10 pA, voltage sensitivity >10 μV). In order to increase the accuracy, a high input impedance (>1012Ω) low drift (<10 pA/week) chopper-stabilized operation amplifier ICL7650 and a high accuracy ∑ δ24 bit A/D converter AD7703 was used in the instrument design. Furthermore, before the A/D conversion, an anti-aliasing low pass filter was applied to filter out the noise signals. The instrument noise level, which was tested by equivalent electric circuits, was 50 μV in potential channel and 10 pA in current channel. The measurement sampling frequency used in this study was 2 Hz and each measurement period consisted of 2048 data. All measurements were automatically controlled by a compatible computer with the EN measurement software.
2.4 Corrosion fatigue tests
Static bending tests were performed on unnotched specimens prior to the corrosion fatigue tests to determine corrosion fatigue testing conditions. Fatigue tests were interrupted at certain numbers of cycles in order to make replicas of the midsurface of the specimens. For each specimen test, more than 5 replicas were taken for detecting crack and initiation and monitoring crack growth. The maximum load (Pmax) over the fatigue cycle was controlled in the range from 0.2 to 0.7 PB, where PB is the bending strength measured in the static bending test. A sinusoidal signal from the function generator was amplified through a buffer before being transformed to higher voltage by a low-power transformer. A dc voltage was added to give pulsed voltage amplitude. In the course of corrosion fatigue, all specimens were tested under total-immersion conditions in NaCl solution, which was maintained at room temperature and a pH in the range of 7.0±0.3.
3 Results and discussion
3.1 Effects of specimen size on corrosion behavior
Both the ordinary-sized plates and the micro-sized specimens were immersed in 3.0% NaCl solution at room temperature for 30 d. Before and after corrosion test, all the specimens were cleaned by ultrasonic cleaning assisted with acetone. For ordinary-sized specimens, the corrosion attack produced obviously localized corrosion on the nickel surface, as shown in Fig.3(a). XIE et al[15] have found that the corrosion fatigue crack is related to the formation of pitting corrosion and intergranular corrosion. Fig.3 (b) shows the typical appearance of unnotched micro-sized specimen after corrosion in 3.0% NaCl solution for 30 d. No obvious pitting corrosion and intergranular corrosion were found on the surface of the micro-sized specimens. With the decrease of dimensions, the corrosion process of materials transited from linear to spherical layer symmetry, the diffusion enhanced, the limiting current density increased, and the ohmic drop decreased[16-17]. As a result, it seems difficult to create localized corrosion and self-catalyst on the surface of micro-sized specimens.
The EN measurements were completed in the 3.0% NaCl solution at room temperature. The measurement period was 24 h, and the typical EN time records, as shown in Fig.4, were obtained. It can be found from the EN results that there are no characteristic EN transients related with the localized corrosion, and only the high frequency white noise from general corrosion is observed. Therefore, in the test period only the general corrosion appears on the surface of micro-sized cantilever beam.
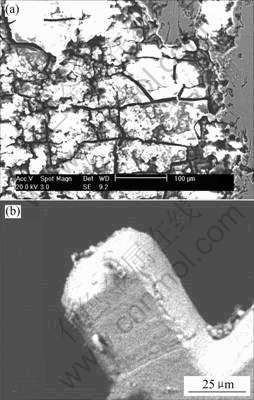
Fig.3 Localized corrosion on surface of ordinary-sized specimens exposed to 3.0% NaCl solution for 30 d (a) and typical appearance of unnotched micro-sized specimen after pre-corrosion in 3.0% NaCl solution for 30 d (b)
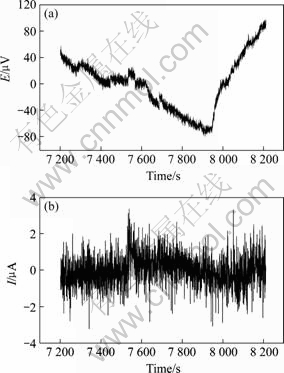
Fig.4 EN data from 3.0% NaCl solution after 2 h
3.2 Effect of load amplitude on corrosion fatigue lifetime
In the course of fatigue tests, a mean load of 67.08 mN was applied to the specimens first and then cyclic loading was applied to the specimen with a cyclic frequency of 2 Hz. The fatigue life curve was thus obtained from 5 different load amplitude levels. Fig.5 shows the fatigue life plots of the Ni micro-sized specimens. The load amplitude at which the specimen does not fail after 1×10⁶ cycles is assumed to be the critical load amplitude, and the critical load amplitude of the micro-sized Ni specimens is determined to be 15 mN. This critical load amplitude together with the mean load is of critical importance to the design of micro-system structures. With increasing load amplitude, the number of cycles to failure, Nf, decreases for micro-sized Ni cantilever beams. At present, it is difficult to compare this value with other fatigue data since there are few data for bulk Ni specimen.
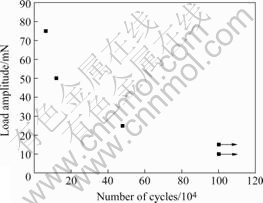
Fig.5 Fatigue life plot of Ni micro-sized specimens tested in 3.0% NaCl solution at room temperature
3.3 Corrosion fatigue behavior of micro-sized Ni cantilever beams
The fracture surfaces of tested specimens were investigated by the scanning electron microscope (SEM). During the fatigue tests, corrosion fracture firstly occurs in the range of notch with a higher tensile bending stress, as shown in Fig.6(a). The cyclic bending stress at the bottom of the notch increases the electrochemistry activity of Ni, and, as a result, the pitting potential decreases with the application of stress. Furthermore, the acceleration of pitting corrosion is related to the increase of the activity of the atoms at the bottom of the notch.
SEM observations show that pits take place on the fracture surface of the tested specimen, as shown in Fig.6(b), and the corrosion fatigue fracture surfaces exhibit clear evidence of trans-columnar fracture. With the application of cyclic stress, the very small initial cracks at the bottom of the notch are generated from the pits with a higher tensile bending stress that might exceed the yield strength of Ni, and, as a result, plastic deformation occurs in the regions of pits with higher bending stress. This deformation related with a greater dissolution current should accelerate the dissolution process of crack tip materials. The explanation for this is that the continuous plastic deformation causes an increase in active points on the metal surface and of activation degree for these points. So, in fabricating microstructures, one should pay more attention to the effect of surface flaws and roughness. Even small flaws may change the design properties since the ratio of flaw size to beam dimension could be much larger in microstructure[18].
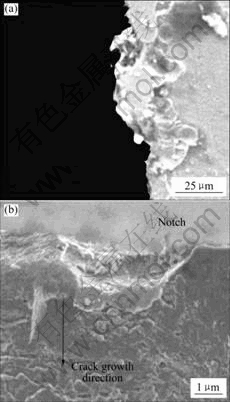
Fig.6 Scanning electron micrographs of notched specimen after fatigue failure (a) and fatigue fracture surface of micro-sized Ni cantilever beam with 3 μm breadth notch tested in 3.0% NaCl solution at room temperature (b)
During the course of the fatigue tests, the maximum bending load of micro-sized Ni cantilever beams decreases continuously prior to final fracture, as shown in Fig.7. The curves can be used for obtaining the distribution of decreased values of maximum bending load at different pre-corrosion durations. The change in maximum loads suggests some creep activity at room temperature during corrosion fatigue test. For microscale specimens, the ratio of surface to volume is much larger than that for macroscale specimens. The slow movement of atoms under mechanical stress is much more severe in metal microstructures than that expected from macroscopically known behavior[19]. Surface atoms can move more easily than the atoms locked in the lattice, which makes localized corrosion pits expand more easily in the horizontal. Creep property of micro-sized nickel at low temperature has been reported by other groups[20], and such phenomena may be explained by increased tendency of grain boundary sliding for micro-sized materials.
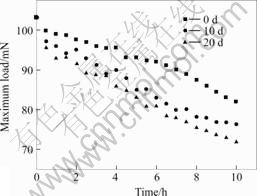
Fig.7 Maximum load relaxation of micro-sized Ni cantilever beams with different pre-corrosion durations at room temperature
With the creep deformation in the range of anodic dissolution under the application of cyclic loading, the mass-transportation process between metal surface and environment is accelerated. Therefore, the micro-cracks at the bottom of the notch are pronounced for the occurrence of closure, and the fractured surface is rather complicated, making it difficult to examine the crack propagation process. The micro-sized Ni specimens appear to have an improved resistance towards total crack as compared with the ordinary-sized Ni specimens. This makes it more difficult to initiate cracks on its surface[21].
Reliability properties, such as fatigue and creep properties of MEMS applications are very important for further development and miniaturization of MEMS devices.
4 Conclusions
Using the femtosecond laser fabricated Ni microcantilever, the corrosion and fatigue tests are investigated. In the static corrosion testing in 3.0% NaCl solution, general corrosion behavior is observed on the surface of the micro-sized specimen, while ordinary-sized plates exhibit the localized corrosion behavior. The critical load amplitude of the micro-sized Ni specimens under corrosion fatigue status is determined to be 15 mN. Corrosion fracture first occurs in the range of notch with a higher tensile bending stress, and exhibits clear evidence of trans-columnar fracture. Under the interaction of cyclic load and the corrosive environment, the creep deformation of the micro-sized Ni specimens can easily occur at room temperature.
References
[1] LI X D, BHUSHAN B. Fatigue studies of nanoscale structures for MEMS/NEMS applications using nanoindentation technique[J]. Surf Coat Tech, 2003, 163/164: 521-526.
[2] BAEK C W, KIM Y K, AHN Y, KIM Y H. Measurement of the mechanical properties of electroplated gold thin films using micromachined beam structures[J]. Sens Actu, 2005, 117(1): 17-27.
[3] SON D, KIM J J, KIM J Y, KWON D. Tensile properties and fatigue crack growth in LIGA nickel MEMS structures[J]. Mater Sci Eng, 2005, 406(1/2): 274-278.
[4] HIGO Y, TAKASHIMA K, SHIMOJO M, SUJIURA S, PFISTER B, SWAIN M V. Fatigue testing machine of micro-sized specimens for MEMS applications[J]. Mater Res Soc, 2000, 605: 242-248.
[5] SPEARING S M. Materials issues in microelectromechanical systems (MEMS)[J]. Acta Mater, 2000, 48(1): 179-185.
[6] DU T B, VIJAYAKUMAR A, SUNDARAM K B, DESAI V. Chemical mechanical polishing of Nickel for application in MEMS devices[J]. Microelectron Eng, 2004, 75(2): 234-241.
[7] ALLAMEH S M, LOU J, KAVISHE F, BUCHHEIT T, SOBOYEJO W O. An investigation of fatigue in LIGA Ni MEMS thin films[J]. Mater Sci Eng, 2004, 37(1/2)1: 256-266.
[8] LUO J K, FLEWITT A J, SPEARING S M, FLECK N A, MILNE W L. Young’s modulus of electroplated Ni thin film for MEMS applications[J]. Mater Letts, 2003, 58(17/18): 2360-2637.
[9] LIU X, DU D, MOUROU G. Laser ablation and micromachining with ultrashort laser pulses[J]. IEEE J Quantum Electron, 1997, 33(10): 1706-1716.
[10] BOROWIEC A, HAUGEN H K. Femtosecond laser micromachining of grooves in indium phosphide[J]. Appl Phys A, 2004, 79(3): 521-529.
[11] DACHRAOUI H, HUSINSKY W. Fast electronic and thermal processes in femtosecond laser ablation of Au[J]. Appl Phys Letts, 2006, 89(10): 104-102.
[12] COTTIS R A, AL-AWADHI M A A, AL-MAZEEDI H, TURQOOSE S. Measures for the detection of localized corrosion with electrochemical noise[J]. Electrochim Acta, 2001, 46(24/25): 3665-3674.
[13] LEGAT A, DOLECEK V. Chaotic analysis of electrochemical noise measured on stainless steel[J]. J Electrochem Soc, 1998, 142(6): 1851-1858.
[14] LIU C, MACDONALD D D, MEDINA E, VILLA J J, BUENO J M. Probing corrosion activity in high subcritical and supercritical water through electrochemical noise analysis[J]. Corro, 1994, 50(9): 687-693.
[15] XIE J, ALPAS A T, NORTHWOOD D. The role of heat treatment on the erosion- corrosion behavior of AISI 52100 steel[J]. Mater Char, 2005, 393(1/2): 42-50.
[16] SCHULTZE J W, BRESSEL A. Principles of electrochemical micro- and nano-system technologies[J]. Electrochim Acta, 2001, 47(1): 3-21.
[17] SCHULTZE J W, TSKOVA V. Electrochemical microsystem technologies: From fundamental research to technical systems[J]. Electrochim Acta, 1999, 44(21/22): 3605-3627.
[18] LI X D, BHUSHAN B, TAKASHIMA K, BAEK C W, KIM Y K. Mechanical characterization of micro/ nanoscale structures for MEMS/NEMS applications using nanoindentation techniques[J]. Ultramicroscopy, 2003, 97(1/4): 481-498.
[19] VAN S, MERLIJN W. MEMS reliability from a failure mechanisms perspective[J]. Microelect Relat, 2003, 43(7): 1049-1060.
[20] WANG N, WANG Z R, AUST K T, ERB U. Room temperature creep behavior of nano crystalline nickel produced by an electroplating technique[J]. Mater Sci Eng, 1997, 237(2): 150-158.
[21] LI X, BHUSHAN B. A review of nanoindentation continuous stiffness measurement technique and its applications[J]. Mater Char, 2002, 48(1): 11-36.
Foundation item: Project(50671040) supported by the National Natural Science Foundation of China; Project(2006CB806006) supported by the National Basic Research Program of China
Corresponding author: GUO Xing-peng; Tel: +86-27-87543432; E-mail: guoxp@mail.hust.edu.cn

