J. Cent. South Univ. (2016) 23: 2223-2229
DOI: 10.1007/s11771-016-3280-0

Simulation and experiment analysis on thermal deformation of tool system in single-point diamond turning of aluminum alloy
ZHANG Yuan-jing(张元晶), DONG Guo-jun(董国军), ZHOU Ming(周明)
School of Mechanical and Electrical Engineering, Harbin Institute of Technology, Harbin 150001, China
 Central South University Press and Springer-Verlag Berlin Heidelberg 2016
Abstract: The aim of this work is to simulate thermal deformation of tool system and investigate the influence of cutting parameters on it in single-point diamond turning (SPDT) of aluminum alloy. The experiments with various cutting parameters were conducted. Cutting temperature was measured by FLIR A315 infrared thermal imager. Tool wear was measured by scanning electron microscope (SEM). The numerical model of heat flux considering tool wear generated in cutting zone was established. Then two-step finite element method (FEM) simulations matching the experimental conditions were carried out to simulate the thermal deformation. In addition, the tests of deformation of tool system were performed to verify previous simulation results. And then the influence of cutting parameters on thermal deformation was investigated. The results show that the temperature and thermal deformation from simulations agree well with the results from experiments in the same conditions. The maximum thermal deformation of tool reaches to 7 μm. The average flank wear width and cutting speed are the dominant factors affecting thermal deformation, and the effective way to decrease the thermal deformation of tool is to control the tool wear and the cutting speed.
Key words: ultra-precision cutting; tool wear; diamond; thermal deformation; form accuracy
1 Introduction
Large mirrors, which are made of aluminum alloy, SiC and so on, are widely used in deep space exploration for their excellent optical performance [1-2]. The optical performance of them is greatly influenced by the machined surface geometric errors which include the form accuracy, waviness and surface roughness [3-4]. The form accuracy of large aluminum alloy mirrors is required to reach 0.03-0.3λ (λ=630 nm). So how to control the form accuracy of machined surface is a key problem to ensure the optical performance of large aluminum alloy mirrors.
The single-point diamond turning (SPDT) method is commonly used by many researchers to machine aluminum alloy for achieving the high precision requirement [5-6]. TO et al [7-8] investigated the effect of the crystallographic anisotropy in ultra-precision diamond turning of aluminum single crystals, and found that the microstrain varied with the crystallography of the machined surface. ARCONA [9] systematically investigated the tool force, chip formation and surface finish in diamond turning of aluminum alloy and established the mathematical model of cutting force. So SPDT method is an effective way to achieve the high efficiency and good quality of optical surface, hence it can be used to manufacture the large scale aluminum alloy mirrors. However, the tool wear is severely caused by long-distance cutting and the variation of cutting speed in the face cutting, which results in the change of cutting temperature and thermal deformation of tool system. The form accuracy of large aluminum alloy mirrors will be decreased by the thermal deformation of tool. Hence, it is important to study thermal deformation of tool system in SPDT of aluminum alloy for improving the form accuracy and optical performance of large aluminum alloy mirrors.
For exploring the cutting mechanism in SPDT, FEM simulations of cutting force, cutting temperature and tool wear were also investigated by many researchers [10-11]. LIST et al [12] estimated the cutting temperature in high speed machining by numerical modeling of chip formation considering the crater wear. PATTEN and JACDB [13] found FEM results of cutting force were agreeable to the experiments in SPDT of single-crystal silicon carbide. GRZESIK et al [14] and WU and HAN [15] used the FEM method to simulate the cutting temperature and achieved the satisfied results. However, the flank wear effect is not taken into account in the modeling in their research. So the simulations of temperature and thermal deformation of tool considering the tool wear generated in cutting zone are studied.
In this work, the thermal deformation simulations considering the tool wear are performed to predict the deformation of tool system in SPDT of aluminum alloy. And comparison of the experimental and simulation results is done to verify the predicted thermal deformation. Then the effects of cutting parameters on the thermal deformation are investigated in SPDT of aluminum alloy.
2 Experimental procedure
In order to obtain the VB of the diamond tool which needs to be used in the posterior numerical model to calculate the heat flux generated in the cutting zone, and verify the cutting temperature acquired from the FEM simulations, the SPDT tests with various cutting parameters (cutting speed, feed rate, tool nose radius and clearance angle) were performed on an ultra-precision lathe. The actual device and schematic diagram of SPDT tests are shown in Fig. 1.
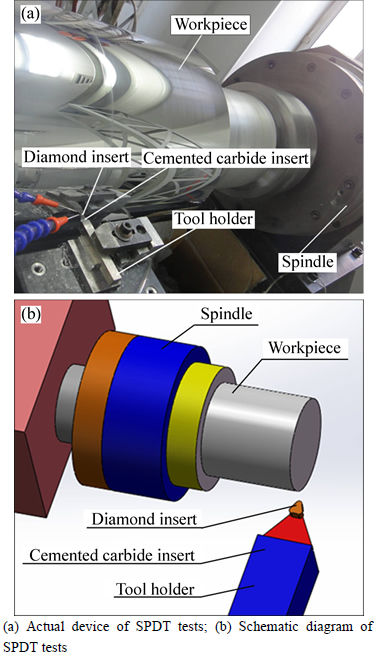
Fig. 1 Actual device and schematic diagram of SPDT tests:
The single crystal diamond cutting tools with rake angle of 0° and flank angles of 5°, 7°and 10° respectively were used. The tool nose radii were 0.6, 1.2, and 2.0 mm, respectively and the cutting edge radius was 70 nm. The work materials used in the tests were 2024 aluminum alloy, the mechanical and physical properties are shown in Table 1.
Table 1 Mechanical and physical properties of 2024 aluminum alloy

The depth of cut was 15 μm and the cutting distance was 62.8 km. The cutting temperature at the end of each test was measured by FLIR A315 infrared thermal imager. The average flank wear width (VB) of the diamond tool was measured by the SEM. The SEM photo of wore diamond tool is shown in Fig. 2. The cutting parameters used in these tests and the VB of the tool obtained from the tests are shown in Table 2.
In order to verify the thermal deformation of the tool system got from the simulations, the measurement thermal deformation tests were performed. As it is difficult to precisely measure the micro-deformation of tool system during the cutting process, the local heating of tool system was used to approximately simulate the heat generating in the actual cutting process to achieve the desired effect. The diamond insert was heated by the heater to reach the temperature obtained from FEM simulations, and the temperature was measured by FLIR A315 infrared thermal imager. Then, the micro- deformation of tool system was measured by DGB-5B inductance sensor. The schematic diagram of measurement thermal deformation device is shown in Fig. 3.
3 Simulation of thermal deformation
3.1 Numerical model of heat flux considering tool wear
For the sake of simulating the thermal deformation of the tool system, firstly the numerical model of heat flux should be established to provide the heat flux generated on the diamond tool during cutting process for the posterior FEM simulation.
In the previous study of diamond turning, the heat flux is relevant with cutting parameters such as cutting speed, cutting force and so on. Tool wear is ignored because it is very little at a short cutting distance. But tool wear is serious in long-distance cutting of SPDT of large aluminum alloy mirrors. So tool wear must be considered to analyze the heat flux in SPDT of large aluminum alloy mirrors. The schematic diagram of cutting process in SPDT of aluminum alloy is illustrated in Fig. 4.
The schematic diagram of cutting layer section is shown in Fig. 5.
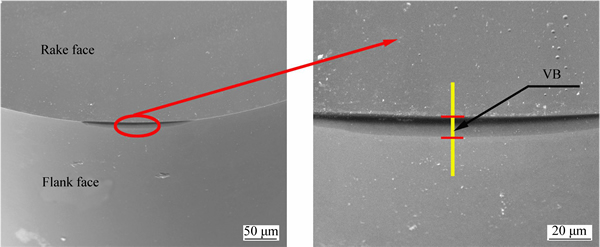
Fig. 2 SEM photo of wore diamond tool
Table 2 Cutting parameters and VB of diamond tool

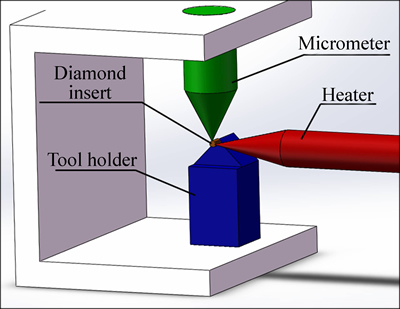
Fig. 3 Schematic diagram of measurement thermal deformation device
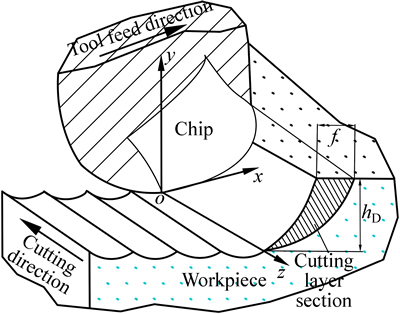
Fig. 4 Schematic diagram of cutting process in SPDT of aluminum alloy
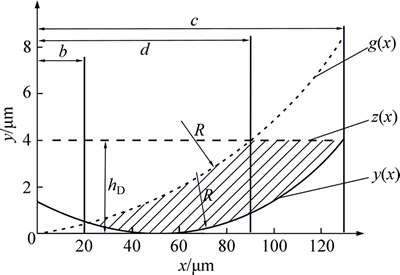
Fig. 5 Schematic diagram of cutting layer cross section
As shown, the cutting layer cross section area AD is given by:
 (1)
(1)
where 
 z(x)=hD; b=f/2;
  c=
c= R is the tool nose radius; f is the feed rate; hD is the depth of cut.
The contact length and the cutting force schematic diagram are shown in Fig. 6.
The contact length lf between the rake face and chip mainly depends on the deformation mechanism of the chip. lf can be approximately expressed as
 (2)
(2)
where hD is the depth of cut, β is the friction angle, and φ is the shear angle.
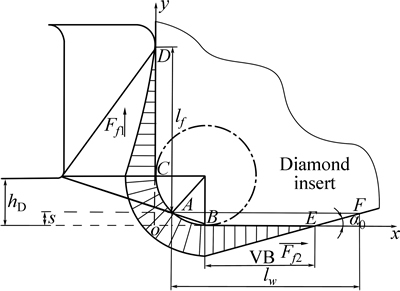
Fig. 6 Schematic diagram of contact length and cutting force
As the rake angle of the diamond tool is 0°, the shear angle φ and the friction angle β satisfy:
 (3)
(3)
where the shear angle φ can be obtained by
 (4)
(4)
where

 E1 is the modulus of aluminum alloy, E2 is the modulus of diamond tool, u1 is the poisson coefficient of aluminum alloy, u2 is the poisson coefficient of diamond tool, v is the cutting speed, and e is the constant 2.78.
The contact length lw between the flank face and chip can be calculated by
 (5)
(5)
where the elastic recovery S is given by:
 (6)
(6)
where γk=-62.2°; VB is the average flank wear width; rn is cutting edge radius.
The friction force on the rake face is given by
 (7)
(7)
where τ is the shear strength of aluminum alloy.
The friction force on the flank face is given by
 (8)
(8)
where

 (9)
(9)
The heat flux on the rake face is:
 (10)
(10)
where the deformation coefficient of chip  can be expressed as
 (11)
(11)
The heat flux generated on the flank face is:
 (12)
(12)
The heat fluxes calculated according to the cutting parameters and the tool wear were taken as the input of the FEM model of the thermal deformation.
3.2 FEM simulations of thermal deformation
A two-step FEM simulation was performed to investigate the thermal deformation of tool system. The steady state cutting temperature was obtained in the first step by inputting the heat fluxes on the rake face and flank face of diamond tool, and the thermal deformation can be calculated in the second step. The FEM model of tool system was established by using Ansys software, including three sections, i.e., diamond inset, cemented carbide insert and tool holder. The YG8 and Cr12 were selected as the material of the insert and tool holder respectively, which are the same as that used in the tests. The FEM model of tool system is shown in Fig. 7. All conditions of the tool system, including diamond tool’s geometrical features, were chosen based on the above experimental data.
The heat fluxes were loaded on the rake face and flank face of the diamond insert. The contact area between the rake face and chip is
 (13)
(13)
The contact area between the flank face and chip is
 (14)
(14)
where B is the width of chip.
Both the environment temperature and the initial temperature of tool system were 20 °C. The heats which diffuse to the environment from the surface of the tool system due to convection depend on the formula: q= h(T1-T0), where T1 and T0 are the tool system temperature and the room temperature, respectively. And the convection coefficient h between the tool system and air was set as 10 W/(m2・K). The X direction and Y direction freedom of the tool system were limited by displacement constraint. The mesh of the zone nearby cutting edge of the diamond tool is finer to enable the temperature to be accurately predicted. For the dimensions of the cemented carbide insert and the tool holder, a coarser mesh is sufficient. The heat flux q1 was loaded on the rake face area S1, and the heat flux q2 was loaded on the flank face area S2.
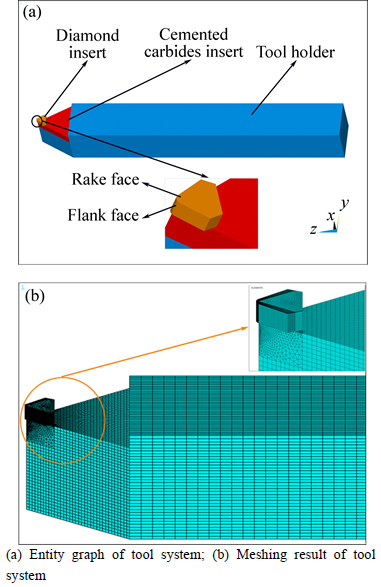
Fig. 7 Entity graph and its meshing result of tool system:
4 Results and discussion
The preparing work for performing the FEM simulation is calculating the heat fluxes in cutting zone. Hence, a series of tests are performed to get the VB values of the tool at each set of cutting parameters stated in Table 2, which are needed in the numerical model of heat flux. Figure 8 shows the temperature distribution and thermal deformation of the tool system obtained from the FEM simulation according to the heat fluxes input described in section 3.1. It can be seen from Fig. 8(a) that the maximum temperature Tmax exists in the vicinity of the cutting edge. The heat generation at the contact zone in the ultra-precision cutting is mainly induced by two phenomena, deformation of the workpiece material done to form the chip at the first deformation region and friction among the workpiece surface and diamond tool at the second and third deformation region. However, the heat generated at the cutting zone can not dissipate in time resulting in the increasing temperature in the vicinity of the cutting edge.
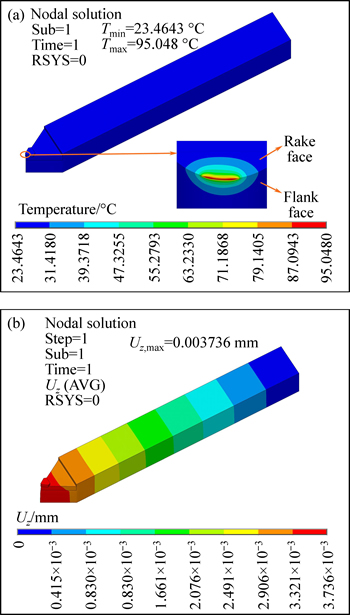
Fig. 8 Simulation results of temperature distribution (a) and thermal deformation (b) of tool system
To validate the simulation results, cutting temperature at the end of each SPDT test and micro- deformation of tool system in the measurement thermal deformation tests are measured. Because the simulation conditions and the tests conditions have been considered to keep consistent, a direct comparison of the experimental results and the simulation results is still valid. Because the Tmax existed at the cutting edge can not be measured by infrared thermal imager, the predicted temperature T around of the cutting edge and thermal deformation of the tool system under different conditions are compared with experimental results, as shown in Fig. 9. It can be seen from Fig. 9 that the predicted values are close to the experimental results. The change trend of temperature and thermal deformation of the tool with various cutting parameters is consistent. Due to the influence of the chip on the diamond insert surface around the cutting zone and environmental factors, the measured temperature is lower than that of the simulations. The maximum relative errors between the experimental and simulated results of the temperature and thermal deformation of tool system are approximately 14%. Moreover, considering the measurement error, the relative error is acceptable, and the simulation results can be considered as reasonable prediction. From Fig. 9(b), it can be seen that maximum thermal deformation of 7 μm is recorded at the cutting speed of 220 m/min, feed rate of 15 μm/r, tool nose radius of 1.2 mm, clearance angle of 5° and VB values of 10.2 μm, which will exert a considerable influence on the form accuracy of large aluminum alloy mirrors. Therefore, it is important to study the effect of cutting parameter and tool wear on thermal deformation of the tool system.
According to the simulation results, a numerical regressive model (total uncertainties of 0.05) of thermal deformation is achieved as
 (15)
(15)
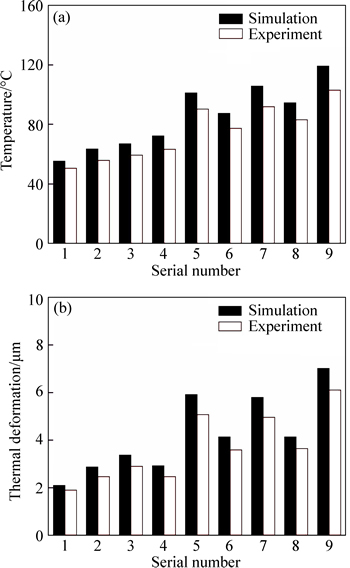
Fig. 9 Temperature (a) and thermal deformation (b) of tool system comparison between simulations and experiments
Equation (15) shows that the VB of tool and the cutting speed v are important factors influencing the thermal deformation. When some wear occurs on the diamond tool, the evolution of tool geometry due to the wear mechanisms must be taken into account. The wear morphology, as shown in Fig. 2, can result in a loss of tool material on the cutting edge radius and the flank face, which will induce the evolution of 0° rake angle to the negative rake angle at the cutting edge. The principal force and feeding force are increased by the negative rake angle due to the high hydrostatic pressure generated underneath the cutting tool, the increasing of contact length of chips with tool rake face and the higher friction force generated on the tool-chip interface. When tool is worn, friction increases with an increasing contact length of the flank face of tool on the machined workpiece surface. Moreover, DUCOBU et al [16] observed that the plastic strains at the machined workpiece surface increase with tool wear by performing FEM simulation, and the higher plastic strains will increase the residual stresses and decrease the quality of the machined workpiece surface. In general, the diamond tool wear will increase the plastic deformation energy of workpiece material and the friction energy converted into heat, which results in the higher temperature and larger thermal deformation of the tool system.
The deformation of the workpiece material increases with an increase of the metal chip volume in the unit time when the cutting speed increases. In addition, the chip curvature decreases with the increase of cutting speed, which will induce the increase of contact length and friction between the chip and rake face of tool. Consequently, the higher cutting speed will result in the increase of temperature and thermal deformation of the tool system.
5 Conclusions
1) The temperature and thermal deformation of tool system obtained from experiments are slightly lower than that from simulations. This is due to the influence of the chip, environmental factors and measurement error. A favorable agreement of the change trend of temperature and thermal deformation with various cutting parameters is achieved, with maximum relative errors of 14% between predicted and experiment results, indicating the validation of the proposed model.
2) According to the simulation results, the maximum temperature Tmax occurs in the vicinity of the cutting edge, and the maximum thermal deformation of tool reaches to 7 μm under the condition of cutting speed of 220 m/min, feed rate of 15 μm/r, tool nose radius of 1.2 mm, clearance angle of 5° and VB values of 10.2 μm.
3) VB of tool and the cutting speed are the most important parameters affecting the thermal deformation of tool. The serious tool wear induces the evolution of tool geometry, the increase of contact length of flank face on workpiece surface, which increases the heat caused by friction. Similarly, the higher cutting speed results in the increase of the heat by decreasing the chip curvature which increases the contact length and friction between the chip and rake face.
References
[1] ZHANG Yu-min, ZHANG Jian-han, HAN Jie-cai, HE Xiao-dong, YAO Wang. Large-scale fabrication of lightweight Si/SiC ceramic composite optical mirror [J]. Materials Letters, 2004, 58(7/8): 1204-1208.
[2] SHIMIZU Y, GOTO S, LEA J C, ITO S, GAO Wei, ADACHI S, OMIYA K, SATO H, HISADA T, SAITO Y, KUBOTA H. Fabrication of large-size SiC mirror with precision aspheric profile for artificial satellite [J]. Precision Engineering, 2013, 37(3): 640-649.
[3] PREDA I, VIVO A, DEMARCQ F, BERUJON S, SUSINI J, ZIEGLER E. Ion beam etching of a flat silicon mirror surface: A study of the shape error evolution [J]. Nuclear Instruments and Methods in Physics Research Section A, 2013, 710(11): 98-100.
[4] TAMKIN J M, MILSTER T D. Effects of structured mid-spatial frequency surface errors on image performance [J]. Applied Optics, 2010, 49(33): 6522-6536.
[5] ABOU-EL-HOSSEIN K, OLUFAYO O, MKOKO Z. Diamond tool wear during ultra-high precision machining of rapidly solidified aluminium RSA 905 [J]. Wear, 2013, 302(1/2): 1105-1112.
[6] MALEKIAN M, MOSTOFA M G, PARK S S, JUN M B G. Modeling of minimum uncut chip thickness in micro machining of aluminum [J]. Journal of Materials Processing Technology, 2012, 212(3): 553-559.
[7] TO S, LEE W B. Deformation behaviour of aluminium single crystals in ultraprecision diamond turing [J]. Journal of Materials Processing Technology, 2001, 113(1/2/3): 296-300.
[8] TO S, LEE W B, CHAN C Y. Ultraprecision diamond turing of aluminium single crystals [J]. Journal of Materials Processing Technology, 1997, 63(1/2/3): 157-162.
[9] ARCONA C. Tool force, chip formation and surface finish in diamond turning [D]. North Carolina State: North Carolina State University, 1996.
[10] KIM J H, KIM K S, CHOI J Y, LEE C M. Estimation of deformed laser heat sources and thermal analysis on laser assisted turning of square member [J]. Juornal of Cantral South University, 2012, 19(2): 402-407.
[11] WANG Meng-jun, HE Zhao, WU Xing-xing, LI Cai-wen, LI Guang-yao. Deformation simulation of low-temperature high-speed extrusion for 6063 Al alloy [J]. Juornal of Cantral South University, 2010, 17(5): 881-887.
[12] LIST G, SUTTER G, BOUTHICHE A. Cutting temperature prediction in high speed machining by numerical modelling of chip formation and its dependence with crater wear [J]. International Journal of Machine Tools & Manufacture, 2012, 54/55: 1-9.
[13] PATTEN J A, JACOB J. Comparison between numerical simulations and experiments for single-point diamond turning of single-crystal silicon carbide [J]. Journal of Manufacturing Processes, 2008, 10(1): 28-33.
[14] GRZESIK W, BARTOSZUK M, NIESLONY P. Finite element modelling of temperature distribution in the cutting zone in turning processes with differently coated tools [J]. Journal of Materials Processing Technology, 2005, 164/165: 1204-1211.
[15] WU Jian, HAN Rong-di. A new approach to predicting the maximum temperature in dry drilling based on a finite element model [J]. Journal of Manufacturing Processes, 2009, 11(1): 19-30.
[16] DUCOBU F, ARRAZOLA P J, RIVIERE-LORPHEVRE E, FILIPPI E. Finite element prediction of the tool wear influence in Ti6Al4V machining [J]. Procedia CIRP, 2015, 31: 124-129.
(Edited by FANG Jing-hua)
Foundation item: Project(51175122) supported by the National Natural Science Foundation of China
Received date: 2015-06-19; Accepted date: 2015-12-10
Corresponding author: DONG Guo-jun, Associate Professor, PhD; Tel: +86-451-86413157; E-mail: dongguojun@hit.edu.cn