钎焊工艺参数对复合翅片-微通道管接头焊角尺寸和显微组织的影响
来源期刊:中国有色金属学报(英文版)2020年第12期
论文作者:J. C. GUIA-TELLO M. I. PECH-CANUL E. TRUJILLO-VAZQUEZ M. A. PECH-CANUL
文章页码:3240 - 3253
关键词:钎焊;复合翅片;Taguchi法;焊角尺寸;显微组织;铝;峰值温度;优化
Key words:brazing; cladded fin; Taguchi method; fillet size; microstructure; aluminum; peak temperature; optimization
摘 要:研究钎焊连接微型多端口铝管和AA4343/AA3003/AA4343翅片,模拟汽车热交换器核心的微型组件,并优化钎焊条件。考虑5种工艺参数,用Taguchi法设计实验,目的是使钎焊接头的焊角尺寸最大化,因为焊角尺寸对钎焊接头的热完整性和力学性能有重要影响。采用金相显微镜测量钎焊接头的焊角长度,通过统计分析获得工艺参数的最佳值(峰值温度、保温时间、加热速率、微通道管类型和焊剂)。在95%置信水平下,焊角长度的变化受钎焊峰值温度(77%)、保温时间(15%)和加热速率(7%)的影响最为显著。预测的最大焊角长度为(152±11) μm,并得到实验验证。对管-翅片接头的显微组织分析表明,峰值温度和保温时间的变化只影响焊角共晶区的大小,而对组成相的性质和成分无影响。
Abstract: This work concerns the optimization of furnace brazing conditions for joining micro-multiport aluminum tubes and fins made with AA4343/AA3003/AA4343 brazing sheet in mini-assemblies mimicking the core of an automotive heat exchanger. Taguchi method was used for design of experiment, considering five process parameters with two levels of values. The aim was to maximize the fillet size of the brazed joints, which has an important influence on the thermal integrity and mechanical properties. Fillet length measurements of brazed joints were performed with a metallographic microscope. The statistical analysis allowed to obtain the optimum values of process parameters (peak temperature, residence time, heating rate, microchannel tube type and flux). At a 95% confidence level, the variability of fillet length is most significantly affected by the peak brazing temperature (77%), residence time (15%) and heating rate (7%). The predicted maximum fillet length was (152±11) μm, which was corroborated by confirmation trials. The microstructural analysis of tube-fin joints showed that variations in peak temperature and residence time affect only the size of the eutectic zone of fillet formed, but not the nature or composition of the constituent phases.
Trans. Nonferrous Met. Soc. China 30(2020) 3240-3253
J. C. GUIA-TELLO1, M. I. PECH-CANUL2, E. TRUJILLO-VAZQUEZ3, M. A. PECH-CANUL4
1. Centro de Investigacion en Materiales Avanzados (CIMAV), Laboratorio Nacional de Nanotecnologia, Miguel de Cervantes No. 120, Chihuahua, Chih., 31136, Mexico;
2. Centro de Investigacion y de Estudios Avanzados del Instituto Politecnico Nacional-Unidad Saltillo, Av. Industria Metalúrgica No.1062, Parque Industrial Saltillo-Ramos Arizpe, Ramos Arizpe, Coahuila, 25900, Mexico;
3. CONACYT-Facultad de Ciencias Fisico MatemAticas, Benemerita Universidad Autonoma de Puebla, Av. San Claudio, Cd Universitaria, Jardines de San Manuel, Puebla, Puebla, 72570, Mexico;
4. Cinvestav-Merida, Km 6 ant. Carr. a Progreso, AP 73 Cordemex, Merida, Yuc., 97310, Mexico
Received 22 March 2020; accepted 27 September 2020
Abstract: This work concerns the optimization of furnace brazing conditions for joining micro-multiport aluminum tubes and fins made with AA4343/AA3003/AA4343 brazing sheet in mini-assemblies mimicking the core of an automotive heat exchanger. Taguchi method was used for design of experiment, considering five process parameters with two levels of values. The aim was to maximize the fillet size of the brazed joints, which has an important influence on the thermal integrity and mechanical properties. Fillet length measurements of brazed joints were performed with a metallographic microscope. The statistical analysis allowed to obtain the optimum values of process parameters (peak temperature, residence time, heating rate, microchannel tube type and flux). At a 95% confidence level, the variability of fillet length is most significantly affected by the peak brazing temperature (77%), residence time (15%) and heating rate (7%). The predicted maximum fillet length was (152±11) μm, which was corroborated by confirmation trials. The microstructural analysis of tube-fin joints showed that variations in peak temperature and residence time affect only the size of the eutectic zone of fillet formed, but not the nature or composition of the constituent phases.
Key words: brazing; cladded fin; Taguchi method; fillet size; microstructure; aluminum; peak temperature; optimization
1 Introduction
Today, industries worldwide are in continuous pursuit of energy-saving, emission and cost reduction. One of the strategies is to modify the existing resources and system components to yield higher overall performance. An example of these system components is the heat exchanger. The recent advances in technology are toward more compact, yet efficient, heat exchangers [1,2].
In the automotive industry, the use of aluminum alloys has been continuously increasing due to its lightweight (which helps to reduce greenhouse gas emissions) and its unique combination of strength, corrosion resistance and recyclability [3-5]. It is the preferred material for heat exchangers, in applications such as engine cooling (radiator), condensers and evaporators for air-conditioning systems, oil cooling parts, and charge air coolers. They are usually fabricated by forming Al alloy sheet and tube stock into the required geometries, fixing the components, and brazing the assembly together in a controlled atmosphere furnace [6,7]. The core of the heat exchanger typically consists of a corrugated louvered fin-and-flat tube configuration. The thermal contact between the fins and the tube (e.g., microchannel tube) depends on the joint formed during brazing. The filler metal is furnished in the fins as a thin clad on both sides of a core alloy. The core layer is often a Mn-rich AA3xxx alloy, which remains solid during the processing and gives strength to the assembly. The clad layer is always a Si-rich AA4xxx alloy that melts during brazing (at around 600 °C), and due to surface tension flows to faying surfaces, produces upon cooling a metallic bond amongst the fins and the multiport tubes. It is usually necessary to employ a flux to eliminate the natural oxide film on aluminum surfaces under a strictly controlled gas atmosphere (high-purity nitrogen, with very low oxygen and water vapor content) [8,9]. During the past 30 years, controlled atmosphere brazing (CAB) with non-corrosive fluxes (specifically the NOCOLOK flux brazing technology) has been developed as the principal technology for fabrication of aluminum heat exchangers [10-12].
As a result of the recent trend toward downsizing and material downgaging, the CAB process is undergoing continuous development to meet the challenges of original equipment manufacturers. However, the industrial CAB furnaces are not suitable for running trials to optimize the process conditions for new materials and designs [13]. In this case, brazing simulation under laboratory scale conditions is quite suitable. A key feature that needs to be evaluated when brazing processing conditions are modified or new Al alloys are selected, is the joint quality (characterized by fillet length, mechanical integrity, microstructure, and corrosion resistance). The use of lab-scale brazing simulations allows to use scientific methodologies to optimize the process conditions. For instance, GAO, SEKULIC, ZHAO, and co-workers [14-17], followed this approach to investigate the brazed joint topology using an inverted tee-joint configuration. They have shown that numerical modelling (based on the minimum potential energy of the equilibrium membrane of the molten metal at the onset of solidification) combined with an experimental methodology can be used to foretell the features and acceptability of brazed structures. Taking into account that there are various processing parameters involved in the brazing process [10,11,14], the authors of this work have proposed the use of design of experiments as a means to evaluate its effect on joint quality with a minimum of experiment trials at a relatively low cost. The Taguchi method is a well-known parametric study tool in engineering quality and experimental design; although it is commonly used to optimize the quality of welding joints (e.g., tensile strength [18]), we recently applied the Taguchi method to optimize the furnace brazing parameters, aiming to achieve an excellent corrosion performance of the tube-fins system of an automotive condenser [19]. The corrosion current density was the optimized dependent variable. The trials were carried out in a laboratory furnace with fin-tube mini-assemblies (mimicking the core of an aluminum automotive condenser). The corrosion behavior was evaluated with electrochemical techniques and was correlated with the microstructural characteristics in the joint zone.
Amongst different features of the brazed joint topology, the fillet length plays a decisive role in the performance of the heat exchanger because it affects the thermal integrity [16] and mechanical properties (shear and tensile strength) [20,21] of the brazed joints in the plate-fin structure. When performing tensile tests of plate-fin structures, one should take into account that there are two contributions to the strength: one from the fillet and the other from the brazed joint itself [20]. JIANG et al [21] showed that the tensile strength increases with filler metal thickness (which at the same time was shown to be directly proportional to the fillet size). Moreover, based on a microstructural analysis, they observed that for a broad range of filler metal thicknesses, fracture starts in the central part of the fillet and then propagates along the brazed joint.
In the present contribution, we used the Taguchi method to optimize the brazing parameters with the aim of maximizing the fillet length of a cladded fin-microchannel tube system, seeking a good understanding of the scientific principles involved in the brazing process. To the best of our knowledge, there is no precedence in the literatures for this study. The methodology used in this work represents a useful tool to analyze new designs of brazed heat exchangers. A correlation of the process conditions with fillet length and on the resulting microstructure was established based on the metallurgical phenomena related to the brazing process. Once the optimum conditions were obtained, experimental values of fillet length were determined in verification trials and a validation of the optimal process conditions was performed by comparing the projected and experimental values.
2 Experimental
2.1 Experimental design
The quantitative effect of the processing parameters in brazing on the fillet length was investigated by means of the Taguchi L8 experimental design [22]. Five processing factors were evaluated at two levels: microchannel tube (two candidate materials with similar compositions, but with different amounts of zinc coating), flux type (with lithium and without lithium), peak temperature (600 and 610 °C), heating rate (5 and 10 °C/min) and residence time at peak temperature (2 and 4 min). The first two factors are related to aluminum alloy candidate materials and different compositions of the NOCOLOK flux. The last three factors are directly connected to furnace operating conditions. The processing parameters were labeled as A, B, C, D and E in that order. In addition, the effect of the interactions between microchannel tube and peak temperature (A×C), and between microchannel tube and residence time (A×E) was investigated. The experimental tests were carried out randomly and in three replicas and the processed samples were identified as TA1, TA2, TA3, and so on.
Analysis of variance of means (ANOVA) was conducted to determine the quantitative effect of processing parameters on the variability of fillet length. This method is a statistical decision-making tool for detecting differences amongst the average performances of analyzed factors. Estimating the experimental error at a specific confidence level (usually, 95% confidence level) can give the significance of all main factors and their interactions. In this sense, the F test is used to decide which parameter has a significant effect. Thus, a high F value indicates that the parameter significantly influences the response variable analyzed [23]. Besides, taking into account the experimental data from the response variable, the ANOVA applied to Taguchi designs involves calculating the following parameters: the sum of squares (SS), degrees of freedom (DOF), variance (V), variance ratio (F), the pure sum of squares (S′) and percent of contributions (P). Further understanding of the meaning of these statistical terms, equations used, and details of the ANOVA analysis procedure can be found elsewhere [22,24].
2.2 Materials and procedures
In this investigation, mini-assemblies combining zinc-coated microchannel tubes and composite brazing sheet fins were supplied by Airtemp de Mexico, S.A. de C.V. Two candidate materials for the micro-multiport aluminum tubes (named here as Tube I and Tube II) with Temper H112 and similar compositions were used. Their chemical compositions and mechanical properties are given in Table 1 and Table 2, respectively. The fins used in the mini-assemblies were multilayer sheets (with 80 μm total thickness) (Temper H14), with tensile strength of 150-200 MPa, elongation of 0.70% and sandwich structure consisting of an aluminum core alloy (AA3003 + Zn) and a clad made of AA4343 alloy with dimensions of (10±2)% of total thickness on each side. The corresponding chemical compositions are presented in Table 3.
Figure 1 shows the cross-section SEM image of a multilayer sheet. The distinct microstructural regions recorresponding to the core and clad (at both sides) have been labeled accordingly. During the brazing process, the clad melts and spreads out on the surface of the microchannel tube, forming the joints during solidification. Two kinds of commercial fluxes applied to the mini-assemblies by the dry electrostatic method were evaluated, namely, flux without lithium (standard NOCOLOK flux) and an enhanced formulation containing lithium (NOCOLOK
 Li flux). The chemical compositions of both flux types are given in Table 4.
Table 1 Compositions of candidate tube alloys (Temper H112)

Table 2 Mechanical properties of candidate tube alloys (Temper H112)

Table 3 Chemical compositions of core and clad alloys in brazing sheet fin (Temper H14) (wt.%)

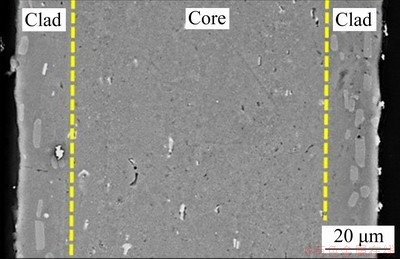
Fig. 1 Micrograph of multilayer sheet
The fin-tube mini-assemblies were prepared with three pieces of equal dimensions (3 cm (long) × 1.6 cm (wide) × 0.18 cm (thick)) of the microchannel tube. A set of fins (2.5 cm (long) × 1.6 cm (wide) × 80 mm (thick)) was placed between each pair of tubes, and the assembly was held together with stainless steel clips (Fig. 2(a)). Before brazing trials, flux without or with lithium (according to the Taguchi L8 design), was applied to each mini-assembly. The brazing trials were performed under ultra-high purity nitrogen (99.999%) at a constant flow rate of 450 mL/min in a ThermolyneTM horizontal furnace model 59300. For this experimental set-up, optimum temperature uniformity and stability were held for ramp rates not higher than 10 °C/min. At the end of the residence, the brazed mini-assembly was cooled down at a rate of 30 °C/min to room temperature and then removed from the chamber. Next, it was sectioned into four quadrants and two of them were selected for metallographic preparation and microscopic examination. Such sections of the brazed mini-assembly were mounted in Epofix resin, abraded (using SiC paper of 320, 500, 800, 1200 grit) and polished (with alpha alumina of 1, 0.3 and 0.05 μm in size), by means of standard metallurgical procedures. A final polishing step was performed with colloidal silica of 0.04 μm. For selected samples, the microstructure details were revealed by etching with Keller solution (190 mL distilled water, 2 mL HF (48%), 3 mL HCl and 5 mL HNO3) after the final polishing. Each of the polished samples exhibited 10-12 tube-fin joints like the one shown in Fig. 2(b).
Table 4 Chemical compositions of NOCOLOCK fluxes (wt.%)

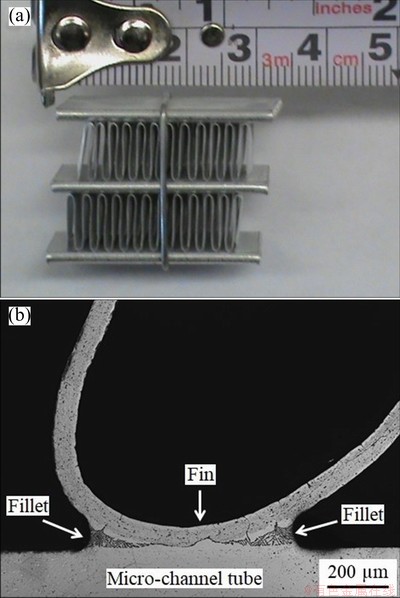
Fig. 2 Assemblage of microchannel tubes/fins after brazing (a) and optical microscopy image of micro- channel tube-fin joint, showing fillet (b)
An Olympus VANOX AHMT3 metallographic microscope provided with a Qimaging Micro- Publisher 3.3 RTV camera was used to acquire images of the formed joints and the Image Pro-Plus software was utilized to examine the images and perform the measurements of fillet length. Finally, characterization of the joint zone was performed by X-ray elemental mapping and energy dispersive spectroscopy analysis (SEM/EDS) using a scanning electron microscope Philips XL30 ESEM provided with an EDX microanalysis device.
3 Results and discussion
3.1 Statistical analysis
Table 5 gives the standard array of Taguchi L8 experimental design with defined factors/levels. Three replicates were tested for each condition. Measurements of fillet length were carried out for 5 randomly chosen joints in each polished sample (section of brazed mini-assembly), and the average values for each replicate are reported in columns R1, R2 and R3, respectively. The last column shows values of the overall mean of each sample, and the variations are attributed to the changes in the processing parameters under the tested conditions. It is worth noting that Samples TA4, TA5 and TA6 exhibited the largest average fillet lengths.
In the Taguchi method, analyses of effects for means involves the knowledge of the average effect of each processing parameter on the response variable, evaluating the delta statistic (effect level 2 minus effect level 1) and establishing ranks assigned to delta values obtained. The results, presented in Table 6, indicate that the factors with the highest impact are C (peak temperature), E (residence time) and D (heating rate). Although the effects of factor A (microchannel tube) and B (flux) on fillet length are minor, they must be considered, as they are essential in the processing of automotive condensers. Therefore, their levels must be established based on the larger effect on the mean of fillet length.
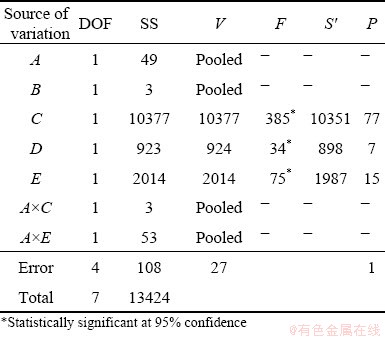
In order to determine statistical significance of factors and interactions, analysis of variance (ANOVA) was carried out at a 95% confidence level. Table 7 gives the ANOVA of means for fillet length. The Ftable for ANOVA of means was F(0.05, 1, 4)=7.7086. If F>Ftable, the factor is significant at the confidence level used. The data show that for ANOVA of means, the significant factors were C (peak temperature), E (residence time) and D (heating rate), with percentage contributions of 77%, 15% and 7%, respectively. The experimental error turned out to be 1%.
Table 5 Factors and levels for Taguchi L8 design and fillet length results for each trial by replication
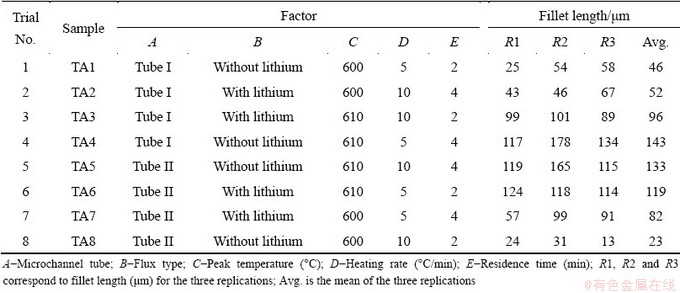
Table 6 Means effects for fillet length

Table 7 ANOVA for fillet length
3.2 Correlation of microstructure with factors having significant influence on fillet length
The effect of each of the three parameters (brazing temperature, residence time and heating rate) on microstructure of the brazed joint is discussed, assuming that the other two parameters (flux type and microchannel tube material) play a minor role.
3.2.1 Effect of peak brazing temperature
The temperature of brazing is related to the temperatures at which the Al-Si filler alloy starts melting (solidus) and is fully molten (liquidus). These are shown in a schematic of the Al-Si binary phase diagram (Al-rich region) presented in Fig. 3. For a temperature in between the solidus and liquids, the filler is partially molten, existing as both solid and liquid. The liquid phase of the cladding is responsible for the propagation and wettability on the surface of the micro-channel tube. Due to capillary phenomena, the molten metal is easily introduced into the gaps between fins and micro-channel tubes, producing the joint after cooling [17]. The quantity of liquid formed, its fluidity and duration are critical to establishing a good metallurgical bond. The formation of insufficient liquid may cause incomplete and defective joints, and excessive heating may lead to core dissolution and segregation in the materials to be bonded [25].
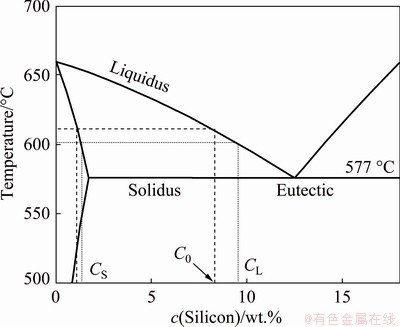
Fig. 3 Schematic of Al-rich region of Al-Si binary phase diagram
For the filler metal AA4343 commonly used in the industry, the reported values of solidus and liquidus temperatures are 577 and 613 °C. Accordingly, the recommended furnace braze range in the industry is 593-621 °C [11,26]. In this work, two possible brazing temperatures within this range were analyzed (600 and 610 °C). An estimation of the liquid and solid fractions (fL and fS, respectively) at these two temperatures should provide useful information. This can be done with the aid of the Al-Si binary diagram and the lever rule [10,25], assuming that the filler alloy we used has a nominal composition of 8.0 wt.% of silicon (see Fig. 3). Therefore, from Fig. 3, the liquid and solid fractions are determined by the equations:
fL=(C0-CS)/(CL-CS) (1)
fS=(CL-C0)/(CL-CS) (2)
where C0 is the initial composition of silicon in the cladding, CL and CS are the liquid and solid compositions, respectively (see Fig. 3). Table 8 gives the silicon compositions CL and CS at the peak temperatures of 600 and 610 °C as well as the corresponding liquid (fL) and solid (fs) fractions. It is evident that a 10 °C increase in temperature produces an increase of about 20% in liquid fraction of the molten filler.
Table 8 Compositions and corresponding liquid and solid fractions of cladding at different peak temperatures in Al-Si system

Figure 4 shows a comparison of micrographs of tube-fin joints formed under different conditions, and the corresponding fillet lengths are indicated. As can be noticed, the fillet length increases with peak temperature; this effect is presumably due to the higher liquid fraction at 610 °C.
The effect of brazing temperature on the microstructure resulting from the re-solidification of the melted metal is discussed. It is well known that during cooling, the microstructure of the brazing joint corresponds to that observed during solidification of the Al-Si eutectic. And as reported by SEKULIC et al [17,27], the typical micro- structures at the joint zone consist of α-phase dendrite assemblies embedded in an irregular eutectic (with dendrite pattern and population being sensitive to the temperature). In all the micrographs shown in Fig. 4, the main feature is the eutectic network with a needle-like Si structure (the dendrites are scarce). It appears that the only change with peak temperature is the size of the eutectic zone (since it is proportional to the fillet length). A thorough description of microstructure can be made with the SEM images and corresponding EDS mappings of alloying elements (in the joint zone) presented in Fig. 5 for selected samples. Considering the results for the sample that exhibited the best fillet length (TA4), it can be observed that the predominant phase is the (Al)-Si eutectic, characterized by the presence of silicon needles. In addition, some block-like precipitates appear in bright contrast in the backscattered electron image. The EDS mappings show that these precipitates contain Fe, Mn and some Cu. Related kind of particles were reported by different researchers [28,29] in the joint zone of two brazed multilayer sheets (modified AA3003 core, clad on both faces with AA4343), and were identified as the Al-Fe-Mn-Si phase. In this investigation, the EDS mappings suggest that the precipitates mentioned above conform to the Al-Mn-Fe phase instead. This eutectic intermetallic constituent, Al(Mn,Fe), has also been detected by DAVOODI et al [30] in AA3003 alloy after a braze-simulation treatment. The EDS map for Cu indicates that the Al-Si eutectic is slightly enriched with this element around the AlMnFe phase, a behavior similar to that observed by AFSHAR et al [31]. Zinc was also analyzed, but its EDS map suggests that it is uniformly distributed in the joint zone. Now, concerning the effect of peak temperature on detailed microstructure, a comparison of the results for Samples TA4 and TA7 in Fig. 5 suggests that the constituent phases are the same, but at a lower temperature, some of the intermetallics appear as needle-like particles.
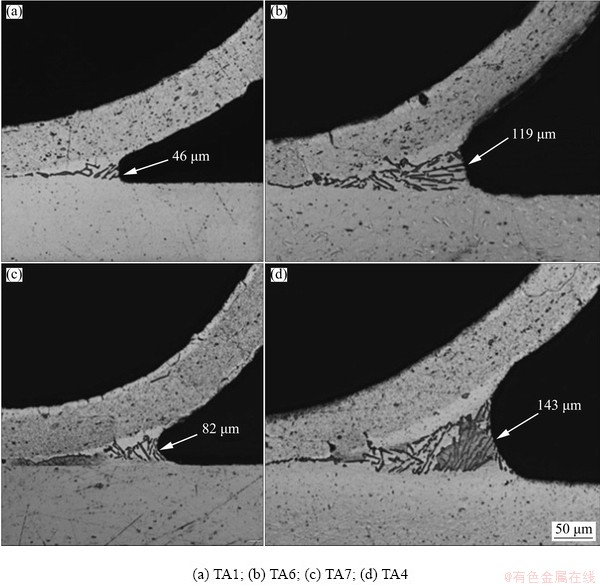
Fig. 4 Micrographs of tube-fin joint for selected samples
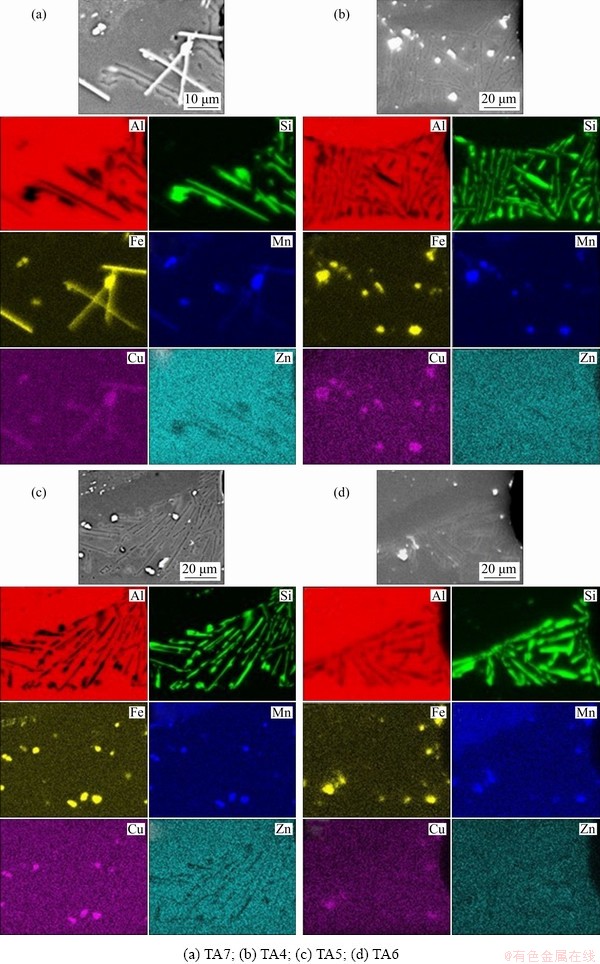
Fig. 5 SEM backscattered images of tube-fin joint and corresponding EDS mappings of Al, Si, Fe, Mn, Cu and Zn for selected brazed samples
3.2.2 Effect of holding time at peak temperature
During holding period at peak temperature (600 or 610 °C), the molten clad must have enough time to flow and spread out before forming the joints. Additionally, conditions for a uniform temperature distribution in the joining area and for the diffusion of alloying elements (Si, Zn, Cu, etc.) must be established. While long holding times may result in good joints with improved resistance, It is recommended that brazing with the NOCOLOK process should not exceed 5 min [11]. The reason is that extended processing times can lead to interactions of the liquid filler metal with the solid substrate. One form of interaction, known as dissolution, occurs when the static liquid braze metal dissolves the solid from the surfaces with which it is in contact (e.g. from the fin or the tube), resulting in an increased volume of the dendritic brazed joint structure after solidification. The other form, erosion, ensues when the liquid metal flows rapidly dissolving the solid alloy over which it is flowing. In the current work, two hold times were tested (2 and 4 min). The micrographs of the fin/tube joints presented in Fig. 4 give evidence that: (1) with increasing hold time, the fillet length increases, and (2) no signs of dissolution (or erosion) are observed for the samples brazed with a holding time of 4 min (TA7 and TA4). A longer time is better; yet, 4 min is not too long so as to cause interactions. The effect of holding time on detailed microstructure can be analyzed by comparing the results for Samples TA4 and TA6 in Fig. 5. The same constituent phases are observed, and apparently, the only difference is that for the shorter holding time, the amount of AlMnFe intermetallics and silicon needles is less, compared to that in the sample brazed during 4 min. Due to non-uniform stress distribution and the resulting stress concentration by the presence of needle-like morphology of silicon and intermetallics, the mechanical properties of the assembly would be decreased [32]. Nonetheless, the higher peak temperature (610 °C) favors a less deleterious morphology of the second phase. Regarding integrity during long-term use of the components, the presence of AlMnFe intermetallics and silicon might result in the formation of a galvanic coupling with the aluminum matrix. Thus, similar to the behavior observed in aluminum matrix composites containing intermetallics, possible localized corrosion by the dissolution of matrix surrounding the intermetallics might be produced [33,34].
3.2.3 Effect of heating rate
There are two crucial aspects to consider for selecting the right heating rate: (1) if heating is too slow, the silicon diffusion process can be prolonged leading to more depletion of Si from the clad layer [14], and (2) in order to maintain a proper uniformity of temperature distribution on the brazed object, the heating rate cannot be too high. For industrial scale furnaces, the typical heating rate recommended is 20-45 °C/min [11]. For lab-scale studies (e.g. related to diffusional solidification phenomena), it is very common to use a heating rate of 10 °C/min [25,35,36].
In this work, the selected heating rates were 5 and 10 °C/min. The means effects analysis for fillet length presented in Table 6 show that the main effect of heating rate at 5 °C/min (97) is higher than for 10 °C/min (76). This suggests that it is more likely to get a maximum fillet length at 5 °C/min than at 10 °C/min. For instance, one can compare the results for Samples TA4 (5 °C/min) and TA5 (10 °C/min) presented in Table 5 (143 and 133 μm, respectively). The micrograph of the joint zone for Sample TA4 (Fig. 4) resembles a typical well brazed fin/tube joint, even though a low heating rate was used. Although a reduction of liquid clad formation due to solid state silicon diffusion into the core might have occurred during the heating stage, a preliminary hypothesis is that it was negligible. A quantitative estimation of the possible loss of clad material will be made in a future work with a systematic metallographic evaluation. By contrasting the microstructure for Samples TA4 and TA5 in Fig. 5, one can observe that they are very similar and that the type of constituent phases and their distribution in the joint zone are nearly unaffected by a change of 5 °C/min in the heating rate.
3.3 Process parameters optimization and validation trials
The levels of the significant factors that maximize the fillet length were selected from Tables 6 and 7: C2 (610 °C peak temperature), D1 (5 °C/min heating rate) and E2 (4 min residence time). The levels for factors A and B were established with the criterion of the largest effect on the mean (Table 6); so, A2 (microchannel tube II) and B2 (flux with lithium) were selected accordingly. Then, the optimal conditions for fillet length are A2B2C2D1E2. These conditions were utilized to project the fillet length value under the optimal conditions, using the following model [20]:

 (3)
(3)
where  is the grand average of the fillet length and
  ,
,  ,
,  ,
,  and
and  are the average effect of the processing parameters at their respective optimum levels (Table 6). The projected fillet length (Yfillet) of (152±11) μm is in good agreement with that obtained in confirmation experimental trials ((151±7) μm) under optimal conditions (A2B2C2D1E2) at a 95% confidence interval.
Figure 6 shows a micrograph of the tube-fin joint corresponding to the confirmation test. It resembles a typical well-brazed joint and as observed for samples in the Taguchi design, the predominant phase is the eutectic network with a needle-like Si structure. The corresponding SEM image and EDS mappings are presented in Fig. 7. The microstructure looks very similar to that for sample TA4 (discussed above).
It is interesting to observe that the best fillet length obtained in the Taguchi design was 143 μm (corresponding to Sample TA4), while the fillet length obtained in the confirmation test was 151 μm. For both samples, the main factors have the same levels (610 °C peak temperature, 4 min residence time and 5 °C/min heating rate). So, the modest increase in fillet length is due to a change in flux type and microchannel tube: flux without lithium and microchannel tube I for Sample TA4 and flux with lithium with microchannel tube II for the optimal conditions. Possible explanations for better performance with Li-flux and tube II are given below.
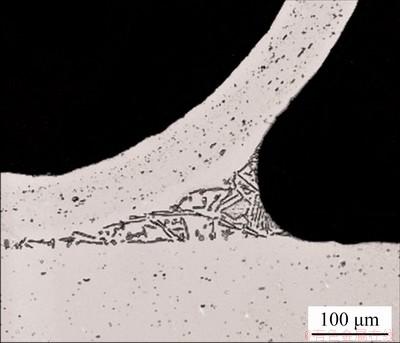
Fig. 6 Micrograph of tube-fin joint for sample corresponding to confirmation test
Potassium fluoroaluminate fluxes are commonly employed in the CAB process, and it is well known that a post braze flux residue layer is formed on the heat exchanger, which enhances its corrosion resistance [11]. However, the fact that such residue exhibits a certain solubility and dissolution in aqueous media causes some concerns. To solve this inconvenience, the NOCOLOCK Li flux was designed to reduce the potential surface interactions of brazed aluminum with water [37]. In this work, from the perspective of fillet length optimization, the NOCOLOCK
 Li flux was better than standard NOCOLOCK
 flux. The characteristics of flux residue were not evaluated because that would involve post-braze exposure tests in humid environments. The results suggest that the flux may have some effect on the wetting and spreading of the molten clad. It has been reported that addition of certain alloying elements (Sn, Ca, Mg, Sb, Pb, Bi and Li) to 99.99% Al reduces the surface tension of the molten alloy [38]. Accordingly, it has been suggested in the literature that the addition of trace quantities of Li to the Al-Si filler alloy reduces the surface tension and enhances the wettability [39]. In this work, the filler metal was not specifically designed with additions of Li. However, it is likely that the lithium present in the NOCOLOCK
 Li flux helped to enhance the wettability and led to a higher joint fillet length.
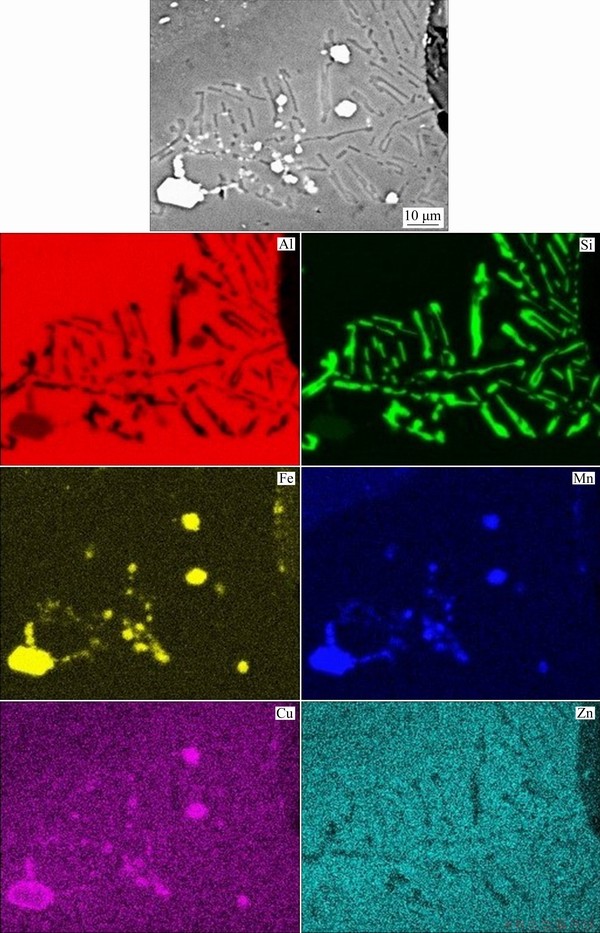
Fig. 7 SEM backscattered image of tube-fin joint and corresponding EDS mappings of Al, Si, Fe, Mn, Cu and Zn for sample corresponding to confirmation test
The flow of liquid is not only controlled by surface tension effects, but also by interactions between liquid and base metal materials. The chemically and structurally inhomogeneous surfaces affect the wettability and brazeability. In particular, surface roughness may have an important effect [40]. Due to the fabrication process such as extrusion or hot/cold rolling, the metal surface of heat exchanger components to be brazed is usually not smooth and the possible role of roughness in brazing process has been explored [41]. According to Table 1, the microchannel tubes used in this work have different amounts of Zn coating, and consistent with Table 2, they also have different roughness values. Usually, the tubes are coated with Zn for corrosion protection purposes [42]. From the approach of fillet length optimization, the microchannel tube II was better than microchannel tube I. Therefore, it appears that this was due to a higher roughness (by a factor of almost 2.5 times).
4 Conclusions
(1) Taguchi design was used to evaluate optimal furnace brazing conditions that maximize fillet length in aluminum cladded fin-microchannel tube mini-assemblies, mimicking the core of an automotive condenser.
(2) The optimal conditions were found to be: 610 °C peak temperature, 4 min residence time, 5 °C/min heating rate, microchannel tube type II and flux with lithium. At a 95% confidence level, the parameter that most significantly affects the variability of fillet length is the peak brazing temperature (77%), followed by residence time (15%) and the heating rate (7%).
(3) The good agreement between predicted optimum fillet length ((152±11) μm) and the corresponding experimental value obtained in confirmation trials ((151±7) μm) accurately validates the designed and performed experiment.
(4) The microstructural analysis of tube-fin joints showed that they typically consist of the eutectic network with a needle-like Si structure (being the α-phase dendrites scarce or even absent), and block-like AlMnFe intermetallics in the middle of the brazing joint.
(5) Variations in peak temperature and residence time affect only the size of the eutectic zone of fillet formed, but not the nature or composition of the constituent phases, e.g. AlMnFe. Heating rate, flux type and microchannel tube material have a negligible effect on the micro- structure.
Acknowledgments
J. C. GUIA-TELLO wishes to express his gratitude to Conacyt (National Council of Science and Technology in Mexico) for the scholarship provided for his doctoral studies. The authors are deeply grateful to the Engineering Department of Airtemp de Mexico, S.A. de C.V. for providing the samples of tube-fin mini-assemblies used in this research and useful feedback. The authors are also thankful to M.Sc. Felipe de Jesús MArquez Torres, Dr. Martha Elena Rivas Aguilar and Dr. Miguel Angel Aguilar GonzAlez for their assistance with microscopy characterization and image analysis.
References
[1] SEKULIC D P. Compact heat exchangers [M]//Handbook of thermal science and engineering. Cham: Springer International Publishing AG, part of Springer Nature, 2018: 1501-1520.
[2] SINGH J, Montesinos-Castellanos A, NIGAM K D P. Process intensification for compact and micro heat exchangers through innovative technologies: A review [J]. Industrial & Engineering Chemistry Research, 2019, 58: 13819-13847.
[3] HIRSCH J. Recent development in aluminum for automotive applications [J]. Transactions of Nonferrous Metals Society of China, 2014, 24(7): 1995-2002.
[4] BROUGH D, JOUHARA H. The aluminium industry: A review on state-of-the-art technologies, environmental impacts and possibilities for waste heat recovery [J]. International Journal of Thermofluids, 2020, 1-2: 100007.
[5] CUI J, ROVEN H J. Recycling of automotive aluminum [J]. Transactions of Nonferrous Metals Society of China, 2010, 20(11): 2057-2063.
[6] BENOIT M J, JIN H, Shalchi-Amirkhiz B, KURUKURI S, WINKLER S, WORSWICK M J, WELLS M A. Microstructure evolution or warm deformed multilayered Al alloy sheet during brazing [J]. Journal of Materials Processing Tech, 2020, 281: 116639.
[7] SHAH R K, SEKULIC D P. Fundamentals of heat exchanger design [M]. New Jersey: John Wiley & Sons Inc., 2003.
[8] European Aluminum Association (EAA). Aluminum automotive manual-joining [R]. Brussels: EAA and Aluminum Extruders Council (AEC), 2015.
[9] SHAH R K. Advances in science and technology of compact heat exchangers [J]. Heat Transfer Engineering, 2006, 27(5): 3-22.
[10] ZHAO H, WOODS R. Controlled atmosphere brazing of aluminum [C]//Advances in Brazing, Science Technology and Applications. Cambridge: Woodhead publishing Limited, 2013: 280-322.
[11] SWIDERSKY H W. Aluminum brazing with non-corrosive fluxes, state of the art and trends in NOCOLOK flux technology [C]//Proc. 6th Int Conf on Brazing, High Temperature Brazing and Diffusion Bonding. Aachen: German Welding Society (DVS), 2001: 1-6.
[12] ROBERTS P M. Introduction to brazing technology [M]. Boca Raton: Taylor & Francis Group, 2016.
[13] NADIN A. Lab based brazing simulation [J]. Aluminum International Today, 2017, 29(4): 35-36.
[14] GAO F, ZHAO H, SEKULIC D P, QUIAN Y, WALKER L. Solid state Si diffusion and joint formation involving aluminum brazing sheet [J]. Materials Science and Engineering A, 2002, 337: 228-235.
[15] SEKULIC D P, GAO F, ZHAO H, ZELLMER B, QIAN Y. Prediction of the fillet mass and topology of aluminum brazed joints [J]. Welding Journal, 2004, 83(S): 102s-110s.
[16] ZHAO H, SALAZAR A J, SEKULIC D P. Analysis of fin-tube joints in a compact heat exchanger [J]. Heat Transfer Engineering, 2009, 30: 931-940.
[17] SEKULIC D P. Modelling of the sequence of phenomena in brazing [M]. Cambridge: Woodhead Publishing Limited, 2013.
[18] GENG Pei-hao, QIN Guo-liang, ZHOU Jun, LI Chang-an. Parametric optimization and microstructural characterization of friction welded aeronautic aluminum alloy 2024 [J]. Transactions of Nonferrous Metals Society of China, 2019, 29(12): 2483-2495.
[19] Guia-Tello J C, Pech-Canul M A, Trujillo- VAzquez E, Pech-Canul M I. Furnace brazing parameters optimized by Taguchi method and corrosion behavior of tube-fin system of automotive condensers [J]. Journal of Materials Engineering and Performance, 2017, 26: 3901-3914.
[20] NOVOSADOV V S. Assessment of the effect of fillets and special features of technology on the mechanical properties of brazed joints [J]. Welding International, 2017, 31(10): 802-808.
[21] JIANG W, GONG J, TU S T. A study of the effect of filler metal thickness on tensile strength for a stainless steel plate-fin structure by experiment and finite element method [J]. Materials & Design, 2010, 31(5): 2387-2396.
[22] ROY R K. A primer on the Taguchi method [M]. Michigan: Society of Manufacturing Engineers, 1990.
[23] LIN H, HWANG Jiun-Ren, FUNG Chin-Ping. Optimization of vacuum brazing process parameters in AA6061 using Taguchi method [J]. Journal of Advanced Mechanical Design, Systems, and Manufacturing, 2016, 10(2): 1-10.
[24] ELANGOVAN S. PRAKASAN K, JAIGANESH V. Optimization of ultrasonic welding parameters for copper to copper joints using design of experiments [J]. The International Journal of Advanced Manufacturing Technology, 2010, 51: 163-171.
[25] TURRIFF D M, CORBIN S F, KOZDRAS M. Diffusional solidification phenomena in clad aluminum automotive braze sheet [J]. Acta Materialia, 2010, 58: 1332-1341.
[26] Solvay Special Chemicals. The NOCOLOK flux brazing process [R]. Hannover: Solvay Fluor GmbH, 2018.
[27] SEKULIC D P, GALENKO P K, KRIVILYOV M D, WALKER L, GAO F. Dendritic growth in Al-Si alloys during brazing. Part 1: Experimental evidence kinetics [J]. International Journal of Heat and Mass Transfer, 2005, 48: 2372-2384.
[28] LACAZE J, TIERCE S, LAFONT M C, THEBAULT Y, PEBERE N, MANKOWSKI G, BLANC C, ROBIDOU H, VAUMOUSSE D, DALOZ D. Study of the microstructure resulting from brazed aluminum materials used in heat exchangers [J]. Materials Science and Engineering A, 2005, 413: 317-321.
[29] TIERCE S, PEBERE N, BLANC C, MANKOWSKI G, ROBIDOU H, VAUMOUSSE D, LACAZE J. Solidification and phase transformations in brazed aluminium alloys used in automotive heat exchangers [J]. International Journal of Cast Metals Research. 2005, 18: 370-376.
[30] DAVOODI A, PAN J, LEYGRAF C, NORGREN S. The Role of intermetallic particles in localized corrosion of an aluminum alloy studied by SKPFM and integrated AFM/SECM [J]. Journal of Electrochemical Society, 2008, 155(5): C211-C218.
[31] AFSHAR F N, TICHELAAR F D, GLENN A M, TAHERI P, SABABI M, TERRYN H, MOL J M C. Improved corrosion resistance of aluminum brazing sheet by a post-brazing heat treatment [J]. Corrosion, 2017, 73(4): 379-393.
[32] DIETER G E. Mechanical metallurgy [M]. 3rd ed. Boston: McGraw-Hill, 1986.
[33] Escalera-Lozano R, Pech-Canul M A, Pech- Canul M I, Quintana P. Corrosion characteristics of Al-Si-Mg/SiCp composites with varying Si/Mg molar ratio in neutral chloride solutions [J]. Materials and Corrosion, 2009, 60(9): 683-689.
[34] Pech-Canul M A, Giridharagopal R, Pech- Canul M I, Coral-Escobar E E. Localized corrosion behavior of Al-Si-Mg alloys used for fabrication of aluminum matrix composites [J]. Journal of Materials Engineering and Performance, 2013, 22: 3922-3932.
[35] TU Y, TONG Z, JIANG J. Effect of microstructure on diffusional solidification of 4343/3005/4343 multi-layer aluminum brazing sheet [J]. Metallurgical and Materials Transactions A, 2013, 44: 1760-1766.
[36] BENOIT M J, WHITNEY M A, WELLS M A, Winkler S. Reduction of liquid clad formation due to solid state diffusion in clad brazing sheet [J] Metallurgical and Materials Transactions B, 2016, 47: 3501-3510.
[37] GARCIA J P, SWIDERSKI H W. Functionalized inorganic fluorides, synthesis, characterization & properties of nanostructures solids [M]. Chichester: John Wiley & Sons Ltd, 2010.
[38] HATCH J E. Aluminum: Properties and physical metallurgy [M]. Ohio: American Society for Metals, 1984.
[39] HAWKSWORTH D K. Advances in brazing: 19. Fluxless brazing of aluminum [M]. Cambridge: Woodhead Publishing Limited, 2013.
[40] KUMAR G, PRABHU K N. Review of non-reactive and reactive wetting of liquids on surfaces [J]. Advances in Colloid and Interface Science, 2007, 133: 61-89.
[41] ZHAO H, ELBEL S, HRNJAK P, PREDRAG S. Influence of surface morphology on wetting behaviors of liquid metal during aluminum heat exchanger fabrication [C]//Proc Int Refrigeration and Air Conditioning Conf. Purdue: Purdue University, 2014: 1-8.
[42] Pech-Canul M A, Guia-Tello J C, Pech-Canul M I, AGUILAR J C, Gorocica-Diaz J A, Arana- Guillen R, Puch-Bleis J. Electrochemical behavior of tube-fin assembly for an aluminum automotive condenser with improved corrosion resistance [J]. Results in Physics, 2017, 7: 1760-1777.
J. C. GUIA-TELLO1, M. I. PECH-CANUL2, E. TRUJILLO-VAZQUEZ3, M. A. PECH-CANUL4
1. Centro de Investigacion en Materiales Avanzados (CIMAV), Laboratorio Nacional de Nanotecnologia, Miguel de Cervantes No. 120, Chihuahua, Chih., 31136, Mexico;
2. Centro de Investigacion y de Estudios Avanzados del Instituto Politecnico Nacional-Unidad Saltillo, Av. Industria Metalúrgica No.1062, Parque Industrial Saltillo-Ramos Arizpe, Ramos Arizpe, Coahuila, 25900, Mexico;
3. CONACYT-Facultad de Ciencias Fisico MatemAticas, Benemerita Universidad Autonoma de Puebla, Av. San Claudio, Cd Universitaria, Jardines de San Manuel, Puebla, Puebla, 72570, Mexico;
4. Cinvestav-Merida, Km 6 ant. Carr. a Progreso, AP 73 Cordemex, Merida, Yuc., 97310, Mexico
摘 要:研究钎焊连接微型多端口铝管和AA4343/AA3003/AA4343翅片,模拟汽车热交换器核心的微型组件,并优化钎焊条件。考虑5种工艺参数,用Taguchi法设计实验,目的是使钎焊接头的焊角尺寸最大化,因为焊角尺寸对钎焊接头的热完整性和力学性能有重要影响。采用金相显微镜测量钎焊接头的焊角长度,通过统计分析获得工艺参数的最佳值(峰值温度、保温时间、加热速率、微通道管类型和焊剂)。在95%置信水平下,焊角长度的变化受钎焊峰值温度(77%)、保温时间(15%)和加热速率(7%)的影响最为显著。预测的最大焊角长度为(152±11) μm,并得到实验验证。对管-翅片接头的显微组织分析表明,峰值温度和保温时间的变化只影响焊角共晶区的大小,而对组成相的性质和成分无影响。
关键词:钎焊;复合翅片;Taguchi法;焊角尺寸;显微组织;铝;峰值温度;优化
(Edited by Bing YANG)
Corresponding author: M. I. PECH-CANUL; Tel: +52 (844) 4-38-96-00 Ext. 8678; E-mail: martin.pech@cinvestav.edu.mx,martpech@hotmail.com
DOI: 10.1016/S1003-6326(20)65457-7

