Article ID: 1003-6326(2005)06-1248-05
Tensile properties and mechanical heterogeneity of friction stir welded joints of 2014 aluminum alloy
ZHAO Yan-hua(赵衍华), LIN San-bao(林三宝),
WU Lin(吴 林), QU Fu-xing(曲福兴)
(State Key Laboratory of Advanced Welding Production Technology,
Harbin Institute of Technology, Harbin 150001, China)
Abstract: 2014 Al alloy of 8mm in thickness was successfully welded by friction stir welding method. The experimental results show that the tensile properties of the joints are significantly affected by the welding parameters. When the weld pitch is 0.25mm/r corresponding to the rotation speed of 400r/min and the welding speed of 100mm/min, the maximum ultimate strength of the joints is 78% that of the base material. For a certain weld joint, different parts possess different mechanical properties. In the three parts of the joint, the upper part is strongest and the middle part is poorest in mechanical properties. The mechanical properties and fracture locations of the joints are dependent on the microstructure variation and micro-hardness distributions of the joints, which attributes to the different thermo-mechanical actions on the different parts of the joints.
Key words: 2014 Al alloy; friction stir welding; mechanical properties; fracture; heterogeneity CLC
number: TG453 Document code: A
1 INTRODUCTION
Friction stir welding(FSW) is a new and promising welding process that can produce low-cost and high-quality joints of many alloys[1-7] because it does not need consumable filler materials and can eliminate some welding defects such as crack and porosity. In the FSW process, the welding temperature is lower than that in the fusion welding, and the metal is in the plastic state, so many fusion welding defects can be avoided. At present, more and more researches have been focused on the FSW process, and the FSW has become one of the popular hotspots of the welding[8-10]. Some studies have involved the effects of welding process parameters on the microstructures and mechanical properties of the joints[11-14]. However, for 2014 aluminum alloy, few literatures about the relationship between welding parameters and mechanical properties of the joints have been found[15]. Moreover, the FSW joint can be considered to be composed of finite thin-layers in the direction of thickness, and each thin-layer is different from the other in mechanical properties because it experiences different thermo-mechanical actions during friction stir welding. However, the research on the difference in mechanical properties between thinner-layers is still very little[16].
This paper aims to demonstrate the influence of welding parameters on the mechanical properties of 2014 Al FSW joints and to disclose the mechanical heterogeneity of the joints so as to obtain useful information for improving the mechanical properties of the joints.
2 EXPERIMENTAL
The base material used in this study is a 2014 aluminum alloy plate of 8mm in thickness, whose chemical composition and mechanical properties are listed in Table 1. The plate was cut and machined into rectangular welding samples of 250mm×100mm, and the samples were longitudinally butt-welded using an FSW machine. The designed welding tool size and welding parameters are listed in Table 2.
After welding, the joints were cross-sectioned perpendicularly to the welding direction for metallographic analyses and tensile tests using an electrical-discharge cutting machine. The cross-sections of the metallographic specimens were etched with mixed acid reagent (95mL water, 2.5mL nitric acid, 1.5mL hydrochloric acid and 1mL hydrofluoric acid) for about 10s, and observed by optical microscope. The configuration and size of the transverse tensile specimens were controlled with reference to GB 2649―89. In order to examine the mechanical heterogeneity of the joints, the tensile specimen with the highest strength was cut perpendicularly to the direction of thickness into three tensile specimens of 1.9mm in thickness, and they were marked by upper, middle and lower parts of the joint.
Table 1 Chemical composition and mechanical properties of 2014 Al alloy

Table 2 Tool size and welding parameters used in this experiment

After the metallographic analyses, the Vickers hardness profiles across the welding nugget, thermo-mechanically affected zone(TMAZ), heat affected zone(HAZ) and partial base material were measured under the load of 0.98N for 15s along the centerlines of the cross-sections with a spacing of 0.5mm using an automatic micro-hardness tester. The tensile tests were carried out at room temperature at a crosshead speed of 1mm/min using a computer-controlled testing machine.
3 RESULTS AND DISCUSSION
Fig.1 shows the tensile properties of the joints welded with different welding pitches. It can be seen that the tensile properties of joints are all lower than those of the base metal. When the welding pitch is smaller than 0.25mm/r, the tensile strength increases slightly with the weld pitch. The maximum tensile strength, 360MPa, is obtained at the weld pitch of 0.25mm/r, equivalent to 78% that of the base metal. When the weld pitch is greater than 0.25mm/r, the tensile strength decreases to a lower level. The change tendency of elongation is similar to that of the tensile strength. The maximum elongation is obtained at the weld pitch of 0.268mm/r.
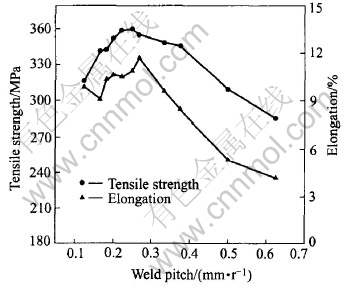
Fig.1 Tensile properties of joints
These results indicate that a softening effect occurs in the 2014 aluminum alloy. The softened levels or tensile properties of the joints are significantly affected by the welding parameters. The optimum welding parameters can be determined from the relationship between the tensile properties and the welding parameters. In this paper, the rotation speed of 400r/min and the welding speed of 100mm/min are the optimum welding parameters for FSW joints of 2014 aluminum alloy. In this case, the maximum strength of the joint is equivalent to 78% that of the base material.
In order to examine the heterogeneity of the mechanical properties of the joint, the joint with the highest strength, which is welded with the rotation speed of 400r/min and welding speed of 100mm/min, is chosen to cut into three parts in the thickness direction. Every specimen for tensile test examination is 1.9mm in thickness and the dimensions of the specimens are shown in Fig.2.
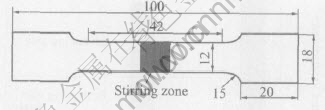
Fig.2 Dimension of specimens for tensile tests
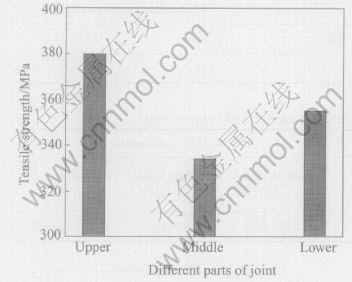
Fig.3 Tensile properties of different parts of joints
Fig.3 shows the tensile test results of the different parts of the joints. The strength of the upper part of the same joint is the highest, while that of the lower and middle part is smaller than that of the upper one. These results clearly indicate that the different parts of the joint possess different mechanical properties. Among the three parts of the joint, the upper part is the strongest, and the tensile strength can reach 380MPa, which is larger than that of the integral joint (360MPa). The middle part of the joint is weaker than the integral joint and this part of the joint is the weakest one among the three component parts.
The fracture location of joints is a direction of the weakest part of the joint. Studying the fracture location of the joint is quite important to understand and improve the mechanical properties of the joint. Fig.4 shows the fracture locations of different parts of the joint. From Fig.4, the fracture location of the joints is expressed by the distance between the weld center and the point of fracture. In the three parts of the same joint, the fracture locations of the middle and upper part are far from the weld center, while that of the lower part is close to the weld center. Moreover, the middle part is fra-
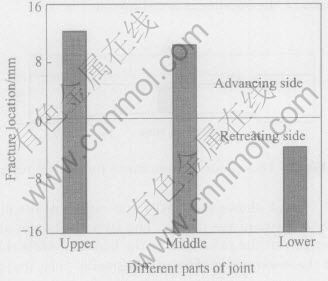
Fig.4 Fracture locations of different parts of joint
ctured at the location of 10.3-10.6mm away from the weld center, which is the interface between HAZ and base metal. The lower part is fractured near the interface between weld nugget and TMAZ.
These results indicate that the fracture locations of the different parts of the same joint are different. Moreover, it should be noted that some parts of the joint fracture either on the advancing side or on the retreating side, which is not the same as the integral joint in tensile test. The integral joint always fractures on the advancing side. It is believed that even if the lower part of the joint fractures on the retreating side, the distinction of the tensile strength between the two sides is not very much. But the mechanical properties in the advancing side of the middle part are lower than the retreating side, and the fracture always occurs on the advancing side. For the integral joint, the middle part acts as a more important role in the tensile properties. As a whole, the fracture always occurs in the advancing side of the joint.
The mechanical properties and fracture locations of the different parts of the joint are dependent on the hardness distributions of the joint if the joint is free of defects. Fig.5 shows the typical cross-sectional micro-hardness distributions of the joint. Comparing the fracture location and the micro-hardness distribution, we can find that the three different parts of the joint always fracture at the place where the hardness is the lowest or at the place where the hardness varies sharply.
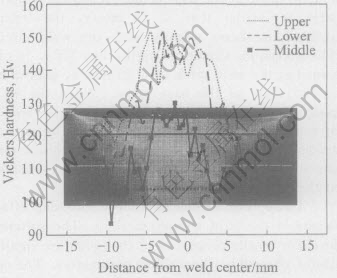
Fig.5 Hardness distributions at different parts of joint
In general, the heterogeneity of the mechanical properties of joints attributes to the different thermo-mechanical actions on the different parts of the joints. In the three parts of the same joint, the upper part is frictionized and stirred not only by the tool pin, but also by the tool shoulder, therefore it is different from the middle and lower parts in microstructure. For the joint used in this study, there are heat input and upset force to ensure the weld metal to flow freely in the upper part, and at the additional stirring action of the shoulder, microstructure in upper part is characterized by very fine grains whose hardness is always very high. From the micro-hardness distribution, we can see that the area of the decreased hardness in the upper part is smaller than that of the other two parts.
The middle part is similar to the upper one, but it is frictionized and stirred only by the pin, therefore the heat input to the middle part is less than that to the upper part. However, the heat output from the middle part is less than that from the upper or the lower part, and then there is sufficient heat input to ensure the weld metal flow. The effective heat absorbed by the middle part may be larger than that absorbed by the upper part or the lower part, thus the middle part is seriously softened and the micro-hardness is lower than that of the other two parts. In the upper and middle part of the joint, there is sufficient heat input and stirring actions in the welding process, and the variation of the microstructure between the shoulder-affected zone and the TMAZ or between the nugget and the TMAZ, is not very sharp. The weak zone is the HAZ, which is characterized by coarse lath-shaped structure.
The lower part of the joint is frictionized only by the pin, and due to the taper geometer of the pin, the heat input in the lower part is the smallest among the three parts, but the heat output is the highest because of the heat transfer to the back fasten bar. The smallest heat input but high output will result in less softening of the material in the lower part of the joint, and the plastic material can not flow as freely as that in the middle part. So the pin can only stir the material within the diameter dimension. Out of the pin diameter, the material flow speed decreases sharply, which results in the abrupt variation of microstructure between weld nugget and TMAZ. So the zone between weld nugget and TMAZ always is one of the weak parts in the joint. With improving the heat input, the fracture location of the lower part will be far from the weld center. In fact, the lower part fractures at the location of 6.4mm away from the weld center in the retreating side when the weld pitch of 0.125mm/r is used. On the other hand, more heat input will also bring some defect on the upper part in the joint, such as tiny crack (as shown in Fig.6), which can decrease the tensile strength of the integral joint. To determine the optimum welding parameters, all parts of the joint must be consi- dered. In this paper, the weld pitch of 0.25mm/r is the best welding parameter.
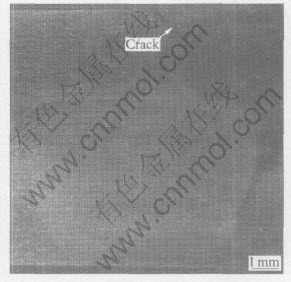
Fig.6 Cross sectional morphology of joint welded at weld pitch of 0.125mm/r
4 CONCLUSIONS
A softened region clearly occurs in the friction-stir-welded joints of the 2014 aluminum alloy, thus the tensile properties of the joints are lower than those of the base material. The welding parameters have significant effects on the tensile properties of the joints. Under the weld pitch of 0.25mm/r, the tensile strength of the integral joint can reach 360MPa, equivalent to 78% that of the base material. Moreover, the different parts of the joint possess different mechanical properties. The tensile strength and the fracture location of the different parts of the joint are dependent on the microstructure and micro-hardness distributions of the joint. Essentially, the heterogeneity of mechanical properties of the joint attributes to the different thermo-mechanical actions on the different parts of the joint.
REFERENCES
[1]Mishra R S, Ma Z Y, Charit I. Friction stir processing: a novel technique for fabrication of surface composite[J]. Mater Sci Eng A, 2003, A341: 307-310.
[2]Benavides S, Li Y, Murr L E, et al. Low temperature friction stir welding of 2024 aluminum[J]. Scripta Materialia, 1999, 41(8): 809-815.
[3]Trillo E A, Murr L E. Friction stir welding of magnesium alloy AZ31B[J]. Journal of Materials Science Letters, 2002, 21(12): 917 -920.
[4]Park S H C, Sato Y S, Kokawa H. Effect of microtexture on fracture location in friction stir weld of Mg alloy AZ61 during tensile test [J] . Scripta Materialia, 2003, 49(2): 161-166.
[5]Park S H C, Sato Y S, Kokawa H, et al. Rapid formation of the sigma phase in 304 stainless steel during friction stir welding[J]. Scripta Materialia, 2003, 49(12): 1175-1180.
[6]Reynolds A P, Tang Wei, Gnaupel-Herold T, et al. Structure, properties, and residual stress of 304L stainless steel friction stir welds[J]. Scripta Materialia, 2003, 48(9): 1289-1294.
[7]Lee W B, Jung S B. The joint properties of copper by friction stir welding[J]. Materials Letters, 2004, 58(6): 1041-1046.
[8]Prado R A, Murr L E, Shindo D J, et al. Tool wear in the friction-stir welding of aluminum alloy 6061+20% Al2O3: a preliminary study[J]. Scripta Materialia, 2001, 45: 75-80.
[9]Prado R A, Murr L E, Soto K F, et al. Self-optimization in tool wear for friction-stir welding of Al 6061+20% Al2O3 MMC[J]. Mater Sci Eng A, 2003, A349: 156 - 165.
[10]Sato Y S, Park S H C, Michiuchi M, et al. Constitutional liquation during dissimilar friction stir welding of Al and Mg alloys [J]. Scripta Materialia, 2004, 50: 1233-1236.
[11]LIU Hui-jie, Fujii H, Maeda M, et al. Tensile properties and fracture locations of friction-stir-welded joints of 2017-T351 aluminum alloy[J]. Journal of Materials Processing Technology, 2003, 142: 692-696.
[12]Mustafa B, Adem K. The influence of stirrer geometry on bonding and mechanical properties in friction stir welding process[J]. Materials and Design, 2004, 5: 343-347.
[13]LIU Hui-jie, Fujii H, Maeda M, et al. Tensile properties and fracture locations of friction-stir welded joints of 6061-T6 aluminum alloy[J]. Journal of Materials Science Letters, 2003, 22:1061-1063.
[14]LIU Hui-jie, Fujii H, Maeda M, et al. Tensile properties and fracture locations of friction-stir welded joints of 1050-H24 aluminum alloy[J]. Journal of Materials Science Letters, 2003, 22: 41-43.
[15]ZHAO Yan-hua, LIN San-bao, WU Lin, et al. Influence of pin size on welding shape and mechanical properties of friction stir welded 2014Al alloy[J]. Trans Nonferrous Met Soc China, 2005, 15(Special 2): 92-96.
[16]LIU Hui-jie, Fujii H, Maeda M, et al. Heterogeneity of mechanical properties of friction stir welded joints of 1050-H24 aluminum alloy[J]. Journal of Materials Science Letters, 2003, 22: 441-444.
(Edited by YANG Bing)
Received date: 2005-03-24; Accepted date: 2005-06-20
Correspondence: LIN San-bao, PhD; Tel: +86-451-86418895; E-mail: sblin@hit.edu.cn