3D晶体取向测试技术在铝合金 晶粒变形分析中的应用
来源期刊:中国有色金属学报(英文版)2014年第7期
论文作者:M. KOBAYASHI H. TODA D. J. LECLERE T. KAMIKO K. UESUGI A. TAKEUCHI Y. SUZUKI
文章页码:2094 - 2101
关键词:同步加速器辐射;X射线断层扫描;X射线衍射;塑性变形;晶体学取向
Key words:synchrotron radiation; X-ray tomography; X-ray diffraction; plastic deformation; crystallographic orientation
摘 要:非均匀变形在材料工程领域是一个有趣的问题。同步辐射成像技术通过跟踪多晶体铝合金的显微组织的特性,提供了局部应变的3D分布图。为了更加深入地分析非均匀的过程,开发了三维X射线衍射分析技术。它利用跟踪晶界获得的信息(GBT),描述了三维空间中新的晶体取向测试技术。
Abstract: Development of inhomogeneous deformation is an interest matter in material engineering. Synchrotron radiation tomography provides 3D distribution map of local strain in polycrystalline aluminum alloy by tracking microstructural features. To perform further deep analysis on development of inhomogeneous deformation, crystallographic grain orientation is necessary. Three-dimensional X-ray diffraction technique was developed. A new crystallographic orientation measurement method was described in 3D space, utilizing grain boundary tracking (GBT) information.
Trans. Nonferrous Met. Soc. China 24(2014) 2094-2101
M. KOBAYASHI1, H. TODA2, D. J. LECLERE1, T. KAMIKO1, K. UESUGI3, A. TAKEUCHI3, Y. SUZUKI3
1. Department of Mechanical Engineering, Toyohashi University of Technology, 1-1, Hibarigaoka Tenpaku-cho, Toyohashi, Aichi 441-8580, Japan;
2. Department of Mechanical Engineering, Kyushu University, 744 Motooka, Nishi-ku, Fukuoka 819-0395, Japan;
3. Japan Synchrotron Radiation Research Institute, 1-1-1, Kouto, Sayo-cho, Sayo-gun, Hyogo 679-5198, Japan
Received 17 October 2013; accepted 28 April 2014
Abstract: Development of inhomogeneous deformation is an interest matter in material engineering. Synchrotron radiation tomography provides 3D distribution map of local strain in polycrystalline aluminum alloy by tracking microstructural features. To perform further deep analysis on development of inhomogeneous deformation, crystallographic grain orientation is necessary. Three-dimensional X-ray diffraction technique was developed. A new crystallographic orientation measurement method was described in 3D space, utilizing grain boundary tracking (GBT) information.
Key words: synchrotron radiation; X-ray tomography; X-ray diffraction; plastic deformation; crystallographic orientation
1 Introduction
Metals that are composed of many crystallites of varying size and orientation can be deformed into various shapes. Plastic deformation in metals is conducted by slip deformation. Not to separate into grains but to continue to exist as a continuum, individual grains have to deform inhomogeneously with keeping deformation in harmony with neighbor grains. Development of inhomogeneous deformation is an interest matter in structural metal materials because inhomogeneous deformation would control mechanical properties.
Recently, synchrotron radiation microtomography (SR-mCT) is often used for visualizing microstructure in aluminum alloy. SR-mCT is one of non-destructive examination methods and provides spatial resolution of about 1 mm. Not only casting defects like a shrinkage and porosity, but also intermetallic particles and micro-pores are able to be observed in 3D in aluminum alloy by SR-mCT. Therefore, SR-mCT has been useful for investigations of fatigue [1,2], ductile fracture [3-7] and thermo-mechanical processing [8-10]. Furthermore, grain boundary network in aluminum alloy is also made visible by applying gallium [11,12]. The SR-mCT can provide not only 3D microstructure information but also local strain distribution in 3D by tracking microstructural features [13]. An analysis method of grain deformation has been proposed by combining with visualization of grain boundary and strain mapping [14]. This method that utilizes particles tracking at grain boundary is named grain boundary tracking (GBT). Schematic illustration of the GBT is shown in Fig. 1. The GBT conducts SR-mCT scans during step-by-step loading and after application gallium. It provides us grain morphology and local strain distribution in deformation process in 3D by 3D image processing and microstructural features tracking. This method visualizes grain microstructure by using X-ray absorption. It is useful for investigation of deformation in polycrystalline materials. However, the GBT cannot measure crystallographic orientation in grains. To perform further deep analysis on development of inhomogeneous deformation, crystallographic orientation information of each grain is necessary. Three- dimensional X-ray diffraction (3DXRD) technique had already been developed to measure crystallographic orientation in a polycrystalline metal [15]. However, it is difficult to measure orientation in plastic deformed sample, because diffraction spots become broad which causes diffraction spot overlap. Besides, the number of diffraction spots increases sharply with increasing the number of grains. It makes the matching between diffraction spot and grain difficult.
The aim of this study is to establish a novel orientation analysis method that utilizes accurate grain position information obtained by GBT, to supply crystallographic orientation to GBT analysis and enable crystal-plasticity deformation analysis up to the fracture in aluminum alloy. In this work, we describe the experimental and analysis procedures, and then verify the validity of the constructed method by using XRD simulation that is based on actual grain morphology obtained by GBT.
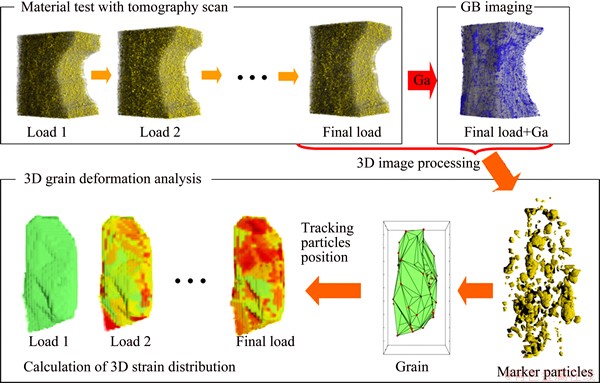
Fig. 1 Schematic illustration of grain boundary tracking (GBT)
2 Experimental
Al-3%Cu alloy was prepared for synchrotron radiation experiment. The alloy was cast from 4N pure aluminum ingot and Al-30%Cu ingot. The cast ingot was given 80% rolling after homogenous heat-treatment. The rolled plate was recrystallized at 763 K for 3.6 ks. Grain size of the plate sample became from 50 to 100 mm. Al-3%Cu alloy plate was cut into a tensile specimen with section of 600 μm×600 mm as shown in Fig. 2.
The experiment was carried out at a beam line BL20XU at the SPring-8. The set-up of synchrotron radiation microtomography is shown in Fig. 3. Material testing rig, which was driven by air, was installed at high-precision rotation stage. Detector consisted of a scintillator, a ×20 optics lens and a CCD camera. The CCD camera with 4000×2624 elements was used in the 2×2 binning mode. 1500 radiographies with 2000×1312 pixels were captured during 180° rotation. The radiographies were reconstructed into a slice-image set of 3D volume by convolution back-projection method.

Fig. 2 Specimen used in this experiment
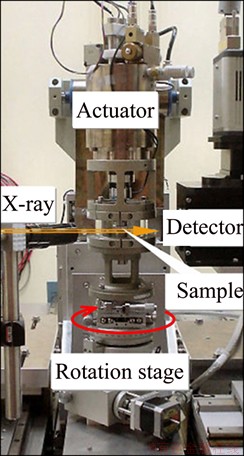
Fig. 3 Synchrotron radiation microtomography set-up at BL20XU in SPring-8
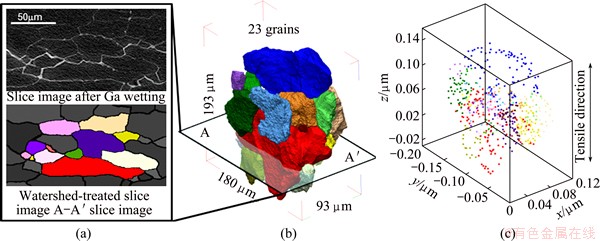
Fig. 4 GBT results for 23 grains detected by 3D image analysis in CT image
The tomographic scans were also carried out during tensile loading step by step. Furthermore, grain boundaries network was visualized by gallium application to the specimen. Figure 4 shows the region of interest that was cut off from 3D volume. 23 grains were detected by the GBT in the region of interest. A slice image after gallium application and a grain segmented image are shown in Fig. 4(a). It has been reported that gallium penetration occurs at grain boundary with misorientation less than 1° [16]. However, grain boundaries with small misorientation showed weaker contrast of gallium in microtomography. In some case, binarization didn’t represent low-angle grain boundaries. Morphology of the segmented 23 grains is represented in Fig. 4(b). Particles that belong to each grain are indicated in Fig. 4(c). GBT can detect and visualize grains and their particles.
Figure 5 depicts the geometry of XRD set-up used for the measurement of crystallographic orientation. A pencil beam was employed with dimensions of 10 μm×10 μm and photon energy of 35 keV. The beam was scanned across the specimen at 60 different points with intervals of 10 μm along the y-axis and at 20 different points with intervals of 16 μm along the z-axis. The specimen was rotated through 180° at each point with a rotation rate of 1° per 0.1 s. A 2048×2048 element CMOS camera with a pixel size of 5 μm was used for recording X-ray diffraction images. The detector covered the all diffraction area of about 10 mm × 10 mm. The distance between sample and detector was set as 14 mm.
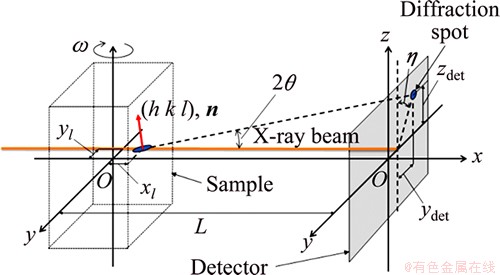
Fig. 5 Geometry of XRD set-up
Diffractions from {111}, {200}, {220}, {311}, {222}, {400} and {331} crystal planes were able to be captured in this setting.
3 Analysis and simulation
3.1 Experiment analysis
The tomographic image after gallium application represents grain boundary (GB) positions because gallium penetrates into GBs of aluminum alloy preferentially. Individual grains and particles that belong to the grains were detected by using the tomographic images before and after gallium application. Because polygons formed by the particles on GBs can represent a grain shape, deformation of grain can be obtained by tracking position of the particles on GBs. Development of local strain at each grain can be estimated from particle displacement.
In order to determine crystallographic orientation, it is necessary to find X-ray diffraction (XRD) spots caused by identical grain. First, positions of XRD spot on detector were specified by image analysis. The positions of XRD spot were collected in the same w angle of sample rotation through all beam-scanning positions. Spot clusters that mean identical grain can be found because XRD spots with similar position are observed while beam scans in identical grain. Figure 6 shows an example of diffraction spots after clustering at ω=35° in Al-3Cu alloy. The GB particle tracking was also performed in advance to indicate individual grain position with accuracy.
To find crystallographic orientation in a grain aggregated structure, determination of original position of XRD spot is the most troublesome task. We have introduced two possibility parameters to match a spot with a grain. The parameters represent relationship between a spot position observed in XRD and a grain position of GBT.
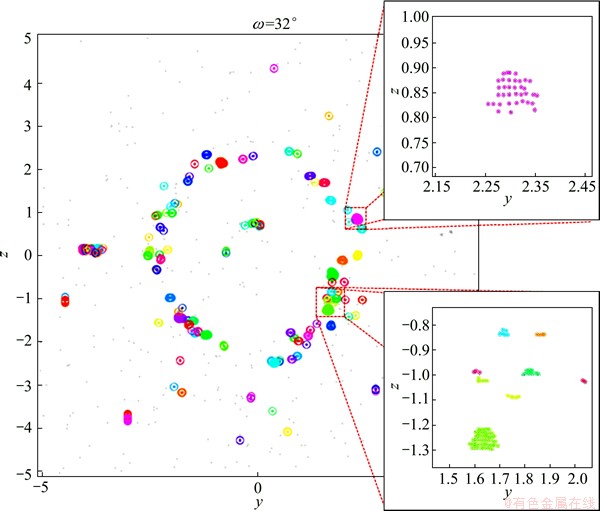
Fig. 6 Diffraction spots after clustering at ω=35° in Al-3Cu alloy
The first parameter, P1, is 2D duration on y-z scanning. Explanatory diagram of possibility parameter is shown in Fig. 7. The P1 is a ratio that is given by dividing the number of XRD spots by the total number of times that the beam intersected a grain. Namely, if TXRD T'GBTgrainA, then P1=NXRD/N'GBTgrain A; otherwise, P1=0. TXRD is a set of beam position, in which diffraction is observed in XRD; T''GBTgrainA is a set of beam position, in which grain A is irradiated by beam; NXRD and N'GBTgrain A mean the numbers of elements in TXRD and T''GBTgrainA, respectively.
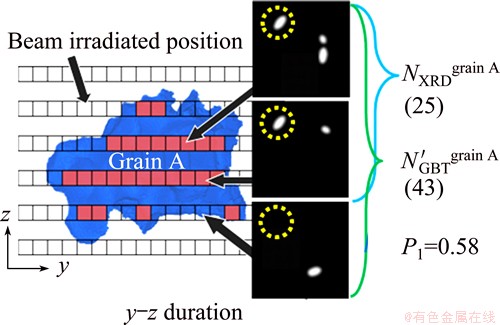
Fig. 7 Explanatory diagram of possibility parameter P1
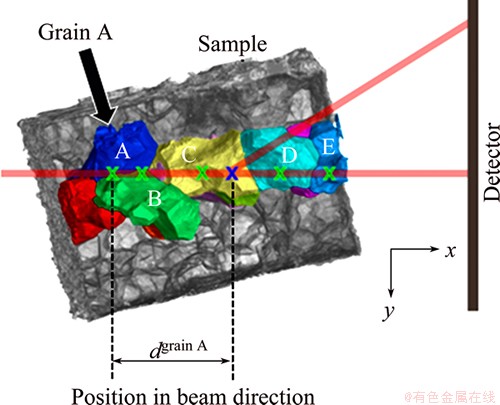
Fig. 8 Explanatory diagram of possibility parameter P2
The second parameter, P2, is based on the difference between the center position of the beam interacting with the grain and the estimated origin of the diffracted beam as shown in Fig. 8. The distance between the center position of the beam interacting with the grain A and the estimated origin of the diffracted beam is given as dgrain A. Indeed, P2 was given as the exponential function using a negative value of the distance having pre-exponential factor, k;
P2=exp(-kdgrain A) (1)
The XRD geometry is
 (2)
(2)
 (3)
(3)
where ydet and zdet are the positions of diffraction spots on detector; yl is the beam position; L is the distance between the sample and the detector; q and h are the diffraction angles as indicated in Fig. 1. q, h and xl can be calculated from geometry as follows;
 (4)
(4)
 (5)
(5)
 (6)
(6)
The sets of XRD spots and grains were determined based on these two possibility parameters. The evaluation function to accept matching of a XRD spot and a grain was as follows: P1≥Pth1 P2≥Pth2, where Pth1 and Pth2 are the threshold values for P1 and P2, respectively.
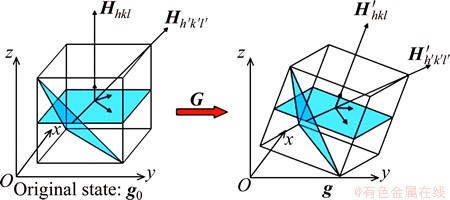
Fig. 9 Schematic illustration of calculation of orientation
After finding a set of XRD spots and grain, scattering vectors, G, at ω=0 can be calculated by using following equation:
 (7)
(7)
A mirror index of the diffracted plane is also detectable from 2q because lattice parameter of aluminum is known. Consequently, more than one scattering vector is assigned to one grain. Finding a rotation matrix that expresses crystallographic orientation needs a pair of scattering vectors as shown in Fig. 9. We calculated an orientation from a pair of scattering vectors as follows. One scattering vector was taken as xc-axis in the orthogonal coordinate system. The unit vector of xc-axis is given as ex=Hhkl=(xex, yex, zex). Next, we defined the second axis (yc-axis) as a vector that is normal to ex and another scattering vector. The unit vector of yc-axis is given as
 =(xey, yey, zey.) (8)
The final third axis (zc-axis) is a vector that is normal to ex and ey. The unit vector of zc-axis is  =(xez, yez, zez). The matrix that express coordinates is given as
g0 =  (9)
(9)
By similar way, we can find a matrix, g, in the rotating grain. Since the difference of two matrixes is orientation, we can obtain orientation matrix through following equation;
G=g g0-1 (10)
A set of two scattering vectors are chosen among scattering vector that is assigned to one grain. Therefore, all combination of scattering vectors, which satisfies the aluminum lattice parameter, has been examined with consideration of lattice symmetry. Most frequent orientation that was found in the orientation space was used as correct orientation finally.
3.2 Simulation
The effectiveness of proposed procedure was verified by XRD simulation that reproduces XRD images obtained in SR experiments. Creation of XRD images was carried out as follows. Conceptional illustration of XRD simulation is shown in Fig. 10. Firstly, grid points were made within a grain that exists in sample space. The square grid with 2 mm interval was used in this study. A crystallographic orientation of the grain was assigned into each the grid point. The grain orientation was selected in random, then the same orientation was given to grid point that consists of each grain. A beam position, yl, was given, and then grid points that were irradiated were detected. If the plane that is detected from orientation assigned on the grid point satisfies Bragg’s law during the minimum rotation step (1° in this study), diffraction occurs. The diffracted beam position can be calculated from Eqs. (2) and (3). Atomic scattering factor, unit cell structure factor and Lorentz factor were considered in intensity of diffraction beam [17]. Gaussian filter was applied as point spread function, when the intensity of diffraction beam was converted into XRD image. The validity of XRD image data reproduced by XRD simulation was confirmed by comparing the data with image obtained in XRD experiment in a single-crystal aluminum wire whose orientation is already known.
To confirm the function of the two possibility parameters proposed in this study, we performed orientation analysis making XRD image data in single-crystal by XRD simulation. A 100 mm cube was used simply as a single-crystal grain shape. Furthermore, we assigned orientation randomly into 23 grain obtained by GBT as shown in Fig. 4, and then made XRD image data and performed orientation analysis. Performance of the orientation analysis algorithm in this study was evaluated.
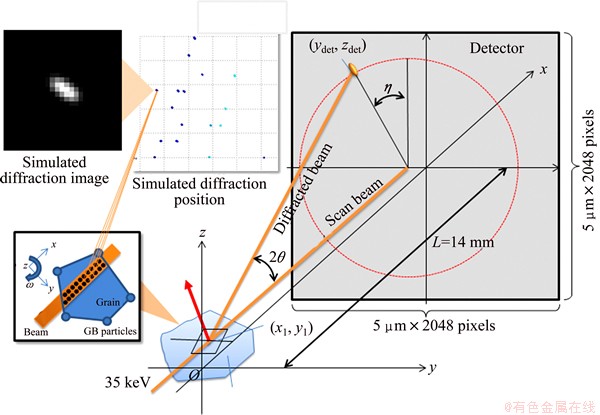
Fig. 10 Conceptional illustration of XRD simulation
4 Results and discussion
The distribution of the possibility parameters, P1 and P2, in simulated XRD data of the single-crystal grain is indicated in Fig. 11. The parameter P1 distributes mainly on approximately 0.8 as shown in Fig. 11(a). The reason that some deviation exists in P1 is that grain projection area changes slightly in w rotation angle. Since a beam-irradiated volume changes in the vicinity of grain edge by w rotation, XRD diffraction intensity varies. When the intensity of XRD spot is lower than the threshold value for binarization, some XRD spots might be missed. Although some deviations exist in P1, all observed XRD spots can be assigned to a grain if Pth1 over 0.6 is applied. Differences between the center position of the beam interacting with the single-crystal grain and the estimated origin of the diffracted beam are shown in Fig. 11(b). The difference indicates ±30 mm error. This error is relatively large because the single-crystal grain size is approximately 50 mm in radius. We must be able to estimate origin of XRD by geometry. However, actually, the resolution of detector affects the estimation accuracy. Therefore, we cannot find the position of XRD origin exactly, namely, which grain causes the XRD. The pixel size of detector for XRD used in this study is 5 mm. Since 2q of diffraction at 35 keV from aluminum {111} plane is 8.69°, a 5 mm deviation on detector corresponds to deviation of 5/tan8.69°=32.7 mm along x-axis in the measuring coordinate. Therefore, the result that was obtained by XRD simulation and indicated in Fig. 11(b) is valid. On the contrary, if the detector resolution increases, accurate position of XRD origin will be available. However, the use of a detector covering wide area is necessary to obtain XRD spots that distribute like a ring. High-resolution and wide-area detector is not available now. The parameter P2 became approximately 0.95 as shown in Fig. 11(c) when k=2.0 was used.
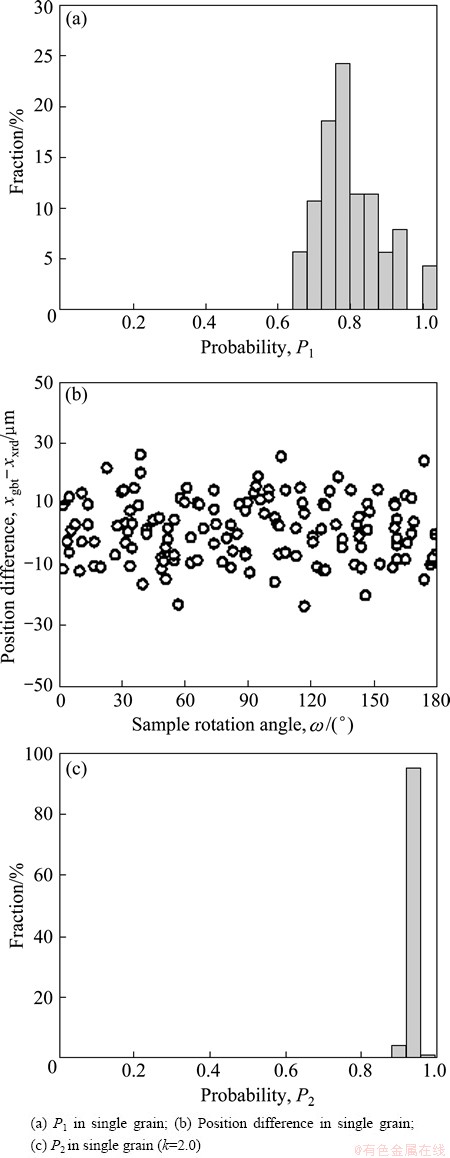
Fig. 11 Confirmation of parameters status in the case of single- grain data generated by XRD simulation built in this study
Table 1 Results of orientation analysis in 23 grains (Pth1=0.6 and Pth2=0.8)
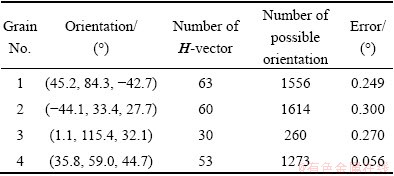
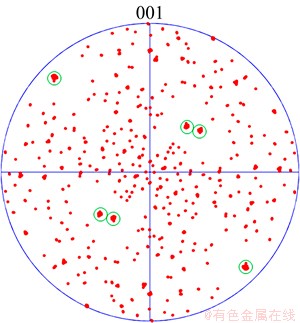
Fig. 12 Example of detected orientation (Grain 1) by proposed method in this study
The crystallographic orientation analysis results are listed in Table 1 in XRD simulated data of 23 grains. The results in 4 grains out of the 23 grains are indicated. The threshold value of possibility parameter were set as Pth1= 0.6 and Pth2=0.8. The proposed procedure assigned successfully 63, 60, 30 and 53 XRD spots to Grain 1, Grain 2, Grain 3 and Grain 4, respectively. In combination among these XRD spots, the sets of scattering vector that satisfied lattice parameter of aluminum were 1556, 1614, 260 and 1273, respectively. Orientations found in Grain 1 are plotted on {001} pole figure in Fig. 12. Accumulation of orientation is seen in circles. Clustering was performed by using a threshold value of 1° in misorientation. The cluster whose number of members is the maximum becomes correct answer. The average orientation calculated from the cluster is accepted as a final solution. The error misorientations between an orientation in XRD simulation and a final solution are listed in Table 1. The largest error is below 0.3°. This accuracy seems to be valid because the step of w rotation to acquire XRD spots was 1°. The accuracy of orientation in this study hasn’t reached that in EBSD by using electron-beam. If w rotation step be small, angle accuracy of orientation would be improved. The non-destructive orientation measurement in three- dimension has strong advantage in this method.
5 Conclusions
The orientation analysis method that utilizes accurate grain position information obtained by GBT was proposed in this study to supply crystallographic orientation to GBT analysis and enable crystal-plasticity deformation analysis up to the fracture in aluminum alloy. The procedure worked effectively in simulated data in single- and multi-crystal case. The orientations of individual grains could be detected from actual experiment data. The results indicated good accuracy, and the largest error was below 0.3°.
Acknowledgement
The synchrotron radiation experiments were performed with the approval of JASRI through proposal No. 2009A1554 and funded through by Grant-in-Aid for scientific research (A): 20246102.
References
[1] ZHANG H, TODA H, QU P C, SAKAGUCHI Y, KOBAYASHI M, UESUGI K, SUZUKI Y. Three-dimensional fatigue crack growth behavior in an aluminum alloy investigated with in situ high-resolution synchrotron X-ray microtomography [J]. Acta Materialia, 2009, 57: 3287-3300.
[2] TODA H, MASUDA S, BATRES R, KOBAYASHI M, AOYAMA S, ONODERA M, FURUSAWA R, UESUGI K, TAKEUCHI A, SUZUKI Y. Statistical assessment of fatigue crack initiation from sub-surface hydrogen micropores in high-quality die-cast aluminum [J]. Acta Materialia, 2011, 59: 4990-4998.
[3] TODA H, HIDAKA T, KOBAYASHI M, UESUGI K, TAKEUCHI A, HORIKAWA K. Growth behavior of hydrogen micropores in aluminum alloys during high-temperature exposure [J]. Acta Materialia, 2009, 57: 2277-2290.
[4] TODA H, YAMAMOTO S, KOBAYASHI M, UESUGI K. Direct measurement procedure for 3-D local crack driving force using synchrotron X-ray microtomography [J]. Acta Materialia, 2008, 56: 6027-6039.
[5] QIAN L, TODA H, UESUGI K, KOBAYASHI M, KOBAYASHI T. Direct observation and image-based simulation of three-dimensional tortuous crack evolution inside opaque materials [J]. Physical Review Letters, 2008, 100: 115505.
[6] WECK A, WILKINSON D S, MAIRE E, TODA H. Visualization by X-ray tomography of void growth and coalescence leading to fracture in model materials [J]. Acta Materialia, 2008, 56: 2919-2928.
[7] TODA H, MAIRE E, YAMAUCHI S, TSURUTA H, HIRAMATSU T, KOBAYASHI M. In situ observation of ductile fracture using X-ray tomography technique [J]. Acta Materialia, 2011, 59: 1995-2008.
[8] TODA H, NISHIMURA T, UESUGI K, SUZUKI Y, KOBAYASHI M. Influence of high-temperature solution treatments on mechanical properties of an Al-Si-Cu aluminum alloy [J]. Acta Materialia, 2010, 58: 2014-2025.
[9] TODA H, YAMAGUCHI T, NAKAWAZA M, AOKI Y, UESUGI K, SUZUKI Y, KOBAYASHI M. Four-dimensional annihilation behaviors of micro pores during surface cold working [J]. Materials Transactions, 2010, 51(7): 1288-1295.
[10] TODA H, MINAMI K, KOYAMA K, ICHITANI K, KOBAYASHI M, UESUGI K, SUZUKI Y. Healing behavior of preexisting hydrogen micropores in aluminum alloys during plastic deformation [J]. Acta Materialia, 2009, 57: 4391-4403.
[11] OHGAKI T, TODA H, SINCLAIR I, BUFFIERE J Y, LUDWIG W, KOBAYASHI T. Quantitative assessment of liquid Ga penetration into aluminium alloy by high-resolution X-ray tomography [J]. Materials Science and Engineering A, 2005, 406(1-2): 261-267.
[12] KOBAYASHI M, TODA H, UESUGI K, OHGAKI T, KOBAYASHI T, TAKAYAMA Y, AHN B G. Preferential penetration path of gallium into grain boundary in practical aluminium alloy [J]. Philosophical Magazine, 2006, 86(28): 4351-4366.
[13] KOBAYASHI M, TODA H, KAWAI Y, OHGAKI T, UESUGI K, WILKINSON D S, KOBAYASHI T, AOKI Y, NAKAZAWA M. High-density three-dimensional mapping of internal strain by tracking microstructural features [J]. Acta Materialia, 2008, 56: 2167-2181.
[14] TODA H, OHKAWA Y, KAMIKO T, NAGANUMA T, UESUGI K, TAKEUCHI A, SUZUKI Y, KOBAYASHI M. Grain boundary tracking technique: Four-dimensional visualisation technique for determining grain boundary geometry with local strain mapping [J]. Acta Materialia, 2013, 61: 5535-5548.
[15] POULSEN H F. Three-dimensional X-ray diffraction microscopy mapping polycrystals and their dynamics [M]. Berlin, Heidelberg, Germany: Springer, 2004.
[16] HAGSTROM J, MISHIN O V, HUTCHINSON B. Gallium enhanced microscopy for revealing grain boundaries and dislocation subboundaries in aluminium alloys [J]. Scripta Materialia, 2003, 49: 1035-1040.
[17] ALS-NIELSEN J, MACMORROW D. Elements of modern X-ray physics [M]. 2nd ed. West Sussex, UK: Wiley, 2011.
M. KOBAYASHI1, H. TODA2, D. J. LECLERE1, T. KAMIKO1, K. UESUGI3, A. TAKEUCHI3, Y. SUZUKI3
1. Department of Mechanical Engineering, Toyohashi University of Technology, 1-1, Hibarigaoka Tenpaku-cho, Toyohashi, Aichi 441-8580, Japan;
2. Department of Mechanical Engineering, Kyushu University, 744 Motooka, Nishi-ku, Fukuoka 819-0395, Japan;
3. Japan Synchrotron Radiation Research Institute, 1-1-1, Kouto, Sayo-cho, Sayo-gun, Hyogo 679-5198, Japan
摘 要:非均匀变形在材料工程领域是一个有趣的问题。同步辐射成像技术通过跟踪多晶体铝合金的显微组织的特性,提供了局部应变的3D分布图。为了更加深入地分析非均匀的过程,开发了三维X射线衍射分析技术。它利用跟踪晶界获得的信息(GBT),描述了三维空间中新的晶体取向测试技术。
关键词:同步加速器辐射;X射线断层扫描;X射线衍射;塑性变形;晶体学取向
(Edited by Hua YANG)
Corresponding author: M. KOBAYASHI; Tel: +81-532-44-6706; E-mail: m-kobayashi@me.tut.ac.jp
DOI: 10.1016/S1003-6326(14)63317-3

