
Effect of non-uniform stress characteristics on stress measurement in specimen
LIAO Kai(廖 凯)1, 2, WU Yun-xin(吴运新)1, GONG Hai(龚 海)1,
YAN Peng-fei(闫鹏飞)1, GUO Jun-kang(郭俊康)1
1. School of Mechanical and Electronic Engineering, Central South University, Changsha 410083, China;
2. Practice and Experiment Station, Guilin University of Electrical Technology, Guilin 541004, China
Received 18 June 2009; accepted 15 December 2009
Abstract: There is a remarkable difference in stress distribution between a specimen and a plate removed from the specimen. The plate presents a uniform stress distribution whereas the specimen presents a non-uniform stress distribution. Firstly, the real stress distributions in plates with thickness of 30, 40 and 50 mm and then in the specimens were obtained through simulation and X-ray surface stress measurement. Secondly, in order to study the impact of specimens shapes and processing ways on the results accuracy, two irregular shapes (parallelogram and trapezoid) and two processing ways (saw and electron discharge machining (EDM)) were compared and analyzed by simulation and experiment using layer removal method, then the specimen effects on measurement results were evaluated. The results show that: 1) the non-uniform stress distribution characteristics of the specimen near the surface of the cut is significant, the range of non-uniform stress distribution is approximately one-thickness distance away from the cut, and it decreases gradually along the depth; 2) In order to ensure the stability in the results, it is suitable to take the specimen plane size 2-3 times of its thickness; 3) Conventional processing methods have little effect on experimental results and the average deviation is less than 5%.
Key words: specimen; non-uniform characteristic; layer removal method (LRM); stress distribution; aluminum alloy plate
1 Introduction
The stress distribution of an aluminum alloy plate is usually evaluated by measuring a specimen which is removed from the plate. However, the stress distribution in the specimen is different from that before removal, so how to obtain a specimen with measurement results close to that of the original plate is a key part to improve the measurement accuracy. Residual stress measurements methods can be divided in two groups: non-destructive methods and destructive methods. For surface stress distribution we often use X-ray diffraction and ultrasonic methods which are non-destructive methods, and for internal stress distribution we use mechanical destructive methods such as hole drilling, layer removal and crack compliance methods[1-3]. The layer removal method (LRM) is cheap, simple and highly accurate.
MICHAEL et al[4-5] discussed the stress relaxation from specimen removal, and defined a “characteristic distance” in which stress is not largely changed away from the cut. The distance was assumed to be one thickness and the specimen plane size is approximately two to three times of its thickness. The present work mainly analyzed the stress change of FSW strip specimen, but didn’t discuss the specimen effect on stress change. VIRKAR[6], PRIME and MICHAEL[7], BENDEK et al[8] carried out the uncertainty study of LRM, determined measurement error, proposed an integrated method and applied it to determine the stress in plate in order to improve the accuracy of mechanical methods. This is very useful in the analysis of non-uniform stress characteristics of a specimen and provides a basic technique for validation of mechanical measurement and simulation analysis.
In this work, the simulation and measurement technologies are introduced to study the effects of non-uniform stress characteristics of specimen, including the cause that generates the non-uniform stress distribution, how to evaluate the consistency of stress results between the specimen and the plate and finally the influence of specimen machining methods on results.
2 Simulation
2.1 Cutting simulation of specimen
Simulation of quenching and cutting process using a non-linear finite element software Msc. Marc involves a semi-coupled thermo-mechanical analysis, in which phase transformation effect is negligible[9]. The simulation object and the experiment object have the same characteristics, i.e. 7075 aluminum alloy rolling plates. The size of the plate is 1 200 mm×220 mm×(30-50) mm. It is heat treated at 475 ℃ for 120 min, then naturally cooled to 15 ℃. The shape of the specimen surface is square. It is supposed that the material is isotropic and continuous, and due to quenching characteristic, the residual stress distribution is symmetrical along depth profile.
Internal stress from quenching is obtained by using the thermo-mechanical semi-coupled relationship calculation method[10-11]. Because of the symmetry, only 1/2 of the plate was modeled to improve the efficiency and the stability of the solution along the length direction. 8-noded hexahedron elements and 21000 elements were used to model the body. Boundary condition of non-linear convective heat transfer was set on outer surface beside the thermal and mechanical symmetry boundary conditions. Surface heat transfer coefficient is a key boundary condition in the simulation of heat field[12], and it is obtained by using the unsteady state heat conduction equation combined with an inverse discrete analysis[13-14].
A “birth-death element” in the simulation of the cutting process is used and then the specimen elements are saved. In order to ensure the compatibility of experiment and simulation, a mesh refinement is conducted. The boundary condition of thermal stress model in quenching plate and the stress contour are shown in Fig.1. The correctness of the simulation results can be validated by XRD of surface stress in plate, which is discussed later.
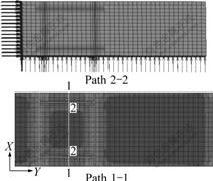
Fig.1 Boundary condition and stress contour of 1/2 quenching plate
2.2 Analysis of non-uniform characteristics
The cut makes the stress on the specimen edges change steeply and the original uniform stress distribution turns into a non-uniform stress distribution after cutting. The normal stress through the cut decreases rapidly and is more than the tangential stress, so the research focuses mainly on normal stress distribution in the cut. The evolvement in the stress in the surface and center of the plate along the depth direction is similar, but the stress release on the surface is higher than that on the center since the surface is in a relatively open and free load space. Although the stress near the cut is changed, the symmetry in stress distribution is not changed because of the regular shape of the specimen.
The position of the nodes in the modeling is shown in Fig.1. Path 1-1 presents the nodes location before cutting (thin solid line in Fig.2(a)) and path 2-2 presents the nodes location after cutting (thick solid line in Fig.2(a)). In Fig.2, the lower curves present compressive stress on the surface and the upper curves present the tensile stress in the middle layer. By analyzing the difference in stress distribution between the specimen and the plate, non-uniform characteristics show that:
1) The stress characters of specimen can be divided into two parts: one is regarded as the stress release part at the edge of the cutting; the second which is far away from the cut is less influenced by the cutting process, so the stress state in this part is almost the same with that before cutting.
2) The stress distribution through path 1-1 indicates that residual stress is higher than the yield strength and decreases at the edges of the plate due to quenching effects[15], it gradually turns uniform away from the edge. In region AA′, the internal stress distribution is basically uniform.
3) There is a stress release at the cut after cutting. The compressive stress peak value (-210 MPa to 110 MPa) diminishes to a value close to zero, causing a weakening region at the edge, so the internal stress present an upper and lower concavity. The release range of the surface stress is greater than that of the middle layer and this range is approximately one thickness (see thin solid curve in Fig.2(a)). Inversely, the uniform phenomenon in the middle layer is greater than that of the surface (see thick solid curve in Fig.2(a)). Different thick plates present a similar regularity, especially the release range in stress at the surface near the cut is approximately one thickness, as shown in Fig.2(b).
3 Experiment and analysis
To determine the surface stress, an X-ray diffractometry with an accuracy 10 MPa made by
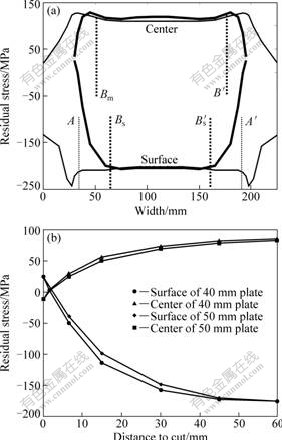
Fig.2 Surface-center stress distribution curve for plate and specimen depth profile: (a) 30 mm thick plate; (b) 40 mm and 50 mm thick plate
PROTO, a Canadian company, was used.
Internal residual stress was measured by using the traditional layer removal method, then the mathematical model integration method was applied to obtain the stress distribution curve[16-17]. Milling experiment process was done by the CNC machining V-60A from LEADWELL center. The processing parameters were[18]: v=1 000 r/min, feed=50 mm/min, depth=2 mm. The processing means of the specimen include EDM and sawing technique. The EDM parameters were: thread diameter=0.18 mm, feed=3 mm/min, frequency =85 Hz.
3.1 XRD surface stress measurement
The experimental materials was heat treated as mentioned above. The surface stress was measured by XRD for specimens with different thicknesses and plane sizes, and the results are shown in Fig.3.
For specimen with different thicknesses, stresses release along the direction normal to the cut presents general regularity and it increases with the thickness. These results are similar to the simulation results. We adopt the “one thickness” definition in order to sufficiently distinguish the change in the initial surface
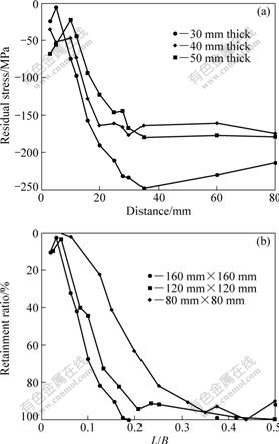
Fig.3 Surface stress curves of different thicknesses samples (a) and different plane size samples (b) (L is distance to cut and B is half of sample length or width)
stress distribution. The results of specimens with different sizes show that: the size of the plane does not affect the release, but when the dimensions are small enough, this causes instability in the surface stress, thereby affects the measurement results.
3.2 Strain-stress measurement
The layer removal method is a mechanical destructive method. Its fundamental basis is that the residual stresses existing in the material can be calculated from the measured deformations, displacements or strains. Since residual stress is an elastic force and there is a monotonic function relation between deformation and stress, strains analysis can reflect the stresses distribution in the plate.
3.2.1 Effects of specimen processing methods
Sawing and EDM are commonly used in machining process. Because aluminum is a soft metal, the sawing process sometimes induces an irregularity in the cut, which causes a high machining stress consequently. Inversely, the EDM is a contact free machining process automatically controlled by a computer, so the cut is regular and the machining stress is very small, and the specimen maintains a regular shape even after the cutting.
Three specimens with a size of 160 mm×160 mm were removed by saw cutting from a plate with a size of 1 200 mm×220 mm×30 mm. The specimens present an irregular shape which is trapezoidal or parallelogram. The results of strain are shown in Fig.4(a). One specimen with a size of 160 mm×160 mm was removed by EDM from another plate with a size of 1 200 mm×220 mm×30 mm, and the specimen presents a regular shape. The strain data comparison between the two sets of specimens are shown in Fig.4(b).
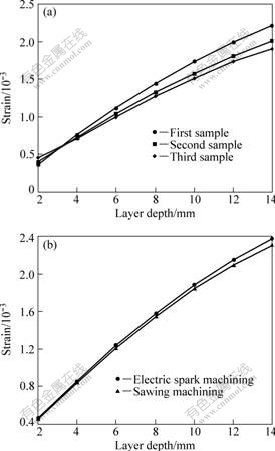
Fig.4 Strain curves of LRM experiment: (a) strain curves of three irregular specimens; (b) strain curves of regular specimens using EDM and sawing machining
Fig.4(a) shows that the irregularity in shape of specimens affects the symmetry in stress distribution and there is difference in stress distribution. For three tests, the minimum mean square is 37.6 and the maximum mean square is 128.7, and the average deviation value is less than 8%. The strains of specimens with regular shape after cutting are very close, and the minimum mean square is 2.5 when the maximum mean square is 34.5, the average deviation value is less than 2%. (Fig.4(b)). The results mentioned above indicate that general processing methods do not greatly affect the stability of the results, and the relative deviation of the results is not great for the irregular phenomenon. Although the accuracy of EDM is higher than that of the sawing, the efficiency of sawing is higher than that of EDM. The key point is to take the specimen size big enough to keep elastic energy.
3.3.2 Measurement experiment of internal stress
The experimental and simulated results of 160 mm×160 mm specimens with different thickness are shown in Fig.5 and the strain curves of specimens with different sizes are shown in Fig.6. It can be concluded that the experimental results are consistent with the simulation results, showing that the non-uniform stress characteristics at the cut do not affect the testing process nor the measurement results.
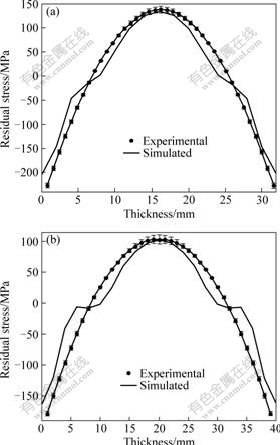
Fig.5 Inner stress curves for experiment and simulation: (a) Quenching stress curves of 30 mm thick plate; (b) Quenching stress curves of 40 mm thick plate
Strains are measured by Layer removal method in three specimens with dimensions of 160 mm×160 mm, 120 mm×120 mm and 73 mm×73 mm from 30 mm plate, and 160 mm×160 mm and 70 mm×70 mm from 40 mm plate and the results are shown in Fig.6. The strain curves are close to each other and fail to affect the measurement results obviously. This fact indicates that only if the volume of specimen is enough to retain initial stress, the results will present real stress. Considering experimental conditions and effect of sample size on stress release, choosing a big size for sample not only can ensure the stabilization of measurement, but also can obtain many groups of data. Error in measurements mainly comes from milling process stress on the plate and stress change due to strain fluctuation with temperature. Error bar is determined by law of uncertainty evaluation.
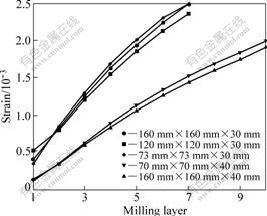
Fig.6 Strain curves for different size samples
4 Discussion
Non-uniform stress distribution in the specimen is symmetric and has a certain pattern, it shows that the stress release at a direction and it shows that the stress releases at a direction normal to the cut and gradually returns to its initial state along the normal direction.
As for the “characteristic distance” mentioned previously, the non-uniform characteristic range is about one thickness. This range is considered as the key point affecting stress measurements, and this range of “one thickness” is not absolute. During the experiment, it is found that even if the specimen plane size is less than twice of the thickness, the change of results is very small unless the surface stress is completely changed for extremely small samples.
There are several possible reasons to be discussed for that. 1) St. Venant’s principle indicates that the change in stress near the cut is great, but the change in distance is not completely definite and the “one thickness” should be a maximal range guaranteed to ensure the measurement stability. 2) The effect of the release of the cutting stress on the surface is greater than that on the middle layer. This is the same with the conclusions drawn from previous analysis, and also shows that even if the specimen is not big enough, there is no significant effect on the test. 3) In order to ensure the accuracy of the experimental results, the size of specimen plane is usually taken to be 2 to 3 times larger than its thickness.
The stress distribution characteristic of the specimen can be divided into two parts: the non-uniform stress zone and the uniform stress zone. Through simulation and experimental measurements, it can be concluded that if the specimen maintains the initial stress of the original plate, the experimental mechanical deformation exactly reflects the stress distribution of plate.
5 Conclusions
1) The stress reduction near the cut of specimen indicates that it is possible that the non-uniform characteristics of specimen affect the measurement results, so the non-uniform range estimated to be one thickness is proposed for comparison between experiment and simulation. The choice of specimen should take into account of the relationship between the depth of plate and the decrease of edge stress. Generally, when the specimen plane size is bigger, the stability of measurements results is higher.
2) The effect of specimen processing on results can be ignored. Although the shapes of specimen could affect the results, the size of specimen is large enough to reduce this effect. From experiences and according to St. Venant’s principle, specimen with plane size two to three times bigger than its thickness is adequate for experiment.
3) The stress state in the specimen can not be equivalent to the initial stress state in the plate, so the error between experimental results and real stress state is inevitable. Study of the non-uniform stress characteristic of “one thickness” in specimen only ensures the stability and repetitiveness of measurements.
References
[1] SEBASTIAN N, BARNA A S. On the estimation of residual stresses by the crack compliance method [J]. Comput Methods Appl Mech Engrg, 2007,196: 3577-3584.
[2] GARY S S, MICHAEL B P. Use of inverse solutions for residual stress measurement [J]. Journal of Engineering Materials and Technology, 2006, 128(3): 375-382.
[3] PRATIHAR S, STELMUKH V, HUTCHINGS M T, FITZPATRICK M E, STUHR U, EDWARDS L. Measurement of the residual stress field in MIG-welded Al-2024 and Al-7150 aluminium alloy compact tension specimens [J]. Materials Science and Engineering A, 2006, 437: 46-53.
[4] MICHAEL B P, THOMAS GN?UPEL-HEROLD, JOHN A B, RICHARD J L, DAVID M B, ROBERT J S. Residual stress measurements in a thick, dissimilar aluminium alloy friction stir weld [J]. Acta Materialia, 2006, 54: 4013-4021.
[5] MICHAEL B P, MICHAEL R H. Residual stress, stress relief, and inhomogeneity in aluminum plate [J]. Scripta Materialia, 2002, 46(1): 77-82.
[6] VIRKAR A V. Determination of residual stress profile using a strain gage technique [J]. Journal of the American Ceramic Society, 1990, 73(7): 2100-2102.
[7] PRIME M B, MICHAEL R H. Uncertainty analysis, model error, and order selection for series-expanded, residual-stress inverse solutions [J]. Journal of Engineering Materials and Technology, 2006, 11: 175-185.
[8] BENDEKA E, LIRAA I, FRANC-OISB M, VIAL C. Uncertainty of residual stresses measurement by layer removal [J]. International Journal of Mechanical Sciences, 2006, 48: 1429-1438.
[9] JAROSLAV M. Finite element analysis and simulation of quenching and other heat treatment processes [J]. Computational Materials Science , 2003, 27: 313-332.
[10] HU Shao-qiu, ZHANG Hui, YANG Li-bin, LIN Gao-yong, ZHANG Ying. Numerical analysis of temperature and thermal stresses fields in quenching 7075 aluminum alloy thick plate [J]. Natural Science Journal of Xiangtan University, 2004, 6: 66-71. (in Chinese)
[11] GU Jian-feng, PAN Jian-sheng, HU Ming-jua. Inverse heat conduction analysis of synthetical surface heat transfer coefficient during quenching process [J]. Journal of Shanghai Jiaotong University, 1998, 32(2): 19-22. (in Chinese)
[12] LI L, ZHOU J, DUSZCZYK J. Prediction of temperature evolution during the extrusion of 7075 aluminium alloy at various ram speeds by means of 3D FEM simulation [J]. Materials Processing Technology, 2004, 145: 360-370.
[13] LIAO Kai, WU Yun-xin, ZHANG Yuan-yuan. A discrete and analytical method of heat transfer coefficient during quenching of aluminum alloy plate [J]. Transactions of Materials and Heat Treatment, 2009, 30(1): 192-196. (in Chinese)
[14] JIA Fei, JIN Jun-ze. Heat transfer coefficient during cooling water of continuous casting of aluminum alloy [J]. The Chinese Journal of Nonferrous Metals, 2001, 11(1): 39-43. (in Chinese)
[15] HU Shao-qiu, ZENG Su-min. The theoretical model of the thermal stress evolution mechanism during quenching of no phase change alloy―(1) the corner and edge model for thermal stress during quenching and the corner effect during quenching [J]. Rare Metal Materials and Engineering, 2006, 35(4): 538-541. (in Chinese)
[16] LIAO Kai, WU Yun-xin, GONG Hai, ZHANG Shu-yuan. Application research of integral method to residual stress through-depth in aluminum alloy thick plate [J]. The Chinese Journal of Nonferrous Metals, 2009, 19(6): 1006-1011. (in Chinese)
[17] VIRKAR A V. Determination of residual stress profile using a strain gage technique [J]. Journal of the American Ceramic Society, 1990, 73(7): 2100-2102.
[18] FUH K H, WU C F. A residual-stress model for the milling of aluminum alloy (2014-T6) [J]. Journal of Materials Processing Technology, 1995, 51: 87-105.
(Edited by FANG Jing-hua)
Foundation item: Project(2005CB623708) supported by the National Basic Research Program of China
Corresponding author: WU Yun-xin; Tel: +86-731-88830813; E-mail: wuyunxin@mail.csu.edu.cn
DOI: 10.1016/S1003-6326(09)60215-6