
J. Cent. South Univ. (2018) 25: 2712-2721
DOI: https://doi.org/10.1007/s11771-018-3948-8

Hydraulic bulging process with axial feedings and strain field of U-shaped metal bellows
HAO Zeng-liang(������)1, XI Chen-yang(ۭ����)1, HUANG Zhi-heng(��־��)1,ZHANG Chun-xiang(�Ŵ���)1, LUO Jun-ting(�濡͢)1, 2
1. Education Ministry Key Laboratory of Advanced Forging & Stamping Technology and Science, Yanshan University, Qinhuangdao 066004, China;
2. State Key Laboratory of Metastable Materials Science and Technology, Yanshan University,Qinhuangdao 066004, China
 Central South University Press and Springer-Verlag GmbH Germany, part of Springer Nature 2018
Abstract: Based on the traditional hydraulic bulging process, an improved hydraulic bulging process with axial feeding in the bulging process was proposed. The finite element simulation and experiment of bellows formed by the traditional and improved hydraulic bulging processes were conducted. The grid strain measurement system analysis results of strain and wall thickness distribution of the metal bellows, obtained from simulation and experiment, show that the maximum thinning rates of the wall thickness under the traditional and improved processes were 15% and 10%, respectively. And the wall thickness distribution of the metal bellows formed with improved process was more uniform. The strain values from the root to crown of the waveform increased gradually. However, the strain values were smaller than those of traditional process due to the axial feeding of the improved process in bulging process.
Key words: hydraulic bulging process; finite element simulation; thinning rate of wall thickness; grid strain measurement system
Cite this article as: HAO Zeng-liang, XI Chen-yang, HUANG Zhi-heng, ZHANG Chun-xiang, LUO Jun-ting. Hydraulic bulging process with axial feedings and strain field of U-shaped metal bellow [J]. Journal of Central South University, 2018, 25(11): 2712�C2721. DOI: https://doi.org/10.1007/s11771-018-3948-8.
1 Introduction
U-shaped stainless steel bellows is widely used in engineering because of its good flexibility and simple structure [1, 2]. Hydroforming process is one of the main forming methods for metal bellows with high efficiency and good mechanical properties [3, 4]. However, the deformation degree at the crown of the work piece is larger, and there is the maximum strain and wall thickness reduction. Especially, the wall thickness has a decisive effect on the performance and service life of the metal bellows [5�C10]. Therefore, it is important to reduce the strain and wall thickness reduction of the work-piece.
SONG et al [11] conducted simulation and experimental verification of the large-diameter double-layer U-shaped bellows hydraulic bulging process. It was found that the thinning at the crest was the most, and the thinning at the trough was smaller which was close to the actual thinning. LIU [12] established the FE models for single and bi-layered U-shaped stainless steel bellows hydroforming based on ABAQUS platform. Furthermore, dynamic explicit algorithm was adopted for the bulging stage, and the reliability of FE model was verified by comparing with the experiment results. LEE [13] established a statistical model, which includes three factors: the stroke, the wall thickness and the internal pressure. The factor of die stroke among the three factors is the most influencing one on determining the final convolution shape of the metal bellows. FURUSHIMA [14] developed a new semi-dieless metal bellows forming process involving local heating and the induction of axial compressive deformation, which controlled the bellows shape without using dies. BAKHSHI-JOOYBARI et al [15] proposed a comprehensive forming window for bellows by using the simulation and experimental results were presented. And the wrinkling and bursting defects for bulge and closing stages, and the safe zone for producing the desired part were determined. MIRZAALI et al [16] investigated and optimized the forming parameters of tube hydroforming process using finite element simulated algorithm. And the maximum formability of axisymmetric tubes under a failure criteria based on material��s forming limit diagram was obtained. FARAJI et al [17] and SHINDE et al [18] studied the influence of the parameters such as mold stroke and pressure on the outer diameter variation and wall thickness distribution of U-shaped bellows through the finite element analysis and experiment.
Since the wall thickness reduction of the metal bellows in bulging process has a decisive influence on the performance of the work-piece, the performance of the metal bellows can be improved by optimizing in the bulging alone. But the relevant research has never been reported. To reduce the strain value and wall thickness reduction of the work-piece, an improved hydraulic bulging process with axial feeding in the bulging process was proposed. The finite element simulation (FEM) and experiment of metal bellows formed by the traditional and process were conducted. The strain field and wall thickness distribution of the metal bellows were obtained by grid strain measurement, and the feasibility of the improved process was verified.
2 Process and FEM
2.1 Process
An improved hydraulic bulging process with axial feedings was proposed based on the traditional hydraulic bulging process. The schematic diagram of stainless steel bellows is shown in Figure 1. The improved hydraulic bulging process with axial feeding is shown in Figure 2.
The tube was fixed on the forming device, then the annular dies and the sealing rings corresponded to each other inside and outside of the tube. The initial location is shown in Figure 1(a)). In bulging process, the internal oil pressure was provided between the two seal rings. At the same time, the tube and annular dies were fed a step of S1 along the axial direction, and then the small convolution was obtained, as shown in Figure 2(b)). In folding process, the internal oil pressure was maintained at a constant value, the tube and annular dies were fed a step of S2 along the axial direction to complete the final shape of the metal bellows, as shown in Figure 2(c)). Repeat the procedure from Figure 2(a)) to Figure 2(c)) to achieve the single waveform continuous forming.
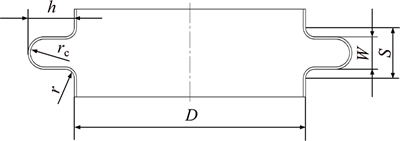
Figure 1 Schematic diagram of stainless steel bellows
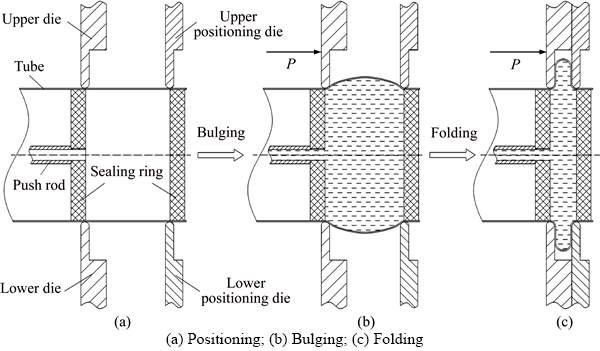
Figure 2 Schematic diagram of metal bellows under improved process:
2.2 FEM
The hydraulic bulging process of the stainless steel bellows under the traditional and improved process was simulated using Marc finite element software. Owing to the axisymmetric structure and force situation of stainless steel bellows, a 1/2 symmetry model was established to reduce the calculation time. Relevant parameters of the bellows are listed in Table 1. Relevant parameters of the hydraulic bulging process are listed in Table 2. Geometric model of hydraulic bulging of stainless steel bellows is shown in Figure 3.
Table 1 Corresponding parameters of bellows
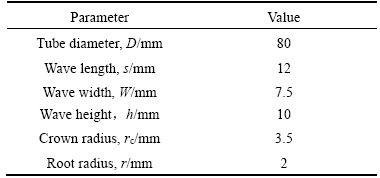
Table 2 Corresponding parameters of hydraulic bulging process
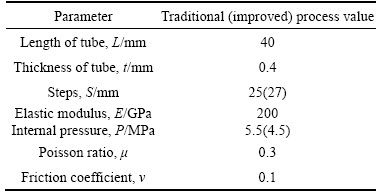
The tubular blank was meshed using 8 node solid elements, which resulted in 3856 elements. The Mises yield condition was adopted during the simulation. During the bulging stage, outside of the tube was bound by the outer dies. Meanwhile a pressure of 5.5(4.5) MPa was applied inside the tube, and the axial feed was 2 mm in the improved process, not in the traditional process. During the folding stage, outer dies of the traditional and improved processes were moved rightwards 18 mm. Then the final waveform was achieved after unloading.
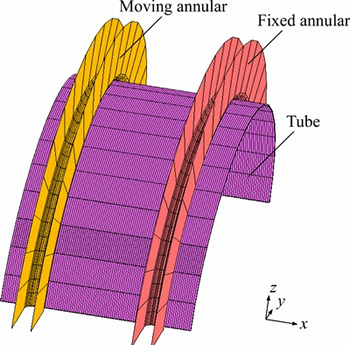
Figure 3 Geometric model of hydraulic bulging of stainless steel bellows
3 Material and experimental method
3.1 Material
The material of the thin-walled tube was 316L stainless. The length, diameter and thickness of the tube were 280 mm, 80 mm and 0.4 mm, respectively. The tensile specimen was machined by wire cutting along the axial direction of the tube. A tensile test was performed with a tensile rate of 4 mm/min at room temperature on an Inspekt100KN electronic universal material testing machine. The mechanical properties of the 316L stainless steel are shown in Figure 4.
3.2 Experimental method
The results of finite element simulation provided references for the experiment. The experimental equipment was SYHCX-150 digital single-wave automatic bellows forming machine. The shape of the stainless steel bellows is provided in Figure 5. As shown in Figure 5, the experimental process of stainless steel bellows was in accordance with the simulation process. The distance between the annular dies under traditional (improved) process in experiment was 25 mm (27 mm) and the internal oil pressure was 5.5 MPa (4.5 MPa). At the same time, the axial feeding in bulging stage of improved process was 2 mm. While the axial feedings of traditional and improved processes were 18 mm in folding stage.
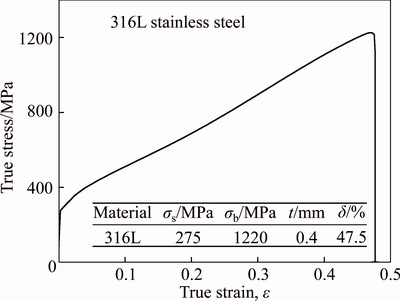
Figure 4 Mechanical properties of 316L stainless steel
Grid strain analysis method was an important analysis technology in the field of sheet metal forming, which could provide direct and reliable data for the analysis of technological process, the verification of finite element simulation, and the mould modification. Before the experiment, the square grids were printed on the surface of the 316L stainless steel by using the electric corrosion marking machines. The changes of grids before and after bulge forming were analyzed by the Comsmart AutoGrid grid strain measurement system. And then the distribution of the strain and wall thickness of the work-piece can be obtained.
4 Results of FEM
4.1 Strain
The equivalent strain nephogram of the stainless steel bellows formed by the traditional and improved processes is shown in Figure 6. In the bulging stage, the maximum equivalent strain values under traditional and improved processes are 0.163 and 0.076, respectively. In the folding stage, the maximum equivalent strain values at the root of the bellows formed by the traditional and improved processes are 0.183 and 0.109, respectively, which at the crown are 0.262 and 0.229, respectively. The equivalent strain distribution of the metal bellows formed by the two processes is consistent, and the equivalent strain values increase gradually from the root-point (element 0) to the crown-point (element 12), but the strain values of the improved process are smaller than those of the traditional process.
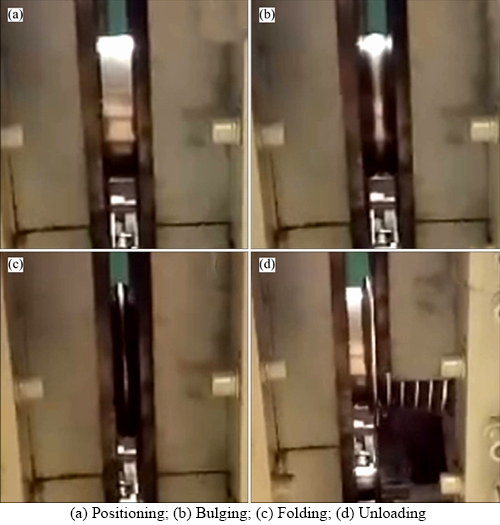
Figure 5 Experimental process of stainless steel bellows:
Figure 6 shows the triaxial strain distribution of stainless steel bellows under the traditional and improved processes. As shown in Figure 7, the distribution trend of the triaxial strain is consistent, and the strain values increase gradually from the root-point (element 0) to the crown-point (element 12). But the strain values of the improved process are smaller than those of the traditional process. Among them, the circumference initial and axial strain values are positive, while the thickness strain value is negative.
4.2 Wall thickness
The wall thickness distribution of the stainless steel bellows is shown in Figure 8. The wall thickness of stainless steel bellows decreased gradually from the root to the crown under the two processes. Comparing the results of the traditional process with the improved one, the maximum wall thickness at the root-point (element 0) of the work- piece is 0.380 mm and 0.396 mm, respectively in the bulging stage, which is 0.370 mm and 0.390 mm, respectively, in the folding stage. While the minimum wall thickness at the crown-point (element 12) of the work piece is 0.365 mm and 0.380 mm, respectively, in the bulging stage, which is 0.340 mm and 0.360 mm, respectively, in the folding stage. It can be seen that the wall thickness of the improved process is larger than that of the traditional one. The wall thickness difference is 0.020 mm and mainly occurs in the bulging stage due to the axial feeding of the improved process.
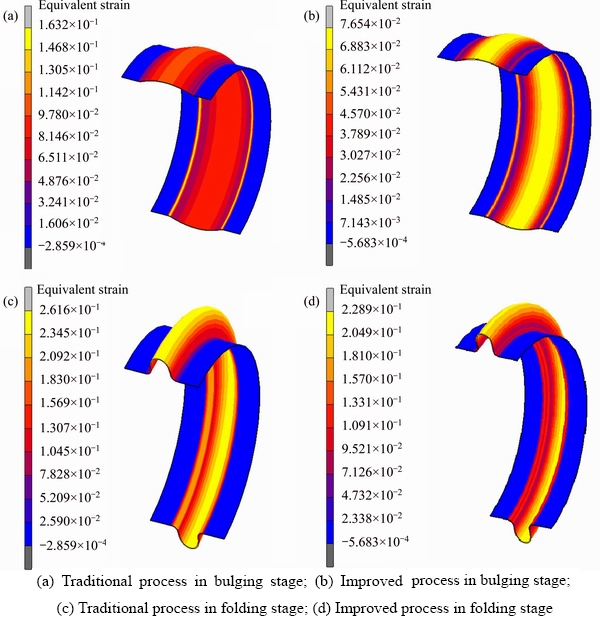
Figure 6 Equivalent strain nephogram of forming process:
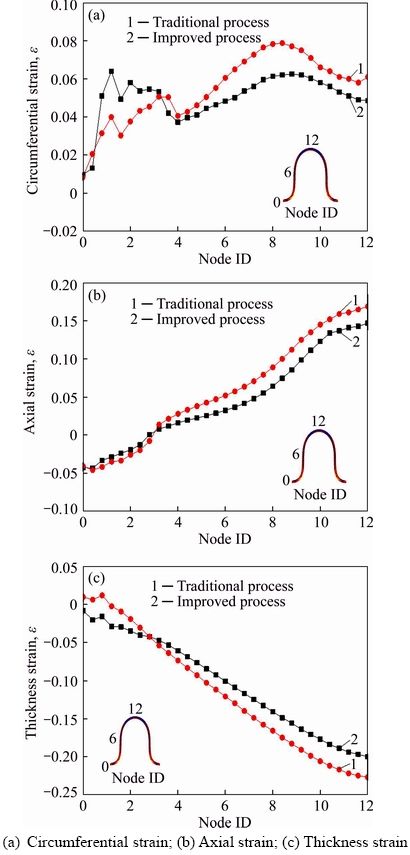
Figure 7 Triaxial strain distribution of bellows under traditional and improved processes:
5 Results of experiment
5.1 Products
Figure 9 indicates the forming bellows under the traditional and the improved processes. As shown in Figure 9, the forming performance of stainless steel bellows under the traditional and improved processes is superior. The grids fan out from the root to the crown. However, the difference of the work piece between the traditional and improved processes was hard to be found. The changes of grids before and after forming can be analyzed with Comsmart AutoGrid grid strain measurement system.
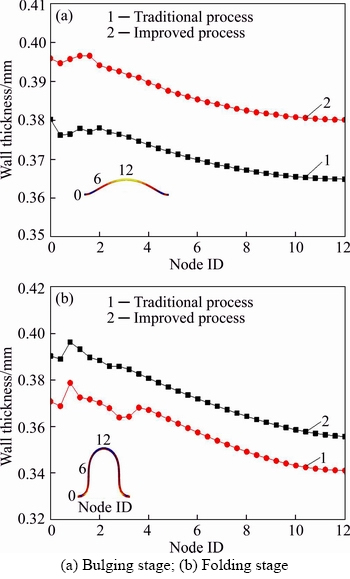
Figure 8 Wall thickness distribution of stainless steel bellows:
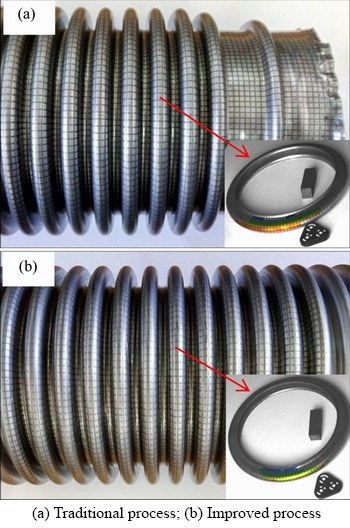
Figure 9 Stainless steel bellows of two forming processes:
5.2 Equivalent strain
Only local grids from the root to the crown are collected by the grid strain measurement system. As the forming performance of the stainless steel bellows is good, the analysis results of the local girds can represent the accuracy and universality of the experimental results. The equivalent strain diagrams of the work piece formed by the traditional and improved processes are shown in Figure 10.
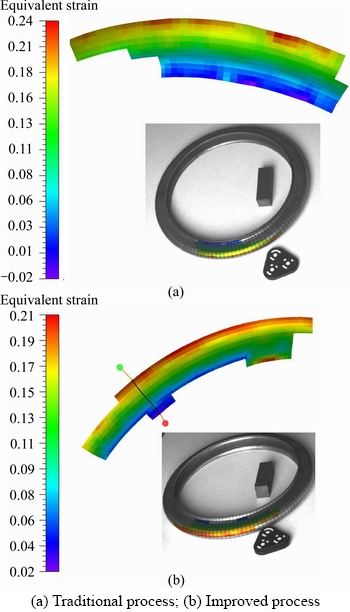
Figure 10 Experiment results of equivalent strain of bellows formed by traditional and improved processes:
Comparing Figure 10 and Figure 6, we can see that the simulation and experimental results of equivalent strain at the crown of the work piece formed by traditional process are 0.262 and 0.240 respectively, which are 0.026 and �C0.020 respectively at the root. The simulation and experimental results of equivalent strain at the crown of the work piece formed by improved process are 0.229 and 0.210 respectively, which are 0.023 and 0.020 respectively at the root. Although there is a certain deviation between the simulation results and experimental results, the distribution of equivalent strain is basically consistent, and the equivalent strain increases gradually from the root to the crown. While the equivalent strain value of the work piece under the improved process is smaller than that of the traditional process.
5.3 Triaxial strain
Figure 11 presents the experimental results of the triaxial strain for work piece formed by different forming processes. It can be seen that the distribution of triaxial strain for work piece formed by the traditional and the improved process is consistent, and the triaxial strain value is the smallest at the root and the largest at the crown. The values of strain increase gradually from the root to the crown. The values of triaxial strain for work piece formed by the improved process are smaller than those of the traditional one, and the distribution is more uniform, which is in consistent with the results of FEM.
5.4 Thinning rate of wall thickness
The thinning rate of wall thickness for the work piece is an important index to test the forming performance. When the thinning ratio of the wall thickness is minor, the forming performance is excellent. The severe thinning rate of the wall thickness will lead to the decrease of service life. Therefore, it is necessary to strictly control the thinning rate of the wall thickness for the work piece.
The experimental results of the thinning rate of the wall thickness for work piece formed by different forming processes are shown in Figure 12. The maximum thinning rate of the work piece formed by traditional and improved processes are 15% and 10% respectively. And the maximum thinning rate occurs at the straight wall and the crown area of the work piece formed by traditional process, while it only occurs at the crown area in the improved process. The thinning rate of the wall thickness is reduced in the improved process, and the distribution of wall thickness is more uniform,which is in accordance with the results of simulation.
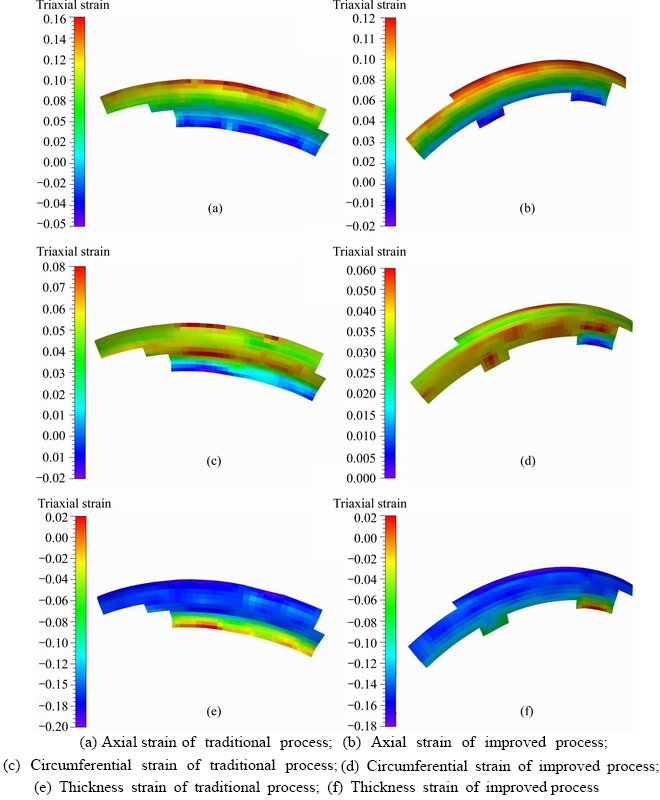
Figure 11 Experiment results of triaxial strain of bellows formed by traditional and improved processes:
Finite element simulation and experimental results show that the wall thickness and strain distribution of the metal bellows formed by the improved process are less than the counterparts after traditional forming process. As a result of the 2 mm axial feed of the tube bland at bulging stage in the improved process, added the bulging needs of the blank, the axial tensile stress of the metal bellows are significantly reduced. Meanwhile, the internal pressure of the bulging stage is reduced from 5.5 MPa to 4.5 MPa. The triaxial strain values of the tube are lower compared with the traditional one. Thus, the performance of the metal bellows is excellent than that of the traditional process.
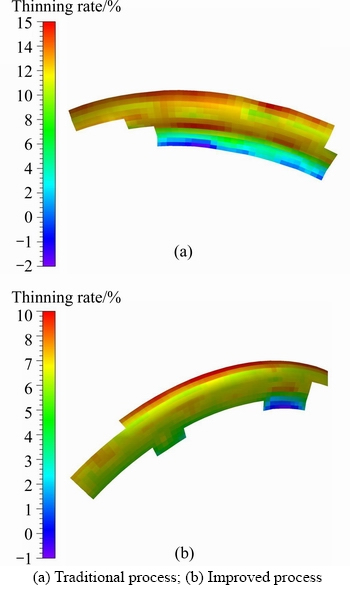
Figure 12 Experiment results of thinning rate of bellows formed by traditional and improved processes:
6 Conclusions
1) The improved hydraulic bulging process with axial feeding was proposed, which reduced the strain value and the thinning rate of the work-piece, and the strain and wall thickness distribution of the metal bellows is more uniform.
2) The maximum wall thicknesses at the root of the work-piece formed by the traditional and improved processes are 0.370 mm and 0.390 mm respectively in the folding stage, whereas the minimum wall thicknesses at the crown are 0.340 mm and 0.360 mm respectively. And the maximum thinning ratios are 15% and 10% respectively.
References
[1] DAYYANI I, SHAW A D, FLORES E I S, FRISWELL M I. The mechanics of composite corrugated structures: A review with applications in morphing aircraft [J]. Composite Structures, 2015, 133(1): 358�C380. DOI: 10.1016/ j.compstruct.2015.07. 099.
[2] HACHEMI H, KEBIR H, ROELANDT J M, WINTREBERT E. A study of the braided corrugated hoses: Behavior and life estimation [J]. Materials & Design, 2011, 32(4): 1957�C1966. DOI: 10.1016/j.matdes.2010.11.075.
[3] ZHANG W W, CONG S. Failure analysis of SUS304 sheet during hydro-bulging based on GTN ductile damage model [J]. International Journal of Advanced Manufacturing Technology, 2016, 86(1�C4): 427�C435. DOI 10.1007/s00170- 015-8199-3.
[4] KANG B H, LEE M Y, SHON S M, MOON Y H. Forming various shapes of tubular bellows using a single-step hydroforming process [J]. Journal of Materials Processing Technology, 2007, 194(1�C3): 1�C6. DOI: 10.1016/j.jmatprotec.2007. 02.029.
[5] GUAN K, ZHANG X, GU X, CAI L, XU H, WANG Z. Failure of 304 stainless bellows expansion joint [J]. Engineering Failure Analysis, 2005, 12(3): 387�C399. DOI: 10.1016/j.engfailanal.2004. 05.007.
[6] XUE Y H, CHEN K, FAN C J, LUO J T. Deep drawing of cup shell by powder cavity flexible forming technology [J]. Journal of Central South University, 2017, 24(4): 766�C772. DOI: 10.1007/s11771-017-3478-9.
[7] ZHANG X, MA Y, ZOU H, TAO S, ZHANG Q, ZHANG E. Experimental study: Correcting the calculation formula for a welded metal bellows' effective diameter [J]. Sealing Technology, 2016, 2016(10): 7�C12. DOI: 10.1016/S1350- 4789(16)30326-9.
[8] LIU C, LU K, SHENG L, SONG Y, SU J, SU M. Manufacture and test of seismic bellows for ITER magnet feeder [J]. Fusion Engineering & Design, 2016, 109�C111: 515�C520. DOI: 10.1016/j.fusengdes.2016.02.065.
[9] BI J, ZHAO C C, BI M M, DU B, CHEN XH, DONG G J. Heat treatment and granule medium internal high-pressure forming of AA6061 tube [J]. Journal of Central South University, 2017, 24(5): 1040�C1049. DOI: 10.1007/s11771- 017-3507-8.
[10] DONG G J, ZHAO C C, ZHAO J P. Research on technological parameters [J]. Journal of Central South University, 2016, 23(4): 765�C777. DOI: 10.1007/s11771-016-3122-0.
[11] SONG L H, HUANG N N, LIN G D, ZHANG W L, MIN L I, GUAN C J. Application of CAE in numerical simulation of bellows forming [J]. Pipeline Technique & Equipment, 2010(4): 35�C37. (in Chinese)
[12] LIU J, HUANG W, LI X, LI L. Comparative study on deformation behavior of single and bi-layered U-shaped stainless steel bellows in hydroforming [J]. Forging & Stamping Technology, 2016, 41(5): 24�C28. (in Chinese)
[13] LEE S W. Study on the forming parameters of the metal bellows [J]. Journal of Materials Processing Technology, 2002, 130�C131(11): 47�C53. DOI: 10.1016/S0924- 0136(02)00787-2.
[14] FURUSHIMA T, HUNG N Q, MANABE K I, SASAKI O. Development of semi-dieless metal bellows forming process [J]. Journal of Materials Processing Technology, 2013, 213(8): 1406�C1411. DOI: 10.1016/j.jmatprotec.2013.03.002.
[15] BAKHSHI-JOOYBARI M, ELYASI M, GORJI A. Numerical and experimental investigation of the effect of the pressure path on forming metallic bellows [J]. Proceedings of the Institution of Mechanical Engineers Part B Journal of Engineering Manufacture, 2010, 224(1): 95�C101. DOI: 10.1243/09544054JEM1586.
[16] MIRZAALI M, LIAGHAT G H, NAEINI H M, SEYEDKASHI S M H, SHOJAEE K. Optimization of tube hydroforming process using simulated annealing algorithm [J]. Procedia Engineering, 2011, 10(1): 3012�C3019. DOI: 10.1016/j.proeng.2011.04.499.
[17] FARAJI G, MASHHADI M M, NOROUZIFARD V. Evaluation of effective parameters in metal bellows forming process [J]. Journal of Materials Processing Technology, 2009, 209(7): 3431�C3437. DOI: 10.1016/j.jmatprotec. 2008.07.057.
[18] SHINDE R A, DR B T P, JOSHI K N. Optimization of tube hydroforming process (without Axial Feed) by using FEA simulations [J]. Procedia Technology, 2016, 23: 398�C405. DOI: 10.1016/j.protcy.2016.03.043.
(Edited by YANG Hua)
���ĵ���
U�Ͳ��ƽ��������ƽ�ʽҺѹ���ι��ռ�Ӧ�䳡����
ժҪ�����ڴ�ͳҺѹ���ι��գ���������νζ���������������ƽ�ʽҺѹ�����¹��ա��Բ��ƽ��������ƽ�ʽҺѹ�����¹��պʹ�ͳҺѹ���ι��ս�������Ԫģ���ʵ���о�����ͨ������Ӧ��������������ƽ������ܵ�Ӧ��ͱں�����ʡ�ģ���ʵ������������ͳҺѹ���ι��պ��ƽ�ʽҺѹ�����¹��յ����ں�����ʷֱ���15%��10%�����ƽ�ʽҺѹ���ι��յıں�ֲ������ȣ����ֹ����µ�Ӧ����Ӳ����������������������������ƽ�ʽҺѹ�����¹������������νε������������С�˲��ƽ������ܳ��θ�����Ӧ��ֵ��
�ؼ��ʣ�Һѹ���Σ�����Ԫģ�⣻�ں�����ʣ�����Ӧ�����
Foundation item: Project(51775479) supported by the National Natural Science Foundation of China; Project(E2017203046) supported by the Natural Science Foundation of Hebei Province, China
Received date: 2017-05-17; Accepted date: 2018-03-23
Corresponding author: LUO Jun-ting, PhD, Professor; Tel/Fax: +86-335-8052253; E-mail: luojunting@ysu.edu.cn; ORCID: 0000- 0002-2694-534x