
Non-steady FE analysis on porthole dies extrusion of
aluminum harmonica-shaped tube
CHENG Lei(程 磊), XIE Shui-sheng(谢水生), HUANG Guo-jie(黄国杰),
WU Peng-yue(吴朋越), HE You-feng(和优锋)
State Key Laboratory for Fabrication and Process of Nonferrous Metals,
General Research Institute for Nonferrous Metals, Beijing 100088, China
Received 15 July 2007; accepted 10 September 2007
Abstract: According to the rigid-viscoplasticity finite element method, the porthole die extrusion process of an aluminum harmonica-shaped tube was successfully simulated based on software Deform-3D. The distribution of stress field, effective strain field, velocity field and temperature field during the extrusion process were discussed and the metal flow in welding extrusion was analyzed. The simulation results show that the material flow velocities in the bearing exit are non-uniform with the originally designed die and the forepart of the profile is not neat or even. Aiming at solving this problem, the modification method of die structure was improved. The result shows that the uniform material flow velocities in the die exit and a perfect extruded are obtained by modification bearing length.
Key words: porthole die; hot extrusion; FE analysis; aluminum profile; harmonica-shaped tube
1 Introduction
The product with hollow section of great complexity can be extruded using special dies based on welding chamber with porthole die. The billet is divided into seams around the core supports which holds the mandrel, and then welds together in the welding chamber before passing through the bearing zone. Porthole die extrusion has significant advantage in the forming process, which can produce the hollow section product that is difficult to be produced by conventional extrusion with a mandrel on the stem. This process is suitable only for aluminum and some of its alloys because of their capacity for pressure welding.
In general, the harmonica-shaped tube used to be the main part of heat exchanger of automobiles, and it has several fine holes to be able to flow refrigerant in the section. The materials of harmonica-shaped tube are mainly Al or Cu alloys that have good heat transfer efficiency because of the characteristics of a cooling system. Harmonica-shaped tube is structurally designed in thin thickness and multi-cell shape to improve the heat efficiency[1]. Because of this shape, harmonica-shaped tube extrusion has complicated conditions in manufacturing. Especially, a condenser tube manufactured by porthole die is a sophisticated part, and requires a tight dimension tolerance and a good surface finish than any other parts. Thus, it is very important to know the detail mechanics, velocity, temperature, stress and strain fields of moving materials. Such information is very useful for properly designing dies and improving the quality of products. However, porthole die extrusion has mainly been executed on the experience of experts due to the complicated die assembly and complexity of metal flow. Some of this experience is rationalized in empirical design rules, but most of the die designs are still dependent on the personal judgment, intuition, and experience. Therefore, FE analysis is a good alternative to evaluate the three-dimensional deformation behavior of metals in porthole die extrusion. Several researches have studied the porthole die extrusion process through experiments and FE simulation[2-8]. But their research objects were restricted to the very simple profile shapes such as round tube and square tube. To simulate the processes of thin-wall or complex profile extrusion processes still has not been significant progress.
For the above mentioned reasons, the objective of this study is to analyze the non-steady state porthole die extrusion by using FE analysis based on Software DEFORM-3D. The behavior of metal flow and welding pressure in the welding chamber is investigated. The velocity field, strain field and temperature field of the deformation body is also investigated by the simulation.
2 FE analysis of extrusion process
2.1 FE model of porthole die extrusion process
In this study, as shown in Fig.1, the shape of harmonica-shaped tube was assumed to be five holes and all of uniform thickness walls of 1.0 mm. Also, the section was built in symmetrically.

Fig.1 Cross-sectional dimension of harmonica-shaped tube (mm)
The 3D modeling of porthole die used in the simulation is shown in Fig.2. The assembly consists of container, porthole, mandrel, and welding chamber. The work-piece and tools can be modeled with 3D modeling software and imported to DEFORM-3D in STL formats. For saving computer RAM source and computation time, the FE simulation is carried out with 1/4 section of the billet and porthole die because of the symmetrical structure.

Fig.2 3D model of porthole die
2.2 Parameters of FE analysis
In the present model, the isotropic rigid-plastic material model was used. Flow stress is a function of effective strain, effective strain rate and temperature as:
 (1)
(1)
where  ,
, and
and  are the effective stress, effective strain and effective strain rate, respectively, and
  is the temperature. The program has an interpolation mechanism that allows it to choose the values of stress and strain rate from the data base.
Al 1050 was chose as material for condenser tube used in simulation. The relationship between flow stress and strain for Al1050 at temperatures of 300, 350, 400, 450 and 500 ℃ are shown in Fig.3(a) and (b) when the effective strain rate is 0.2 and 100 s-1, respectively.

Fig.3 Relationship between flow stress and strain for Al1050 alloy at different temperatures
The friction between work-piece and tooling is assumed to be of constant shear type. The frictional force in the constant shear model is defined by
 (2)
(2)
where fs is the frictional stress, k is the shear yield stress and m is the friction coefficient. This states that the friction is a function of the yield stress of the deforming body. To be close to the actual operating conditions of aluminum extrusion, the friction coefficient is supposed to be 0.7, representing a non-lubricating state suitable for porthole die extrusion from the consideration of welding quality. The process parameters used in FE simulation are given in Table 1.
Table 1 Process parameters used in FE simulation

3 Results and discussion
3.1 Metal flow in porthole die extrusion
Metal flow in the porthole die extrusion is very complex because of the complicated die structure. The procedures of porthole die extrusion are divided into three stages according to the material flow. Fig.4 (a) shows the dividing stage, in which the billet is divided into several strands at the bridges of the die. Fig.4 (b) shows the welding stage, in which the divided materials flow into the welding chamber through the portholes, and are welded to each other to generate the welding plane. Fig.4 (c) shows the forming stage, in which the metal flows to form a required hollow section, and then flows out through the die bearing.
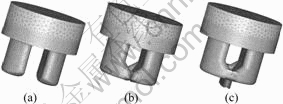
Fig.4 Extrusion stages of porthole die: (a) Dividing; (b) Welding; (c) Forming
3.2 Distribution of velocity and die bearing optimization
With the defined process parameters and the originally designed die structure, the FE simulation of porthole die extrusion was executed. The extrudate’s shape is illustrated in Fig.5. Fig.6 shows the velocity distribution curves in the profile cross-section of the bearing exit. It can be seen that the change of flow velocity is increased linearly from the edge region of harmonica-shaped tube to centre. The material flow velocity at the centre position is obviously faster than that at the edge region, and distinctively obvious in the initial stage of extrusion process. The flow velocity of the centre position is 327.7 mm/s and the flow velocity of the edge position is 315.7 mm/s. The largest flow velocity and minimum flow velocity difference 12 mm/s.

Fig.5 Profile shape in original die
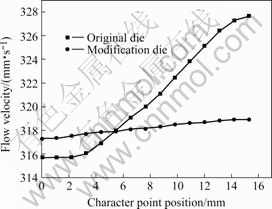
Fig.6 Velocity distribution curve in bearing exit
This uneven material flow causes the forepart uneven of profile and will easily lead to extrudate’s profile warping, welding shortcomings and local die wearing problems which will greatly influence the quality of the profile. Therefore, the original die design is not perfect and some measures should be taken to optimize the die design and eliminate uneven flow velocity. The factors influencing the material exit velocity include the shape, size and location of the portholes, the shape and size of the seaming chamber, the length of the bearing land, etc. And adjusting the length of die bearing during the porthole die extrusion is the most effective method to control material flow velocity. Die bearing plays a hindering role to metal flow. The reducing length of bearing can reduce the friction resistance, force the metal to flow to the position with little resistance, thus the metal flow become more and more even in the profile of whole cross-section of the bearing exit[9]. Therefore, optimization design is made on the length of bearing exit. Fig.7 shows the different length of die bearing after optimization.
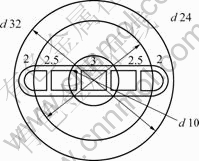
Fig.7 Different length of die bearing after optimization(mm)
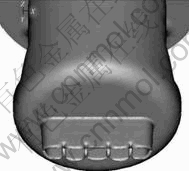
Fig.8 Profile shape in modification die
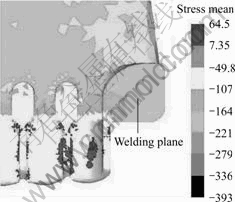
Fig.9 Distribution of welding pressure at forming stage
With the same defined process parameters and the optimized designed die structure, the extrudate’s shape is illustrated in Fig.8. It can be seen that the forepart of harmonica-shaped tube is very even. The comparison of flow velocity curves of bearing exit between the original and the modified die design is shown in Fig.6. It can be seen that the flow velocity curve of modified die design is more flat. The flow velocity of the centre position is 318.9 mm/s and the flow velocity of the edge position is 317.3 mm/s. The largest flow velocity and the minimum flow velocity difference 1.6 mm/s. Therefore, it can realize a uniform material flow at the exit of the dies.
3.3 Welding pressure
In the porthole die extrusion, it is very important to calculate the welding pressure that affects the welding strength, which classifies the quality of aluminum profiles. In general, if the mean pressure of material in welding plane is over the yield stress in FE analysis, it can be estimated that welding pressure is good[10-11]. Fig.9 shows the distribution of mean pressure in the welding plane found by FE analysis. The max welding pressure in the welding plane is 164-221 MPa. The yield stress is about 40 MPa when the material temperature is 500 ℃. Thus, the max welding pressure is approxi- mately 4.1-5.5 times higher than the yield stress.
3.4 Distribution of temperature and effective strain
Fig.10 shows the distribution of temperature at the forming stage. Fig.11 shows the distribution of the effective strain at the forming stage. From the result, we can see that the distribution of temperature is very similar to the effective strain. In the die bearing exit, the temperature and effective strain reach the maximum at the same time. As the ram proceeds, the heat generated by plastic deformation and friction at the interface between the materials and the die causes gradual increase of the material temperature. At the same time, it can be seen that the temperature increment is slow before the forming stage. But it is fast at the forming stage. So the temperature increment due to friction is smaller than due to deformation.
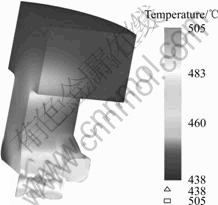
Fig.10 Distribution of temperature at forming stage
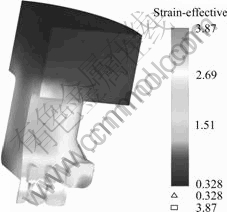
Fig.11 Distribution of effective strain at forming stage
4 Conclusions
1) The behavior of metal flow is analyzed, and the welding pressures are calculated from the normal pressure through 3D FE analysis. The results will be used for the establishment of database for the diverse conditions to design proper dies.
2) Uniform material flow velocity in the cross section of the bearing exit in porthole die extrusion process is extremely important for improving quality of aluminum profiles. The FE analysis results show that the uniform material flow velocity in the bearing exit is obtained by modification of bearing length. It can be seen that adjusting the length of die bearing during the porthole die extrusion is the most effective method to control the material flow velocity.
3) The metal temperature in porthole die extrusion increases remarkably due to friction and plastic energy of the deformation. The temperature increment due to deformation is bigger than that due to friction.
References
[1] LEE J M, KIM B M, KANG C G. Effects of chamber shapes of porthole die on elastic deformation and extrusion process in condenser tube extrusion[J]. Materials and Design, 2005, 26(4): 327-336.
[2] ZHOU Fei, PENG Ying-hong, RUAN Xue-yu. Numerical simulation of aluminum material extrusion process by finite element method[J]. The Chinese Journal of Nonferrous Metals, 1998, 8(4): 637-642. (in Chinese)
[3] YU Hu-ping, PENG Ying-hong, RUAN Xue-yu. Simulation of the extrusion process using porthole dies[J]. Forging & Stamping Technology, 1999, 24(5): 9-11. (in Chinese)
[4] LIU Han-wu, DING Hua, CUI Jian-zhong. FEM simulations and analysis of profile extrusion process in porthole die[J]. Die Industry, 1999(4): 9-11. (in Chinese)
[5] SHUAI Ci-jun, XIAO Gong, NI Zheng-shu. Application of computer aided engineering optimum design method in aluminum profile extrusion mould[J]. International Journal of Machine Tools and Manufacture, 2003, 10(1): 64-68.
[6] MOOI H G, KOENIS P T G, HUETINK J. An effective split of flow and die deformation calculations of aluminum extrusion[J]. J Mater Process Technol, 1999, 8: 67-76.
[7] LIU Jian-sheng. Finite element simulation technology and application of metal plastic machining[M]. Beijing: Metallurgical Industry Press, 2003. (in Chinese)
[8] YAN Hong, BAO Zhong-xu, LIU He-sheng, LUO Zhong-min. Numerical simulation of angle aluminum profile extrusion processes[J]. The Chinese Journal of Nonferrous Metals, 2001, 11(2): 202-205. (in Chinese)
[9] LIU Jing-an. The design, manufacturing, usage and maintenance of aluminum sections extrusion die[M]. Beijing: Metallurgical Industry Press, 1999. (in Chinese)
[10] JO H H, LEE S K, JUNG C S, KIM B M. A non-steady state FE analysis of Al tubes hot extrusion by a porthole die[J]. Journal of Materials Processing Technology, 2006, 173(4): 223-231.
[11] JO H H, LEE S K, LEE S B, KIM B M. Prediction of welding pressure in the non-steady state porthole die extrusion of A17003 tubes[J]. International Journal of Machine Tools and Manufacture, 2002, 42(6): 753-759.
Foundation item: Project(50674017) supported by the National Natural Science Foundation of China
Corresponding author: CHENG Lei; Tel: +86-10-82241162; E-mail: mechl@126.com
(Edited by YUAN Sai-qian)