Trans. Nonferrous Met. Soc. China 28(2018) 896-901
Tensile behaviors of fatigued AZ31 magnesium alloy
Yang SHU, Xi-yan ZHANG, Jiang-ping YU, Li TAN, Rui-sen YIN, Qing LIU
School of Materials Science and Engineering, Chongqing University, Chongqing 400030, China
Received 3 November 2016; accepted 6 March 2017
Abstract: The relationship between microstructure and tensile behaviors of fatigued AZ31 magnesium alloy was investigated. Axial fatigue tests were performed on PLG-100 fatigue machine at stresses of 50 and 90 MPa. Tensile samples were cut from the fatigued samples, named as L-sample and H-sample respectively, and the O-sample was cut from original rolled AZ31 alloy. The EBSD and TEM were used to characterize the microstructure. It is found that the twinning-detwinning was the main deformation mechanism in high stress fatigue test, while dislocation slipping was dominant in low stress fatigue test. After fatigue tests, the average grain size of the L-sample and H-sample decreased to 4.71 and 5.33 μm, and the tensile and yield strength of the L-sample and H-sample increased slightly. By analyzing SEM images, the ultimate fracture region of the L-sample consisted of dimples, while there were many microvoids in the ultimate fracture region of the H-sample. Consequently, the tensile behaviors of fatigued magnesium have a close relationship with microstructure.
Key words: AZ31 magnesium alloy; fatigue; tensile mechanical properties; fracture morphology; microstructure
1 Introduction
Magnesium and its alloys are widely used as project structural materials due to their high specific strength and excellent machinability [1,2]. For project structural materials, fatigue failure is the main failure mechanism, while it will lead to great economic loss and social harm since there is no obvious macroscopic plastic deformation before fatigue failure. As is well known, magnesium alloys have a hexagonal close-packed (HCP) crystal structure and the main deformation mechanisms are basal <a> slip and  extension twinning [3,4]. When the stretch is parallel to the c-axis (or compression is perpendicular to the c-axis), the
  extension twinning can be activated [5]. If the stretch is perpendicular to the c-axis (or compression is parallel to the c-axis), the formed
  extension twins will disappear, called as detwinning process [6]. Twinning and detwinning take place alternately during fatigue process. Many studies have reported the fatigue behavior of magnesium. YU et al [7] have investigated the microstructure evolution during high cycle fatigue in magnesium alloy, and they used continuous dynamic recrystallization (CDRX) theory to explain the microstructure evolution in fatigue and prove a new way to improve the manufacture performance of magnesium alloy. YOSHIKO et al [8] used electron back-scattered diffraction (EBSD) to analyze the fatigue crack initiation behavior of magnesium, and they have made it clear that the stress concentration at the secondary twin will lead to the fatigue crack initiation. The studies on symmetric [9-12] and asymmetric [11-14] stress-strain loops of magnesium alloys have also been reported. All the above studies focused on fatigue properties of magnesium alloy, while some articles described the tensile mechanical properties of fatigued magnesium alloy, only few studies on tensile fracture morphologies of fatigued magnesium alloy have so far been published. In this work, we aimed at investigating the tensile behaviors of fatigued AZ31 magnesium alloy and explaining the relationship between microstructure and tensile behaviors, and revealed the different fracture mechanisms of high stress and low stress fatigued AZ31 magnesium alloy.
2 Experimental
Commercial rolled AZ31 magnesium plate was used in the current research, and the chemical composition is listed in Table 1. Two fatigued samples with a gauge length of 80 mm were cut along rolling direction (RD), whose sizes are shown in Fig. 1(a). Axial fatigue tests were carried out on PLG-100 fatigue machine at a stress ratio of R=-1 and frequency f=100 Hz, the fatigue load was 50 MPa (low stress fatigue) and 90 MPa (high stress fatigue). After fatigue tests, tensile samples were cut from the fatigued sample along RD, named L-sample (cut from fatigued sample under stress amplitude of 50 MPa) and H-sample (cut from fatigued sample under stress amplitude of 90 MPa), respectively. The tensile sample was also cut from the original rolled AZ31 magnesium plate along RD, named as O-sample. A total of six tensile experiments were performed and two tests were performed at each fatigued or original sample. Figure 1(b) shows the sizes of three tensile samples. Tensile tests were performed with a strain rate of 1×10⁻³ s-1 by using SHIMADZU AG-X10KN machine. The EBSD test plane was parallel to RD-ND plane, and the EBSD samples were prepared by standard metallographic polishing, followed with electro- polishing. Channel 5 software was used to process the EBSD data and calculate the grain size. TEM samples were prepared by electropolishing using a Struers Tenupol-5 machine, and TEM bright-field images were taken together with corresponding thickness for the purpose of analyzing the microstructure of the L-sample and H-sample. The tensile fracture morphology was observed by TESCAN VEGA 3 LMH SEM.
Table 1 Chemical composition of AZ31 alloy (mass fraction, %)

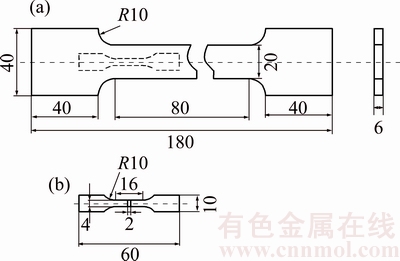
Fig. 1 Shape and dimension of fatigued (a) and tensile (b) sample (unit: mm)
3 Results and discussion
3.1 Fatigue properties and microstructure
Fatigue properties of the L-sample and H-sample are listed in Table 2. After 3.6×10⁴ fatigue cycle deformation, the H-sample was broken into two parts. Figure 2(a) shows the microstructure of the O-sample, and the average grain size of the O-sample was 5.84 μm. The microstructures of L-sample and H-sample are shown in Figs. 2(b) and (c), and their average grain sizes are 4.71 and 5.33 μm, respectively. Figures 3(a) and (b) show the TEM images of L-sample and H-sample, respectively. Obviously, there are many dislocations inside the L-sample, while the microstructure of H-sample consists of dislocations and twins.
Table 2 Fatigue properties of sample

During the fatigue progress, as for the L-sample, it is difficult to activate the  extension twinning because of the low cyclic stress. Thus, the main deformation mechanism is dislocation slipping, and a mass of dislocations were produced in the L-sample in the process of fatigue. With the help of dislocation motion and pile-up, low angle boundaries were formed in the early stage of fatigue process, and then the grain boundaries were generated with dislocation piling up at low angle boundaries, the grain size finally became smaller to 4.71 μm [7]. For the H-sample, at a higher cyclic stress of 90 MPa, the
  extension twinning can be activated in the first compressive loading along RD, and the following reversal tensile stress can activate detwinning process. When the tensile stress reaches 90 MPa in the first cycle, detwinning completes and few residual extension twins remain in the H-sample. The twinning-detwinning was carried on until the H-sample was broken into parts under the last tensile stress. The twinning-detwinning process will also produce secondary twins. The dislocation slipping and twinning-detwinning obstruct each other in the high stress fatigue process, so the grain size of the H-sample decreases slightly to 5.33 μm. Meanwhile, plenty of dislocations, the residual
  extension twins and secondary twins still remain in the H-sample after fatigue process.
3.2 Tensile mechanical properties
The engineering stress-strain curves of tensile samples are shown in Fig. 4. The yield strengths of the O-sample, L-sample and H-sample are 238, 254 and 253 MPa. And the tensile strengths of the O-sample, L-sample and H-sample are 269, 293 and 278 MPa. Apparently, the yield/tensile strength of the O-sample is lower than that of other two samples. Since the fatigue deformation is one kind of cold deformation, it is found that the dislocations density in grains will increase with the fatigue process going on. As a result, the mechanical properties will increase a lot. But the experiment result shows that the yield/tensile strength only increases slightly.
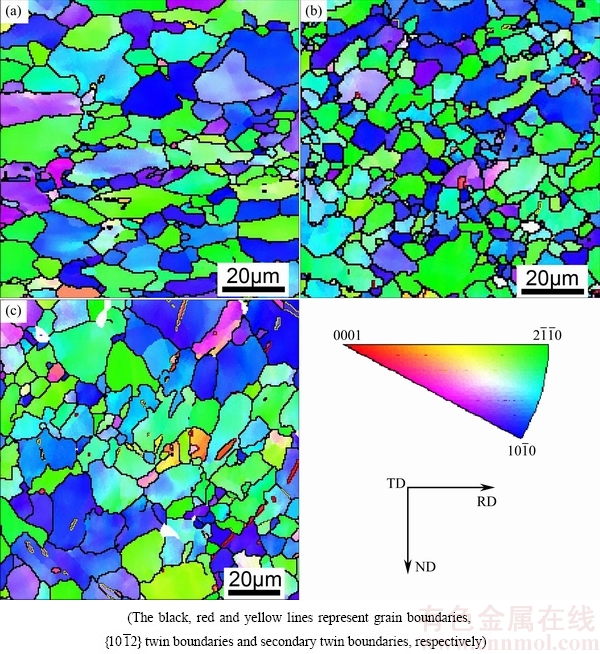
Fig. 2 EBSD maps of O-sample (a), L-sample (b) and H-sample (c)
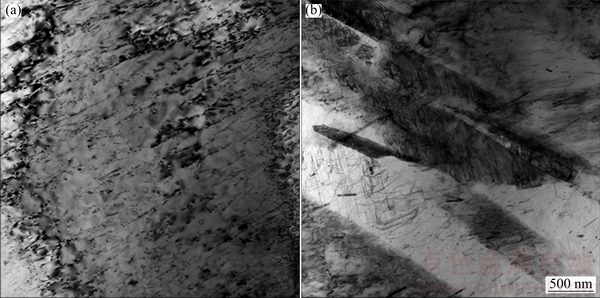
Fig. 3 TEM bright images of L-sample (a) and H-sample (b)
In the earlier fatigue stage, the fatigue process can produce numerous dislocations at grain boundaries and refine grains. The yield/tensile strengths of the L-sample and H-sample are enhanced because of the grain refinement strengthening and work-hardening strengthening. As the fatigue process continues, the tensile strength of fatigue sample can reach the maximum. After the peak yield/tensile strength, work-softening occurred and microcracks appeared with the fatigue process going on. The work-hardening and softening both occurred in the whole fatigue process and through fatigue process, and the yield/tensile strengths of the L-sample and H-sample are slightly higher than that of the O-sample. The results of tensile tests are consistent with reports in Ref. [15]. The elongations of the O-sample, L-sample and H-sample are 18.3%, 19.0% and 17.8%, respectively. Because the dislocation slip has a better capability of plastic deformation than twinning, combined the microstructure of three tensile samples, the elongation of L-sample is the highest and the H-sample has the lowest elongation.
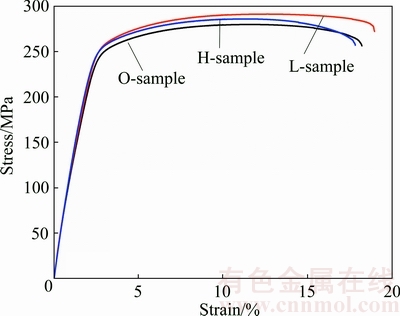
Fig. 4 Engineering stress-strain curves of O-sample, L-sample and H-sample
3.3 Tensile fracture morphologies
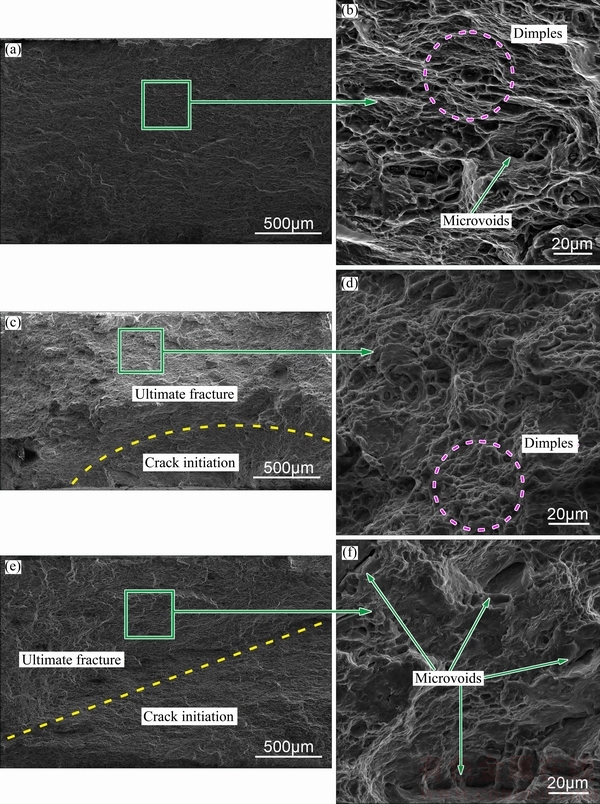
Fig. 5 Low and high magnification fracture morphologies of O-sample (a, b), L-sample (c, d) and H-sample (e, f)
Figure 5(a) shows the tensile fracture surface of the O-sample at low magnification. The fracture of the O-sample was typical ductile fracture pattern and its deformation and fracture process was the formation, growth and coalescence of microdefects. The fracture morphology of the O-sample at high magnification is shown in Fig. 5(b). Obviously, the fractographs consist of equal-axis dimples and a small amount of microvoids.
Figures 5(c) and (e) show the tensile fracture surfaces of the L-sample and H-sample at low magnification, respectively. The tensile fracture surface of the two samples can be divided into two parts that are cracks initiated region and ultimate fracture region. After fatigue process, there are many dislocations and other microdefects inside the L-sample. The morphology of initiated region is relatively smooth because of the slow crack expand rate and microdefects, which does not exist in the O-sample. The ultimate fracture regions of the L-sample and H-sample at high magnification are shown in Figs. 5(d) and (f), respectively. The ultimate fracture region of the L-sample consists of dimples, while ultimate fracture region of the H-sample has many microvoids. The  extension twins and secondary twins have a poor compatible deformation capability and induce the crack nucleation. The plentiful microvoids of the H-sample can be ascribed to the numerous
  extension twins or secondary twins. As for the L-sample, although the tensile stress is high enough to activate twinning, the dislocations and fine grains can prevent the formation of the
  extension twins, and let alone secondary twins. So, the ultimate fracture region of the L-sample consists of dimples without microvoids. When the tensile stress is high enough, a few appropriate orientation grains can activate twinning to accommodate deformation. As a result, we can observe a few microvoids on the tensile fracture morphology of the O-sample. According to the discussion above, twins can induce crack nucleation and lead to a large number of microvoids.
4 Conclusions
1) The average grain sizes of the L-sample and H-sample decrease from 5.84 μm (the average grain size of the O-sample) to 4.71 and 5.33 μm, respectively.
2) The work-hardening and softening both occur in the whole fatigue process and through fatigue process, the tensile strengths of the L-sample and H-sample are slightly higher than that of O-sample. And the elongation of the L-sample is higher than that of the other two samples.
3) The ultimate fracture region of the L-sample consists of dimples, while ultimate fracture region of the H-sample has many microvoids. And twins can induce crack nucleation and lead to a large number of microvoids.
References
[1] LIU Qin. Research on plastic deformation mechanism of Mg alloys [J]. Acta Metallurgica Sinica, 2010, 46: 1458-1472.
[2] CHEN Hong-bing, LIU Tian-mo, LU Li-wei. Influence of pre-strain and heat treatment on subsequent deformation behavior of extruded AZ31 Mg alloy [J]. Transactions of Nonferrous Metals Society of China, 2015, 25: 3604-3610.
[3] AGNEW S R, DUYGULU  . Plastic anisotropy and the role of non-basal slip in magnesium alloy AZ31B [J]. International Journal of Plasticity, 2005, 21: 61-93.
[4] KOIKE J, OHYAMA R. Geometrical criterion for the activation of prismatic slip in AZ61 Mg alloy sheets deformed at room temperature [J]. Acta Materialia, 2005, 53: 63-72.
[5] WANG Y N, HUANG J C. The role of twinning and untwinning in yielding behavior in hot-extruded Mg-Al-Zn alloy [J]. Acta Materialia, 2007, 55: 897-905.
[6] QIAO H, AGNEW S R, WU P D. Modeling twinning and detwinning behavior of Mg alloy ZK60A during monotonic and cyclic loading [J]. International Journal of Plasticity, 2015, 65: 61-84.
[7] YU Da-liang, ZHANG Ding-fei, LUO Yuan-xin. Microstructure evolution during high cycle fatigue in Mg-6Zn-1Mn alloy [J]. Materials Science and Engineering A, 2016, 658: 99-108.
[8] YOSHIKO U, TOSHIFUMI K, KAZUHIRO T, YOSHIFUMI K. EBSD analysis of fatigue crack initiation behavior in coarse-grained AZ31 magnesium alloy [J]. International Journal of Fatigue, 2016, 84: 1-8.
[9] MATSUZUKI M, HORIBE S. Analysis of fatigue damage process in magnesium alloy AZ31 [J]. Materials Science and Engineering A, 2009, 504: 169-174.
[10] KWON S, SONG K, SHIN S I. Low cycle fatigue properties and cyclic deformation behavior of as-extruded AZ31 magnesium alloy [J]. Transactions of Nonferrous Metals Society of China, 2010, 20: 533-539.
[11] PARK S H, HONG S G, LEE B H. Low-cycle fatigue characteristics of rolled Mg-3Al-1Zn alloy [J]. International Journal of Fatigue, 2010, 32: 1835-1842.
[12] YU Qin, ZHANG Ji-xi, JIANG Yan-yao, LI Qi-zhen. Effect of strain ratio on cyclic deformation and fatigue of extruded AZ61A magnesium alloy [J]. International Journal of Fatigue, 2012, 44: 225-233.
[13] LIN Y C, CHEN Xiao-min, LIU Zheng-hua. Investigation of uniaxial low-cycle fatigue failure behavior of hot-rolled AZ91 magnesium alloy [J]. International Journal of Fatigue, 2013, 48: 122-132.
[14] BEGUM S, CHEN D L, XU S. Strain-controlled low-cycle fatigue properties of a newly developed extruded magnesium alloy [J]. Metallurgical and Materials Transactions A, 2008, 39: 3014-3026.
[15] YAN Z F, ZHANG H X, WANG W X. Temperature evolution mechanism of AZ31B magnesium alloy during high-cycle fatigue process [J]. Theoretical and Applied Fracture Mechanics, 2014, 70: 30-38.
镁合金疲劳后的拉伸力学行为
舒 洋,张喜燕,余江平,谭 力,尹瑞森,刘 庆
重庆大学 材料科学与工程学院,重庆 400030
摘 要:对疲劳后AZ31镁合金的拉伸行为和显微组织之间的关系进行研究。轴向疲劳实验在PLG-100疲劳实验仪上进行,其疲劳载荷为50和90 MPa。从载荷为50和90 MPa疲劳样上截取的拉伸样分别命名为样品L和H,原始材料上截取的拉伸样命名为样品O。采用电子背散射技术和透射电镜表征试样的显微组织。结果表明,在高的循环应力下,试样的主要变形机制为孪生-退孪生,而在较低的循环应力下,位错滑移主导疲劳变形。疲劳变形后,样品L和H的平均晶粒尺寸分别减小到4.71和5.33 μm,而样品L和H的屈服强度和抗拉强度略微提高。通过扫描电镜发现样品L的最终断裂区由韧窝组成,而样品H的最终断裂区有许多微孔洞。因此,镁合金的拉伸力学行为和显微结构间有着密切的关系。
关键词:AZ31镁合金;疲劳;拉伸力学性能;断口形貌;显微组织
(Edited by Xiang-qun LI)
Foundation item: Projects (51271208, 51071183, 50890170) supported by the National Natural Science Foundation of China; Project (2010CB631004) supported by the National Basic Research Program of China
Corresponding author: Xi-yan ZHANG; Tel: +86-23-65112154; E-mail: kehen888@163.com
DOI: 10.1016/S1003-6326(18)64723-5