Research on technological parameters of pressure forming with hot granule medium on AA7075 sheet
来源期刊:中南大学学报(英文版)2016年第4期
论文作者:赵长财 董国疆 赵建培 押媛媛 曹秒艳
文章页码:765 - 777
Key words:granule medium; aluminum alloy sheet; drawing; hot forming; forming limit diagram
Abstract: Hot granule medium pressure forming (HGMF) process is a new process in which granule medium replaces the medium in existing flexible-die hot forming process, such as liquids, gases or viscous medium. Hot forming of light alloy sheet parts can be realized based on the properties of granule medium, such as withstanding high temperature and pressure, filling well, sealing and loading easily. In this work, the forming of AA7075 cylindrical parts by HGMF process is taken as an example to establish the constitutive relation and forming limit diagram (FLD) of AA7075 sheet which is related to temperature by hot uniaxial tensile test of sheet metal. Based on the assumption that granule medium is applied to extended Drucker-Prager linear material model, the finite element model of HGMF process is established and the effect of technological parameters, such as forming temperature, blank-holder gap and drawing ratio, on the sheet metal formability, is studied. The limit drawing ratio curve of AA7075 cylindrical parts at forming temperature of 175-300°C is obtained by HGMF process test, and the limit drawing ratio reaches the maximum value of 1.71 at 250°C. The results of numerical simulation are consistent with the results of process test, and the forming force, distribution of wall thichness and form of instability are predicted correctly, which provides reference for the application of HGMF process.
J. Cent. South Univ. (2016) 23: 765-777
DOI: 10.1007/s11771-016-3122-0

DONG Guo-jiang(董国疆)1, ZHAO Chang-cai(赵长财)2, ZHAO Jian-pei(赵建培)2,
YA Yuan-yuan(押媛媛)2, CAO Miao-yan(曹秒艳)2
1. College of Vehicles and Energy, Yanshan University, Qinhuangdao 066004, China;
2. Key Laboratory of Advanced Forging & Stamping Technology and Science of Ministry of
Education (Yanshan University), Qinhuangdao 066004, China
 Central South University Press and Springer-Verlag Berlin Heidelberg 2016
Abstract: Hot granule medium pressure forming (HGMF) process is a new process in which granule medium replaces the medium in existing flexible-die hot forming process, such as liquids, gases or viscous medium. Hot forming of light alloy sheet parts can be realized based on the properties of granule medium, such as withstanding high temperature and pressure, filling well, sealing and loading easily. In this work, the forming of AA7075 cylindrical parts by HGMF process is taken as an example to establish the constitutive relation and forming limit diagram (FLD) of AA7075 sheet which is related to temperature by hot uniaxial tensile test of sheet metal. Based on the assumption that granule medium is applied to extended Drucker-Prager linear material model, the finite element model of HGMF process is established and the effect of technological parameters, such as forming temperature, blank-holder gap and drawing ratio, on the sheet metal formability, is studied. The limit drawing ratio curve of AA7075 cylindrical parts at forming temperature of 175-300 °C is obtained by HGMF process test, and the limit drawing ratio reaches the maximum value of 1.71 at 250 °C. The results of numerical simulation are consistent with the results of process test, and the forming force, distribution of wall thichness and form of instability are predicted correctly, which provides reference for the application of HGMF process.
Key words: granule medium; aluminum alloy sheet; drawing; hot forming; forming limit diagram
1 Introduction
Flexible-die thermoforming technology on light alloy sheet, as an advanced flexible forming method, has been the hotspot and frontier issue in the field of sheet forming at home and abroad. The flexible-die forming technologies with the medium of hot liquids, gases or viscosity are representative.
For the study on hydro-mechanical deep drawing process with hot medium, PALUMBO and PICCININNI [1] used this process to form an aluminium bipolar plate, the forming shape and technological parameters of bipolar plate were optimized by the material performance test of sheet metal and the numerical simulation of forming process. POURBOGHRAT et al [2] drew the FLDs of AA5754-O sheet based on M-K theory and Barlat 2000-2D yield function at different temperatures. The forming characteristics of warm stamping, sheet hydroforming and sheet thermo-hydroforming of AA5754-O sheet were studied by process tests and numerical simulation. Overall, it was concluded that SHF is the most ideal for deep drawing of aluminum alloy sheets with sharp radii features. LANG et al [3] established a unified constitutive equation considering the macroscopic behavior and microscopic evolution of AA7075-O sheet, such as the influence of loading rate, the evolution of dislocation density and isotropic hardening. And the deformation laws are consistant with the hot hydroforming process test of sheet metal. WANG et al [4] studied the deep drawing formability of AA7075-T6 sheet by isothermal and non-isothermal experiments at different temperatures. The results show that the deep drawing formability of AA7075-T6 sheet is the best at 140-220℃ and the enough hardness and strength can be maintained after forming. Hot hydro-mechanical deep drawing process is especially suitable for the manufacturing of sheet parts with complex shape, varied sizes, high-quality appearance and small batch, which not only makes the production of sheet parts simple and flexible but also reduce mold costs greatly [5-7]. However, hydraulic power of high temperature and pressure requires many additional devices, which contains large expensive superchargers,high temperature and pressure valves and pipelines, the system for protection, collection and filtration of hot medium. The heat-resisting performance of the above supporting components limits the forming temperature range of this technology.
For the study on quick plastic forming (QPF), the significant progress has been made by Wayne State University in the basic research work of material including the deformation pattern, the fracture mechanism and the forming limit of QPF process. LIANG et al [8] used a new technology which combines warm stamping with superplastic gas (SPF) bulging forming to form engine hoods of automobile with AA5038 sheet. The QPF process can be applied in larger temperature range (strain rate is at 10-2 s-1 level) [9-10], which overcomes many defects of superplastic forming, such as low productivity, high SPF-grade materials costs, and has advantages of optimizing the performance of product and improving the production efficiency. However, the products formed by QPF process are worse than that formed by hot hydraulic forming in terms of stability and forming precision, the materials which are suitable for QPF process can achieve large elongation with higher strain rate. Therefore, the development of new materials with higher strain rate is the key to break through the bottlenecks of technology application.
In terms of studying the viscous pressure thermoforming, BARIANI et al [11-12] poured the molten polymer with high temperature into the mold cavity to deform the plate under the action of both high temperature and high polymer. The formability of sheet metal is effected by the following technological parameters: blank holder force and the temperature, flow velocity and viscosity of polymer. LIU and WANG [13] deformed conical parts with viscous medium at 200 °C, which can avoid the fracture that occurs at the bottom of convex area of parts at room temperature and improve the formability of parts. The reasonable control of the viscous medium flowing can adjust the magnitude and direction of tangent adhesion force, thus the forming quality of parts can be improved. But the heat resistance of viscous medium seriously limits the application of the technology in the field of light alloy thermoforming.
In summary, the domestic and foreign experts and scholars have achieved many useful results in terms of studying the flexible-die thermoforming technology on light alloy sheet. While the technology with high temperature and pressure needs higher requirements for existing flexible-die forming technology, such as the match of medium and sealing element, the design of supercharging device and transmission system, etc. The cost of whole productive process has obviously increased because of the complicated technological path and high investment of equipments, which limits the further promotion and application of flexible-die forming technology on sheet metal. Based on this, our group proposed the hot granule medium pressure forming (HGMF) technology [14]. It is a new technology which uses the heat resisting granule medium, instead of the liquid, gas or viscous medium in existing flexible-die thermoforming technology, to achieve the thermal deep drawing (bulging) forming on sheet metal and pipe. Based on the properties of granule medium, such as high temperature, pressure resistance and filling well, the forming technology has some advantages, such as wider range of forming temperature, sealing and loading easily, which provides a convenient forming method for light alloy tube and sheet metal parts formed difficultly at room temperature [15-17].
In this work, the HGMF technology is applied to form the AA7075 cylindrical cups. By the hot uniaxial tensile test, the constitutive equation is constructed and yield locuses are drawn. And on this basis, the forming limit diagrams (FLDs) of AA7075 sheet at different temperatures are obtained by combining the Hill’s local necking criterion with the M-K method. Based on the assumption that granule medium applies to extended Drucker-Prager linear model, the FEM simulation is constructed to study the deformation rules, optimize technological parameters and successfully produce the typical parts.
2 Research on material performance test
2.1 Hot uniaxial tensile test
In this work, the AA7075 sheet (initial thickness t0=1 mm) is regarded as the study subject. InspektTable100 electronic universal testing machine is used for the hot uniaxial tensile tests, as shown in Fig. 1. Environmental test chamber is used for heating under 250 °C and enclosed high-temperature furnace is used for convective heating of the whole above 300 °C. The temperature is directly measured with contant method by thermal couple and the overall errors of temperature are within ±(1-5) °C in the furnace.
In order to obtain the anisotropy parameters of sheet metal, different specimens are cutted out respectively at the angles of 0°, 45° and 90° between length direction and rolling direction of sheet metal. The specimen is made by high-pressure water cutting machine, and the dimension tolerance is less than 0.02 mm. In the tests, the strain rates are respectively set as 0.001, 0.005 and 0.02 s-1 with the constant strain rate control mode and the temperatures are set as 25-300 °C.
2.2 True stress-strain curve
The stress-strain curves of AA7075 sheet show two kinds of typical characteristics at 25-300 °C (as shownin Fig. 2): (1) the monotone increasing curve in which the work hardening plays a dominant role; (2) the dynamic recovery curve which increases at first and then becomes the steady-state. At 25-200 °C, the rheological stress increases with the increase of strain and then decreases sharply until sheet metal is fractured after reaching peak stress, and sheet metal has no apparent necking deformation; work hardening dominates the deformation process in which the characteristic of brittle fracture appears. At 200-300 °C, the rheological curves show dynamic recovery characteristic, and work hardening is eliminated by softening process caused by dynamic recovery, which shows some characteristics of ductile fracture, but the characteristics of brittle fracture are still primary. AA7075 sheet shows strong sensitivity to temperature, and the effect of temperature is stronger than that of strain rate in the degree of effect.
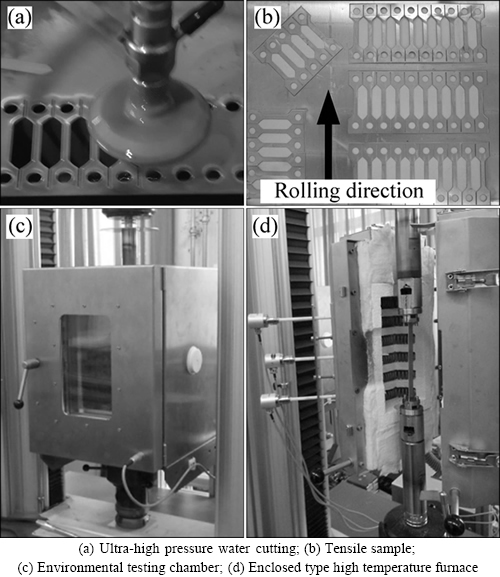
Fig. 1 Hot uniaxial tensile tests:
Considering the effect of strain hardening, strain rate and temperature on the true stress-strain curve, the mathematical model of dynamic recovery type of the single increasing function is used to describe the constitutive relation of AA7075 sheet. The constitutive equation is obtained by taking the test data for multiple linear regression statistics:
 (1)
(1)
where  is equivalent stress;
  is equivalent strain;
  is equivalent strain rate; T is deformation temperature.
The comparison between data curve of constitutive equation and experimental data is shown in Fig. 2 and the regression statistical parameters are shown in Table 1.
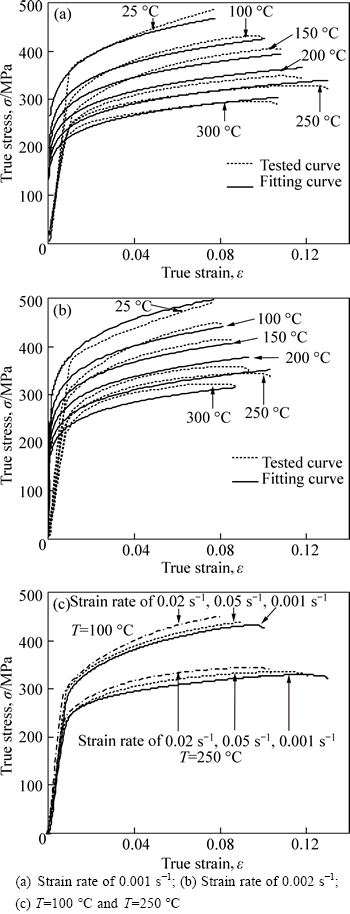
Fig. 2 True stress-strain curves of AA7075 sheet:
Table 1 Parameters of constitutive equation regression statistics

2.3 Effect of deformation temperature and deformation rate on strength
The hot uniaxial tensile test shows that yield strength σs and ultimate tensile strength σb of AA7075 sheet both decrease with the increase of temperature and increase slightly with the increase of strain rate, the effect of temperature is stronger than that of strain rate, as shown in Fig. 3. Because the yield strength of AA7075 sheet is not very sensitive to strain rate, the effect of strain rate on yield strength can be ignored. The average of yield strengths corresponding to each strain rate at the same temperature can be obtained and fitted by a linear equation:
 (2)
(2)

Fig. 3 Yield strength and tensile strength curves
2.4 Effect of deformation temperature and deformation rate on elongation
At 25-250 °C, the elongation at maximum force Agt and total elongation at fracture At of AA7075 sheet increase with the increase of temperature. But both the measured values of them decrease at 300 °C, which is related to the property that AA7075-T6 is a typical heat-treatable material. Temperature changes affect its heat-treatment condition, so the elongation does not continue to rise but declines at 300 °C. The deformation rate has remarkable effect on elongation, and the material can get a larger elongation under lower strain rate. Namely, Agt=12.53%, At=13.87% at 250 °C.
2.5 Effect of deformation temperature and deformation rate on Lankford's coefficient
The experiment shows that when the strain rate is 0.001 s-1, the Agt-values of samples are in 8.09%-12.53% at 25-300 °C. In order to analyze the change rule of lankford’s coefficient (r) at different temperatures, the strain rate of 0.001 s-1 is selected in this test; when engineering strain level reaches 7%, the length and width of grid on the tensile samples are measured to obtain the r-value, as shown in Fig. 5.
The r-value of AA7075 sheet increases with the temperature increasing, and the plastic deformation capacity of material can be also enhanced. However, the r-values are less than 0.81 even at the maximum tensile temperature of 300 °C, which makes the sheet easier deform in thickness direction than in panel surface direction, thus the sheet is easy to be thined down. At 150-250 °C, the r-value increases significantly. The plastic strain ratio of weighted average  can be accurately fitted by the linear equation (as shown in Fig. 5):
 (3)
(3)

Fig. 4 Elongation curves under different temperatures and strain rates:
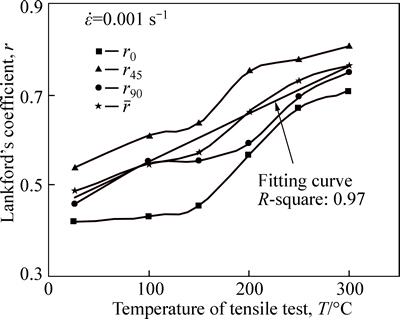
Fig. 5 Lankford’s coefficient curves
2.6 Effect of deformation temperature and deformation rate on fracture morphology
The AA7075 fracture samples obtained under different loading conditions in hot uniaxial tensile tests are observed by HITACHI S-3400N scanning electron microscope, and the fracture morphologies at different temperatures with strain rate of 0.001 s-1 are obtained, as shown in Fig. 6.
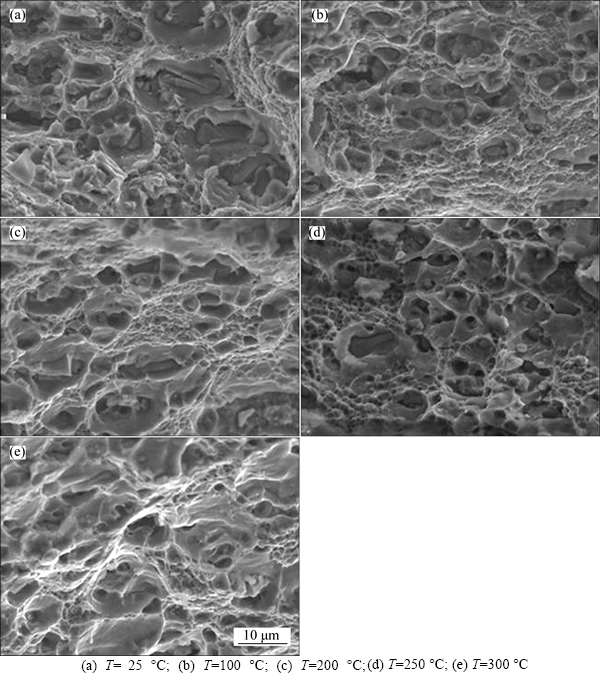
Fig. 6 Fracture morphologies under different forming temperatures:
Figure 6 shows that with the deformation temperature increasing, the ductile fracture characteristics of AA7075 sheet become increasingly obvious, and all the fracture surfaces have dimple and river pattern of different sizes. Fractures present brittleness features obviously at 25 °C, no obvious tearing ridge exists, and the small dimples are shallow. With the deformation temperature increasing to 100 °C, the dislocation glide energy reduces, the fractures present obvious river pattern, tearing ridge can be observed, and alloy toughness increases. At 100-250 °C, some small precipitated phases remelt, and the size of precipitated phase becomes small, which makes the dimples on the fracture surface small and deep, the toughness of alloy increases to the maximum. At 250-300 °C, small precipitated phases remelt, large ones begin to grow up, which makes the size of middle-sized dimples increase and be lengthened apparently, finally the toughness of alloy begins to fall.
In conclusion, the r-value of AA7075 sheet is comparatively larger at 250-300 °C while the differences of in-plane anisotropy characteristics are comparatively smaller. Also, the elongation reaches the maximum at 250 °C and the ductile fracture characteristics are the most obvious. Therefore, it can be preliminarily predicted that the optimum forming temperature of AA7075 sheet is about 250 °C.
3 Yield locus and theoretical FLD
3.1 Yield criterion and yield locus
In order to accurately represent the yield behavior in the process of sheet metal forming, the selection of the yield criterion is extremely important for analysis. It was reported that Hill-48 yield criterion does not absolutely match sheet materials of r-value<1, while Logan- Hosford yield function can describe the yield locus of aluminium alloy sheet quite well [18]. In this work, the assumption that plane stress on sheet metal of planar isotropy and nornal anisotropy is adopted. Logan- Hosford yield function can be represented as
 (4)
(4)
where σ1 and σ2 are the major and minor stress respectively in the plane (MPa); M is the stress exponent of the yield function. For the body-centered cubic structure, M=6; and for the face-centered cubic structure, M=8. The aluminum alloy sheet belongs to the face- centered cubic structure at room temperature. Y is the subsequent yield stress (MPa). The change rule of Y follows the constitutive equation of the material. And there is  in simple tension state.
Form Eqs. (2)-(4), the temperature-dependent Logan-Hosford initial yield locus of AA7075 sheet can be drawn (as shown in Fig. 7). If the long axis of apptoximate elliptical yield locus is longer, the deformation resistance would be larger under the stress state of the same sign, and the strength of danger section would be higher in deep drawing. If the minor axis is shorter, the deformation resistance would be less under the stress state of opposite sign, which is suitable for the deformation of flange region. If the ratio of the absolute value of stress on long axis (ω=0) to that on minor axis (ω=π/2) of the yield locus is defined as η, then, for the Logan-Hosford yield locus, η increases with the temperature increasing, and η increases from 1.675 at room temperature to 1.777 at 300 °C, which indicates that the deep drawing performance of sheet metal at high temperature is better than that at room temperature.
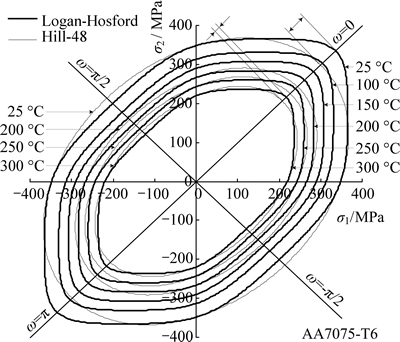
Fig. 7 Yield locus of AA7075 sheet varing with temperature
If M=2, Logan-Hosford yield function can be converted into the Hill-48 yield criterion, namely:
 (5)
(5)
Form Eq. (2), Eq. (3) and Eq. (5), the temperature-dependent Hill-48 yield function of AA7075 sheet can be obtained, and it is drawn in two-dimensional stress space (as shown in Fig. 8). The comparison shows that the gap of the two yields is large at low temperature, the biggest difference occurs in the stress state of bidirectional tensile (compress). But this characteristic weakens significantly with the increase of temperature, when the temperature reaches 200-300 °C, the biggest difference is less than 6.5%-4.4% between the two yield loci. Therefore, by studying the HGMF process of AA7075 sheet, Hill-48 yield criterion can replace Logan-Hosford yield criterion with the deforming temperature of 200-300 °C.

Fig. 8 Theoretical forming limit diagram
3.2 Theoretical forming limit diagram
FLD is one of the most comprehensive and visual methods to judge and assess the formability of sheet metal. Now it mainly depends on the experiments to obtain the FLD of sheet metal, but the process of warm forming limit test on aluminum alloy sheet is complicated, time-consuming and expensive. Therefore, it is widely concerned to predict the FLD of sheet metal with the material parameters obtained in uniaxial or biaxial tensile test by theoretical analysis. In this respect, the M-K theory was used to predict the FLDs of AA5182 and AA5754 sheets based on VOTE hardening model and BARLAT YLD'96 yield criterion of uniaxial tensile test [19]. Based on M-K model, The FLDs of 5A09 and AA5083 sheets coupling temperature were deduced [20-21] and strain rate and satisfactory results have been achieved in all studies. Therefore, in this work, the theoretical FLD of AA7075 sheet is deduced by combining Hill theory with M-K theory based on constitutive equations, Logan-Hosford and Hill-48 yield function and the material performance parameters obtained in hot uniaxial tensile test, which provides the basis for numerical simulation analysis of HGMF process.
When the forming limit is predicted by applying M-K theory, the initial uneven degree has great influence on the calculation. Therefore, firstly, the FLD in the second quadrant is predicted by applying Hill’s localized necking criterion and Hill-48 yield criterion, and the limit strain corresponding to the point of plane strain is determined. Then, the limit strain value corresponding to the point of plane strain is predicted by applying M-K theory, and the initial uneven degree is changed to make the value close to the value obtained by Hill theory. Thus the material defect parameters of M-K theory can be determined, and the FLD in the first quadrant is obtained by applying Logan-Hosford yield criterion, as shown in Fig. 9. The theoretical FLD shows that, with the increase of deformation temperature, the rupture instability interval of AA7075 sheet decreases.

Fig. 9 Principle and moulds of HGMF technology
The theoretical FLD, which is based on the constitutive equation and the yield criterion, only reflects the hardening and softening effects of material strain and temperature variation and does not reflect the influence of the organizational change of sheet metal caused by deformation temperature on elongation. The analysis on fracture has already shown that the toughness of alloy gradually declines at 250-300 °C. Therefore, in the theoretical FLD, the phenomenon that the safety interval at 300 °C is larger than that at 250 °C is likely to deviate from the actual situation. In addition, the Hill theory and the M-K theory are generally applicable to determine the rupture instability of materials which have the characteristic of ductile fracture, but AA7075 sheet is mainly characterized by brittle fracture at room temperature to 200 °C, therefore, the forming limit curve under 200 °C may tend to be safe.
4 Numerical simulation and experiments of HGMF process
In order to explore the mechanism of HGMF process and reveal the characteristics of thermoplastic deformation on AA7075 sheet, in this work, the typical cylindrical part is taken as the forming target to simulate the forming process and study the technological test. The effect of forming process parameters on the formability can be further studied and the mechanism and reason of generating deep drawing fracture are explored, which may accumulate experience and provide reference for promotion and practical application in more fields. The principle and the die set of HGMF technology are shown in Fig. 9. The sizes of forming height and shape of bottom are not limited, only H is defined as the height of free forming.
4.1 Establishment of numerical model of HGMF process
The simulation analysis of HGMF process includes very large shell deformation and complex frictional contact conditions, which belongs to the quasi-static simulation. Therefore, the application of ABAQUS/ Explicit explicit nonlinear dynamic analysis method can effectively solve these highly nonlinear quasi-static problems. In addition, the extended Drucker-Prager linear model in ABAQUS can reflect the compressive hardening of granules that the yield strength is associated with the confining pressure and the compressive yield strength is much larger than the tensile yield strength. So, the extended Drucker-Prager linear model is suitable for the simulation of scattered mitochondria materials with internal friction under the condition of monotonic loading.
The material performance test of AA7075 sheet shows that the absolute values of Δr which are plane directivity coefficients of sheet metal are all less than 0.17 at room temperature to 300 °C, it means that the characteristics of plane anisotropic are not obvious. Meanwhile, the cylindrical parts are rotational symmetrical parts, and the granule medium can be expressed by the extended Drucker-Prager linear model, which also has the characteristic of axial symmetry. Therefore, in order to reduce the computational cost, in this work, the axisymmetric numerical model is established for analysis. In addition, the die, solid granule medium and sheet metal need to be heated to the objective forming temperature in forming process, and the temperature should be maintained constant during loading. Therefore, the effect of functional transformation in forming process can be ignored, and the forming can be considered as isothermal deep drawing, namely the effect of heat exchange among die, medium and sheet metal in the process of numerical simulation is overlooked. The punch-die and indenter are regarded as rigid bodies and the axisymmetric analytical rigid body model is established in accordance with the geometric dimensions of actual condition.
4.1.1 Definition of material model
Material performance tests show that the r-value of AA7075 sheet is large at 250-300 °C and the elongation is the largest at 250 °C, which can predict that the best forming temperature of AA7075 sheet is about 250 °C. Therefore, the numerical simulation of forming process focuses on the range of 200-300 °C. Meanwhile, the difference of yield loci of Hill-48 and Logan-Hosford is relatively small in this range, and the biggest difference is less than 6.5%. So the Hill-48 yield criterion provided by ABAQUS can be used to set parameters, and the isotropic hardening is assumed. And the axisymmetric model is applied to analyze sheet metal based on the assumption of plane isotropy and thick anisotropy. The thick anisotropic parameters are set based on Eq. (3) and constitutive relation is set based on Eq. (1).
In this work, the 5# non-metallic granules (NMG) is selected as the pressure-transfer medium for the thermal deep drawing on aluminum alloy sheet. The diameters of 5# NMG are 0.117-0.14 mm, Rockwell hardness reaches HRC 48-55 and the appearance is bright and round; 5# NMG belongs to the non-viscous materials, namely the value of cohesion is zero. The material composition of 5# NMG makes it have stable mechanical and chemical properties at medium temperatures (under 400 °C), which shows that it keeps certain hardness and has no viscous phenomenon under high pressure condition. The parameters of extended Drucker-Prager material model of 5# NMG and contact friction coefficient at room temperature are obtained from material performance tests such as uniaxial compression and shear strength, as shown in Table 2.
Table 2 Simulation parameters of 5# NMG

4.1.2 Definition of contact conditions
There are three kinds of contacts: the die and sheet, the sheet and medium, and the die and medium in the process of HGMF technology, the scale of contact is larger than that of one unit, which belongs to finite sliding. Because the die is regarded as rigid bodies, contact pair algorithm offered by ABAQUS/Explicit is selected. On the other hand, the model of Coulomb friction is adopted. The contact friction coefficient between sheet metal and die is set 0.08. The friction coefficients between granule medium and sheet metal, die and granule medium, are set to be associated with the contact pressure according to the curves in Table 3 [17].
Table 3 Coefficient of sliding friction μn between 5# NMG and sheet metal

4.1.3 Mesh generation
For the sheet metal, the 2-node linear axisymmetric shell unit SAX1 is adopted. In order to more accurately describe the bending effect and the characteristics of stress and strain in thickness direction during deformation process, seven integrated points are set along thickness direction. For the medium of NMG, the 4-node bilinear axisymmetric quadrilateral unit with reduced integration CAX4R is adopted.
4.2 Analysis on results of numerical simulation
The numerical simulation adopts AA7075 sheet with initial thickness t0=1.0 mm, the inner diameter of cylindrical die d0=80 mm, and the radius of cylindrical die rd=5 mm, as shown in Fig. 9. The simulation analysis mainly focuses on the main technical parameters, such as the forming temperature T, the drawing ratio λ and the blank-holder gap. The other parameters are assumed constant when the effect of one parameter on formability is analyzed.
4.2.1 Effect of forming temperature
The initial diameter of sheet metal is assumed to be D0=135 mm; the controlling method of setting blank-holding gap (BHG, Tg) is adopted, namely tg=1.15t0; the simulation analyses of three samples whose forming temperatures are 200 °C, 250 °C and 300 °C, respectively are conducted. When the forming height of three samples are 40 mm, the principal strain ε1 (the axial strain εr) and the minor strain ε2 (the circumferential strain εθ) along the path of generating line are collected and input into theoretical forming limit curve (FLC), as shown in Fig. 10.
Figure 10 shows that the effect of increasing forming temperature on principal strain locus mainlyfocus on the biaxial tension line OA and the compression and tension line CD. With the increase of forming temperature, the thinning trend of sheet metal in the bottom of parts weakens, and the flowing deformation of sheet metal in the flange and the fillet of flange is more smooth. The effect of increasing forming temperature on the tension and compression line AC is not obvious, namely the principal strain loci basically coincide. Point A and point B are the closest to fracture area, the principal strain locus at the forming temperature of 200 °C has entered the fracture region of theoretical forming limit from point B. Accordingly, it can be initially determined that the most dangerous fracture area in the forming process of cylindrical parts are the transition fillet AB of spherical cap at the bottom and cylinder wall. Meanwhile, the interval of theoretical forming limit expands with the increase of temperature, and it manifests as the AB area tends to be safe, which means that the increase of forming temperature can suppress the trend of fracture in this area.
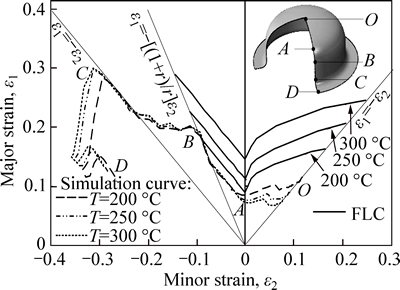
Fig. 10 Principal strain loci under different forming temperatures
The loading paths at different forming temperatures obtained by numerical simulations are extracted, and the forming states of parts corresponding to the feature points of load curve are marked, as shown in Fig. 11.
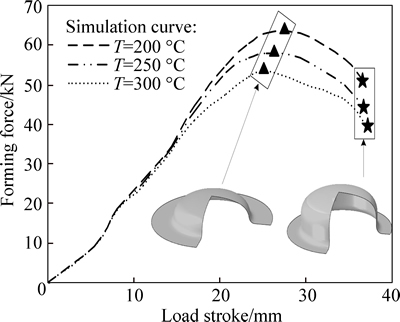
Fig. 11 Loading curves under different forming temperatures
It can be seen from Fig. 11 that the loading paths do not monotonically increase; there is a peak in the loading curves during the forming process, then the forming force reduces with the development of deformation.The geometrical dimensions of the parts when the loading loci are at the peak are collected, it can be found that the forming states of parts are basically identical under different forming temperatures, which are all in the critical state of forming cylindrical straight wall. It is similar to the moment and mechanism of forming the peak of deep drawing force during drawing cylindrical parts by traditional rigid mold; the main reason is that the bending stress of plank is large under the joint action of the deep drawing on medium and the round corner of die. At the peak, the ratios of the instantaneous outer diameter of flange Dw to the initial diameter of slab D0 at different forming temperatures are all close to 0.91, which not only gets close to the condition that the flange wrinkling is the most serious but also increases the forming force. Thus, the reasons of forming the wave crest are the increase of bending stress of transition fillet and the rising trend of flange wrinkling in the early stage of forming process. With the development of forming, the above two factors gradually weaken, which makes the forming force decrease to some degree. The increase of forming temperature can reduce the deformation resistance of sheet metal and slow down the deformation strengthening trend of sheet metal, thus the bending straightening force for the deformation of sheet metal and the deformation resistance of flange can be weakened in the forming process, and the forming force can be reduced.
4.2.2 Effect of blank-holder gap
Supposing T=250 °C, and D0=135 mm, the BHG tg is set to be 1.10t0, 1.15t0 and 1.20t0 respectively, and the three samples are established to conduct numerical simulation. When the forming height is 40 mm under different BHGs, the principal strain loci along the path of generating line are output, as shown in Fig. 12.
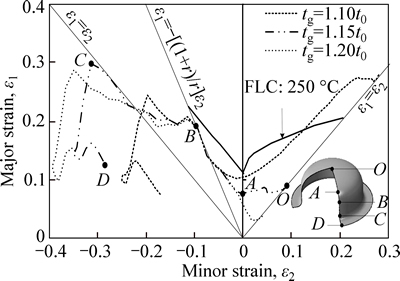
Fig. 12 Principal strain loci under different BHGs (T=250 °C)
It can be seen from Fig. 12 that the effect of BHG on the variable tendency of principal strain locus is significant, especially for the free bulging area at the bottom, the radius of die and the flange; only the principal strain loci of the transition fillet area between the spherical cap at the bottom and the straight wall overlap. When tg=1.10t0, the principal strain locus in the biaxial tension area has entered the fracture area decided by the theoretical forming limit curves. With the BHG increasing, the principal strain locus stays far away from the fracture area on the whole, the part which is the closest to the forming limit curve is still the line AB.
The distribution of thickness along the path of generating line can be determined under different BHGs according to the results of simulation, as shown in Fig. 13.
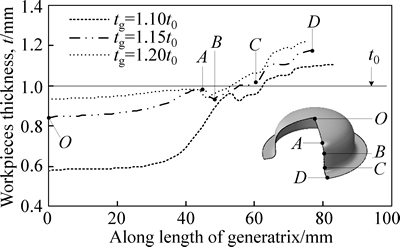
Fig. 13 Distribution curves of thickness under different BHGs (T=250 °C)
Figure 13 shows that when the BHG is too small, the wall thickness of the free deformation area at the bottom reduces most seriously, and the wall thickness difference of parts is large on the whole. When the BHG is too large, the wall-thinning trend in the free deformation area significantly weakens, the thinnest point turns to point B in the transition area of fillet at the bottom, and the wall thickness difference of parts decreases on the whole. However, if the BHG is too large, the flange area will be not flat or even wrinkled.
4.2.3 Effect of drawing ratio
Supposing T=250 °C, tg=1.15t0, and the initial diameter D0 is set to be 130 mm, 135 mm, 140 mm and 145 mm, respectively, namely the deep drawing ratio λ is 1.63, 1.69, 1.75 and 1.81, respectively, the four samples are established to conduct numerical simulation. When the forming height is 30 mm, the principal strain locus and the distribution curve of wall thickness are extracted for comparing and analyzing, as shown in Figs. 14 and 15.
The analyses on Figs. 14 and 15 show that based on the same forming temperature and BHG, the fracture trend of sheet metal forming increases with the increasing drawing ratio, the point in danger of fracture is still point B. When λ=1.81, the point B has entered the fracture area; and when λ=1.75, the principal strain locus at point B is close to the forming limit curve. The increase of deep drawing ratio has evident effect on the principal strain locus except the line OA. Besides, the increase of deep drawing ratio makes the thinning trend of sheet metal in the free deformation area and straight wall segment enhanced.
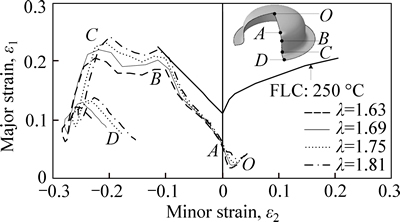
Fig. 14 Major strain locus under different deep drawing ratios (T=250 °C)
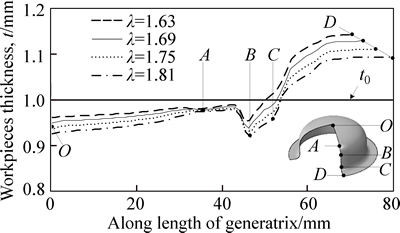
Fig. 15 Distribution curves of wall thickness under different deep drawing ratios (T=250 °C)
In order to further explore the fracture trend of parts in the forming process, the principal strain loci of sample at different forming stages with λ=1.75 are extracted for comparing and analyzing, as shown in Fig. 16.
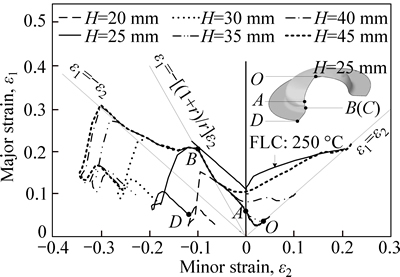
Fig. 16 Principal strain loci at different forming stages with deep drawing ratio 1.75 (T=250 °C)
The varying trend of principal strain locus with the development of forming is shown in Fig. 16. With the development of forming, the thickness of the free deformation area at the bottom gradually reduces, and the reducing rate of thickness increases significantly with the increase of forming height H; the fringe of flange thickens gradually, but the thickening rate of thickness decreases with the increase of forming height H. When is 25 mm, the straight wall line BC forms initially, but the point B gets close to the theoretical forming limit. However, with the development of forming, the point B in the lower intersection line of transition fillet between the spherical cap at the bottom and the straight wall has no trend to further move to the fracture area, the value of principal strain at point B remains unchanged and the deformation mode is close to uniaxial tensile; however the line OA in the free bulging area rapidly moves to the fracture area, when H=45 mm, the center area at the bottom has reached the fracture limit.
Due to the effect of complex factors, such as the initial inequality degree, the effect of forming lubrication, the manufacturing precision of mold and the heating inequality of sheet metal, the certain critical region needs to be given. From the above analysis, it can be initially determined that for the formation of cylindrical parts by HGMF forming process on AA7075 sheet, when T= 250 °C and tg=1.15t0, the limit deep drawing ratio is 1.69-1.75. At the initial forming stage, the point in danger of fracture is located in the lower intersection line of transition fillet between the spherical cap at the bottom and the straight wall, and the forming height is 20-25 mm; if the part does not fracture at the initial forming stage, the point in danger of fracture should be at the bottom of the spherical cap in the free bulging area, and the limit forming height gets close to 45 mm.
In summary, for the AA7075 cylindrical parts designed in this work, the thickness of slab t0=1.0 mm, the initial diameter of slab is selected 135-140 mm, the forming temperature is set above 250 °C, and the BHG is 1.15t0-1.20t0 in the free bulging area, cylindrical parts (free bulging at the bottom) could be obtained by HGMF forming process, the forming height of the parts is about 40 mm, the wall-thickness difference is less than 0.3 mm, and the required forming force does not exceed 70 kN.
4.3 Research on HGMF process test
The moulds and temperature-control device are developed based on the data and conclusions of the numerical analysis of HGMF process (as shown in Fig. 9). The moulds mainly include die holder, indenter, die, blank holder and the device adjusting BHG. The temperature-control system adopts the ohmic heating rods to heat. In order to heat the moulds, medium and sheet metal evenly, there are 16 heating rods in the die and blank holder and they are arranged in staggered arrangement. Nickel chromium-nickel silicon thermocouple (K-type thermocouple) is used to measure temperature; and four monitoring points are designed and each monitor controls four heaters to achieve closed-loop control of heating, warm-keeping and monitoring. The AA7075 sheet is adopted in the test, and the initial thickness t0=1.0 mm. The inner diameter of cylindrical parts die d0 is 80 mm, and the round in the entrance of die rd is 5 mm.
The process of forming test is as follows. Firstly, according to the process requirements, a certain quantity of granule medium is filled and the BHG is set; then the moulds are matched and heated. Secondly, when the temperature- control system reaches the objective temperature, the moulds are opened; then the sheet metal with lubricant is placed on the blank holder and the moulds are matched and heated to the objective temperature again. Thirdly, the inner slider puts pressure on the indenter, and the computer collects the signals of pressure and displacement in real time.
In order to measure the effect of forming temperature on formability, the assumption of D0=130 mm and tg=1.15t0=1.15 mm is conducted, the forming temperature is set in the range of 25-220 °C, and five samples are selected for process test. The loading rate is set as 1 mm/s,and the loading displacement is recorded when the parts fracture. Then, under the same forming condition, the loading is controlled by displacement and stop before fracture. The parts which are close to the forming limit are obtained at different forming temperatures, as shown in Fig. 17.

Fig. 17 Parts formed at 25-220 °C (tg=1.15t0, D0=130 mm)
The test shows that the forming performance of sheet metal is very poor when the forming temperature is 25-200 °C and the biggest forming height is less than 25 mm. However, the cylindrical part whose deep drawing ratio is 1.625 can be formed smoothly when the forming temperature reaches 220℃, and the forming height is H=42.5 mm, the outer diameter of flange is Dw=90 mm.
The fracture characteristics of samples show that the position of fracture surface lies in the position lower than the fillet entrance of die, and the fracture surface develops along the circumference of parts, which is perpendicular to the direction of radial stress, namely the macroscopic fracture surface is perpendicular to the direction of maximum normal stress, the orientation of fracture surface is normal. When T is 25-175 °C, the fracture morphology of parts shows distinct brittle fracture characteristics, the fracture surface is smooth and bright, and the thickness basically does not reduce in the fracture section. When T=200 °C, the thickness reduces to some degree in the macroscopic fracture surface, and the ductile fracture characteristic occurs, but the brittle fracture is still major. The deformation characteristics of simulation samples are extracted respectively at 200 °C and 220 °C, the principal strain locus and the distribution of thickness can be drawn, as shown in Fig. 18.
The result of numerical simulation shows that when D0=130 mm, T=20 °C and H=25 mm, the value of principal strain along the toroidal intersecting line at point B has reached the theoretical fracture limit region, which is consistent with the result of process test.
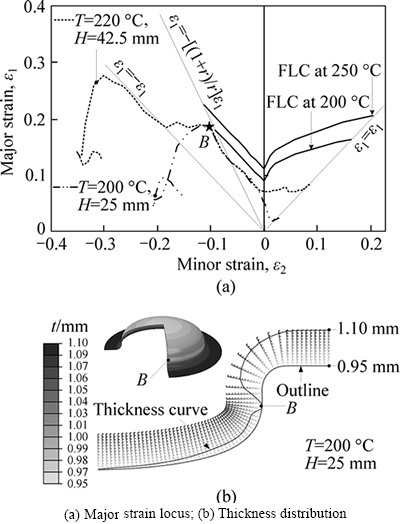
Fig. 18 Major strain locus and thickness distribution:
However, the distribution of thickness in numerical simulation shows that the amount of wall thinning is small at point B (namely t=0.95 mm), which is consistent with the brittle fracture characteristics analyzed by the above process test. The result of numerical simulation also shows that when T is 220 °C and H is 42.5 mm, the principal strain locus of the transition fillet area at the bottom of parts has not yet reached the forming limit curve (at 200-250 °C) of 220 °C. The parts can be formed smoothly, which matches the process test.
Supposing D0=137 mm, tg=1.15t0=1.15 mm and the forming temperature is set as 230 °C, 250 °C and 270 °C respectively, the parts are obtained as shown in Fig. 19.
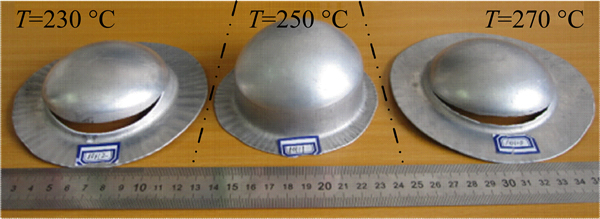
Fig. 19 Parts formed at 230-270 °C(tg=1.15 t0, D0=137 mm)
The tests under the same conditions show that when T=250 °C, the deep drawing performance of the AA7075 sheet is the best and the optimum forming temperature range is less than ±20 °C. Macroscopic observation on the fracture morphology of the broken parts at 230 °C and 270 °C shows that the characteristic of ductile fracture is significantly more obvious than that at low temperatures, but the fracture morphology is still the combination of brittle fracture and ductile fracture. The formability of sheet metal gradually increases when the forming temperature rise from room temperature to 250 °C. After that, the formability of sheet metal shows downward trend and is very unstable when the temperature reaches 270 °C, which is related to the property that AA7075 is a typical heat-treatable material. The temperature variation affects the heat treatment condition, which leads the performance of sheet metal instability at this temperature.
The material performance test and fracture morphology analysis also show this feature, namely when T=250-300 °C, the small precipitated phases remelt, and the big precipitated phases begin to grow up, which result in the increase of the size of middle-sized dimples on the fracture surface, and the ductility of alloy begin to decrease.
The diameter of slab continue to increase to 140 mm in the technological test, namely the deep drawing ratio is set as 1.75, the forming temperature is set as 250 °C, and multiple deep drawing tests are conducted. The results show that the fracture of sheet metal occurs at the beginning of forming, and the fracture appears in the area of intersecting line between the radius of die and the free bulging area. This is consistent with the results of numerical simulation, as shown in Fig 17. Therefore, when T=250 °C, the limit drawing ratio (LDR) of cylindrical parts fromed on AA7075 sheet is 1.71. According to the above method, the LDR curve of cylindrical part formed on AA7075 sheet (the bottom is free bulging area) is obtained by a lot of tests at 175- 300 °C, as shown in Fig. 20.

Fig. 20 LDR curve of AA7075 sheet varing with temperature
5 Conclusions
1) The constitutive relation curves of AA7075 sheet have significant temperature sensitivity at 25-300 °C, which can be described precisely by the single function model of dynamic response. The elongation has strong sensitivity to the temperature and strain rate and it obtains the maximum at about 250 °C. The nornal anisotropy coefficient increases linearly with the increase of temperature and reaches the maximum of 0.81 at 300 °C, the in-plane anisotropy characteristic is relatively weak at 250-300 °C. The result of material performance tests shows that the AA7075 sheet has the best plastic performance at about 250 °C.
2) Forming temperature is the most important factor to influence the formability of AA7075 sheet. The limit drawing ratio curve of AA7075 cylindrical part is obtained by the HGMF process test at 175-300 °C, and the limit drawing ratio reaches the maximum of 1.71 at 250 °C.
3) The numerical simulation and the process test show that based on the constitutive equation and the Logan-Hosford yield function obtained by the uniaxial tensile tests, the theoretical FLD of AA7075 sheet is established by combining Hill’s local necking criterion with the M-K theory. The phenomenon of fracture instability can be predicted accurately.
References
[1] PALUMBO G, PICCININNI A. Numerical-experimental investigations on the manufacturing of an aluminium bipolar plate for proton exchange membrane fuel cells by warm hydroforming [J]. International Journal of Advanced Manufacturing Technology, 2013, 69(1/2/3/4): 731-742.
[2] POURBOGHRAT F, VENKATESAN S, CARSLEY J E. LDR and hydroforming limit for deep drawing of AA5754 aluminum sheet [J]. Journal of Manufacturing Processes, 2013, 15(4): 600-615.
[3] LANG Li-hui, DU Ping-mei, LIU Bao-sheng, CAI Gao-can, LIU Kang-ning. Pressure rate controlled unified constitutive equations based on microstructure evolution for warm hydroforming [J]. Journal of Alloys and Compounds, 2013, 574: 41-48.
[4] WANG Hui, LUO Ying-bing, FRIEDMAN P, CHEN Ming-he, GAO Lin. Warm forming behavior of high strength aluminum alloy AA7075 [J]. Transactions of Nonferrous Metals Society of China, 2012, 22: 1-7.
[5] SINGH S K, MAHESH K, KUMAR A, SWATHI M. Understanding formability of extra-deep drawing steel at elevated temperature using finite element simulation [J]. Materials and Design, 2010, 31(9): 4478-4484.
[6]  M, AGCAYAZI A, CARSLEY J E. An experimental study on robustness and process capability of the warm hydroforming process [J]. Journal of Manufacturing Science and Engineering, 2011, 133(2): 371-380.
[7] MAHABUNPHACHAI S,  M, CARSLEY J E. Investigations on deformation behavior of AA5754 sheet alloy under warm hydroforming conditions [J]. Journal of Manufacturing Science and Engineering, 2011, 133(5): 1983-1988.
[8] LIANG Hai-jian, WU Xiao-wei, WANG Yong, JIN Quan-lin, MA Zhao-li, FENG Shuang-sheng. Research on quick superplastic forming for aluminium alloy sheet [J]. Materials Science Forum, 2013, 735: 301-306.
[9] SUN P H, WU H Y, TSAI H H, HUANG C C, TZOU M D. Effect of pressurization profile on the deformation characteristics of fine- grained AZ31B Mg alloy sheet during gas blow forming [J]. Journal of Materials Processing Technology, 2010, 210(12): 1673-1679.
[10] SHAO Zong-ke, ZHANG Wen-ming, HUANG Zhong-guo, YUAN Qing-hua, LEI Kun. Superplastic forming and mechanical properties for TC4 alloy negative-angle part [J]. Chinese Journal of Rare Metals, 2012, 36(4): 511-516. (in Chinese)
[11] BARIANI P F, SALVADOR M, LUCCHETTA G. Development of a test method for the rheological characterization of polymers under the injection molding process conditions [J]. Journal of Materials Processing Technology, 2007, 191(1/2/3): 119-122.
[12] BARIANI P F, BRUSCHI S, GHIOTTI A, LUCCHETTA G. An approach to modelling the forming process of sheet metal-polymer composites [J]. CIRP Annals-Manufacturing Technology, 2007, 56(1): 261-264.
[13] LIU Jiang-guang, WANG Zhong-jin. Prediction of wrinkling and fracturing in viscous pressure forming (VPF) by using the coupled deformation sectional finite element method [J]. Computational Materials Science, 2010, 48(2): 381-389.
[14] CAO Miao-yan, ZHAO Chang-cai, WU Li-jun, DONG Guo-jiang. Lubricant research on SGMF of magnesium alloy sheet [J]. Advanced Materials Research, 2013, 675: 311-316.
[15] DONG Guo-jiang, ZHAO Chang-cai, CAO Miao-yan. Flexible-die forming process with solid granule medium on sheet metal [J]. Transactions of Nonferrous Metals Society of China, 2013, 23(9): 2666-2677.
[16] DONG Guo-jiang, ZHAO Chang-cai, CAO Miao-yan. Process of back pressure deep drawing with solid granule medium on sheet metal [J]. Journal of Central South University, 2014, 21(7): 2617-2626.
[17] DU Bing, ZHAO Chang-cai, DONG Guo-jiang, YA Yuan-yuan. Study on thin-walled tube forming by solid granule medium forming [J]. ICIC Express Letters, 2014, 8: 2649-2654.
[18] NAKA T, NAKAYAMA Y, UEMORI T, HINO R, YOSHIDA F. Effects of temperature on yield locus for 5083 aluminum alloy sheet [J]. Journal of Materials Processing Technology, 2003, 140(1/2/3): 494-499.
[19] ABEDRABBO N, POURBOGHRAT F, CARSLEY J. Forming of AA5182-O and AA5754-O at elevated temperatures using coupled thermo-mechanical finite element models [J]. International Journal of Plasticity, 2007, 23(5): 841-875.
[20] MA Gao-shan, WAN Min, WU Xiang-dong. Theoretical prediction of FLDs for Al-Li alloy at elevated temperature based on M-K model [J]. The Chinese Journal of Nonferrous Metals, 2008, 18(6): 980-984. (in Chinese)
[21] YU Zhong-qi, HOU Bo, LI Shu-hui, LI Zhong-qin. Prediction of forming limit for aluminum alloy sheet coupling with temperature and strain rate [J]. Journal of Mechanical Engineering, 2010, 46(8): 37-41. (in Chinese)
(Edited by FANG Jing-hua)
Foundation item: Projects(51305386, 51305385) supported by the National Natural Science Foundation of China; Project(E2013203093) supported by the Natural Science Foundation of Hebei Province, China
Received date: 2015-01-25; Accepted date: 2015-04-10
Corresponding author: ZHAO Chang-cai, Professor, PhD; Tel/Fax: +86-13633333873; E-mail: zhao1964@ysu.edu.cn

