Trans. Nonferrous Met. Soc. China 20(2010) s713-s718

X38CrMoV5 hot-work tool steel as tool material for thixoforging of steel: Numerical and experimental evaluation
A. RASSILI, J. C. PIERRET, G. VANEETVELD, J. HALLEUX, G. WALMAG, J. LECOMTE-BECKERS
Thixo Unit ULg, Department of Aerospace and Mechanical Engineering, University of Liège, 4000 Liège, Belgium
Received 13 May 2010; accepted 25 June 2010
Abstract:Although thixoforming of low melting point alloys as aluminum or magnesium is now an industrial reality, thixoforming of high melting point alloys as steel is still at the research level. High working temperature, die wearing and production rate are problems that must be solved and are under investigation. The aim of this work is to evaluate the thermal and mechanical loadings applied to the tools during the steel thixoforging process in order to determine whether classical hot-work tool steel can be an appropriate tool material. This evaluation has been realized thanks to experimental trials and to simulations on the finite elements code Forge2008?. The effect of the loadings on the tool’s failure modes are highlighted and compared with the ones observed in classical hot forging. Beyond this, the failure modes of hot-work tool steel, the X38CrMoV5 or H11, were presented.
Key words: thixoforging; steel; high melting point; tool; material
1 Introduction
Due to high slug temperature (usually higher than 1 350 ?C), tools surfaces reach very high temperature. In hot forging, this temperature can reach 500 ?C[1-3]; in thixoforging, tool temperature can reach 700 ?C. Such a temperature is higher than classical tool steels annealing temperature and can lead to a fall of the mechanical properties. In order to minimize the thermal shocks, dies are usually pre-heated from 40 to 350 ?C in hot forging.
Thixoforging process is composed of three sequential steps: 1)Brutal contact of high temperature slug on the tool. If needed, tool closing can be done before or after this step. 2)Forming steps during which mechanical constraints are applied to the tool. 3)Part ejection and tool cooling.
In production, these steps are repeated in a cycle. Tool damages exist different mechanisms: Fatigue cracking following thermomechanical loading cycle, microstructure evolution or scaling due to hot working, geometrical modification generated by wearing or plastic deformation. The common failure modes observed in hot Forging the shown in Fig.1.
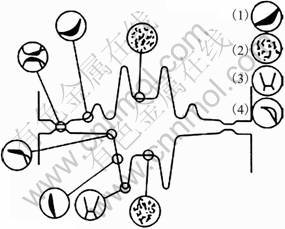
Fig.1 Most common hot forging tools failure modes and their localizations: (1) Abrasive wearing; (2) Thermal fatigue;
(3) Mechanical fatigue; (4) Plastic deformation [4]
In thixoforging, thermomechanical loadings are quite different as forming loads are lower but thermal loads are higher. The failure modes can be different too.
2 Experimental
2.1 Tool
The tool used during this work (shown in Fig. 2) was developed in collaboration with European partners. It is made in H11 hot work steel and forms an axisymmetric double-cup part. The deformation is a compression followed by an important reverse extrusion. Due to small thickness of the walls, this geometry highlights the thermal effects occurring during forming. The dies and the punches are instrumented by thermocouples in order to measure their inner thermal fields. At the beginning of cycle, the tool is open and the punches are out of the dies. When heating is done, robot puts the slug in the lower die and moves back. Then, the upper part of the tool moves down to close it and the two punches form the part. It is also possible to form with the upper punch alone if the lower one is already inside the die at the beginning of cycle. This tool is also used to determine friction parameters[5].
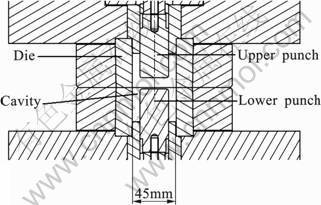
Fig.2 Axisymmetric double-cup tool
2.2 Tool material
Tool is made of X38CrMoV5 hot working tool steel. It has a good thermal shocks resistance thanks to the presence of chrome, molybdenum and vanadium. It is commonly used as die material in hot forging[6]. The X38CrMoV5 composition is given in Table 1.
Chrome, molybdenum and vanadium make carbides which increase wearing resistance. Chrome and molybdenum delay the softening due to annealing. Chrome and vanadium inhibit the grains coarsening during austenitizing and chrome and silicon increase scaling resistance.
Table 1 Mass fraction of X38CrMoV5 hot working tool steel (Mass fraction, %)[6]

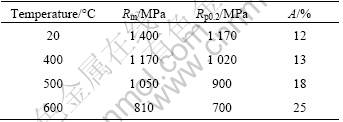
Nevertheless, this steel grade looses a part of its mechanical properties at high temperature. Table 2 gives the mechanical properties of X38CrMoV5 for four working temperatures for a material previously oil-quenched at 1 040 ?C after two temperings at 640 ?C. At 600 ?C, resistance is nearly divided by two. Extrapolated at 800 ?C, Rp0.2 falls to 400 MPa, lower than the locking force applied in the dies. Moreover, the austenitizing beginning temperature (830 ?C) is close to be the working one[7].
Table 2 Mechanical properties of X38CrMoV5 at different working temperatures[7]
2.3 Modeling
The Finite Elements code Forge2008? was used for the simulations. The constitutive law used in this work is quite simple and mainly driven by the liquid fraction, and so the temperature. Thus, the structure of the raw material and its evolution are not explicitly represented. Even if this is a limitation of the calculation results, the error on the flow behavior is small for high solid fraction. Thermal exchanges are already taken into account by the FE code.
The constitutive law is a classical Spittel one (which is the default law used by the solver) when material temperature is lower than solidus and a modification of this Spittel equation is made when the material temperature is higher than solidus. The modification induces a linear decrease of the consistency by multiplying it by a factor going from one to zero between the solidus and the liquidus. There is then a smooth transition between semi-solid and solid behavior during cooling.
The constitutive law is

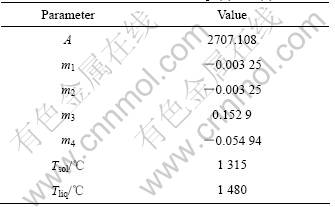
where σ is stress, ε is strain,  is strain rate, T is temperature, Tliq is liquidus temperature, Tsol is solidus temperature and A, m1, m2, m3 and m4 are constants depending on the steel grade. For 100Cr6 steel, the values of the constant parameters are given in Table 3. A and m1 - m4 came from the database of Forge2008? ,Tliq and Tsol were obtained by Differential Scanning Calorimetry (DSC)[8].
Table 3 Values of constants used in Eqs.(1) and (2)
3 Results and discussion
3.1 Mechanical loading
In the case of thixoforming, mechanical loadings are 10-20 to 20 times lower than those in hot forging[9]. Fig.3 shows the Von Mises equivalent stresses calculated by the Forge2008? software at the end of forming inside the lower part of the tool. The simulated forming is a 100Cr6 steel slug symmetrically deformed at a tool speed of 170 mm/s. It appears that maximum stress, for the areas in contact with the semi-solid material, is around 170 MPa. This maximum stress is located in the center of the punch top surface. If the punch temperature reaches a value for which its material yield stress is lower than 170 MPa, there would be a deformation of this punch.
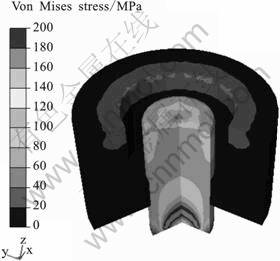
Fig.3 Von Mises equivalent stresses inside tool at end of forming
The accordance of the simulation total load to the recorded forming load for the upper punch is shown in Fig.4.
The simulation did not take into account of the locking force applied to the dies to keep the tool closed. In the present case, this force is 2 MN. On a surface of about 3 200 mm?, the pressure is close to 630 MPa.
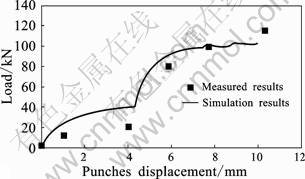
Fig.4 Comparison of forming load measured during test and calculated by Forge2008?
3.2 Thermal loading
In hot forging, slugs are usually heated at a temperature higher than 1 000 ?C[10-11]. Their contact with the dies can heat these ones up to 500 ?C. In thixoforming, the working temperatures are still higher, until more than 1 400 ?C. Tools surfaces are then subjected to very high temperature. The double-cup tool was designed in order to be instrumented by K-type thermocouples. The measures of these thermocouples allowed validating the temperature fields calculated by simulation, as shown in Fig.5.

Fig.5 Comparison of temperatures inside tool measured by thermocouples and calculated by Forge2008?
Fig.6 shows the temperature fields inside the lower part of the tool at the end of the forming and two seconds after, when the tool opens and the part is ejected. Simulation results show that, at the moment of the ejection, the surface temperature can reach 800 ?C. In this case, if the stresses are imposed, the tool can easily be damaged because of galling during the ejection.
Simulation has been run for hot work tool steel. In the case of another tool material, and thus another thermal conductivity, the surface temperature should be different. In the case of a lower thermal conductivity, the surface temperature would be higher, which will be interesting from the forming point of view, as the flowing material temperature would stay higher during a longer time, the forming load would be lower. At the opposite, from the tool point of view, this higher surface temperature would increase the risk to overrun the tool material yield stress and to damage the tool. Thermal stresses, coming from thermal gradients, depend on these gradients value and the thermal dilatation coefficient.
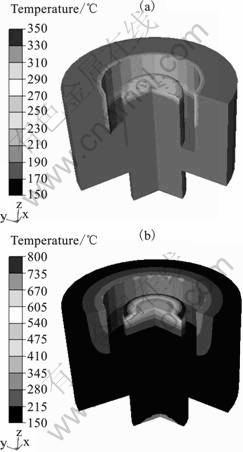
Fig.6 Temperature fields inside tool at end of forming (a) and at ejection time (b)
3.3 Wearing
Fig.7 shows the area of maximum wearing. In hot forging, they are located where sliding speeds are higher, thus mainly at the punch edge. On the die, there is not any wearing at the joining plane level as the tangential speed is null in this area in the case of a symmetric deformation. As the working temperature is higher in thixoforming, the tool wearing resistance is lower than that in hot forging.
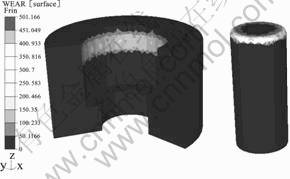
Fig.7 Wearing areas inside tool
3.4 Hardness
Hardness of the tooling’s lower punch was measured after 50 cycles of forming. Fig.8 shows the hardness measured on the punch.
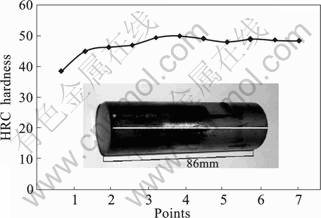
Fig.8 Hardness measured along the lower punch after 50 parts forming
The graph shows that the lower part of the punch keep, its original hardness HRC 48-50. But the hardness of the last three centimeters has noticeably been decreased. The closest point to the plane surface has a hardness of only HRC 38.5. This softening is due to annealing occurring at high temperature. This means that the punch is more easily deformable. Moreover, some marks are visible on the punch surface, due to galling and abrasive wearing.
3.5 Mechanical resistance
Figs. 9 and 10 give profile measures of the upper punch and die, respectively. These profiles were measured on four different lines in order to limit the impact of local damages.
The profile of the punch lateral surface (Fig.9(a)) does not show significant modification of this surface. On the top surface (Fig.9(b)), a small modification can be noted, as the point 0, corresponding to the punch edge, is few hundredths of millimeters lower than point 12, corresponding to the surface center. This slight deformation is due to the punch diving inside the semi-solid steel. It seems that mechanical resistance of the punch is high enough to avoid great plastic deformation.
The top surface of the die (Fig.10(b)) does not show any major modification, except the usual one due to scum (residual lubricant, scaling, etc) crushing between the dies bearing areas during the locking. However, the inner lateral surface (Fig.10(a)) shows a great deformation (0.2-0.5 mm) at the joining plane level. This is due to the dies locking which induces important stresses (about 630 MPa). Around this joining plane, the temperature can reach 500 ?C (Fig. 6). In this case, the Rp0.2 of X30CrMoV5 tool steel is 900 MPa (Table 2), higher than that of the locking force. Nevertheless, one must take into account of the locking force regulation. As it is not perfect, the locking load often reaches a transient value, higher than 2.5 MN for a setting of 2 MN. In this case, the stress can reach 800 MPa, close to the Rp0.2 of X38CrMoV5 steel It is sufficient to create a deformation, really small but increases from trial to trial. The deformation is thus a kind of fold of the die toward the inside at the joining plane level. This is an important issue, as the deformation acts as a reverse draft during the ejection, locking the part inside the die. At the opposite of the punch case, the mechanical resistance of the X38CrMoV5 hot work tool steel does not seem sufficient in this case.
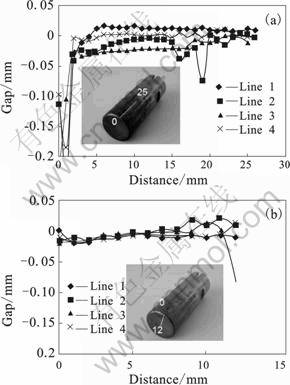
Fig.9 Profile measures on punch after 50 formings along lateral (a) and top (b) surfaces
An other super-thickness is visible close to point 25, in Fig.10(a), but this is only due to lubricant waste accumulation. This is not a die deformation.
4 Conclusions
1) Up to now, thixoforming tool lifetime is still the main lock to the technology industrialization. Due to high working temperature, mechanical features of the hot work tool steels classically used in hot forging strongly decrease. In particular, hardness and yield stress are too low to guarantee the tooling integrity.
2) Hardness can be increased by surface treatment, as nitriding, glazing or oxidation. The problem is to keep a good adherence of the coating or a good stability of the structural treatment.
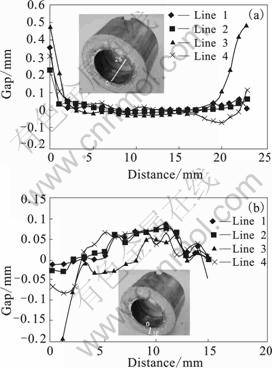
Fig.10 Profile measures on die after 50 parts forming along lateral inside (a) and top (b) surfaces
3) Plastic deformation is the main issue. It is due to mechanical and thermal stresses. Compared with hot forging, mechanical stresses are clearly lower but thermal stresses are higher. However, at industrial production rate (6-12 parts per minute), the working temperature should be higher but temperature variation would be lower, so the thermal fatigue should be lower than that in the case of laboratory study. An important point is also to minimize the contact time between tool and semi-solid steel in order to minimize the tool temperature. Parts ejection must then be as fast as possible to decrease thermal loading.
4) The X38CrMoV5 hot working tool steel can be used only for low stresses forming. Its hardness is not sufficient to avoid abrasive wearing at high working temperature.
Acknowledgement
The authors gratefully acknowledge the University of Liège, the First Europe Project, the COST541 action and the Walloon Region for their financial support.
References
[1] ANDREIS G, FUCHS K D, SCHRUFF I. The wear behaviour of hot-work tool steels used in forging process [C]// Proceedings of the 5th International Conference on Tooling. 1999: 593-600.
[2] WALTER S, HAFERKAMP H, NIEMEYER M, BACH F W, HENZE A. Material failure mechanisms of forging dies [C]// Proceedings of the 5th International Conference on Tooling. 1999: 215-224.
[3] KIRCHER D, MICHAUD H, BOGARD V. Hot forging tools failure analysis by the help of numerical simulation [J]. Mat & Tech, 1999(1/2): 31-38.
[4] ASM Handbook: Forming and Forging. ASM Publisher, 1998.
[5] PIERRET J C, RASSILI A, VANEETVELD G, BIGOT R, LECOMTE-BECKERS J. Friction coefficients evaluation for steel thixoforging [J]. International Journal of Material Forming, 2010, 3(1): 763 - 766.
[6] BARREAU O. Friction and wearing study for hot-working tool steel [D]. Institut National Polytechnique de Grenoble, 2004.
[7] LEVEQUE R. Tool steels: Unormalised numerical data. [EB/OL] .[2004]. http: www.techniques-ingenieur.fr.
[8] LECOMTE-BECKERS J, RASSILI A, ROBELET M, PONCIN C, KOEUNE R. Study of the liquid fraction and thermophysical properties of semi-solid steels and application to the simulation of inductive heating for thixoforming [J].Advanced Methods in Material Forming, 2005: 321-347.
[9] BIGOT R, FAVIER V, ROUFF C. Characterisation of semi-solid material mechanical behavior by indentation test [J]. Journal of Material Processing Technologies, 2004, 160: 43-53.
[10] BRABAZON D, NAHER S, BIGGS P: Laser surface modification of tool steel for semi-solid steel forming[J]. Solid State Phenomena, 2008,141/142/143: 255-260.
[11] BRABAZON D, NAHER S, BIGGS P. Glazing of tool dies for semi-solid steel forming [J]. International Journal on Material Forming, 2008 (Supp l): 985-988.
(Edited by CHEN Can-hua)
Foundation item: Thixo Unit ULg, Walloon Region ThixoAcier
Corresponding author: A.RASSILI; Tel: +32-4-3615946; E-mail: a.rassili@ulg.ac.be