
Laser surface hardening of AISI H13 tool steel
Jae-Ho LEE, Jeong-Hwan JANG, Byeong-Don JOO, Young-Myung SON, Young-Hoon MOON
School of Mechanical Engineering, Pusan National University, Busan, 609-735, Korea
Received 18 June 2008; accepted 10 March 2009
Abstract: An attempt was made to improve the surface hardness and wear properties of AISI H13 tool steel through solid solution hardening and refinement of microstructures using a 200 W fiber laser as a heat generating source. The hardness of laser melted zone was investigated. In order to identify the effect of heat input on the laser melting zone, scanning conditions were controlled. The results show that, the hardness of as-received AISI H13 tool steel is approximately Hv 240, and the hardness after laser surface heat treatment is around Hv 480-510. The hardening depth and width are increased with the increase in the heat input applied. Application of experimental results will be considered in tooling industry.
Key words: laser surface hardening; AISI H13 tool steel; Vickers hardness; laser energy density
1 Introduction
There are two types of surface hardening methods; one is physical method (induction hardening process, flame hardening, electrolytic quenching, electro spark hardening, and physical vapor deposition), and the other is chemical method (carburizing, nitriding, Toyota diffusion treatment, chemical vapor deposition, and metallic cementation)[1-2]. Surface heat treatment with laser beam uses the characteristics of self-quenching that cools rapidly into materials without cooling water unlike general surface heat treatment. If surface of materials is hardened, abrasion resistance and corrosion resistance are increased because a dense and homogeneous structure is formed on the surface. Accurate analysis is needed because mechanical characteristics of material are changed by scanning laser energy[3-4]. Laser surface hardening has two advantages. First, there is no much deformation of material since input energy is not too much. Second, the surface of material is smooth after laser hardening so it does not need post-process. It is required to search the optimum process condition and predict width and depth of melted zone from process variables applied to practical work. Especially, surface hardness is important for mold to produce the parts of identical quality. This is applied in almost all industries (the automobile part, the electric electronic component and office equipment etc). The surface hardness of tools is an essential element in quality and productivity control of the parts. High strength, toughness, abrasion resistance and corrosion resistance are needed for high machining speed and high performance parts[5-6]. Hot-worked H13 tool steel was used in this study in precision molds of manufacturing tools for processing or die casting since it has advantages of high resistance to thermal shock and thermal fatigue, high abrasion resistance and heat resistance. However, it has the characteristics of large amount of changes of measurement and twisting of materials during heat treatment. So, it is usual to have roughing processing due to the large amount of changes of measurement and to have electric discharge machining after heat treatment. Laser surface hardening technology was applied to overcoming the disadvantages above[7].
Fiber laser system has some advantages such as simplicity, high electrical-to-optical efficiency, reliability, excellent thermal properties, robustness and low running cost[8]. In order to treat surfaces, heat treatment structure characteristics, such as hardness, and beam scan rate, were investigated experimentally after fiber laser beam was irradiated on the surface of AISI H13.
2 Experimental
2.1 Experimental equipment
Fig.1 shows the laser system. Fiber laser (IPG YLR-200) used in this study has wave length of 1.07 μm and its maximum power is 200 W. Laser with 80 μm beam diameter can be applied to local surface hardening of precision tool. And scanner(SCANLAB hurrySCAN?20) is of a system controlled laser scanning method. To produce oxide-free coatings in all experiments, the chamber was shielded by using N2 gas (5 L/min).
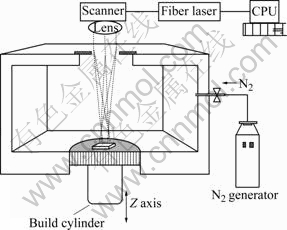
Fig.1 Schematic drawing of laser system
2.2 Experimental method
Specimen used in this study is AISI H13, which is hot rolled mold tool steel. The chemical composition of specimen (mass fraction, %) is 0.41 C, 1.12 Si, 0.41 Mn, 5.2 Cr, 1.23 Mo, 1.1 V, 1.3 Ni and balance Fe.
The heat input (J/mm2) of the hardened area is estimated by using Eq.(1):
 (1)
(1)
where P is the laser power (W); τ is the pulse duration (s); f is the pulse frequency (Hz); D is the spot diameter (mm); v is the scan rate (mm/s).
In order to measure depth and hardness of melted zone, laser power and scan rate were controlled in various conditions and then fine microstructure and hardness were measured by optical microscope (OLYMPUS GX51) and micro-vickers hardness test device, respectively.
Fine microstructure and hardness were measured after etching in order to examine mechanical and metallurgical characteristics. Hardness test was carried out with an applied load of 0.05 N using Vickers hardness test device. And characteristics of hardened layer were observed by optical microscope.
The laser scan rates used in the experiments were in the range of 33.6-336 mm/s. Other process parameters used in the experiment are listed in Table 1.
Table 1 Experimental conditions

3 Results and discussion
3.1 Hardness and microstructure characteristics
Melted zone, HAZ(heat affected zone) and base metal were observed after scanning, and Vickers hardness was measured in each region and then analyzed. Fig.2 shows the hardness profile of the cross-sectional plane after laser surface hardening with 200 W laser power at different scan rates.
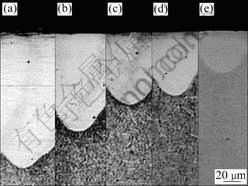
Fig.2 Depth of melted zone at different scan rates: (a) 73.2 mm/s; (b) 146.4 mm/s; (c) 219.6 mm/s; (d) 292.8 mm/s; (e) 366 mm/s
Each hardness value reported here is an average of 5-6 measurements on the same sample at equivalent locations. In Fig.3, hardened surface of specimen is divided into 3 parts (melted zone, HAZ and base metal). When high density laser beam is irradiated on metal surface, ferrite structure reaches homogeneous austenite temperature in a very short time. In the homogeneous austenite state, after the lapse of sufficient time for carbide melting, if it is cooled rapidly, the structure becomes strengthened as martensite is formed[9]. Melted zone structure was observed like ferrite but hardness value was measured as high as Hv 500. In addition, dense martensite grain was also observed in transitional zone. Base metal had the structure not affected by laser beam and hardness value was measured to be around Hv 240. When scan rate was 73.2 mm/s and 366 mm/s, depths of melted zone were 200 and 60 μm, respectively. According to Eqn.(1), the maximum heat input was 34.15 J/mm2 and the minimum heat input was 6.83 J/mm2 and difference of heat input was 27.32 J/mm2. Fig.4 shows the change of depth of melted zone with energy density. From the result of Vickers hardness measurement from surface to base metal, the Vickers hardness was decreased in melted zone, heat affected zone and base metal order. Fig.5 shows the change of Vickers hardness of specimen with scan rate.
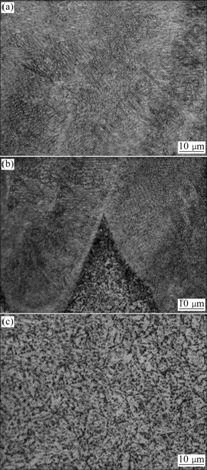
Fig.3 Microstructures of AISI H13: (a) Melted zone; (b) HAZ; (c) Base metal
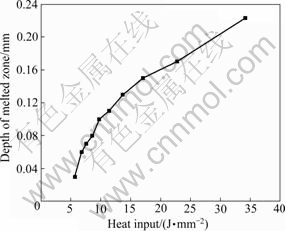
Fig.4 Charge of depth of melted zone with heat input rate
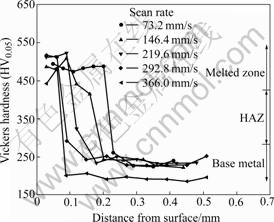
Fig.5 Vickers hardness distribution of AISI H13 at different scan rates
3.2 Focal point of laser beam
Fig.6 shows the change of depth of melted zone at different focal points, in order to estimate the relation between laser focal point and depth of melted zone. The laser focal points used in the experiments were from +10 mm to -10 mm. The laser power and scan rate used in the experiments were 200 W and 146.5 mm/s, respectively, with beam diameter of 80 μm.
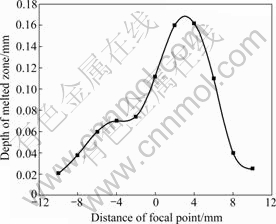
Fig.6 Change of depth of melted zone with distance of focal point
From experimental results, the depth of laser melted zone was the largest, when laser focus point was from -2 to -4 mm. Because of the largest heat input, focal point is at downward direction of specimen[10]. Therefore, laser beam set at downward direction of specimen is efficient to apply in thick material processing.
4 Conclusions
1) Vickers hardness of melted zone converges in a range of Hv 480-500. As the laser energy density increases, depth of melted zone increases on AISI H13.
2) When high density laser beam is irradiated on metal surface, in homogeneous austenite state, after the lapse of sufficient time for carbide melting, the structure becomes strengthened as martensite is formed. The Vickers hardness of melted zone is two times higher than that of base metal.
3) The depth of laser melted zone is the largest, when laser focus point is from -2 to -4 mm.
Acknowledgement
This work was partially supported by the Korea Research Foundation Grant funded by the Korean Government (MOEHRD, Basic Research Promotion Fund) and grants-in-aid for the National Core Research Center Program from MOST/KOSEF.
References
[1] Choi S D, Cheong S H, Yang S C, Kim J G. SKD11 surface heat treatment characteristics by high power diode laser [C]// Proceeding of KSMTE 2007 Autumn Annual Meeting, 2007: 380-385.
[2] SHIGEMATSU I, NAKAMUEA M, SAITOU N, SHIMOJIMA K. Surface hardening treatments of pure titanium by carbon dioxide laser [J]. Journal of Materials Science Letters, 2000, 19: 967-970.
[3] van INGELGEM Y, VANDENDAEL I, van den BROEK D, HUBIN A, VEREECKEN J. Influence of laser surface hardening on the corrosion resistance of martensitic stainless steel [J]. Electrochimica Acta, 2007, 52: 7796-7801.
[4] Lee H b, Jang I S, Jung D h, Kim K S. Surface hardening of hot forging die using diode laser [C]// Proceeding of Korea Society of Laser Processing 2002 Autumn Annual Meeting, 2002: 45-49.
[5] Na S J, Kim S D, Lee K E, Kim T K. A study on the laser surface hardening of SM 45C steel [J]. Trans of the KSME, 1987, 11: 53-62.
[6] Shin H J, Yoo Y T. Microstructural and hardness investigation of hot-work tool steels by laser surface treatment [J]. Journal of Materials Processing Technology, 2008, 201: 342-347.
[7] Shin H J, Yoo Y T, Ahn D G, Shin B H. The surface heat treatment of die steel SKD61 using CW Nd:YAG laser [C]// Proceeding of KSME 2006 Spring Annual Meeting, 2006: 3080- 3085.
[8] Han Y H. Laser beam quality and process efficiency [C]// Proceeding of Korea Society of Laser Processing 2006 Spring Annual Meeting, 2006: 48-50.
[9] Chiang K A, Chen Y C. Laser surface hardening of H13 steel in the melt case [J]. Materials Letters, 2005, 59: 1919-1923.
[10] Shin H J, Yoo Y T, Ahn D G, Im K. Laser surface hardening of S45C medium carbon steel using Nd:YAG laser with a continuous wave [J]. Journal of Materials Processing Technology, 2007, 187/188: 467-470.
Corresponding author: Young-Hoon MOON; Tel: +82-51-5102472; E-mail: yhmoon@pusan.ac.kr
DOI: 10.1016/S1003-6326(08)60377-5
(Edited by YANG Bing)