Microstructure characterization of Ti-6Al-4V titanium laser weld and its deformation
来源期刊:中国有色金属学报(英文版)2012年第9期
论文作者:徐培全
文章页码:2118 - 2123
关键词:钛合金;激光焊;变形;力学性能
Key words:titanium; laser welding; deformation; mechanical properties
摘 要:观察Ti-6Al-4V钛合金焊缝的变形行为。采用激光焊方法制备焊缝,利用光学显微镜、扫描电镜、压缩力学试验、透射电镜及高分辨分析方法研究焊缝的宏观成形、微观组织、力学性能及结构。讨论了焊缝在压缩应力和腐蚀作用下的滑移变形机制。结果表明:钛合金激光焊缝的压缩强度最大可达1.191 MPa;激光焊缝中可以观察到滑移行为,在断口中的滑移带最小为600 nm,在腐蚀试样中发现的滑移带最小为75 nm。
Abstract: Slip deformation in Ti-6Al-4V titanium laser welds was observed. Laser welding was used to prepare the titanium welds. Macrostructure, microstructure, mechanical property and structure of laser welds were studied using optical microscope, scanning electron microscope, compression experiment, transmission electron microscope (TEM) and high resolution TEM. Subsequently, slip deformation mechanism occurred in fracture and etched weld was discussed. The results indicate that the maximum compression strength reaches 1.191 GPa. Slip deformation easily happens in titanium laser welds and the minimum slip bands are 600 nm and 75 nm respectively in fracture and etched laser welds.

![]()

Trans. Nonferrous Met. Soc. China 22(2012) 2118-2123
XU Pei-quan
College of Materials Engineering, Shanghai University of Engineering Science, Shanghai 201620, China
Received 28 November 2011; accepted 28 April 2012
Abstract: Slip deformation in Ti-6Al-4V titanium laser welds was observed. Laser welding was used to prepare the titanium welds. Macrostructure, microstructure, mechanical property and structure of laser welds were studied using optical microscope, scanning electron microscope, compression experiment, transmission electron microscope (TEM) and high resolution TEM. Subsequently, slip deformation mechanism occurred in fracture and etched weld was discussed. The results indicate that the maximum compression strength reaches 1.191 GPa. Slip deformation easily happens in titanium laser welds and the minimum slip bands are 600 nm and 75 nm respectively in fracture and etched laser welds.
Key words: titanium; laser welding; deformation; mechanical properties
1 Introduction
The need for fatigue resistance, mass reduction and corrosion resistance in the aircraft industry has raised interest in using titanium alloys with higher specific strength to replace stainless steel and high temperature alloy in some structural and mechanical parts [1,2]. It is required to have a reliable joining process for anti-fatigue purpose. However, welding of titanium alloy still faces many challenges.
Titanium alloys can be joined by different welding processes: gas tungsten arc welding (GTAW) [3], friction welding (FW) [4-6], electron beam [7] and brazing welding [8]. The absence of porosity in the joint and enlargement of the weld nugget significantly improves the bonding strength of the spot brazed joint [9]. Besides Ti/Ni bonding, the parameters such as composition of brazing alloy and welding current can be used to control the quality of resistance spot-welded joints in titanium alloy [10]. Among the single thermal source welding methods, electron beam welding is always used to manufacture high-end titanium product for its narrow HAZ region, high quality and high vacuum. It was widely used in the aviation industry, especially for the aircraft [11]. During electron beam welding, the researches indicate that driving force of phase transformation of Ti-6Al-4V alloy welded joint comes from the difference of chemical free energy between the new phase martensite and the parent phase [11,12]. Beside the above methods, ultrasonic welding is another choice [13]. The application of laser-arc hybrid welding can improve the bonding strength but increase the weld width and HAZ range [14].
With the development of laser science and technology, laser welding has been adopted to weld titanium alloys in civil aviation aircraft instead of electron beam welding, e.g. A380 air bus. Laser welding exhibits some advantages such as a narrow heat affected zone, high-velocity and deep penetration, free of vacuum and low residual stress [15,16]. However, when the thicker plate was welded, gas porosity appeared easily, especially near the weld root to lower the mechanical properties. In addition, during welding of titanium alloys, deformation such as slip deformation, deformation twinning is easily formed [17-20] and leads to fatigue failure.
The goal of present study is to investigate the microstructure and mechanical properties of titanium laser welds. Deformation behavior occurred in titanium laser welds and its mechanisms are further discussed.
2 Experimental
Welds chosen for this study were prepared using CO2 laser at different welding velocities. The base metal was 200 mm×100 mm×6 mm Ti-6Al-4V alloy. Titanium was alloyed with small amounts of aluminum and vanadium, typically 6% and 4% respectively, by mass fraction. The contents of the impurities are as follows: O 0.20%; Fe 0.3%; H 0.015%; C 0.06%; N 0.05% (mass fraction). During welding, a copper backing strip with claps was used with narrow bead of weld and low angle distortions of the joints. The laser beams focused on the surface of the plate with a radius of 1 mm. A front and back shielding gas in gas trailer (He) was used to protect the molten pool and heat affected zone (HAZ). The flow rate was 28 L/min. The parameters for laser welding were laser power, P=6 kW; welding velocity, v=2.0 m/min, v=1.6 m/min, v=1.4 m/min, respectively; defocusing amount 0 mm.
The microstructures of laser welds were characterized by means of OM, SEM with an energy-dispersive spectrometer (EDS). Polished samples were etched with a Kroll’s reagent (3 mL hydrofluoric acid, 6 mL nitric acid and 100 mL water). Compression experiment was carried out to evaluate mechanical properties of titanium laser welds using AG-25TA electronic universal material testing machine. The accuracy was controlled in the range of ± 0.5% of indicated value or ±0.25% of the measurement range. The original dimensions were 5.9 mm × 5.9 mm × 15 mm. The fracture morphology was characterized using Hitachi S-4800 SEM.
A further confirmation of slip deformation was carried out using JEM 2010. TEM samples were prepared using standard procedures involving ion milling. The parameters were: voltage 200 kV; dark current 96 μA; emission current 128 μA; current density 109.8 pA/cm2; explosive time: 1-8 s.
3 Results
3.1 Macrostructure of laser welds
The macrostructures of laser welds are shown in Fig. 1. With the increase of welding heat input, the laser welds manifest wider weld. We also notice that excess weld metal exists at the end and elliptical shape-like concave forms at the beginning of laser welds (see Fig. 1(a)) when welding velocity is 2.0 m/min. Moreover, the laser flash and zigzag appearance are formed at the back side of weld (see Fig. 1 (b)). When welding velocity is 1.6 m/min, well metallurgical bonding is obtained either front side or back side (see Figs. 1(c) and (d)). When welding velocity decreases to 1.4 m/min, the welding heat input is overload. Excess weld metal at the end and concave forming at the beginning of laser welds are similar to semicircle (see Figs. 1(e) and (f)). The excess HAZ at the top side and the back side of laser welds will lower the mechanical properties of laser welds.
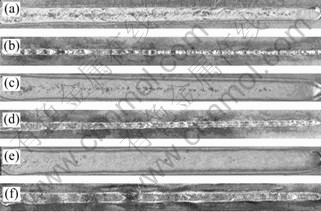
Fig. 1 Optical images of titanium laser welds: (a) Top side, P= 6 kW, v=2.0 m/min; (b) Back side, P=6 kW, v=2.0 m/min; (c) Top side, P=6 kW, v=1.6 m/min; (d) Back side, P=6 kW, v=1.6 m/min; (e) Top side, P=6 kW, v=1.4 m/min; (f) Back side, P=6 kW, v=1.4 m/min
3.2 Microstructure of laser welds
Figure 2 illustrates the microstructure of laser welds while welding velocity is 1.6 m/min. The typical microstructure consists of superfine acicular α, α+β and prior β-grain boundaries. Besides, there are non- equilibrium interphase (β→α+β transition), widmanstaten or martensite α′ and serrated α-Ti. The superfine acicular α, fine acicular α+β and prior β-grain boundaries are observed. The widmanstaten or martensite α′ distributes in some regions and is formed at α/β interface in the fine acicular α and β.
In order to reveal the microstructure, further investigation of laser weld was carried out and the result is shown in Fig. 3 (v=1.6 m/min). It is observed that there is one black massive microstructure which is separated by the other gray microstructure. Consequently, it is observed that the black massive microstructure consists of different lattices which appear at grain boundary between base metals and HAZ. In addition, the nearer to welded seam, the more the lattice formed in laser welds. During laser welding, deformation in some regions along certain slip systems is observed under the effect of thermal effect and welding residual stress. In polycrystalline grains, some regions deform along certain slip system to accommodate deformation in neighboring grains. Different from those shear bands formed during deformation, it is noticed that there are much more discontinuous and inhomogeneous deformations.
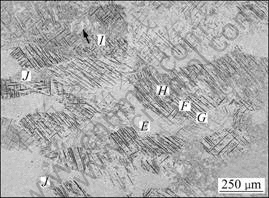
Fig. 2 Typical microstructure of titanium laser welds (Microstructure containing superfine acicular α (E), fine acicular α and β (F), prior β-grain boundaries (G), non-equilibrium interphase during L→α→α+β(H), black arrow indicating widmanstaten or martensite α′ at α/β interface in fine acicular α and β microstructure(I) and serrated α-Ti(J))
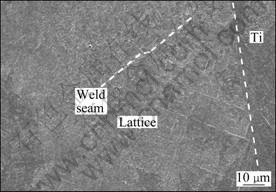
Fig. 3 Lattice structure and shear bands formed in laser welds
3.3 Compression
The compression true stress―strain curve are displayed in Fig. 4. The 0.2% offset yield strength of welded joint (v=2 m/min) is 1.113 GPa, higher than that of base metal. The weld achieves an impressive ultimate strength of 1.191 GPa. The strong working hardening and microstructure distribution provoke non-uniform deformation and slip deformation in different positions of fracture, leading to a slow ascending curve in the compression test, unlike titanium alloys that show plunging compression curves peaking every early in plastic deformation. In contrast, the compression curve of specimen (v=1.6 m/min) terminates at 7.97% plastic strain. The peak stress reaches 1.016 GPa. When welding velocity decreases to 1.4 m/min, compression curve of specimen terminates at plastic strain of 12.72%. The peak stress is 1.121 GPa.
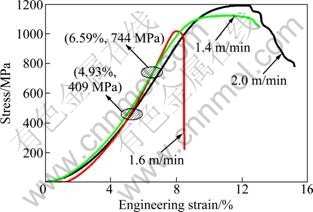
Fig. 4 Room-temperature compression true stress―strain curves of titanium laser welds at different welding velocities
4 Discussion
Much higher strains are achievable in compression test than tensile test, consequently, the activate energy for slip deformation is provided. As shown in Fig. 5(a), because specimens are not well lubricated and the height-to-diameter ratio (h/d) is larger than 1.5 (h/d=2.83 in current research), failure breaking occurs and the fracture indicates that the failure is triggered by flaws (the most likely source of flaws is the hydrogen pores) or the other crack nucleation sites under the high stresses in the sample. Figure 5(b) shows that the fracture manifests such features as barriers, compression deformation (B in Fig. 5(b)), slip deformation (C and D in Fig. 5(b)) and failure fracture (E in Fig. 5(b)). The results indicate that there are non-homogeneous strains at different regions. So, fracture failure occurs once the forces surpass the yield limit.
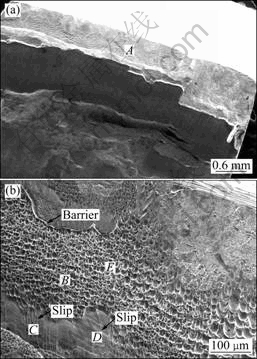
Fig. 5 SEM images of fracture of compression fracture (a) and region A (b)
The SEM image of compression deformation in region B in Fig. 5(b) is shown in Fig. 6(a). From the image, the grain boundary (GB, black arrows in Fig. 6(a)) in region B is driven by the external force accompanied by spreading vertical to the external force. Therefore, some grain boundaries enlarge, others are compressed. GB between two adjacent grains migrates from original position to the new position and exhibits a large deformation parallel to the external force (upper right in Fig. 6(a)). In addition, some particles are also observed in the bottom of some grain boundaries (white arrow in Fig. 6(a)). Compression deformation in region B exhibits inter-crystalline cracking blocked by GB barrier.
Figure 6(b) illustrates the slip deformation of region C in Fig. 5(b). Slip is the process by which plastic deformation is produced by dislocation motion. By external forces, part of the crystal lattice glides along a slip direction, resulting in a changed geometry of the titanium laser welds. More specially, slip occurs between planes containing the smallest Burgers vector [21,22]. In titanium alloy, there are three different possible Burgers-vector types instead of one and eleven different slip systems could operate in principle [23]. The dislocation structure, slip deformation in laser welds are much more complicated. Some slip systems might be activated by welding residual stress even if there is no any external force. However, some slip systems cannot be activated because of the large variation of the critical resolved shear stress from one slip system to others [24,25].
In current research, we assume that multiple slip bands [25] have the same thickness (l1) in primary α- grain and they are separated by uniform distance (d1), as illustrated in Fig. 7. The wavelength (w1) of the slip band is w1=l1+d1; δ is the slip offset and Δ stands for the total deformation. Actually, even though the total deformation Δ is the same, slip system is more heterogeneous in titanium laser welds.
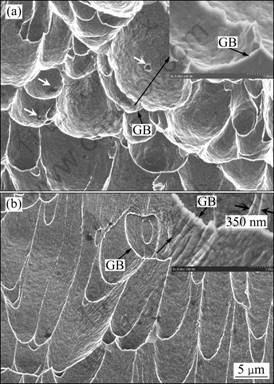
Fig. 6 SEM images of deformation: (a) Compression deformation B in Fig. 5(b); (b) Slip C in Fig. 5(b)
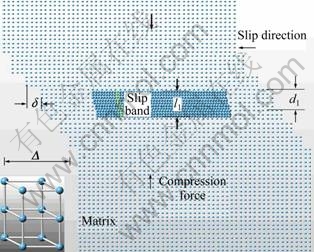
Fig. 7 Schematic illustration of parameters slip band for α primary phase (average offset δ might be several hundreds atoms diameters; average distance d1 between active slip planes might be several micrometers)
The results indicate that slip deformation can be activated in laser welds without external forces. Therefore, slip systems can occur, and are only affected by welding residual stress or the intrinsic stress caused by large CTE difference between two adjacent grains and temperature gradient. Consequently, slip deformation plays an important role in the plastic deformation of HCP titanium materials. A major discussion of this study is the slip deformation that the onset of compression process and corrosion process observed in titanium welds is found to correlate with the intrinsic stress and external stress. In current research, two kinds of slip deformations are observed. One is slip deformation in compression fracture driven by compression stress and residual intrinsic stress simultaneously (see Fig. 8); the other is observed in as-eroded specimen mainly resulting from the residual stress and intrinsic stress generated by CTE (see Fig. 9).
Figure 8(a) indicates the slip deformation of region D in Fig. 5(b). From the figure, slip boundary (SB) and two kinds of slips, broad structured slip and thin slip, are observed. Generally speaking, broad structured slip contains much more thin slips if only there is enough energy in the system. The thin slip is formed simultaneously with the primary slip, and the primary and thin slips built a complex and narrow slip front, with motion occurring cooperatively. Clearly, for the slip deformation mechanism, the width of structured slips (λ) is 600 nm, as indicated in Fig. 8(c). In some region, if the slips formation energy is enough, thin slip will form in the structured slips.
The minimum slip band is 120 nm (see Fig. 8(a)). Slips formed in laser welds are mainly activated by external forces, welding residual stress and intrinsic stress. However, different from broad structured slip system, thin slips can be activated by residual stress and intrinsic stress caused by CTE difference without any external force (see Fig. 9(a)). When the external forces are utilized, the width of slip increases. And slip becomes thicker by two layers via the glide of single grains (600 nm, see Fig. 8(c)) contrast with slips without any external force (400 nm, see Fig. 9(a)). When the slip is only activated by welding residual stress and intrinsic stress, the slip space and thickness become smaller. The minimum slip band is 75 nm. The conjugate slip is observed (see Fig. 9(b)). In addition to the slip shear of plane at the boundary, the other type must undergo a shear-type shuffle. The initial stacking fault is assimilated into the slip boundaries, and there is no trace within the slip.

Fig. 8 SEM images of slip deformation in fracture under compression at different magnifications (Black arrows stand for SB, white arrows stand for thin slips in Fig. 8(a))
For further investigation, TEM results indicate that slip deformation consists of slip plane and slip boundary (Fig. 10(a)). In Fig. 10(a), d1, d2 and d3 stand for the distance of two lattice planes. The width of distance between two adjacent slip bands is 600 nm. The slip deformation is confirmed by HRTEM results, as shown in Fig. 10(b) and the width of lattice is 2 nm.
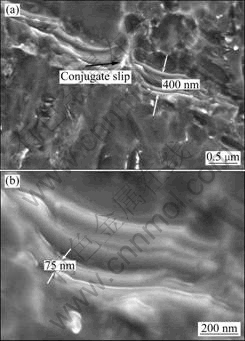
Fig. 9 SEM images of slip deformation at different magnifications (as-eroded)

Fig. 10 TEM image of slip deformation and its SAED pattern (a) and HRTEM image (b)
5 Conclusions
1) Slip deformation in titanium laser welds can be activated by external forces. However, if there is no external force, the broad structured slip deformation cannot be activated but the thin slips can be activated. The minimum width values of slip are 600 nm and 75 nm respectively in fracture and etched laser welds. Slips formed in laser welds are mainly activated by external forces, welding residual stress and intrinsic stress.
2) The titanium laser welds achieve an impressive ultimate strength of 1.191 GPa. GB between two adjacent grains migrates from original position to the new position and exhibits a larger deformation parallel to the force and SB consists of slip plane and slip boundaries.
References
[1] LU K. The future of metals [J]. Science, 2010, 328(5976): 319-320.
[2] CHRISTIAN J W, MAHAJAN S. Deformation twinning [J]. Progress in Materials Science, 1995, 39(1-2): 1-157.
[3] SHORT A B. Gas tungsten arc welding of α+β titanium alloys: A review [J]. Materials Science and Technology, 2009, 25(3): 309-324.
[4] GUO Y N, CHIU Y L, ATTALLAH M M, LI H Y, BRAY S, BOWEN P. Characterization of dissimilar linear friction welds of α-β titanium alloys [J]. Journal of Materials Engineering and Performance, 2012, 21: 770-776.
[5] SANDERS D G, RAMULU M, EDWARDS P D, CANTRELL A. Effects on the surface texture, superplastic forming, and fatigue performance of titanium 6Al-4V friction stir welds [J]. Journal of Materials Engineering and Performance, 2010, 19(4): 503-509.
[6] LIU H J, ZHOU L, LIU Q W. Microstructural characteristics and mechanical properties of friction stir welded joints of Ti-6Al-4V titanium alloy [J]. Materials & Design, 2010, 31(3): 1650-1655.
[7] HUANG J L, GEBELIN J C, STRANGWOOD M, REED R C, WAMKEN N. Coupled thermodynamic/kinetic model for hydrogen transport during electron beam welding of titanium alloy [J]. Materials Science and Technology, 2012, 28(4): 500-508(9).
[8] KHOREV A I. High-strength titanium alloy VT23 and its applications in advanced welded and brazed structures [J]. Welding International, 2010, 24(4): 276-281.
[9] MEN'SHIKOV G A, ANTONO V G, SEVRYUKOV O N, FEDOTOV V T. Using brazing alloys for controlling the quality of resistance spot-welded joints in titanium alloys [J]. Welding International, 2009, 23(12): 963-966.
[10] QIU R F, HIGUCHI K, SATONAKA S, IWAMOTO C. Characterization of joint between titanium and aluminum alloy welded by resistance spot welding with cover plate [J]. Quarterly Journal of the Japan Welding Society, 2009, 27(2): 109-113.
[11] LIU Xin, GONG Shui-li, LEI Yong-ping. Thermodynamic character of phase transformation of TC4 titanium alloy electron beam welded joint [J]. Transactions of the China Welding Institution, 2010, 31(2): 57-59. (in Chinese)
[12] IRISARRI A M, BARREDA J L, AZPIROZ X. Influence of the filler metal on the properties of Ti-6Al-4V electron beam weldments. Part I: Welding procedures and microstructural characterization [J]. Vacuum, 2010, 84: 393-399.
[13] OWA T, KONDO T, TAKIZAWA H. Production and bond strength of similar-titanium ultrasonic welded joints [J]. Welding International, 2010, 24(3): 182-187.
[14] BRANDIZZI M, MEZZACAPPA C, TRICARICO L, SATRIANO A A. Optimization of the parameters of hybrid laser-arc welding of the titanium Ti-6Al-4V alloy [J]. Rivista Italiana della Saldatura, 2010, 62(2): 177-185.
[15] GAO M, WANG Z M, LI X Y, ZENG X Y. Laser keyhole welding of dissimilar Ti-6Al-4V titanium alloy to AZ31B magnesium alloy [J]. Metallurgical and Materials Transactions A, 2012, 43(1): 163-172.
[16] BUDDERY A, KELLY P, DRENNAN J, DARGUSCH M. The effect of contamination on the metallurgy of commercially pure titanium welded with a pulsed laser beam [J]. Journal of Materials Science, 2011, 46(8): 2726-2732.
[17] GHADERI A, BAMETT M R. Sensitivity of deformation twinning to grain size in titanium and magnesium [J]. Acta Materialia, 2011, 59(20): 7824-7839.
[18] BOZZOLO N, CHAN L, ROLLETT A D. Misorientations induced by deformation twinning in titanium [J]. Journal of Applied Crystallography, 2010, 43: 596-602.
[19] SALEM A A, KALIDINDI S R; DOHERTY R D, SEMIATIN S L. Strain hardening due to deformation twinning in alpha-titanium: Mechanisms [J]. Metallurgical and Materials Transactions A, 2006, 37(1): 259-268.
[20] RUSAKOV G M, LITVINOV A V, LITVINOV V S. Deformation twinning of titanium beta-alloys of transition class [J]. Metal Science and Heat Treatment, 2006, 48(5-6): 244-251.
[21] ZHANG M, BRIDIER F, VILLECHAISE P, MENDEZ J, MCDOWELL D L. Simulation of slip band evolution in duplex Ti-6Al-4V [J]. Acta materialia, 2010, 58(3): 1087-1096.
[22] JONES I P, HUTCHINSON W B. Stress-state dependence of slip in titanium-Al-4V and other H.C.P. metals [J]. Acta Metallurgica, 1981, 29(6): 951-968.
[23] FUNDENBERGER J J, PHILIPPE M J, WAGNER F, ESLING C. Modeling and prediction of mechanical properties for materials with hexagonal symmetry (zinc, titanium and zirconium alloys) [J]. Acta Materialia, 1997, 45(10): 4041-4055.
[24] M?LLNER P, ROMANOV A E. Internal twinning in deformation twinning [J]. Acta Materialia, 2000, 48: 2323-2337.
[25] WILLIAM F. Hosford mechanical behavior of materials [M]. 2nd ed. Cambridge, UK: Cambridge University Press, 2009: 11.
徐培全
上海工程技术大学 材料工程学院,上海 201620
摘 要:观察Ti-6Al-4V钛合金焊缝的变形行为。采用激光焊方法制备焊缝,利用光学显微镜、扫描电镜、压缩力学试验、透射电镜及高分辨分析方法研究焊缝的宏观成形、微观组织、力学性能及结构。讨论了焊缝在压缩应力和腐蚀作用下的滑移变形机制。结果表明:钛合金激光焊缝的压缩强度最大可达1.191 MPa;激光焊缝中可以观察到滑移行为,在断口中的滑移带最小为600 nm,在腐蚀试样中发现的滑移带最小为75 nm。
关键词:钛合金;激光焊;变形;力学性能
(Edited by LI Xiang-qun)
Foundation item: Project (51105240) supported by the National Natural Science Foundation of China
Corresponding author: XU Pei-quan; Tel: +86-13661448502; Fax: +86-21- 67791377; E-mail: peiquan.x@hotmail.com
DOI: 10.1016/S1003-6326(11)61437-4

