���ĺ���ĭ������Բ���ڰ�����ģ���ϵ��տڹ���
��Դ�ڿ����й���ɫ����ѧ��(Ӣ�İ�)2017���9��
�������ߣ�Seyed Ghaem AMIRHOSSEINI Abbas NIKNEJAD Nader SETOUDEH
����ҳ�룺1976 - 1988
�ؼ��ʣ����Ա��Σ��տڹ��̣���ɢ�ܣ�Բ�ܣ����죻�����غɣ�����λ��
Key words��plastic deformation; nosing process; dissipated energy; circular tube; nozzle; axial load; axial displacement
ժ Ҫ���������ۺ�ʵ�鷽�����о����ĺ;۰�����ĭ������Բ���ڰ�����ģ���е��տڹ��̡���֤�˹��ڿ��Ľ���Բ���ڰ�����ģ�������Ա��ε�������ģ�͡����ڸ�ģ�ͣ��Ʋ�����۷��̣����ڹ�����ĺ���ĭ�������ܵ�˲ʱ�����غɺͺ�ɢ��������λ�Ƶı仯���Ʊ��˻�ͭ�ܺ����ܲ��������Ϊ�������죬����֤������ģ�͡�����Ԥ����ʵ����Խ���Ƚϣ���ʾ����Ԥ����غ�-λ��ͼ�ͺ�ɢ��-λ��ͼ��ʵ�����������õ�һ���ԣ��Ӷ�֤���˸����۵���ȷ�ԡ����⣬ģ��ָ������ɢ�ܺ������غ�����Ľ����ܵIJ��ʡ��ں��ֱ���йأ������ʼ�����ء����ͬʱ��ʵ��������������ϩ�ط����Ĵ����������տڹ��̵ļ�������λ�ơ�
Abstract: Nosing process of circular metal tubes in empty and polyurethane foam-filled conditions on a semispherical rigid die was analyzed by theoretical and experimental methods. A new theoretical model of plastic deformation of circular metal tubes was demonstrated during the nosing process on a rigid semispherical die. Based on the analytical model, some theoretical relations were calculated to estimate instantaneous forming load and dissipated energy of empty and foam-filled circular metal tubes versus axial displacement. Some circular brazen and aluminum tubes were prepared and shaped into semispherical nosed nozzles to verify the present theory. Comparison of theoretical predictions and the corresponding experimental measurements reveals that predicted load-displacement and dissipated energy-displacement diagrams by theoretical formulas have a good correlation with the corresponding experimental curves and it proves verity of the theory. Also, the present theory shows that dissipated energy and axial load of empty tubes depend on material type, wall thickness and diameter of the tubes and they are independent of tube initial length. Furthermore, the experimental results show that the presence of polyethylene Teflon-constraints increases ultimate axial displacement of the forming process.
Trans. Nonferrous Met. Soc. China 27(2017) 1976-1988
Seyed Ghaem AMIRHOSSEINI1, Abbas NIKNEJAD1, Nader SETOUDEH2
1. Mechanical Engineering Department, Yasouj University, P. O. Box 75914-353, Yasouj, Iran;
2. Materials Engineering Department, Yasouj University, P. O. Box 75914-353, Yasouj, Iran
Received 5 July 2016; accepted 19 December 2016
Abstract: Nosing process of circular metal tubes in empty and polyurethane foam-filled conditions on a semispherical rigid die was analyzed by theoretical and experimental methods. A new theoretical model of plastic deformation of circular metal tubes was demonstrated during the nosing process on a rigid semispherical die. Based on the analytical model, some theoretical relations were calculated to estimate instantaneous forming load and dissipated energy of empty and foam-filled circular metal tubes versus axial displacement. Some circular brazen and aluminum tubes were prepared and shaped into semispherical nosed nozzles to verify the present theory. Comparison of theoretical predictions and the corresponding experimental measurements reveals that predicted load-displacement and dissipated energy-displacement diagrams by theoretical formulas have a good correlation with the corresponding experimental curves and it proves verity of the theory. Also, the present theory shows that dissipated energy and axial load of empty tubes depend on material type, wall thickness and diameter of the tubes and they are independent of tube initial length. Furthermore, the experimental results show that the presence of polyethylene Teflon-constraints increases ultimate axial displacement of the forming process.
Key words: plastic deformation; nosing process; dissipated energy; circular tube; nozzle; axial load; axial displacement
1 Introduction
Cold metal forming processes have been used for many years to produce precision component parts that have a near-net-shape, high structural integrity and good surface finish. Nosing is a simple variant of the cold forming process that is utilized in the manufacture of a wide range of components like tube connectors, revolution vessels and hollow spheres. Nosing was also referred to as a tube end forming process [1]. The term ��end forming of tubes�� is commonly used to describe the production of simple or complex tube end shapes by a wide variety of processes such as expansion, reduction, inversion, flaring, flanging and tapering that can be obtained by single or multiple metal forming processes. End-forming of thin-walled tubes by expansion and reduction is accomplished by forcing a tapered, dedicated punch (or die) into the tube end, and then retracting the punch (or die) back off after achieving the desired shape [2]. The process of tube end-forming has wider application on the production of revolution vessels, connection between tubes or fluid pipe circuit, and other flight fairings. The nosing forming is to press tube end into spherical die or conical die to form an ogive nose at tube end. As tube thickness thickens in the nosing process, preformed design of the initial shape for tube end is able to reduce further machining on the work- piece [3]. In addition, hollow spheres are currently utilized in multiple engineering applications ranging from small shapes utilized for setting up closed-cell foams for energy absorption, acoustic noise dissipation, and thermal insulation to large shapes employed in the assembling of industrial mixing bowls, liquid collection silos, and pressure reservoirs. There are applications of hollow spheres in transportation vehicles, civil construction, home appliances, modern design, and architectural parts [4]. Internal support with mandrels or loose fillers is commonly utilized to prevent the collapse by flattening or wrinkling. End forming of thin-walled tubes may also require internal support. Simple operations such as one side nosing and reduction can take advantage of conventional mandrels to prevent collapse by local instability and wrinkling [5].
In recent decades, many experimental and theoretical researches have studied end-forming of tubes to variant shapes. NIKNEJAD et al [6] used some rigid conical dies to perform splitting process on circular metal tubes under the quasi-static axial compression loading. Also, NIKNEJAD and MOEINIFARD [7] produced double-walled tubular parts by performing external inversion process on metal tubes with circular cross-section. MANABE and NISHIMURA [8] clarified the characteristics of nosing by a circular curved die by caring out some experiments on thin-walled aluminum tubes and they established advantages of circular curved die by comparing the results with those for a conical die. Numerical analysis was also performed on optimum die radius and die contact pressure by examining the effects of die profile on these quantities. REID and HARRIGAN [9] analyzed plastic deformation mechanisms of metal tubes during the quasi-static nosing and internal inversion by finite element code ABAQUS. KWAN [10] used the finite-element method to investigate the cold eccentric nosing process of metal tubes with an eccentric conical die from circular tube billets. Influences of process parameters such as tube length, tube thickness, die fillet radius, die angle, friction factor, strength coefficient and strain-hardening exponent of billet material on the critical nosing ratio of tubes were examined. ROSA et al [11] represented results of a comprehensive investigation on the internal inversion of thin-walled tubes using a die, theoretically and experimentally. LU [3] combined the volume incompressible condition, Levy�CMises equation, and explicit die profile description to develop analytical expressions for calculating the preformed shape, nosing ratio and tube end strain rate in the tube nosing process by spherical die. ALVES et al [2] carried out a numerical and experimental study on the expansion and reduction of thin-walled tubes by using different types of dies. ALMEIDA et al [12] extended the fundamentals of tube expansion and reduction using a die by a comprehensive theoretical and experimental investigation. Theoretical investigation was accomplished by the utilization of virtual prototyping modeling techniques based on the finite element method and the experimental work is mainly utilized for supporting and validating the theoretical investigation. ALVES et al [13] studied the expansion and reduction of thin-walled tubes using a die, theoretically and experimentally. The theoretical investigation was supported by axisymmetric and three- dimensional numerical simulations based on the finite element flow formulation. Some experimental works were performed on aluminum alloy tubes. KARRECH and SEIBI [14] focused on the expansion of metal tubes by driving rigid conical mandrels of various diameters through tubes to obtain desirable expansion ratios. A mathematical model was developed to predict stress field in the expanded zone and required drawing force for the expansion. ALVES and MARTINS [4] extended the scope of application of single-stage nosing so as to include small-batch production of polymer hollow spheres. Also, ALVES and MARTINS [15] addressed influences of material flow and damage on the occurrence of successful and unsuccessful modes of deformation with the objective of establishing the formability limits of the free expansion and reduction of thin-walled PVC tubes using a die. ALVES et al [5] introduced a novel type of mandrels (sacrificial polymer mandrels) that is expected to enlarge the tube forming window of very slender preforms by diminishing the risk of wrinkling and plastic instability. Besides, ALVES et al [16,17] introduced an innovative manufacturing process that is capable of shaping industrial tubes into small size, seamless, reservoirs made from a variety of materials and available in many shapes. The process was carried out by axial pressing the open ends of a tube against two shaped dies, while providing internal support by a low melting point (recyclable) mandrel, until achieving the desired shape of the reservoir. SALIH and ISMAIL [18] used the finite element analysis in nosing process and established principles of nosing process through different die profiles. ORSOLINI and BOOKER [1] studied the validity of forming load predictions through a comparison with experimental data taken from a forming press, and with two-dimensional (2D) and three-dimensional (3D) finite element analysis results, for a specific bearing size on the limit of a thin/thick section. Wrinkling and influence of rubber hardness on the winkling behavior in the rubber forming of convex flange was predicted by SUN et al [19]. They compared the predictions with experimental results of rubber forming process. WANG and YUAN [20] introduced a numerical method for coupled deformation between sheet metal and flexible-die. They used finite element method to analyze elastoplastic deformation of sheet metal and element-free Galerkin method to investigate bulk deformation of flexible-die. SIYAHPOOSH and NIKNEJAD [21] introduced a new theoretical deformation model during the contraction process as a cold metal forming process and calculated absorbed energy and instantaneous axial force of empty tubes with circular cross-section. NIKNEJAD et al [22] introduced a new manufacturing method to shape circular tubes into columns with triangular cross-section by the elastoforming process. Also, a theoretical analysis was performed to derive a theoretical formula for predicting total dissipated energy that is required for the forming process. Furthermore, NIKNEJAD and KARAMI FATH [23] investigated Teflon-pad forming of circular metal blanks into quasi-cup specimens by compressing metal sheets between a Teflon-filled die and a rigid punch with desirable shape by theoretical and experimental methods. A theoretical relation was derived to estimate required energy for shaping the circular blanks into the quasi-cup samples based on the energy method.
In this work, end-forming of circular metal tubes into spherical nosed tubes was investigated by theoretical and experimental methods, using a rigid semispherical die in two different conditions of empty and polyurethane foam-filled. For this purpose, a new theoretical model of plastic deformation was represented and some analytical relations were derived to predict instantaneous axial load and dissipated energy versus axial displacement during the nosing process on empty and filled tubes.
2 Theory
By compressing a circular metal tube on a die with semispherical hole, nosing process occurs as shown in Fig. 1. During the process, plastic deformations are considered in tube wall; and tube end is shaped into a semispherical pattern. Figure 1 illustrates the theoretical deformation model of tube in the forming process. Considering the introduced model, axial load and dissipated energy of circular tubes in two different conditions of empty and polyurethane foam-filled are obtained through the nosing progress using the work balance method.
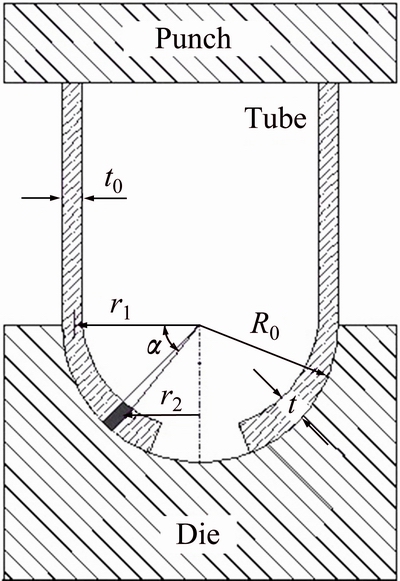
Fig. 1 Empty circular tube during nosing process using rigid semispherical die
2.1 Empty tube
Four different mechanisms of energy dissipater are considered in the theoretical deformation model of nosing process: circumferential contraction, bending of tube wall, meridian strain, and friction. Therefore, total dissipated energy during the forming process is equal to summation of dissipated energies by the circumferential contraction (Ec), tube wall bending (Eb), meridian strain (Em), and friction (Ef) as follows:
Et=Ec+Eb+Em+Ef (1)
When a circular metal tube is compressed into a rigid semi-spherical die, radius of tube cross-section decreases, nonlinearly. So, a circumferential contraction strain occurs in tube wall as the following relation:
 (2)
(2)
In the above equation, R0 is the outer radius of circular tube or radius of spherical die and t0 is initial wall thickness of the tube. Also, t and �� respectively indicate wall thickness and corresponding angle of volume element as shown in the figure. Initial mean radius of tube cross-section is equal to
 (3)
(3)
Also, mean radius of the volume element is obtained as
 (4)
(4)
Considering the volume constancy during plastic deformations, the following relation is obtained.
2��r1t0dL=2��r2tdL (5)
Substituting Eqs. (3) and (4) into Eq. (5) results in the following relation for estimating wall thickness of the volume element versus initial wall thickness and outer radius of the tube and position angle:
 (6)
(6)
Generally, in a rigid-perfectly plastic material, strain energy is calculated as
 (7)
(7)
where ��0 is the flow stress of tube material; and according to the following relation, it is obtained versus yield stress, ��y, ultimate stress, ��u, and strain hardening exponent, n [24].
 (8)
(8)
Substituting Eq. (2) into Eq. (7), a mathematical simplification results in the following formula to calculate strain energy due to the circumferential contraction:
 (9)
(9)
Bending of tube wall with a curvature radius equal to die radius is another energy dissipation mechanism during the forming process. Mean bending strain of the volume element is obtained as follows:
 (10)
(10)
By substituting Eq. (10) into Eq. (7), dissipated energy due to the bending process in tube end is calculated as
 (11)
(11)
During the nosing process, a bending progress occurs in the longitudinal direction of tube wall and an unbending progress occurs in the circumferential direction. In the present article, the first one is called as bending process and the next one is called as meridian strain. Dissipated energy by the meridian strain is equal to dissipated strain energy by the bending process due to the spherical geometry, so,
Em=Eb (12)
To obtain dissipated energy due to the friction, a volume element is considered as shown in Fig. 2 and an equilibrium equation is written in the radial direction for the mentioned element:
 (13)
(13)
In the above equation, q is the contact pressure in the radial direction and angles of �� and �� are two components of spherical coordinates. During the plastic deformation of the forming process, circumferential stress, ���� is equal to flow stress ��0. Therefore, according to the relation Pf=�Ҧ�qdA, friction force is calculated as follows:
 (14)
(14)
where �� is the friction coefficient of die-tube interface. Based on the geometrical relations, axial displacement of rigid platen is obtained as
��=r1�� (15)
Dissipated energy due to the friction phenomenon is derived as the following relation:
Ef=2��0��t0��2 (16)
Therefore, considering Eq. (15) and summing the dissipated energy by four mentioned mechanisms result in total dissipated energy during the nosing process versus axial platen displacement, ��:

 (17)
(17)
Equation (17) predicts the theoretical diagram of dissipated energy-axial displacement during the nosing process on an empty circular tube subjected to the quasi-static loading.
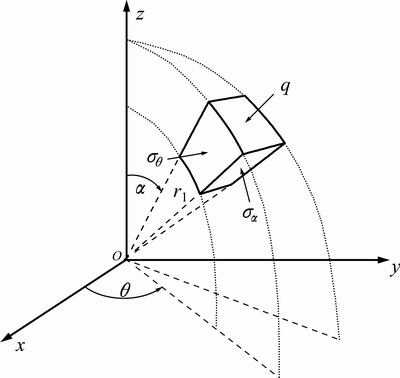
Fig. 2 Volume element in spherical coordinate system
Required axial load for performing the shaping process on empty circular tubes can be determined by differentiating instantaneous dissipated energy respect to axial displacement. Therefore, instantaneous axial load of the nosing process on empty metal tubes by a semispherical die is calculated as

 (18)
(18)
2.2 Polyurethane foam-filled tube
Based on theoretical concepts, total dissipated energy during the nosing progress on foam-filled tubes is equal to summation of energy dissipations by polyurethane foam and empty tube. Therefore, total dissipated energy by a filled tube during the process is as follows:
Efilled=Efoam+Et (19)
where Efoam is the energy dissipation by polyurethane foam-filler.
Polyurethane foam dissipates the kinetic energy during the compression process as the following relation:
Efoam=��p��V (20)
In the above equation, ��p and ��V are plateau stress and volume change of the foam during the forming process. Experimental observations demonstrate that stress-stain diagram of polyurethane foams during the axial compression is similar to the sketched curve in Fig. 3. The curve shows that value of the compressive stress on the polyurethane foam during a long course remains constant, approximately; and the corresponding stress is defined as plateau stress. Therefore, absorbed energy by polyurethane foam-filler is estimated as Eq. (20).
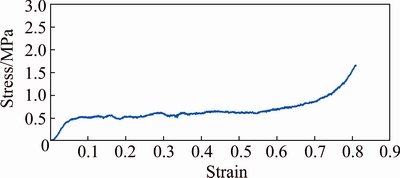
Fig. 3 Compressive stress-strain curve of used polyurethane (PU) foam
Polyurethane foam-filler is a porous material. Experimental results [25] of the compressive stress�C strain diagrams of polyurethane foams show that during a small displacement, normal stress increases versus displacement such as elastic deformation, linearly. So, during a wide range of displacement and until trapped air exists in the pores through the deformation, applied force on the polyurethane foam remains approximately in- variant. It is assumed that plateau stress is constant [25].
��V is the difference between initial and secondary volumes of the foam during the process and it can be calculated as
 (21)
(21)
So, by substituting Eq. (21) into Eq. (20), the following relation is obtained to predict energy dissipation by the foam:
 (22)
(22)
Substituting the above equation in Eq. (19) and differentiating respect to �� results in the following formula to predict instantaneous axial load versus axial displacement during the nosing progress:


 (23)
(23)
3 Experimental
In experimental part of the present research, some brazen and aluminum tubes were prepared to compress into a die with semispherical hole in the quasi-static condition. All tests were performed by a DMG machine, model 7166. The specimens were compressed between a rigid die and a rigid platen. Four dies with semispherical hole of 14, 16, 25 and 30 mm in diameters were made from hardened steel. Diameter of semispherical hole of the dies was selected based on the outer diameter of each sample. The dies with semi-sphere diameters of 14 and 16 mm were drilled and then finished; but, the dies with semi-sphere diameter of 25 and 30 mm were produced by a NC machine. Surface qualities of two different methods of die machining were different and also, qualities of external surface of aluminum and brazen tubes were different. Coulomb friction coefficient between drilled dies and brazen tubes was estimated as 0.1. Also, friction coefficients of brazen and aluminum tubes in contact with the NC machined dies were estimated as 0.2 and 0.3, respectively. In two different conditions of dry and lubricated surfaces, friction coefficient between two surfaces made of various metals is usually equal to 0.1-0.5. Value of friction coefficient is dependent on various parameters such as surfaces quality, the presence or absence of the lubricant and relative velocity of two surfaces. In the present research work, two different methods were used to manufacture the dies, which consist of drilling and NC machining. The experimental observations demonstrated that surface of the drilled dies is smoother than the NC machined dies. Furthermore, the experiments showed that external surface of the used brazen tubes is smoother than the aluminum ones. Lubricant was used in all the performed tests of the present article. Therefore, in the theoretical predictions, friction coefficients of the brazen tubes in contact with the drilled and NC machined dies were considered as to 0.1 and 0.2, respectively; and friction coefficient of the aluminum tubes in contact with the NC machined dies was considered equal to 0.3 based on the above justifications.
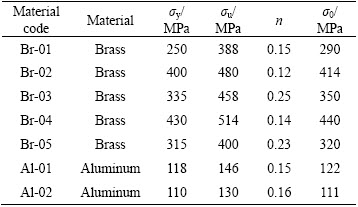
Figure 4 illustrates the dies with semi-sphere diameters of 25 and 30 mm. Brazen and aluminum specimens were prepared in different diameters, wall thicknesses and lengths to verify effects of geometrical characteristics on the process. The tubes were tested in two different filling conditions during the nosing process: empty and polyurethane foam-filled. In the filled condition, specimens were filled by polyurethane foam with plateau stress of 0.6 MPa. A solid cylindrical specimen of the polyurethane foam was prepared and used in the uniaxial compressive test to obtain the compression stress�Cstrain diagram of the foam (Fig. 3) and to determine its plateau stress. Table 1 lists characteristics of the specimens. In the table, D, t0 and L are outer diameter, initial wall thickness and length of tubes, respectively. Axial compression tests were performed in the quasi-static condition with a constant loading rate of 5 mm/min. Table 2 lists the material properties of different specimens that were measured from simple tensile tests according to ASTM E8M standard. Materials of the specimens are categorized in 5 types of brass and 2 types of aluminum which are indicated by Br-01-05 and Al-01-02, respectively. In Table 2, ��0, ��y and ��u are flow stress, yield stress and ultimate stress of tube material, respectively, and n is the power of strain hardening.
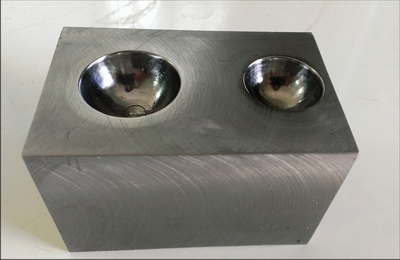
Fig. 4 Die with semi-sphere diameter of 25 and 30 mm
Table 1 Characteristics of specimens
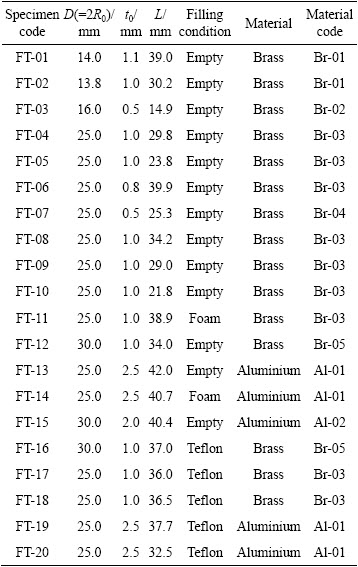
Table 2 Material properties of specimens
4 Results and discussion
In the theory, some new theoretical relations based on the energy method were introduced to predict diagrams of axial load-displacement and dissipated energy- displacement of empty and foam-filled tubes during the nosing process. The present theory shows that dissipated energy and forming load are dependent on material type, initial wall thickness and outer radius of tubes during the nosing process.
4.1 Verification of theory
Theoretical Eqs. (17) and (18) estimate dissipated energy and axial load in term of displacement for empty tubes during the nosing process. Some nosing tests were performed on empty tubes and experimental diagrams of load and energy dissipation versus displacement were sketched to compare with theoretical estimations and investigate verity of the present theory. Also, some specimens were filled by polyurethane foam and tested during the nosing process to verify theoretical Eq. (23).
4.1.1 Empty tubes
In the experiments, some empty brazen and aluminum tubes with different diameters and lengths were prepared and axially compressed to shape a circular tube into a spherical nozzle. Desired process occurs when tube end is shaped without folding in tube wall. All the tests were performed until the folding was considered in tubes wall.
Figures 5 and 6 respectively illustrate experimental diagrams of dissipated energy and axial load versus displacement of the specimen FT-01 with outer diameter of 14 mm and initial wall thickness of 1.1 mm. The corresponding theoretical curves of the specimens are illustrated in the figures to compare with the experimental results. Comparison of the theoretical and experimental curves in Figs. 5 and 6 shows that a good agreement is considered from the commencement of the process up to the folding creation in the empty tube with diameter of 14 mm and it proves verity of the present theory. Also, a reasonable correlation between slopes of two corresponding curves in each figure shows that the general form of the derived mathematical function for predicting axial load and dissipated energy is correct and the represented theoretical deformation model is compatible with the real behavior of the tube.
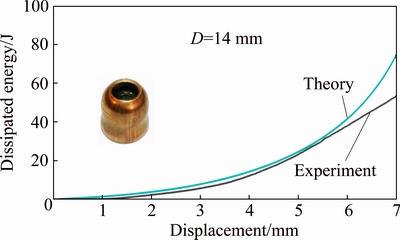
Fig. 5 Theoretical and experimental diagrams of dissipated energy-displacement of specimen FT-01
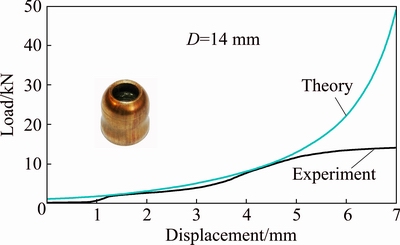
Fig. 6 Theoretical and experimental diagrams of axial load- displacement of specimen FT-01
As a numeric investigation, measurements show that at axial displacement of 4.7 mm, before the folding appearance, total dissipated energy of the experiment of the specimen FT-01 is equal to 19.5 J and the theoretical relation predicts it equal to 21 J. It shows an error percentage of 7.7% and consequently, logical accuracy of the present theory. Similar comparison for axial load at the same displacement of 4.7 mm shows that the error percentage of the theoretical estimation of axial load is 5%.
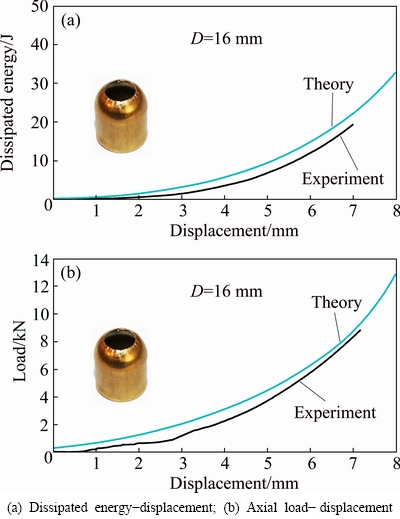
Fig. 7 Theoretical and experimental diagrams of specimen FT-03
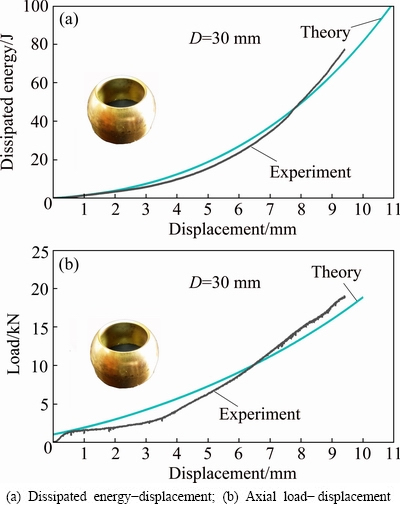
Fig. 8 Theoretical and experimental diagrams of specimen FT-12
According to Fig. 6, it is found that undesirable folding occurs during the nosing process. By increasing the axial displacement, the axial load increases. When the axial load reaches the threshold force of folding, folding phenomenon occurs in the tube wall as an undesirable deformation mode. This means that in the nosing process on empty tubes without any lateral constraints, there is an ultimate bound for axial displacement.
For better conclusion, Figs. 7 and 8 perform a comparison between theoretical and experimental diagrams of dissipated energy and axial load versus displacement for the brazen specimens FT-03 and FT-12, respectively. The specimens FT-03 and FT-12 have different diameters of 16 and 30 mm and wall thicknesses of 0.5 and 1.0 mm, respectively. The sketched curves in Figs. 7 and 8 show that before the folding appearance, error percentages of predicted dissipated energy by the theoretical relation (17) for specimens FT-03 and FT-12 are respectively 15% and 2.80% respect to the corresponding experimental measurements. Also, comparison of predicted axial load by Eq. (18) and the corresponding experiments on specimens FT-03 and FT-12 shows error percentage of 4.0% and 9.4 %, respectively. The figures illustrate similar trends of analytical axial load and dissipated energy variations during the nosing process comparing with the corresponding experimental results and it affirms compatibility of the introduced theoretical deformation model and the present theories with the real mechanical behavior of brazen empty tubes.
To investigate repeatability of the experiments three similar specimens of each group were prepared and tested. Also, some other nosing tests were carried out on aluminum tubes to investigate independence of precision and accuracy of the present theory respect to tube material type. Figure 9 compares the axial load- displacement diagrams of the aluminum specimens FT-15. Also, the energy dissipation-displacement diagrams of the aluminum specimen FT-13 are sketched in Fig. 10. In each figure, both of the theoretical and experimental curves are illustrated. The specimen FT-15 has nominal diameter of 30 mm and wall thickness of 2 mm; while, nominal diameter and wall thickness of the specimen FT-13 are 25 and 2.5 mm, respectively. The results indicate that error percentage of theoretical predictions for axial load of the specimen FT-15 is 3% and difference of energy dissipation of the specimen FT-13 is 8%, in comparison with the corresponding experimental measurements.
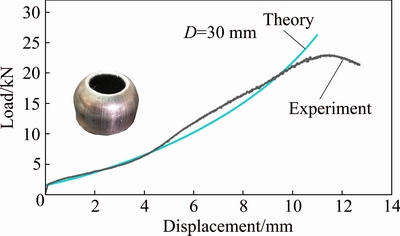
Fig. 9 Theoretical and experimental axial load-displacement diagrams of specimen FT-15
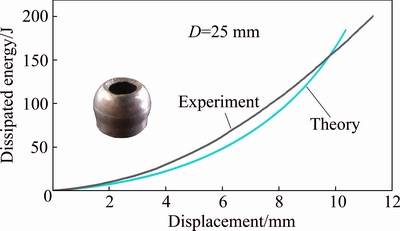
Fig. 10 Theoretical and experimental dissipated energy-displacement diagrams of specimen FT-13
The performed comparisons show that analytical Eqs. (17) and (18) can predict instantaneous axial load and dissipated energy versus displacement during the nosing process on aluminum tubes as well as brazen ones, in the empty condition. It proves independence of verity and accuracy of the present theory respect to tube material.
4.1.2 Foam-filled tubes
Theoretical Eq. (23) estimates the axial load- displacement diagram of circular metal tubes in the polyurethane foam-filled condition during the nosing process. Figure 11 compares the theoretical and experimental curves of axial load versus displacement of the foam-filled specimen FT-11 with outer diameter of 25 mm. An acceptable correlation between the results shows that the theoretical compression model of polyurethane foam and the derived relations are correct and compatible with the nosing behavior of metal tubes. In addition, the same trend is considered in the theoretical curve respect to the corresponding experimental curve.
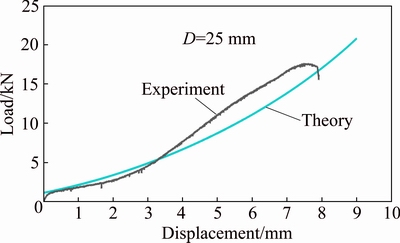
Fig. 11 Comparison of theoretical and experimental load- displacement diagrams of foam-filled specimen FT-11
For better comparison, Fig. 12 compares the theoretical and experimental dissipated energy- displacement curves of the foam-filled specimen FT-14 during the forming process on a semispherical die. As a numeric investigation, the figure shows that dissipated energy by the tube at the same axial displacement of 9.5 mm from the theoretical and experimental curves are obtained equal to 140.74 and 149.14 J. It shows an error percentage of 5.6% for the theoretical predictions respect to the corresponding experiment. Good agreement between the results asserts the accuracy of the present theoretical analysis. However, the figure shows that during the process, the theoretical curve is lower than the corresponding experimental curve and in some zones, their difference is considerable. Figure 3 shows that required stress for compressing the polyurethane foam is approximately constant during a long course; but, when axial displacement increases and reaches a certain value, by enhancing the axial displacement, required stress increases, nonlinearly. But, in the theoretical analysis, applied stress on the polyurethane foam-filler was considered as a constant value that called plateau stress. It can justify the considered difference between the sketched theoretical and experimental curves in Fig. 3.
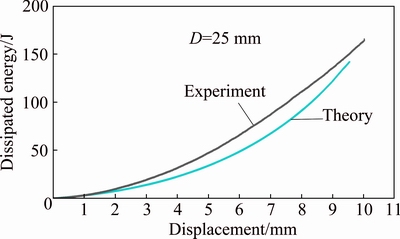
Fig. 12 Comparison of theoretical and experimental dissipated energy-displacement diagrams of foam-filled specimen FT-14
In the following sections, influences of some test characteristics are investigated on the nosing process of circular metal tubes.
4.2 Effects of tube length
Figure 13 demonstrates the load-displacement curves of the specimens FT-08, 09 and 10 to study the effects of initial tube length on the nosing process. The initial lengths of the specimens FT-08, 09 and 10 are respectively 34.2, 29.0 and 21.8 mm. Other characteristics of the mentioned samples are the same. Comparison of the experimental diagrams in Fig. 13 reveals that variations of tube length in the studied limit have no effect on required load through the nosing process. Also, experimental measurements show that the specimens FT-08, 09 and 10 with different tube lengths have the same energy dissipation during the tube end forming.
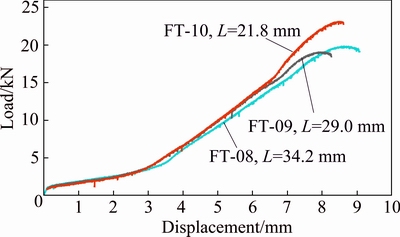
Fig. 13 Experimental load-displacement diagrams of empty brazen specimens FT-08, 09 and 10 with different lengths
Reviewing of the theoretical Eqs. (17) and (18) shows that the total dissipated energy and axial load are independent of tube initial length during the nosing process. Therefore, the same trend is considered in theoretical predictions and the corresponding experimental measurements in viewpoint of tube length effect.
4.3 Effects of tube radius
Figure 14 denotes the experimental diagram of axial load/flow stress versus axial displacement of the brazen specimens FT-02, 04 and 12 with the same wall thickness but, with different tube outer diameters of 13.8, 25 and 30 mm, respectively. It can be seen that at the same displacement of the nosing process, when tube diameter reduces, required axial load increases and folding phenomenon occurs in a smaller displacement.
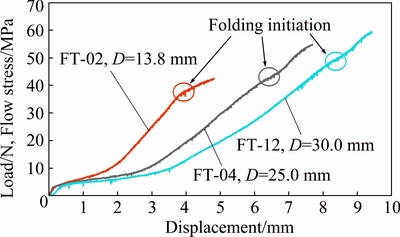
Fig. 14 Experimental curves of axial load/flow stress versus displacement of empty brazen specimens FT-02, 04 and 12
Equation (18) predicts the instantaneous axial load of nosing process on empty tubes using a semispherical die. Figure 15 illustrates the theoretical and experimental results of required axial load/flow stress of the specimens FT-02, 04 and 12 with the same wall thickness of 1.0 mm and different diameters of 13.8, 25 and 30 mm at the same axial displacement of 3.5 mm. It can be seen that in the nosing process on empty tubes with different diameters and with the same other characteristics, when the tube diameter enhances the axial load reduces and this reasonable correlation between the results demonstrates the precision of the present theory. Experimental measurements show that total dissipated energy/flow stress of the specimens FT-02, 04 and 12 are equal to 0.08, 0.11 and 0.17 J/MPa, respectively. This means that by increasing tube diameter total dissipated energy during the forming process of nosing enhances. In other words, although tubes with smaller diameter need higher forming load at a certain displacement, and their total dissipated energies are less than larger tubes during the process.
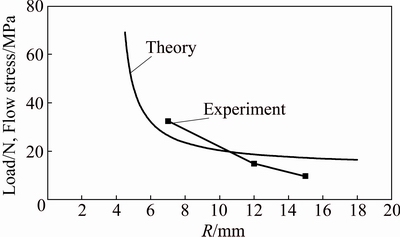
Fig. 15 Theoretical and experimental results of axial load/flow stress of specimens FT-02, 04 and 12 at same axial displacement versus tube radius
4.4 Effects of tube wall thickness
Figure 16 illustrates the experimental diagrams of the instantaneous axial load versus axial displacement of the specimens FT-05, 06 and 07. The samples have the same outer diameter of 25 mm but their wall thicknesses are different and equal to 0.5, 0.8 and 1.0 mm. The curves show that the thinnest brazen specimen FT-07 has the least axial load and the thickest sample FT-05 has the highest nosing load. This means that when thicker tube is used in the nosing process, the required axial load increases.
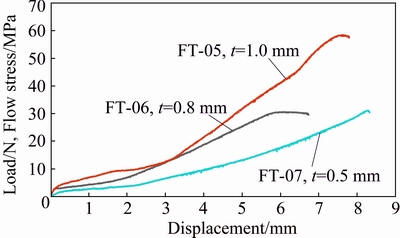
Fig. 16 Experimental curves of axial load/flow stress versus axial displacement of empty brazen specimens FT-05, 06 and 07
Also, by considering the analytical Eq. (18) it is found that the present theory introduces a second-order polynomial function for axial load of nosing process on empty tubes respect to tube wall thickness.
For better comparison, Fig. 17 represents the theoretical curve of axial load/flow stress versus tube wall thickness and also, the experimental results of the specimens FT-05, 06 and 07 as the squared markers. The figure shows that the theoretical predictions and experimental measurements show a nonlinear incremental trend of forming load respect to tube wall thickness and it is another proof of the present theory precision.
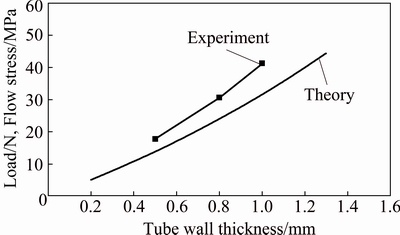
Fig. 17 Theoretical curve and experimental results of axial load/flow stress versus tube wall thickness
4.5 Effects of polyethylene Teflon-filler
Some specimens of each geometrical group were filled by polyethylene Teflon to investigate the influences of Teflon-filler on the nosing process. Then, they were axially compressed between a rigid platen and a semispherical die for shaping end of the tubes. Teflon-filler was used as the filler to improve the shaping progress and to enhance ultimate axial displacement before the folding appearance. In other words, the polyethylene Teflon-filler is used to increase the nosing process course and decrease the radius of tube edge cross-section. Different geometries of polyethylene Teflon were prepared and used as lateral constraint during the nosing processes to achieve optimum filling condition. Investigated experimental conditions showed that in the studied cases, as the best geometrical shape of the fillers, the specimens were filled by a Teflon rod with initial length of (L-R0), and a hole with diameter of 60% of tube inner diameter and depth of (��/2-1)��R0 was drilled on the Teflon rod end. Also, a thick-walled cylinder of Teflon with inner diameter equal to tube outer diameter, was put around the tube wall as a lateral constraint. Figure 18 illustrates the specimens FT-16, 17 and 19 with inner polyethylene Teflon-filler and also, outer cylindrical constraint before the shaping test.
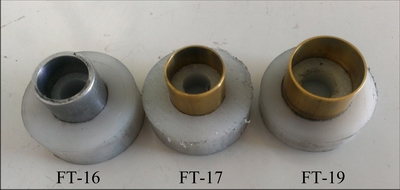
Fig. 18 Photos of specimens FT-16, 17 and 19 before shaping test
Experimental measurements show that by using the mentioned lateral constraints of polyethylene Teflon, nosing course increases and the forming process improves. For better comparison, ratio of axial displacements of constrained specimen to empty one (��filled/��empty) is introduced as a suitable criterion to investigate the effects of polyethylene Teflon constraints on the nosing process. Numeric measurements show that ��filled/��empty ratio of the brazen specimens FT-16, FT-17 and the aluminum specimen FT-19 with diameters of 30, 25 and 25 mm are 1.1, 1.1 and 1.4, respectively. On the other hand, ultimate axial displacements of the constrained specimens FT-16, 17 and 19 increase up to 0.8, 0.8 and 3.7 mm, with respect to the corresponding empty specimens (��filled-��empty).
Figure 19 shows the axial load-displacement curves of the aluminum specimens FT-13 and FT-19. According to the figure, a considerable increment is considered in the nosing course of the constrained specimen respect to the other one. This means that the presence of polyethylene Teflon improves the nosing process on circular tubes. Also, as a desirable phenomenon, the presence of Teflon constraint does not enhance required force for the forming process. In addition, Fig. 20 compares the axial load-displacement diagrams of the constrained brazen specimens FT-16 and FT-17 with the corresponding empty specimens FT-12 and FT-08, respectively. The figure indicates that the axial displacement of the constrained specimens is higher than the corresponding empty ones and it proves the advantage of using the polyethylene Teflon as the lateral constraints for improving the forming process.
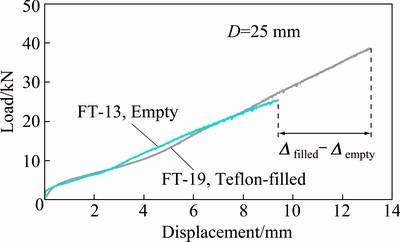
Fig. 19 Experimental load-displacement curves of empty and Teflon-filled aluminum specimens FT-13 and FT-19
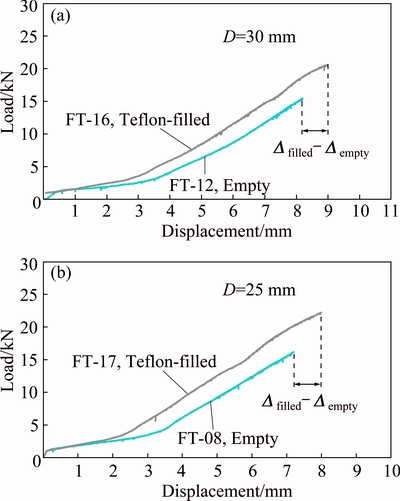
Fig. 20 Experimental load-displacement curves of Teflon- filled and empty brazen specimens FT-16 and FT-12 (a), FT-17 and FT-08 (b)
Furthermore, some of the specimens were tested with different conditions of lateral constraints. In the following, two types of unsuccessful constraints are considered.
The empty specimen FT-08 and the constrained specimen FT-18 were prepared and tested under the axial loading to perform the nosing process. Unlike the specimens FT-16, 17 and 19 with the optimum constraints, the specimen FT-18 was laterally constrained by an inner solid Teflon rod with initial length of (L-R0) and with an outer hollow cylinder of Teflon. Figure 21 illustrates the constrained brazen specimen FT-18.
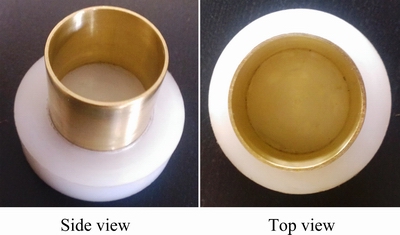
Fig. 21 Photos of constrained brazen specimen FT-18 before test
Experimental results show that the recent constraint by an inner solid Teflon rod causes an undesirable reduction in the ultimate axial displacement. Figure 22 shows the experimental axial load-displacement curves of the constrained specimen FT-18 and the empty specimen FT-08.
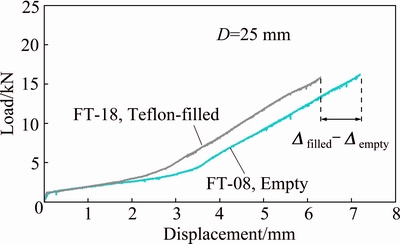
Fig. 22 Experimental load-displacement curves of empty and constrained brazen specimens FT-08 and FT-18
According to the figure and numeric measurements, it is found that the difference between ultimate axial displacements of the constrained and empty specimens FT-18 and FT-08 is equal to -0.9 mm. This means that by constraining the specimen FT-18 with the inner Teflon rod, ultimate axial displacement of the nosing process decreases as an undesirable phenomenon.
To investigate another lateral constraint pattern, Fig. 23 compares the experimental curves of the empty specimens FT-13 and the corresponding constrained sample FT-20. The specimen FT-20 was laterally constrained by a Teflon rod with initial length of L-R0 while a hole with a diameter equal to 60% of tube outer diameter and depth of (��/2-1)��R0 has been drilled on the Teflon rod cross-section. No constraint was used into the tube. Figure 23 illustrates that the ultimate axial displacement of the constrained specimen increases by 1.1 mm; but, its ultimate axial displacement increment is less than the corresponding increment of the optimum constrained specimen FT-19 respect to the empty sample. In other words, in similar filling condition by the Teflon into the tubes, the presence of the outer Teflon constraint causes a desirable increment in the ultimate axial displacement; so, the outer constraint improves the nosing process.
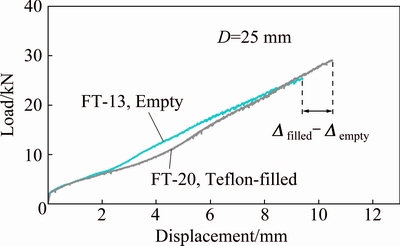
Fig. 23 Experimental load-displacement curves of empty aluminum specimens FT-13 and corresponding and internal constrained sample FT-20
5 Conclusions
This article introduces a new theoretical model of the nosing process on circular metal tubes in empty and foam-filled conditions using a rigid semispherical die. Based on the introduced model, instantaneous axial load and dissipated energy during the nosing process are predicted in term of axial displacement. The theoretical analysis demonstrates that dissipated energy and axial load of empty tubes are dependent on material type, tube wall thickness and tube outer radius. Then, some axial compression tests were performed on aluminum and brazen tubes to investigate the precision of the theory. An acceptable correlation between the theoretical predictions and the experimental results proves the accuracy of the suggested theoretical model. Also, the theoretical analysis and experimental measurements show that the dissipated energy during the nosing process on circular metal tubes is independent of initial tube length. Furthermore, to improve the nosing process and increase the nosing course, some different patterns of polyethylene Teflon cylinders were used as the inner and outer lateral constraints on the metal tubes. The experimental results show that the presence of polyethylene Teflon-constraints enhances the ultimate axial displacement of the forming process.
Acknowledgments
The authors gratefully acknowledge Eng. Ezzatallah Hosseinzadeh for his supports in preparing the specimens and Mr. Yashar ABDOLZADEH for his help in this research program. Also, the authors gratefully acknowledge Strength of Materials Laboratory in Yasouj University. This article is a part of Dr. Abbas Niknejad��s Research Mater Plan in Yasouj Unibersity.
References
[1] OROLINI A, BOOKER J D. Modeling capabilities required for the double nosing process in the assembly of spherical plain bearings [J]. Proceedings of the Institution of Mechanical Engineers, Part B: Journal of Engineering Manufacture, 2012, 226(5): 930-940.
[2] ALVES M L, ALMEIDA B P P, ROSA P A R, MARTINS P A F. End forming of thin-walled tubes [J]. Journal of Materials Processing Technology, 2006, 177: 183-187.
[3] LU Y H. Study of preform and loading rate in the tube nosing process by spherical die [J]. Computer Methods in Applied Mechanics and Engineering, 2005, 194: 2839-2858.
[4] ALVES L M, MARTINS P A F. Nosing of thin-walled PVC tubes into hollow spheres using a die [J]. International Journal of Advanced Manufacturing Technology, 2009, 44: 26-37.
[5] ALVES L M, PARDAL T C D, MARTINS P A F. Forming of thin-walled hollow spheres using sacrificial polymer mandrels [J]. International Journal of Machine Tools and Manufacture, 2009, 49: 521-529.
[6] NIKNEJAD A, REZAEI B, LIAGHAT G H. Empty circular metal tubes in the splitting process�Ctheoretical and experimental studies [J]. Thin-Walled Structures, 2013, 72: 48-60.
[7] NIKNEJAD A, MOEINIFARD M. Theoretical and experimental studies of the external inversion process in the circular metal tubes [J]. Materials and Design, 2012, 40: 324-330.
[8] MANABE K I, NISHIMURA H. Nosing of thin-walled tubes by circular curved dies [J]. Journal of Mechanical Working Technology, 1984, 10: 287-298.
[9] REID S R, HARRIGAN J J. Transient effects in the quasi-static and dynamic internal inversion and nosing of metal tubes [J]. International Journal of Mechanical Sciences, 1998, 40(2-3): 263-280.
[10] KWAN C T. An analysis of the eccentric nosing process of metal tubes [J]. Journal of Materials Processing Technology, 2003, 140: 530-534.
[11] ROSA P A, RODRIGUES J M C, MARTINS P A F. Internal inversion of thin-walled tubes using a die: Experimental and theoretical investigation [J]. International Journal of Machine Tools and Manufacture, 2004, 44: 775-784.
[12] ALMEIDA B P P, ALVES M L, ROSA P A R, BRITO A G, MARTINS P A F. Expansion and reduction of thin-walled tubes using a die: Experimental and theoretical investigation [J]. International Journal of Machine Tools and Manufacture, 2006, 46: 1643-1652.
[13] ALVES M L, GOUVEIA B P P, ROSA P A R, MARTINS P A F. On the analysis of the expansion and reduction of thin-walled tubes using a die [J]. Proceedings of the Institution of Mechanical Engineers, Part B: Journal of Engineering Manufacture, 2006, 220: 823.
[14] KARRECH A, SEIBI A. Analytical model for the expansion of tubes under tension [J]. Journal of Materials Processing Technology, 2010, 210: 356-362.
[15] AlVES L M, MARTINS P A F. Cold expansion and reduction of thin-walled PVC tubes using a die [J]. Journal of Materials Processing Technology, 2009, 209: 4229-4236.
[16] ALVES L M, PARDEL T C D, MARTINS P A F. Nosing thin-walled tubes into axisymmetric seamless reservoirs using recyclable mandrels [J]. Journal of Cleaner Production, 2010, 18: 1740-1749.
[17] ALVES L M, SILVA M B, MARTINS P A F. Fabrication of small size seamless reservoirs by tube forming [J]. International Journal of Pressure Vessels and Piping, 2011, 88: 239-247.
[18] SALIH D S M, ISMAIL A R. Investigation die profile effect on nosing process using finite element method [J]. Modern Applied Science, 2011, 5: 2.
[19] SUN Yong-na, WAN Min, WU Xiang-dong. Wrinkling prediction in rubber forming of Ti-15-3 alloy [J]. Transactions of Nonferrous Metals Society of China, 2013, 23(10): 3002-3010.
[20] WANG Zhong-jin, YUAN Bin-xian. Numerical analysis of coupled finite element with element-free Galerkin in sheet flexible-die forming [J]. Transactions of Nonferrous Metals Society of China, 2014, 24(2): 462-469.
[21] SIAHPOOSH P, NIKNEJAD A. Contraction process of the circular tubes on the conical die-theory and experiment [J]. Proceedings of the Institution of Mechanical Engineers, Part B: Journal of Engineering Manufacture, 2016, 230(3): 475-493.
[22] NIKNEJAD A, AMIRHOSSEINI S G H, SETOUDEH N. Theoretical and experimental investigation of shaping process of circular metal tubes into triangular columns by the elastoforming method [J]. Proceedings of the Institution of Mechanical Engineers, Part B: Journal of Engineering Manufacture, DOI: 10.1177/ 0954405415595915 (Online).
[23] NIKNEJAD A, KARAMI FATH I. Teflon-pad shaping process of circular metal blanks into quasi-cup specimens by theoretical and experimental methods [J]. Transactions of Nonferrous Metals Society of China, 2016, 26: 213-227.
[24] SANTOSA S P, WIERZBICKI T, HANSSEN A G, LANGSETH M. Experimental and numerical studies of foam-filled sections [J]. International Journal of Impact Engineering, 2000, 24: 509-534.
[25] NIKNEJAD A, M RAHMANI D. Experimental and theoretical study of the lateral compression process on the empty and foam-filled hexagonal columns. Materials and Design, 2014, 53: 250-261.
Seyed Ghaem AMIRHOSSEINI1, Abbas NIKNEJAD1, Nader SETOUDEH2
1. Mechanical Engineering Department, Yasouj University, P. O. Box 75914-353, Yasouj, Iran;
2. Materials Engineering Department, Yasouj University, P. O. Box 75914-353, Yasouj, Iran
ժ Ҫ���������ۺ�ʵ�鷽�����о����ĺ;۰�����ĭ������Բ���ڰ�����ģ���е��տڹ��̡���֤�˹��ڿ��Ľ���Բ���ڰ�����ģ�������Ա��ε�������ģ�͡����ڸ�ģ�ͣ��Ʋ�����۷��̣����ڹ�����ĺ���ĭ�������ܵ�˲ʱ�����غɺͺ�ɢ��������λ�Ƶı仯���Ʊ��˻�ͭ�ܺ����ܲ��������Ϊ�������죬����֤������ģ�͡�����Ԥ����ʵ����Խ���Ƚϣ���ʾ����Ԥ����غ�-λ��ͼ�ͺ�ɢ��-λ��ͼ��ʵ�����������õ�һ���ԣ��Ӷ�֤���˸����۵���ȷ�ԡ����⣬ģ��ָ������ɢ�ܺ������غ�����Ľ����ܵIJ��ʡ��ں��ֱ���йأ������ʼ�����ء����ͬʱ��ʵ��������������ϩ�ط����Ĵ����������տڹ��̵ļ�������λ�ơ�
�ؼ��ʣ����Ա��Σ��տڹ��̣���ɢ�ܣ�Բ�ܣ����죻�����غɣ�����λ��
(Edited by Xiang-qun LI)
Corresponding author: Abbas NIKNEJAD; Tel: +98-74-31001301; Fax: +98-74-31009555; E-mail: Aniknejad@yu.ac.ir
DOI: 10.1016/S1003-6326(17)60222-X

