����Ħ���ӹ�SiP/ZA40ԭλ���ϲ��ϵ�Ħ��ѧ��Ϊ
��Դ�ڿ����й���ɫ����ѧ��(Ӣ�İ�)2020���11��
�������ߣ�F. RAJABI R. TAGHIABADI M. H. SHAERI
����ҳ�룺3043 - 3057
�ؼ��ʣ�Zn-40Al-2Cu�Ͻ𣻹裻���ϲ��ϣ�Ħ��ѧ������Ħ���ӹ�
Key words��Zn-40Al-2Cu alloy; silicon; composite; tribology; friction stir processing
ժ Ҫ���о���ͬ����Ħ���ӹ�(FSP)���ղ�����ת��(400��630��800��1000 r/min)���ƶ��ٶ�(25��50 mm/min)�� Si ������ǿZn-40Al-2Cu��ԭλ���ϲ���Ħ�����ܵ�Ӱ�졣���������Ż���ѡ��800 r/min��25 mm/min��Ϊ���FSP������������������ö����FSP�ܸ��Ʋ��ϵ�Ħ�����ܡ����磬��0.75 MPa�غ��£����ĵ���FSP�ĸ��ϲ���ĥ���ʺ�ƽ��Ħ������(COF)�ֱ��δ�ӹ��ĸ��ϲ��Ͻ���53% ��50%��ĥ������ĥм��ɨ��� �������ʾ������֯�������Ǵֹ�������ܼ�ϸ���;��ȷֲ�����������ļ�С������ȱ�ݵ�����������忹���Ʊ�����������Ҫ���ء���Щ���ش�ʹ�γ��ȶ���Ħ���㣬�Ӷ����Ʋ��ϵ�Ħ�����ܡ�
Abstract: The effect of friction stir processing (FSP) at different rotation speeds (400, 630, 800, and 1000 r/min) and traverse speeds (25 and 50 mm/min) on the tribological properties of a Si particle reinforced Zn-40Al-2Cu-based in-situ composite was investigated. After preliminary optimization, 800 r/min and 25 mm/min were selected as optimum FSP parameters. According to the results, multi-pass FSP improved the tribological properties. For instance, at an applied pressure of 0.75 MPa, the wear rate and average coefficient of friction (COF) of four-pass FSPed composite were lower than those of base composite by 53% and 50%, respectively. SEM examinations of worn surfaces, wear debris, and worn subsurfaces revealed that the intensive refinement and uniform distribution of microstructural phases, especially the coarse Si particles, reduced Si particles interspacing, and elimination of casting defects were the most important factors enhancing the substrate resistance against sliding-induced deformation. This led to the formation of stable tribolayers that improved the tribological properties.
Trans. Nonferrous Met. Soc. China 30(2020) 3043-3057
F. RAJABI, R. TAGHIABADI, M. H. SHAERI
Department of Materials Science and Metallurgy, Imam Khomeini International University (IKIU), Qazvin, Iran
Received 23 February 2020; accepted 29 July 2020
Abstract: The effect of friction stir processing (FSP) at different rotation speeds (400, 630, 800, and 1000 r/min) and traverse speeds (25 and 50 mm/min) on the tribological properties of a Si particle reinforced Zn-40Al-2Cu-based in-situ composite was investigated. After preliminary optimization, 800 r/min and 25 mm/min were selected as optimum FSP parameters. According to the results, multi-pass FSP improved the tribological properties. For instance, at an applied pressure of 0.75 MPa, the wear rate and average coefficient of friction (COF) of four-pass FSPed composite were lower than those of base composite by 53% and 50%, respectively. SEM examinations of worn surfaces, wear debris, and worn subsurfaces revealed that the intensive refinement and uniform distribution of microstructural phases, especially the coarse Si particles, reduced Si particles interspacing, and elimination of casting defects were the most important factors enhancing the substrate resistance against sliding-induced deformation. This led to the formation of stable tribolayers that improved the tribological properties.
Key words: Zn-40Al-2Cu alloy; silicon; composite; tribology; friction stir processing
1 Introduction
The cast Zn-Al-based alloys, due to their unique properties including low cost, low melting point, high fluidity, high wear resistance, very good friction characteristics, very high corrosion resistance, and favorable mechanical properties, are promising candidates for substitution of ferrous and non-ferrous components in applications where high mechanical and tribological properties are required [1-3].
The mechanical properties and wear resistance of these alloys can be further improved by the addition of appropriate amounts of allying elements such as Cu. According to Refs. [2,4], Cu addition encourages the formation of hard e-CuZn4 interdendritic in the microstructure of Zn-Al alloys, thus, improving their hardness and wear resistance. However, there is a maximum limit for Cu (e.g. 2wt.% in monotectoid Zn-40Al-2Cu alloy), above which increasing volume fraction of e-CuZn4 phase deteriorates the wear resistance and tensile properties [4].
Si is another element that can be added individually, or along with Cu, to the composition of Zn-Al alloys to increase their strength, load- bearing capacity, and tribological properties [4]. However, due to its limited solid-solubility in Zn-Al matrix [5], Si almost entirely precipitates as nearly pure primary Si (SiP) and/or eutectic (SiE) particles in the matrix, of which their size, morphology, and distribution are concentration- dependent. SAVASKAN and BICAN [4] determined 2.0 wt.% as the critical Si concentration in Zn-40Al alloy, above which the formed coarse brittle SiP particles deteriorate mechanical and wear properties. PRASAD [6] also demonstrated that adding Si (more than 2.0 wt.%) promotes formation of primary Si in the microstructure of Al-37.5Zn alloy. Based on Prasad��s work, SiP particles facilitate the nucleation and propagation of cracks which increase the alloy��s wear. However, it was found that the presence of high-melting-point Si crystals can decrease the alloy��s wear at high sliding speeds, where surface temperature is substantially high. LIU et al [7] studied the wear properties of ZA27-5Si alloy in as-cast and spray-deposited conditions. Their results showed that the wear resistance and anti-friction capacity of spray-deposited ZA27-5Si alloy were significantly greater than those of traditionally-cast samples. This improvement was attributed to the fine and uniform distribution of SiP particles within the matrix, lower number of porosities, and development of lamellar eutectoid phase with improved interfaces with SiP particles.
Therefore, to take the benefits of high Si content for tribological properties of Zn-Al-Si alloys, it seems necessary to refine the size, modify the morphology, and improve the distribution of SiP particles in the matrix. With regard to the compositional/morphological similarity between the SiP particles present in the microstructure of cast Zn-40Al-2Cu and hypereutectic Al-Si alloys, different techniques can be used to modify the shape and distribution of SiP particles in the microstructure of Zn-40Al-2Cu alloy, the most important of which are heat treatment [8], rapid solidification [9,10], mechanical processing techniques (e.g. extrusion [11], equal channel angular pressing (ECAP) [12] and compressive torsion process (CTP) [13]), molten metal processing techniques such as mechanical stirring, intensive shearing, electromagnetic stirring or ultrasonic treatment of solidifying alloy [14-17]. However, regardless of their effectiveness, some of these methods are expensive, some of them need special equipment, some are encountered with the sample size/shape limitations, and some cannot be used for modification of alloys with limited plasticity (like HCP structured alloys). Chemical modification [18,19] is also a simple efficient process capable of SiP modification. However, the exact control of the type and concentration of the modifier element(s) is of crucial importance. Otherwise, alloy properties are likely to be degraded via formation of micropores, and hard intermetallics rich in modifier element, etc [20,21].
Friction stir processing (FSP) [22,23] is another effective technique that can be used to modify the as-cast microstructure of Zn-Al-based alloys. In FSP, a non-consumable rotating pin tool is forced to the alloy surface until its shoulder touches the surface. The rotating tool is dwelled for a predetermined time after which it is allowed to travel in the desired direction. The tool/work-piece frictional interaction, on one hand, locally increases the surface temperature, softens the material in the stirring zone (SZ) and, on the other hand, promotes the intense mixing of the material around the pin forming a localized region that experiences effective microstructural refinement, homogenization and densification.
The efficiency of FSP in microstructural refinement and mechanical properties improvement of different alloys especially the alloys/composites comprising of coarse (primary) phases in their microstructure was previously investigated [24-28]. However, to the best of our knowledge, little attention has been given so far to study the effect of FSP on Zn-Al-based alloys. As discussed above, the optimum Si concentration to give the best combined mechanical and tribological properties in ZA40-based composites is about 2 wt.% [4]. In the current study, we attempted to improve the tribological properties of Si particle reinforced ZA40 in-situ composite (Zn-40Al-2Cu-2Si) via FSP surface modification.
2 Experimental
The experimental alloys were prepared by using commercially pure Zn (99.8 wt.%), high- purity Al (99.9 wt.%), high purity Cu (99.9 wt.%), and Al-30Si master alloy. The melting operation was carried out in a SiC crucible using a resistance furnace (AZAR VM2L-1200/3.9 kW). Once being prepared, the molten alloy was skimmed, heated up to 550 ��C, and gently stirred, manually, by a coated stainless steel rod for 2 min before being cast into a pre-heated (180 ��C) cast-iron mold to obtain slabs with dimensions of 150 mm �� 100 mm �� 10 mm. The average cooling rate of the molds was 4.8 ��C/s. The chemical composition of the base alloy analyzed by X-ray fluorescence spectrometer (ARL ADVANT XP) is presented in Table 1.
FSP was conducted using an MST FP-4M universal milling machine. The FSP tool was made from a hardened and tempered AISI H13 steel (HRC (58��2)). The schematic diagrams showing the FSP process, tool shape and its geometry are illustrated in Fig. 1. FSP was performed under different rotation speeds of 400, 630, 800, and 1000 r/min, and traverse speeds of 25 and 50 mm/min. The plunge depth was kept at 0.3 mm. FSPed samples were characterized by a three-part number system as xxx-xx-x. The first part refers to the rotation speed (r/min), the second part (after the first dash) refers to the traverse speed (mm/min), and the third part (after the second dash) refers to the number of FSP passes. It is worth mentioning that, due to their partial melting during FSP, the samples processed at a rotation speed of 1000 r/min were not further investigated.
The Vickers microhardness test (according to ASTM E��384) was performed using a Gnehm- Hartepr��fer FM100 microhardness tester with a load of 0.5 kg for a dwelling time of 15 s on the transverse cross-section of FSPed surface layer at the mid-thickness of the processed zone. The average of six indentation tests was reported as the final microhardness value. Shear punch testing, as an appropriate method to measure mechanical properties of small-sized specimens [29], was employed to determine the mechanical properties of samples extracted from the stirring zone. Thin square sheets (0.8 mm in thickness) were cut by diamond saw from the SZ of FSPed samples. The obtained sheets were then polished down to a thickness of 0.7 mm and punched using a shear punch fixture with a 6.2 mm-diameter flat cylindrical punch and a 6.25 mm-diameter receiving hole. All the shear punch tests were carried out using a Zwick/Roell Z100 universal testing machine at a constant cross-head speed of 1 ��m/s and the average values of three samples were reported as the final results. The shear stress was calculated as follows [30]:
 (1)
(1)
where t, P, and t represent the shear stress, applied force, and specimen thickness, respectively, and rave is the average radius of the punch and the die, which is obtained using the following relation:
 (2)
(2)
where rpunch and rdie are radii of the punch and the die, respectively.
The following equation was also used for measuring normalized punch displacement (d):
d=h/t (3)
where h is the punch displacement.
Table 1 Chemical composition of investigated alloys

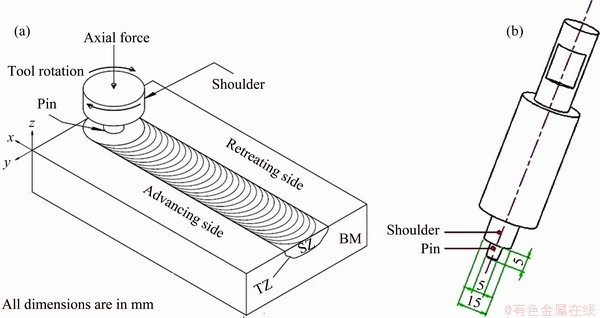
Fig. 1 Schematic diagrams showing FSP process (a) and geometry and dimensions of FSP tool (b) (Unit: mm)
Pin-on-disk apparatus (TR-20 DUCOM) in accordance with ASTM G99��90 was used for dry sliding wear tests. The wear tests were carried out under the applied pressures of 0.25, 0.5, and 0.75 MPa at a constant sliding speed of 0.13 m/s for a sliding distance of 1000 m at ambient temperature with the relative humidity controlled at (48��3)%. The cylindrical pins of 9 mm in height and 6 mm in diameter were extracted from the slabs by wire cutting. The disk material was made of hardened AISI/SAE 52100 steel (HRC (60��2)). The average roughness (Ra) of the pin and disk surfaces was measured using a Hummel Werke-T-800 profilometer and Ra values were determined to be 1.23 and 0.38 mm for the pin and disk surfaces, respectively. The tests were repeated at least three times under the same conditions. Before each test, the specimens were rinsed ultrasonically in distilled water and immersed in acetone and cold distilled water.
The cross-sections of the samples were polished mechanically for metallography purposes and etched with a 10 mL HF+90 mL distilled water reagent. The microstructural examination of specimens and morphological examination of worn surfaces and wear debris were performed by a VEGA/Tescan and an AIS2300C scanning electron microscope (SEM) equipped with energy dispersive spectroscopy (EDS) device, respectively. The Archimedes�� principle was applied to determining the porosity level of the samples as described comprehensively elsewhere [31]. Quantitative metallography was also carried out using a UTHSCSA image tool (Ver. 1.28).
3 Results and discussion
3.1 Microstructural characterization and mechanical properties
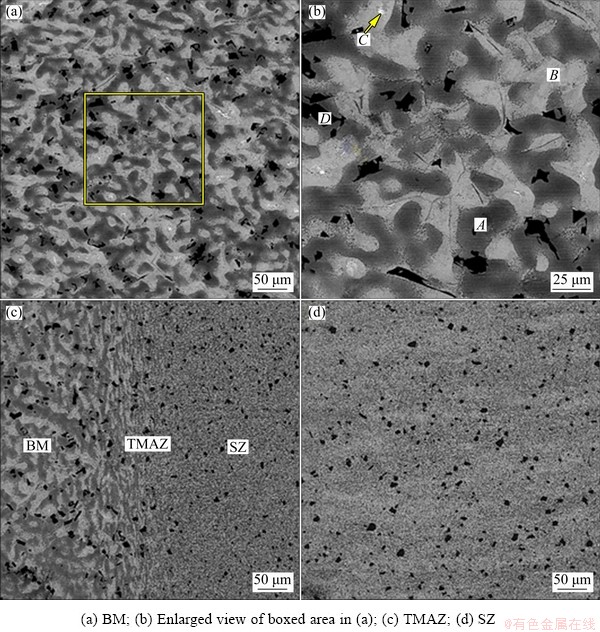
Fig. 2 SEM images of different zones of 800-25-1 sample
Figure 2 shows the typical microstructures of different zones of 800-25-1 sample. As seen, three distinct regions are observed: unaffected base metal (BM), thermo-mechanically affected zone (TMAZ), and stirred zone (SZ). BM microstructure (Figs. 2(a) and (b)) mainly consists of dark gray Al-rich ��-dendrites (Zone A), light gray inter- dendritic a+h eutectoid (Zone B), white Cu-rich e-CuZn4 phase (Zone C), and black SiP particles (Zone D). The EDS analysis results of the marked zones are presented in Fig. 3. As seen, due to the very low solid-solubility in Zn-Al matrix [5], Si atoms almost entirely precipitate as pure Si.
In the course of FSP, the frictional interaction of the rotating tool pin with base metal increases the temperature in a finite area around the pin, which enhances material plasticity and forms a vigorously-stirred zone with a well-modified microstructure (so called SZ). According to Fig. 2(d), the most important SZ microstructural features are severe deformation and fracture of coarse primary dendrites and eutectoid regions, even distribution of segregations, effective refinement of microconstituents especially SiP phase and e-CuZn4 intermetallics that convert to ultrafine particles and their uniform distribution within the matrix. However, due to being subjected to the lower applied strains, TMAZ microstructure has experienced lower deformation/refinement (Fig. 2(c)).
The effects of FSP parameters on the SZ microstructure, average size of SiP particles in the SZ, and SZ microhardness of Si particle reinforced ZA40 composite are shown in Figs. 4 and 5, respectively. As seen, as a result of frictional heating and severe plastic deformation [32,33], FSP has substantially modified the composite microstructure. The most effective modification, in terms of the refinement/even distribution of second phase particles, elimination of coarse primary ��-dendrites, reduction of segregations, and microhardness improvement, belongs to 800-25-1 sample. Therefore, the multi-pass FSP experiments were conducted at a rotation speed of 800 r/min and a traverse speed of 25 mm/min.
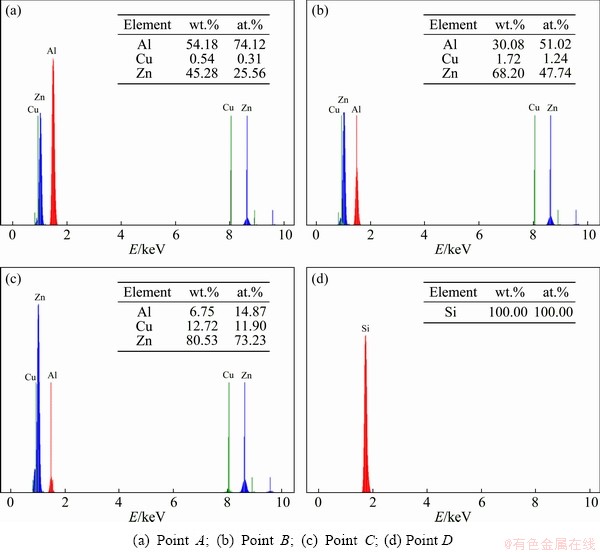
Fig. 3 EDS analysis results of main microconstituents shown in Fig. 2(b)
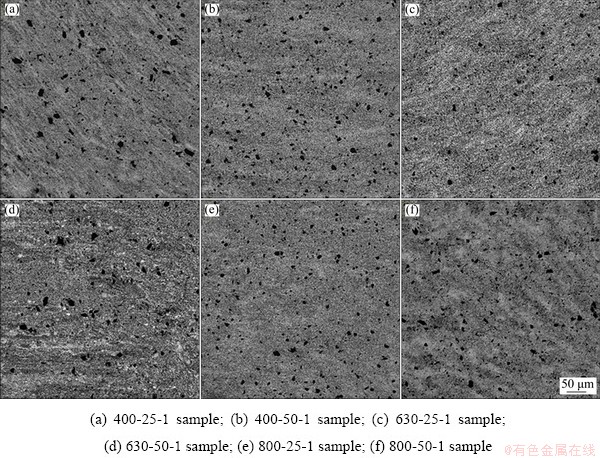
Fig. 4 SEM images showing SZ microstructures
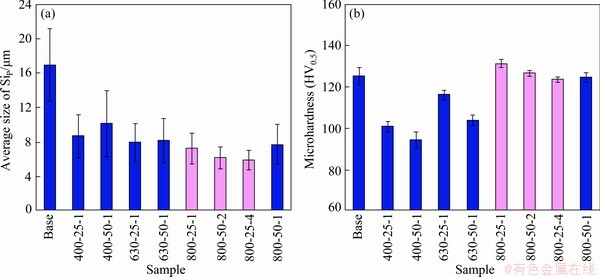
Fig. 5 Effect of FSP parameters on average size of SiP particles (a) and SZ microhardness (b)
Figure 6 depicts the SZ microstructure of 2-pass and 4-pass FSPed samples. The effect of multi-pass FSP on the average size of SiP particles is also illustrated in Fig. 5(a). As seen, multi-pass FSP has little effect on the size of the second phase particles. It seems that when the already refined particles are subjected to the strains applied during multi-pass FSP, due to their small size and low aspect ratio, they tend to rotate and disperse in the matrix, rather than being fractured and/or refined. In addition, multi-pass FSP has substantially improved the interface integrity of the particles/ matrix [34-36]. The volume fraction of microporosities measured by the Archimedes method has also decreased from 1.19% in the base alloy to 0.67%, 0.55%, and 0.53% in single-pass, 2-pass, and 4-pass FSPed samples, respectively.

Fig. 6 SEM images showing effect of multi-pass FSP on SZ microstructure
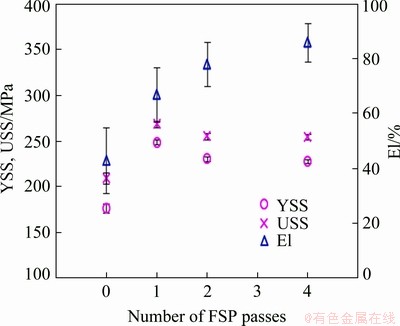
Fig. 7 Effect of number of FSP passes on YSS, USS, and normal displacement (El) of 800-25-x samples
The effect of multi-pass FSP on microhardness, yield shear strength (YSS), ultimate shear strength (USS), and normal displacement elongation (El) of 800-25-x alloys is shown in Figs. 5(b) and 7. As seen, as a result of FSP-induced microstructural modifications including intense refinement/uniform distribution of alloy microconstituents and elimination of casting defects such as large micropores, single-pass FSP has improved the mechanical properties.
Both HCP e-CuZn4 [37] and diamond-type cubic Si [38] compounds are brittle and, due to their high melting entropy, a faceted-type interface is formed with the matrix [39]. Therefore, upon mechanical loading, they are likely to be fractured and/or debonded from the matrix. However, the concentrated stress on the particles refined by FSP is effectively reduced, and as a result, their resistance against fracture and/or de-bonding is improved. Furthermore, the small size/interspacing of particles significantly increases the required stress for dislocations to bypass them [32,33]. The formation of dynamically recrystallized grains, which is equal to increasing the density of grain boundaries, also plays a significant role in improving hardness/mechanical strength. This is because grain boundaries are good barriers to dislocation slip [40].
FSP also substantially increases the number of dislocations in the FSPed zone, many of which have been annihilated by the dynamic recrystallization [41]. However, it has been claimed that the interaction of dislocations, either those existing along sub-grain boundaries or those remaining in the SZ grains [41-43], may lead to dislocation strengthening [33]. The elimination of large micropores (as potential stress risers/crack initiators in the matrix) is another important advantage of FSP that can improve the hardness and strength of the alloy. The elimination mechanism is as follows. During FSP, substantial amounts of heat generated from friction, plastic deformation, and viscous dissipation increase the material plasticity/ deformability [44]. Therefore, when subjected to the intensive shear strains of the stirring tool/forging pressure of the shoulder, the material around the pin experiences severe plastic flow/forging that eliminates the existing micropores.
Increasing the number of FSP passes further improves the alloy ductility, but decreases its microhardness and mechanical strength (Figs. 5(b) and 7). For instance, while the normal displacement of 4-pass FSPed sample is 28% higher than that of 1-pass FSPed sample, its average microhardness and USS are slightly (about 5%) lower than those of 1-pass FSPed sample. Moreover, compared to the base alloy, the USS and normal displacement of 4-pass FSPed alloy are higher by 21% and 100%, respectively. In agreement with the previous findings [45], this softening can be explained by the severe breakage of primary ��-dendrites, size, and volume fraction reduction of hard phases as a result of their dissolution/ fragmentation, and formation of process-related defects such as porosities.
3.2 Tribological properties
The effect of multi-pass FSP on the dry sliding wear behavior of Si particles reinforced ZA40 composite under different applied pressures is shown in Fig. 8. As seen, applying FSP has improved the wear resistance of the composite, especially when the sliding tests are conducted at the higher applied pressures. For instance, under the applied pressures of 0.25 and 0.75 MPa, the wear resistance of 800-25-1 composite is lower than that of base sample by 8% and 28%, respectively. It is also evident from the wear rate results that increasing the FSP pass number has a positive impact on the composite wear. At the applied pressure of 0.75 MPa the wear rate of 800-25-4 composite is lower than those of 800-25-1 and base alloys by 27% and 53%, respectively.
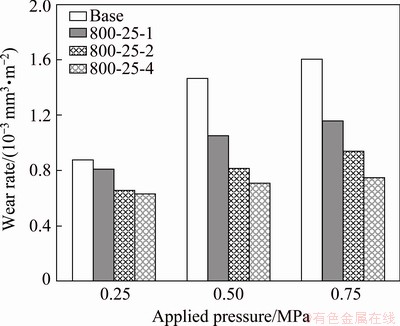
Fig. 8 Variation of wear rate of base and 800-25-x samples with applied pressure
To investigate the effect of FSP on the wear behavior and elucidate the relevant wear mechanisms, the worn surfaces and wear debris were examined by SEM. The SEM micrographs showing the worn surfaces of the base alloy after 1000 m wear under applied pressures of 0.25 and 0.75 MPa are shown in Fig. 9. Figure 9(a) depicts worn surface morphology of the base alloy worn at an applied pressure of 0.25 MPa. The enlarged view of the boxed area in Fig. 9(a) is shown in Fig. 9(b). According to Fig. 9(a), under the applied pressure of 0.25 MPa, the worn surface has been covered by an oxide-rich tribolayer. The EDS analysis is shown in Fig. 10(a). The presence of delaminated craters and abrasion grooves on the tribolayer suggest that the abrasive wear and delamination are the dominant wear mechanisms of the base alloy at low applied pressures. The formation of a mixture of flaky and equiaxed wear particles (Fig. 11(a)) reinforces the proposed mechanisms.
Under the applied pressure of 0.75 MPa, the base sample tribolayer has experienced extensive delamination as its dominant wear mechanism (Figs. 9(c) and (d)). In conformance with the worn surface morphology, the generation of large flaky wear particles (Fig. 11(b)) also confirms the intense delamination of the base sample. However, regarding the chemical composition similarity between Point B (inside the delaminated crater) and Point C (out of the crater) (Fig. 10(c)), it seems that the delaminated microcracks have been mostly propagated through the tribolayer itself, implying the mild wear as the dominant mechanism.
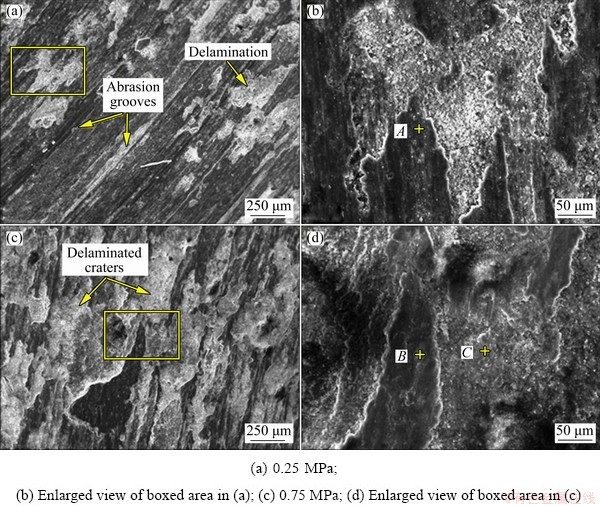
Fig. 9 SEM images showing worn surface morphology of base alloy under different applied pressures
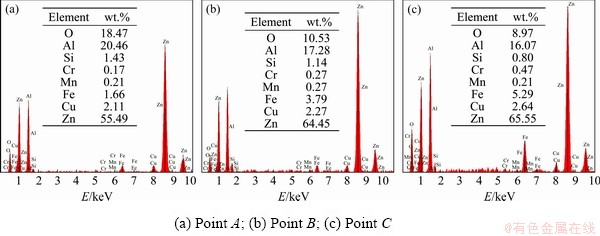
Fig. 10 EDS analysis results of marked points shown in Fig. 9
The worn surface morphologies of 800-25-1 and 800-25-4 samples after sliding wear under applied pressures of 0.25 and 0.75 MPa are shown in Figs. 12 and 13, respectively. As seen, contrary to the base sample (Fig. 9), at a given applied pressure, the surface of 800-25-1 alloy (Fig. 12) has been covered by a well-compacted stable tribolayer comprising of small-sized craters and shallow abrasion grooves that are aligned toward the sliding direction. It is also evident from Fig. 13 that increasing the number of FSP passes has significantly increased the tribolayer stability and improved its smoothness. The morphologies of the wear debris generated from 800-25-1 and 800-25-4 samples worn under an applied pressure of 0.75 MPa are shown in Fig. 14. As seen, in agreement with the wear results (Fig. 8) and worn surface morphologies (Figs. 12 and 13), the wear particles are mainly composed of small-sized flakes and fine equiaxed particles. Therefore, the mild delamination and light abrasive wear of tribo- layer can be considered as the dominant wear mechanisms of FSPed samples especially those obtained by multi-pass FSP.
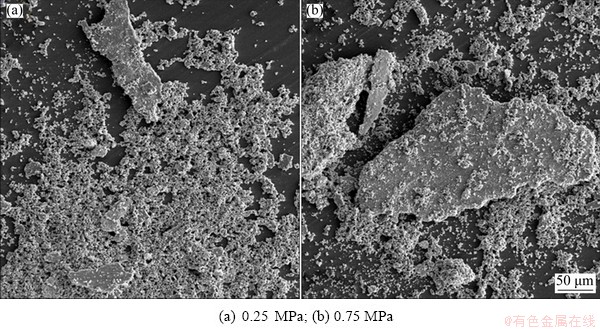
Fig. 11 SEM images showing wear debris morphologies of base alloy at different applied pressures
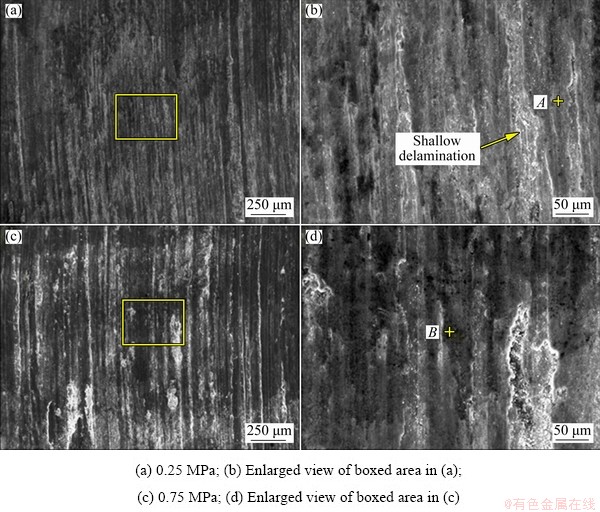
Fig. 12 SEM images showing worn surface morphologies of 800-25-1 sample after sliding wear at different applied pressures
The EDS analysis results of the points marked on the worn surfaces of 800-25-1 and 800-25-4 samples in Figs. 12 and 13 after sliding for 1000 m under the applied pressures of 0.25 and 0.75 MPa are shown in Fig. 15. These analyses evidently confirm the positive impact of FSP on the tribolayer stability. Moreover, compared to the base sample (Fig. 10), the lower percentages of Fe and Cr elements in the tribolayer composition of FSPed samples indicate the formation of a stable tribolayer on the worn surface which effectively prevents the direct contact between the pin and steel counterface surfaces.
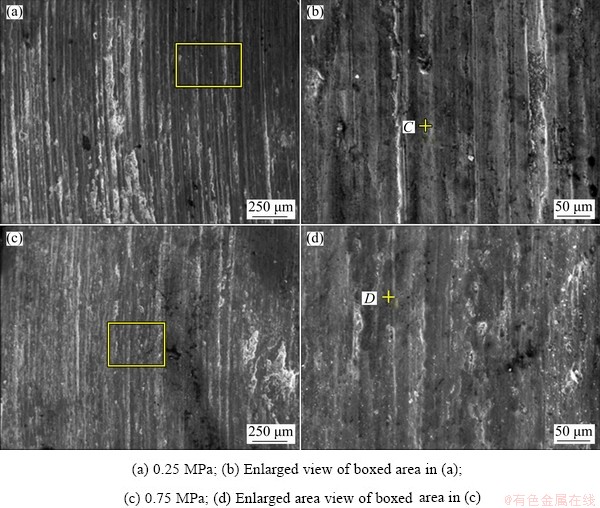
Fig. 13 SEM images showing worn surface morphologies of 800-25-4 sample after sliding wear at different applied pressures
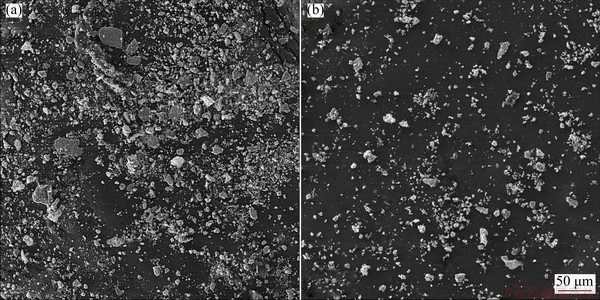
Fig. 14 SEM images showing wear debris morphologies of 800-25-1 (a) and 800-25-4 (b) samples at applied pressure of 0.75 MPa
The subsurface microstructures of the base and 800-25-4 samples are shown in Fig. 16(a) and (b), respectively. The variation of subsurface equivalent strain (e), obtained by Eq. (4) [46], against the depth below the worn surface is also shown in Fig. 16(c).
 (4)
(4)
where q is the shear angle between grain boundaries and the normal to the worn surface. As seen, due to mechanical properties improvement, applying FSP has substantially decreased both the amplitude and depth of friction-induced subsurface plastic deformation.
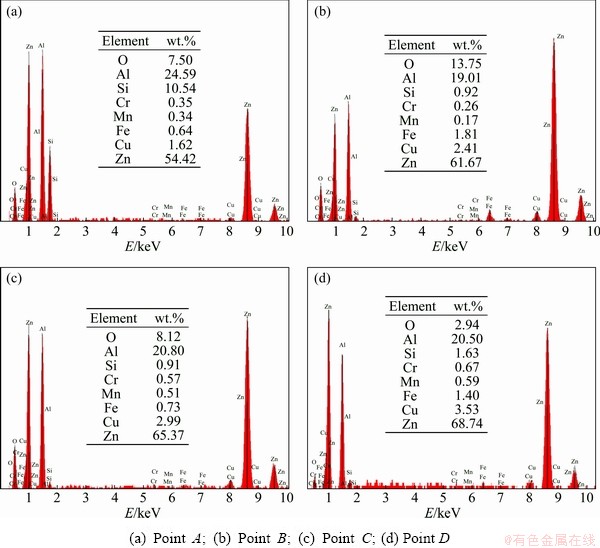
Fig. 15 EDS analysis results of marked points shown in Figs. 12 and 13
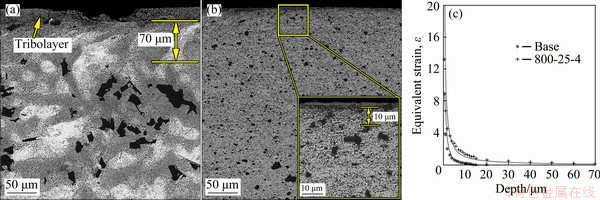
Fig. 16 Subsurface microstructures of base (a) and 800-25-4 (b) samples worn at applied pressure of 0.75 MPa, and variation of subsurface equivalent strain with depth below worn surface (c)
Decreasing substrate deformation increases the tribolayer stability on the surface which in turn improves the wear resistance by decreasing the probability of adhesive and abrasive wear. In addition, the intimate mixing of ��- and h-phases in FSPed samples can substantially increase wear characteristics of their substrates because the FCC ��-phase imparts deformability and strengthening characteristics while the HCP h-phase brings about solid lubrication as well as load carrying capability to the alloy system [6].
Regarding the inverse proportionality of COF (��) to tribolayer shear strength (ti) (Eq. (5)), the presence of a stable tribolayer can also decrease the average COF.
 (5)
(5)
where �� is a constant and ti and t0 are shear strengths of interface and bulk, respectively [47]. Decreasing the COF reduces the frictional heat generated during sliding and the sliding-induced surface shear strains leading to the lower substrate plastic deformation. The variation of COF of the base, 800-25-1, and 800-25-4 samples against sliding distance during sliding at an applied pressure of 0.75 MPa is shown in Fig. 17.
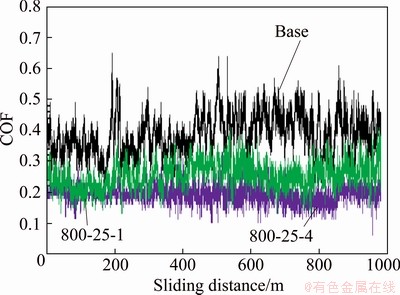
Fig. 17 Variation of COF of base, 800-25-1, and 800-25-4 samples with sliding distance at applied pressure of 0.75 MPa
As seen, the average COFs of 1-pass (0.27��0.05) and especially 4-pass (0.19��0.03) FSPed samples are substantially lower than that of base alloy (0.38��0.14). Moreover, the FSPed samples show lower fluctuation in their COF plots. Considering the worn surface morphologies (Figs. 12 and 13), the improved friction behavior of surface-modified samples can be explained by the formation of a stable tribolayer on their worn surfaces. Tribolayer is an oxide-rich porous layer that exhibits very low shear strength [48,49]. Therefore, increasing its stability decreases the average value of COF and its fluctuations by different mechanisms such as lower probability of adhesion between mating surfacing, reduction of the force required to overcome the interfacial shear strength, and lowering the amounts of entrapped wear particles between the sliding pairs, thereby decreasing the abrasion of counterface [48,49].
4 Conclusions
(1) FSP refines and evenly distributes the composite microconstituents, especially the large SiP particles and casting defects, decreases the interspacing of SiP particles, and encourages the formation of ultrafine dynamically recrystallized grains.
(2) These microstructural modifications substantially improve the mechanical properties of the composite. The optimum improvement was observed in 4-pass FSPed alloy, compared to the base alloy, its USS and normal displacement were improved by 21% and 100%, respectively.
(3) Applying 4-pass FSP improves the composite tribological properties. At an applied pressure of 0.75 MPa, applying 4-pass FSP decreased the wear rate and COF of the composite by 53% and 50%, compared with the base alloy, respectively.
(4) Increasing the substrate resistance against sliding-induced plastic deformation and formation of stable tribolayers on the surfaces of FSPed composites are likely the most important factors responsible for their improved tribological properties.
References
[1] LIU Ting, SI Nai-chao, LIU Guang-lei, ZHANG Rui, QI Chang-yang. Effect of Si addition on microstruvture and thermal fatigue properties of Zn-3.8Al-2.5Cu alloys [J]. Transactions of Nonferrous Metals Society of China, 2016, 26: 1775-1782.
[2] SAVASKAN T, MALEKI R A. Friction and wear properties of Zn-25Al-based bearing alloys [J]. Tribology Transactions, 2014, 57(3): 435-444.
[3] AZAKL Z, SAVASKAN T. An examination of friction and sliding wear properties of Zn-40Al-2Cu-2Si alloy in case of oil cut off [J]. Tribology International, 2008, 41(1): 9-16.
[4] SAVASKAN T, BICAN O. Effects of silicon content on the microstructural features and mechanical and sliding wear properties of Zn-40Al-2Cu-(0-5)Si alloys [J]. Materials Science and Engineering A, 2005, 404(1-2): 259-269.
[5] BERENT K, PSTRUS J, GANCARZ T. Thermal and microstructure characterization of Zn-Al-Si alloys and chemical reaction with Cu substrate during spreading [J]. Journal of Materials Engineering and Performance, 2016, 25(8): 3375-3383.
[6] PRASAD B. Effects of partially substituting copper by silicon on the physical, mechanical, and wear properties of a Zn-37.5%Al-based alloy [J]. Materials Characterization, 2000, 44(3): 301-308.
[7] LIU Y C, YANG G C, LU Y L, YANG L S. Damping behavior and tribological properties of as-spray-deposited high silicon alloy ZA27 [J]. Journal of Materials Processing Technology, 1999, 87(1-3): 53-58.
[8] DANG B, JIAN Z Y, XU J F, CHANG F E, ZHU M. Effect of phosphorus and heat treatment on microstructure of Al-25%Si alloy [J]. China Foundry, 2017, 14(1): 10-15.
[9] SUAREZ-ROSALES M A, PINTO-SEGURA R, PALACIOS-BEAS E, HERNANDEZ-HERRERA A, CHAVEZ-ALCALA J F. Effect of rapid solidification and addition of Cu3P on the mechanical properties of hypereutectic Al-Si alloys [J]. Materials Research, 2016, 19: 67-73.
[10] HABRAKEN F, DAUTZENBERG J H. Formability of rapid-solidification-processed hypereutectic Al-Si alloys [J]. CIRP Annals, 1994, 43(1): 211-214.
[11] JEONG H, YOON D, KIM E, PARK H, NA K. The influence by hydrostatic extrusion on the microstructure and extrudability of the IM processed hypereutectic Al-Si-X alloys [J]. Journal of Materials Processing Technology, 2002, 130-131: 438-443.
[12] SWAMINATHAN S, GARCIA-INFANTA J M, MCNELLEY T R, RUANO O A, CARRENO F. Severe plastic deformation of an as-cast hypoeutectic Al-Si alloy [J]. Journal of Materials Science, 2008, 43(23-24): 7501-7506.
[13] KUME Y, KOBASHI M, KANETAKE N. Microstructure refinement of Al-Si alloy using compressive torsion processing [J]. Materials Science Forum, 2006, 519-521: 1441-1446.
[14] ZHANG Z, LI H T, STONE I C, FAN Z. Refinement of primary Si in hypereutectic Al-Si alloys by intensive melt shearing [C]//IOP Conference Series: Materials Science and Engineering. Aochen: IOP Publishing Ltd., 2012.
[15] LU D H, JIANG Y H, GUAN G S, ZHOU R F, LI Z H, ZHOU R. Refinement of primary Si in hypereutectic Al-Si alloy by electromagnetic stirring [J]. Journal of Materials Processing Technology, 2007, 189(1-3): 13-18.
[16] FENG H K, YU S R, LI Y L, GONG L Y. Effect of ultrasonic treatment on microstructures of hypereutectic Al-Si alloy [J]. Journal of Materials Processing Technology, 2008, 208(1-3): 330-335.
[17] TAKAGI H, UETANI Y, DOHI M, YAMASHITA T, MATSUDA K, IKENO S. Effects of mechanical stirring and vibration on the microstructure of hypereutectic Al-Si-Cu-Mg alloy billets [J]. Materials Transactions, 2007, 48(5): 960-966.
[18] AL-HELAL K, STONE I C, FAN Z. Simultaneous primary Si refinement and eutectic modification in hypereutectic Al-Si alloys [J]. Transactions of the Indian Institute of Metals, 2012, 65(6): 663-667.
[19] LI Q L, XIA T D, LAN Y F, LI P F, FAN L. Effects of rare earth Er addition on microstructure and mechanical properties of hypereutectic Al-20%Si alloy [J]. Materials Science and Engineering A, 2013, 588: 97-102.
[20] IBRAHIM M, ELGALLAD E, VALTIERRA S, DOTY H, SAMUEL F. Metallurgical parameters controlling the eutectic silicon characteristics in Be-treated Al-Si-Mg alloys [J]. Materials, 2016, 9(2): 78-95.
[21] TILLOVA E, CHALUPOVA M, HURTALOVA L. Changes of mechanical properties of AlSi7Mg0.3 cast alloy through filtration [J]. Key Engineering Materials, 2014, 635: 1-4.
[22] MA Z Y. Friction stir processing technology: A review [J]. Metallurgical and Materials Transactions A, 2008, 39(3): 642-658.
[23] YOUSEFI F, TAGHIABADI R, BAGHSHAHI S. Improving the mechanical properties of Mn-added hypoeutectic Al-4Ni alloy by friction stir processing [J]. Transactions of Nonferrous Metals Society of China, 2019, 29: 460-472.
[24] RAO A G, DESHMUKH V P, PRABHU N, KASHYAP B P. Ductilizing of a brittle as-cast hypereutectic Al-Si alloy by friction stir processing [J]. Materials Letters, 2015, 159: 417-419.
[25] RAO A G, DESHMUKH V P, PRABHU N, KASHYAP B P. Enhancing the machinability of hypereutectic Al-30Si alloy by friction stir processing [J]. Journal of Manufacturing Processes, 2016, 23: 130-134.
[26] MAHMOUD T S, SHABAN O M, ZAKARIA H M, KHALIFA T A. On effect of FSP on microstructural and mechanical characteristics of A390 hypereutectic Al-Si alloy [J]. Materials Science and Technology, 2010, 26(9): 1120-1124.
[27] MAHMOUD T S. Surface modification of A390 hyper- eutectic Al-Si cast alloys using friction stir processing [J]. Surface and Coatings Technology, 2013, 228: 209-220.
[28] MOHARRAMI A, RAZAGHIAN A, EMAMY M, TAGHIABADI R. Effect of tool pin profile on the microstructure and tribological properties of friction stir processed Al-20wt.%Mg2Si composite [J]. Journal of Tribology, 2019, 141(12): 122202.
[29] ANSARIAN I, SHAERI M H, EBRAHIMI M, MINARIK P, BARTHA K. Microstructure evolution and mechanical behaviour of severely deformed pure titanium through multi- directional forging [J]. Journal of Alloys and Compounds, 2019, 776: 83-95.
[30] MAHMUDI R, SADEGHI M. Correlation between shear punch and tensile strength for low-carbon steel and stainless steel sheets [J]. Journal of Materials Engineering and Performance, 2012, 22(2): 433-438.
[31] TAYLOR R P, MCCLAIN S T, BERRY J T. Uncertainty analysis of metal-casting porosity measurements using Archimedes�� principle [J]. International Journal of Cast Metals Research, 1999, 11(4): 247-257.
[32] SOUSTANI M F, TAGHIABADI R, JAFARZADEGAN M, VASHEGHANI FARAHANI M. Effect of multi-pass friction stir processing on microstructure and mechanical properties of cast Al-7Fe-5Ni alloy [J]. Materials Research Express, 2019, 6(10): 106571.
[33] YOUSEFI F, TAGHIABADI R, BAGHSHAHI S. Effect of partial substitution of Mn for Ni on mechanical properties of friction stir processed hypoeutectic Al-Ni alloys [J]. Metallurgical and Materials Transactions B, 2018, 49(6): 3007-3018.
[34] YUVARAJ N, ARAVINDAN S, VIPIN. Fabrication of Al5083/B4C surface composite by friction stir processing and its tribological characterization [J]. Journal of Materials Research and Technology, 2015, 4(4): 398-410.
[35] HUANG C W, AOH J N. Friction stir processing of copper- coated SiC particulate-reinforced aluminum matrix composite [J]. Materials, 2018, 11(4): 599-614.
[36] GAN Y, SOLOMON D, REINBOLT M. Friction stir processing of particle reinforced composite materials [J]. Materials, 2010, 3(1): 329-350.
[37] DURMAN M, MURPHY S. An electron metallographic study of pressure die-cast commercial zinc�Caluminium-based alloy ZA27 [J]. Journal of Materials Science, 1997, 32(6): 1603-1611.
[38] WARMUZEK M. Aluminum-silicon casting alloys: An atlas of microfractographs [M]. New York: ASM International, 2004.
[39] WANG F, ESKIN D, CONNOLLEY T, MI J W. Influence of ultrasonic treatment on formation of primary Al3Zr in Al-0.4Zr alloy [J]. Transactions of Nonferrous Metals Scoiety of China, 2017, 27: 977-985.
[40] SHI Fei, WANG Chun-qing, ZHANG Zhong-ming. Microstructures, corrosion and mechanical properties of as-cast Mg-Zn-Y-(Gd) alloys [J]. Transactions of Nonferrous Metals Society of China, 2015, 15: 2172-2180.
[41] SATO Y S, PARK S H C, KOKAWA H. Microstructural factors governing hardness in friction-stir welds of solid-solution-hardened Al alloys [J]. Metallurgical and Materials Transactions A, 2001, 32(12): 3033-3042.
[42] FUJII H, CUI L, NAKATA K, NOGI K. Mechanical properties of friction stir welded carbon steel joints-friction stir welding with and without transformation [J]. Welding in the World, 2008, 52(9-10): 75-81.
[43] HUANG K T, LUI T S, CHEN L H. Pre-treated effect of friction stir processing of Al alloy 5052 on vibration fracture behavior under resonant vibration [J]. Materials Transactions, 2005, 46(12): 3051-3058.
[44] IZADI H. Fabrication of metal matrix composites by friction stir processing [D]. Edmonton, Alberta: University of Alberta, 2014.
[45] PURCEK G, AYDIN M, SARAY O, KUCUKOMEROGLU T. Enhancement of tensile ductility of severe plastically deformed two-phase Zn-12Al alloy by equal channel angular extrusion [J]. Materials Science Forum, 2010, 633-634: 437-447.
[46] PERRIN C, RAINFORTH W M. Work hardening behaviour at the worn surface of Al-Cu and Al-Si alloys [J]. Wear, 1997, 203-204: 171-179.
[47] HIRANI H. Fundamentals of engineering tribology with applications [M]. Cambridge: Cambridge University Press, 2016.
[48] POULADVAND S, TAGHIABADI R, SHAHRIYARI F. Investigation of the tribological properties of AlxSi-1.2Fe(Mn) (x=5-13wt.%) alloys [J]. Journal of Materials Engineering and Performance, 2018, 27(7): 3323-3334.
[49] NADIM A, TAGHIABADI R, RAZAGHIAN A, NOGHANI M T, GHONCHEH M H. Effect of Fe-impurity on tribological properties of Al-15Mg2Si composite [J]. Transactions of Nonferrous Metals Society of China, 2018, 28: 1084-1093.
F. RAJABI, R. TAGHIABADI, M. H. SHAERI
Department of Materials Science and Metallurgy, Imam Khomeini International University (IKIU), Qazvin, Iran
ժ Ҫ���о���ͬ����Ħ���ӹ�(FSP)���ղ�����ת��(400��630��800��1000 r/min)���ƶ��ٶ�(25��50 mm/min)�� Si ������ǿZn-40Al-2Cu��ԭλ���ϲ���Ħ�����ܵ�Ӱ�졣���������Ż���ѡ��800 r/min��25 mm/min��Ϊ���FSP������������������ö����FSP�ܸ��Ʋ��ϵ�Ħ�����ܡ����磬��0.75 MPa�غ��£����ĵ���FSP�ĸ��ϲ���ĥ���ʺ�ƽ��Ħ������(COF)�ֱ��δ�ӹ��ĸ��ϲ��Ͻ���53% ��50%��ĥ������ĥм��ɨ��� �������ʾ������֯�������Ǵֹ�������ܼ�ϸ���;��ȷֲ�����������ļ�С������ȱ�ݵ�����������忹���Ʊ�����������Ҫ���ء���Щ���ش�ʹ�γ��ȶ���Ħ���㣬�Ӷ����Ʋ��ϵ�Ħ�����ܡ�
�ؼ��ʣ�Zn-40Al-2Cu�Ͻ𣻹裻���ϲ��ϣ�Ħ��ѧ������Ħ���ӹ�
(Edited by Wei-ping CHEN)
Corresponding author: R. TAGHIABADI; E-mail: taghiabadi@ikiu.ac.ir
DOI: 10.1016/S1003-6326(20)65441-3

