Trans. Nonferrous Met. Soc. China 22(2012) s793-s800
Rotary ultrasonic-assisted milling of brittle materials
KUO Kei-lin1, TSAO Chung-chen2
1. Department of Vehicle Engineering, National Taipei University of Technology, Taipei 106;
2. Department of Automation Engineering Tahua Institute of Technology, Hsinchu County 307
Received 21 May 2012; accepted 22 September 2012
Abstract: In order to improve the machining efficiency of ultrasonic milling, the easiest and most effective approach was started with the improvement of tool design. The main objective of this research was to utilize rotary ultrasonic machining (RUM’s) effectiveness in removing brittle materials to extend the applications of this independent, innovative manufacturing method (self-driving rotary ultrasonic machining), and to experimentally investigate its milling application on brittle materials. The designed tool was used in the conjunction with previously established RUM machine tools, and glass was selected as workpiece for experiments. The interrelationship between feed rate and depth of cut was discussed. By measuring the surface roughness of workpiece, the overall efficacy of utilizing RUM for milling was evaluated and presented. Ultrasonic assisted milling results in the reduction of milling resistance, which leads to a greater process rate.
Key words: rotary ultrasonic; ultrasonic assisted milling; brittle material
1 Introduction
The application of ultrasonic machining was first introduced by WOOD and LOOMIS in 1927. They applied high frequency vibrations (about 70 kHz) onto a glass rod to remove material from a glass substrate, with the aid of grinding grits. They found that this process was suitable for drilling holes in the glass substrate, and published the first research paper about ultrasonic machining [1]. In 1950, American engineer BALAMUTH revealed that the tool type impacts the grit blend as well as the material removal rate. This research led to the developments of the machining tools used, resulting in considerable improvements in the efficiency of ultrasonic for brittle and hard material removal [2]. Early in its development, ultrasonic machining relied on longitudinal vibration and abrasive slurry to remove material in the micro scale. The modes of material removal mechanisms included hammering, abrasion, and hobbing, as shown in Fig. 1(a) [3-5]. As a result, its application was limited mainly to drilling processes, and the depth of material excavation was restricted by the depth that the slurry could get into the hole. The surface abrasion mechanism was used until TYRELL [6] introduced the bonding of abrasive material directly to the tool by electroplating diamond grits onto the bottom of a circular plate. MARKOV then extended this approach to rotary ultrasonic machining (RUM) by electroplating diamond grits onto the bottom and flank of the tool. He successfully performed slot milling and improved the attainable drilling depth, meanwhile promoting the development of the ultrasonic milling processes [7]. This fixed-grit milling approach involves no free rolling of grinding grits, which effectively eliminates the hobbing action. However, the effect of the material extraction is enhanced as a result of coupling grinding grits and the tool, as shown in Fig. 1(b) [8]. Since milling is categorized as a horizontal machining process, its motion is perpendicular to the longitudinal kinetic energy supplied by the RUM. This means that the hammering and extraction action cannot aid the milling process, leaving only abrasion action which is generated by tool rotation and micro-vibration [9]. Under these circumstances, it appears that the easiest and most effective approach to increase the efficiency of ultrasonic milling process begins with the improvement of tool design. PEI and PRABHAKAR [10] designed a milling tool with a 15° taper with respect to the bottom face of the tool. This design uses the taper angle to resolve longitudinal force into lateral force, which keeps all three material removal modes (hammering, abrasion and extraction). PEI named this approach rotary ultrasonic face milling (RUFM), and discussed the material removal rate (MRR) of drilling and milling in detail in Ref. [11]. As the tool radius restricts the depth of cut in RUFM, only surface milling can be performed, with the width of workpiece smaller than the tool radius. Comparing the MRR with other processes, ultrasonic grinding is a more efficient alternative method for surface milling than other ultrasonic machining methods [12]. In order to improve application of ultrasonic milling, YA et al [13] modified the bottom of the tool into globe shape. The curved surface of the tool effectively transfers the ultrasonic kinetic energy, and letters were successfully engraved onto a glass workpiece.

Fig. 1 Material removal modes
2 Experimental setup
In this experiment, the RUM platform consists of several systems, such as the ultrasonic system, feed system, drive control system. The feed system uses computer-controlled stepper motors to drive ball screws. It offers synchronous drive with 3 degrees of freedom. The Visual Basic programming language is used to perform process planning. The tool path is thus generated automatically, which effectively reduces the impact of human factors (Fig. 2).

Fig. 2 Photograph of experimental setup
The ultrasonic system generates oscillation through piezoelectric ceramics. The maximum oscillation amplitude generated by piezoelectricity is limited, so the processing frequency was set to be near the resonant frequency of the milling system in order to take advantage of the resonance effect and increase the oscillation amplitude and energy. This means the efficiency of the process can increase. In order to maintain the ultrasonic kinetic energy at the optimal level, the experimental platform comprises a resonance sensor and compensation system. It automatically measures the resonant point of the oscillation tool and adjusts accordingly, which is more reliable than manual adjustment. In addition, the resonant frequency varies due to the heat generation of the vibration system, changes in processing impedance, tool wear, and other factors. This automatic compensation scheme considers the above factors, and fine-tunes the processing frequency every 10 s to keep the high-frequency vibration at an optimal state.
3 Experimental parameters and design
3.1 Experimental parameters
3.1.1 Vibration frequency and amplitude
The ultrasonic milling utilizes high-frequency oscillations generated by piezoelectric ceramics. The amplitude of oscillation is 0.1-0.3 μm, which can increase several times though the horn. In order to increase the capacity of the process, a greater voltage can be applied. However, the improvements from increasing voltage are rather limited. The processing frequency must be set near the resonant frequency of the milling system in order to take advantage of the resonance effect and increase the oscillation amplitude and energy. An amplification of 10 to 100 times is attainable depending on the distance to the resonance point. Because of the greater amplitude, the efficiency of the process can increase.
The resonant frequency varies due to the heat generation of the vibration system, as well as other factors like processing resistance and tool wear. Considering these uncertainties, this research platform comprises an automatic frequency compensation system. The processing frequency can be automatically adjusted using the feedback of the resonance change, so that the vibration can be maintained at an optimal state.
3.1.2 Rotation speed
The RUM process makes use of not only vibration for material removal but also abrasion due to rotation. This is the main reason that the MRR of RUM is better than that for the fixed ultrasonic machining. Higher rotation speeds result in higher material removal rates; however, the increase in rotation speed leads to a decrease in the surface quality after processing. In addition, the greater centrifugal force associated with the increased rotation speed means that the coolant cannot remain on the working surface for as long, reducing cooling effectiveness.
3.1.3 Depth of cut and feed rate
The material removal rate (MRR) refers to the material removed per unit time; its computation depends on the tool shape, length of material milled, and milling time taken. As such, disparate material removal rates may result from experiments. Since milling is a horizontal machining process, the most important process parameter is the feed rate. Since the feed rate will determine the overall milling time, a higher feed rate will result in a more efficient process. As such, the feed rate should be determined in conjunction with the efficiency of material removal. The material removal volume also varies in accordance with the depth of cut. When the depth of cut increases, the resistance imparted on the tool increases accordingly. If the depth of cut is too large, an enormous stress is imparted on the tool, which will result in tool deformation and fracture. In this case, the feed rate should be reduced because of the large depth of cut.
3.2 Experiment design
3.2.1 Workpiece selection
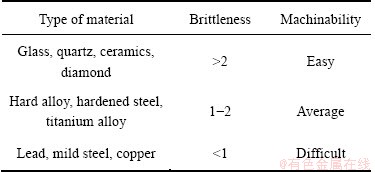
Ultrasonic machining makes use of the energy of micro-oscillations to remove material in hammering actions. Hence, when milling hard, brittle materials, the repeated hammering action generated by the ultrasonic energy is transferred to the material and causes fracture before plastic deformation. However, if machining a ductile material, its high plastic deformation would absorb the kinetic energy associated with the hammering action, eliminating the effect of ultrasonic. This leads to an unfavorable MRR. The suitability of a material for ultrasonic machining can be determined by its brittleness, the definition and computation of which is shown as
B=SS/SF (1)
where B means the brittleness, SS means the shear stress, and SF means the fracture stress. The harder the material, the lower the fracture stress. Thus, the brittleness is higher. The brittleness and ultrasonic machinability of different materials are listed in Table 1. As listed in Table 1, ultrasonic is suitable for machining hard and brittle materials like glass and ceramics. As the goal of this research is to evaluate the efficiency and the practicality of ultrasonic milling, the non-tempered glass is selected for experiments, as it is cheap and easily obtained. Its Knoop hardness is approximately in the range of 450-510.
Table 1 Material brittleness and ultrasonic machinability
3.2.2 Design of material removal experiment
MRR varies with the depth of cut (H) and feed rate (v). When H and v increase, the MRR increases. However with an increase of milling resistance, excessive resistance to milling may coarsen the surface finish of the workpiece and accelerate tool wear. In order to understand the interrelationship between the above two factors, three levels of feed rate and three levels of the depth of cut were selected as process parameters in the material removal experiment. The process parameter matrix designed for the experiment is listed in Table 2. The experiments performed involve the milling of a slot 150 mm in length, with the varying parameters. The surface roughness of the milled slot was measured after each run. In order to reduce experimental error, the rotation speed was fixed at 5000 r/min, and the amplitude was adjusted as 25 μm. The resonance compensation system automatically adjusted the resonance frequency of the tool. The tool has a fixed length of 30 mm. These constant parameters cause the frequency to remain relatively constant throughout the experiment.
Table 2 Ddesign of material removal experiment

3.2.3 Reference experiment
Theoretically, ultrasonic reduces the cutting resistance and the surface roughness of the finished workpiece. In order to verify whether or not the ultrasonic process has an impact on these parameters, a reference experiment was conducted to compare the results of the material removal experiment. As a larger mill depth results in higher process resistance, the depth of cut was fixed at 3 mm in order to simplify the experimental parameters. With a different feed rate, a 150 mm length slot was milled without ultrasonic. The design of the reference experiment is listed in Table 3.
Table 3 Design of milling reference experiment without ultrasonic

4 Experimental results
This experiment aims to evaluate whether or not ultrasonic milling benefits material removal. Under different feed rates and the depths of cut, the impact of each parameter on surface roughness of the finished workpiece was discussed.
A surface roughness meter was used to measure the average surface roughness (Ra) of the 2.5 mm sampling width. Because the detector is limited to a 25 mm measurement length, the entire 150 mm slot cannot be completely measured. Instead, the tool entrance and exit areas were selected for surface roughness measurement. In order to reduce the measurement error, the measurements were randomly repeated 20 times at different locations in the entrance and exit areas, and the results were averaged and compared, as listed in Table 4.
4.1 Comparison of feed rate and depth of cut
According to the results in Table 4, the plots of surface roughness versus depth of cut at different feed rates for the entrance and exit areas are shown in Figs. 3 and 4, respectively. A common trend can be observed at the entrance area. That is, the surface roughness increases with feed rate and the depth of cut. However, surface roughness decreases at feed rate v1, despite the increase in the depth of cut from H1 to H2. The cause of this can be seen from the comparison of tool wear shown in Fig. 5. Figure 5(a) is a photo of the surface of the brand new tool, and Fig. 5(b) shows the surface of the same tool after milling with process parameters v1H2. In Fig. 5(b), the fewer grinding grits are visible due to tear- out of the material that envelops the grits. This has led to a protrusion of the grinding grits, rendering increased cutting angles of the grinding grits. As a result, the surface roughness of the milled surface decreases.
Table 4 Surface roughness of slot at milling entrance and exit area
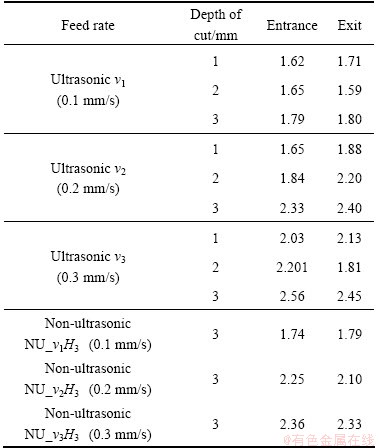

Fig. 3 Surface roughness at entrance area

Fig. 4 Surface roughness at exit area

Fig. 5 Comparison between tool surface
Comparison of surface roughness at the exit area reveals that the surface roughness corresponding to process parameters v1H2 was smaller than that corresponding to v1H1, for the same reason as the case of the entrance area. It should be noted that the plot of v3 shows an appreciable drop in surface roughness corresponding to depth of cut H2. This was consistently observed in several experimental runs. Theoretically, the increase in the depth of cut and feed rate would roughen the tool’s surface quicker. However, no such trend was observed for the milling condition corresponding to v3H2. Nothing in particular was observed when examining the tool surface corresponding to v3H2 in Fig. 6, except that more grinding grits were found on the surface of the used tool. However, at a 200x magnification of the purple frame in Fig. 6, more protruded grinding grits can be observed (Fig. 7). Because of the unevenness of the surface, the focused examination under microscope was not possible, which served as an indirect proof that the surface was indeed uneven. More grinding grits and more obvious protrusion of the grits were found in the surface of the used tool corresponding to milling condition v3H2. This observation accounts for the obvious decrease in surface roughness of the milled workpiece.

Fig. 6 Micrograph of tool surface after processing v3H2

Fig. 7 Micrograph of tool surface after processing v3H2
Observations made on the exit areas corresponding to process parameters v2H3 and v3H3 reveal an insignificant difference in surface roughness. The considerable drop in surface roughness leads to the conclusion that tool wear influences surface roughness. This agrees with the observation of the tool surface relating to process v3H3, as shown in Fig. 8. It reveals serious tool wear at the bottom face and even tear-out of the grinding grits. This is due to the high value of both the depth of cut and the feed rate, which leads to an excessive resistance to the milling process, and in turn imposes a large compressive stress on the grinding grits. As a result, the grinding grits were crushed and torn out of the tool. Since the milling tool used with process parameters v3H3 has suffered from that more severe wear, more protrusion of the grits was observed, which theoretically leads to a surface roughness decrease. However, the excessive tool wear would also result in tear-out of the grinding grits, as shown in Fig. 9. Because there were no grinding grits present on the tool surface under this condition, the tool was presumably forced to mill along the surface of the glass. This is confirmed by the numerous scratch marks generated by the rotational abrasion (see Fig. 9). Hence, the detachment of the grinding grits is attributable to coarsening of the milled surface.

Fig. 8 Micrograph of tool surface after processing v3H3
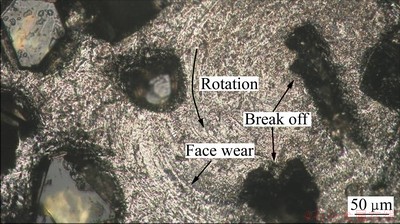
Fig.9 Micrograph of tool surface after processing v3H3
4.2 Comparison of surface roughness at entrance and exit areas
Each combination of process parameters results in different surface roughnesses at the entrance and exit areas of the milled slot. To understand the differences among each parameter, the surface roughnesses at the entrance and exit areas were plotted against different depths of cut at different feed rates v1-v3, respectively, as shown in Figs. 10-12. As the figures show, the surface roughnesses at the exit area is generally greater than that at the entrance area. The curve trends for both entrance and exit areas with feed rate v1 agree with each other. The observation of the comparison with v2 also reveals a greater roughness at exit area than entrance area. However, the surface roughness at the entrance area corresponding to process v2H3 shows a significant increase to a roughness close to that of the exit area. Because of the deeper depth of cut, there was a greater milling resistance generated at the entrance area, and the surface roughness thus increased. According to the curves for v3, the roughness at the exit area relating to processes v3H2 and v3H3 are less than those at entrance area. This is due to the protrusion of grinding grits after tool wear, which results in the reduction of surface roughness at preferable operation conditions; however, the increased milling resistance led to serious grit wear and breakage as well as a decreased grit cutting angle and grade. Due to the excessive milling resistance for the process v3H3, the grinding grits suffered severe tool wear. Instead of lowering the roughness, the bottom surface of the tool started to wear and tear-out, as shown in Fig. 8. However, as the grits were not completely detached from the tool, the roughness at the exit area was still lower than that at entrance area. If material removal was continued, the surface quality would coarsen compared to that at the entrance area.
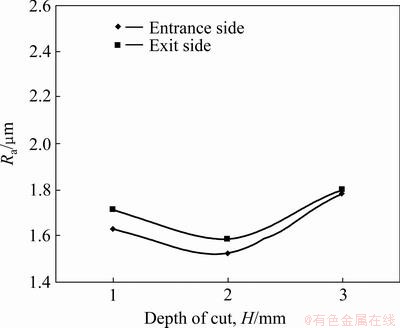
Fig. 10 Comparison of surface roughnesses at entrance and exit areas with feed rate v1
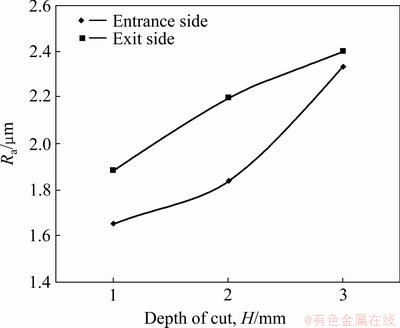
Fig. 11 Comparison of surface roughnesses at entrance and exit areas with feed rate v2

Fig. 12 Comparison of surface roughnesses at entrance and exit areas with feed rate V3
4.3 Impact of ultrasonic on milling process
Since the reference experiments without ultrasonic were only performed with a depth of cut of 3 mm (H3), only the corresponding ultrasonic processes v1H3, v2H3 and v3H3 were used for comparison. Figure 13 shows the comparison at the entrance area of the milled slot. It can be seen that non-ultrasonic process results in a lower value of roughness. An identical behavior can be observed in Fig. 14. These results conflict with the notion that ultrasonic improves surface quality.
This conflict is due to the longitudinal vibration of the ultrasonic milling process, whose direction of motion is perpendicular to the milling path. In order to utilize the kinetic energy generated by oscillation for the milling process, the tool has been designed in a globe shape, the curved surface of which converts the oscillation into component forces for material removal. On the tool surface there exists longitudinal vibrations, which lead to workpiece damage due to the micro vibration of tool against the bottom surface of the slot. As a result, the surface roughness increased. If ultrasonic is used for a drilling process, the oscillating kinetic energy can be completely utilized for material removal. In addition, the measuring point is at the inner wall of the drilled hole. The longitudinal vibration will not coarsen the surface here; instead, the surface quality is improved due to the abrasive effect.
Figure 15 shows a comparison of surface roughnesses at the entrance and exit areas of the non-ultrasonic (NU) milled slot. The plots of NU_v1H3 show a coarser surface at the exit area than at the entrance area. When the feed rate increased to NU_v2H3 and NU_v3H3, the surface quality that at the exit area was better than at the entrance area. This is due to the protrusion of grinding grits after the tool wear reached to a certain level, leading to an increase in the material removal rate. Another primary reason is due to tool wear, which causes a decrease in cutting angle as well as the size of the grinding grits. As a result, the surface roughness decreased slightly during the process, but the roughness would increase if serious tool wear occurs.
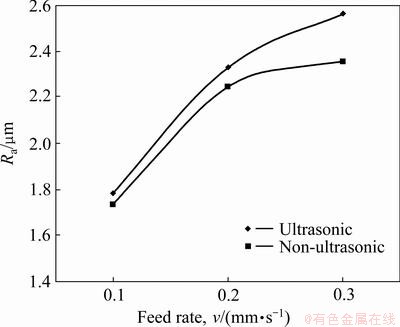
Fig. 13 Comparison of surface roughnesses between ultrasonic and non-ultrasonic processes at entrance area

Fig. 14 Comparison of surface roughnesses between ultrasonic and non-ultrasonic processes at exit area

Fig. 15 Comparison of surface roughnesses of non-ultrasonic processes at entrance area and exit area
5 Conclusions
1) The increases in depth of cut and feed rate lead to the increased surface roughness at the entrance area; the behaviors of v1 and v2 at the exit area agree with this increasing trend. However, a considerable drop of surface roughness is observed corresponding to process parameter v3H2. This is due to the increasing wear and breakage of grinding grits, which lead to a decrease of the cutting angle. Thus, the surface roughness decreases.
2) Increasing the depth of cut and feed rate results in an increased milling resistance, which tends to accelerate the tool wear. When the wear of grinding grits reaches a certain level, the surface roughness decreases slightly, as the cutting angle and size of grits decrease. However, when excessive resistance occurs and tears out the grits, the surface roughness increases due to the detachment of grinding grits and the direct contact between the coated tool surface and workpiece.
3) The ultrasonic assisted milling results in the reduction of milling resistance, which leads to a greater process rate. However, the longitudinal ultrasonic oscillation causes damage to the milled workpiece surface due to its micro crush action against the workpiece. Thus, the surface quality of ultrasonic milling is worse than that of non-ultrasonic milling. Moreover, the grinding grits suffer greater stress and easier tear-out due to this micro crush action. Therefore, the tool design method, which changes tool angle to increase the ultrasonic kinetic energy for material removal, enables the concept of ultrasonic milling on one hand, but increases the surface roughness on the other hand.
References
[1] WOOD R W, LOOMIS. Philosophical magazine Ser. 7 [M]. 1927: 417-436.
[2] ENSMINGER D. Ultrasonic, the low and high intensity applications [M]. New York: Marcel Dekker Inc., 1973: 445.
[3] SHAW M C. Ultrasonic grinding [J]. Microtechnic, 1956, 10(6): 257-265.
[4] ROZENBERG L D, KAZANTSEV V F, MAKAROV L O, Yakhimovich D F. Utrasonic cutting, consultants bureau [M]. New York, 1964: 80-85.
[5] ENOMOTO Y. Sliding Fracture of soda-lime glass in liquid environmental [J]. Journal of Materials Sciences, 1981, 16(12): 3365-3370.
[6] TYRRELL W R. Rotary ultrasonic machining [R]. Dearborn: SME Technical Paper, 1970: 70-516.
[7] MARKOV A I. Ultrasonic drilling and milling of hard non-metallic materials with diamond tools [J]. Machine and Tooling, 1977, 48: 45-47.
[8] PRABHAKAR D, FERREIRA P M, HASELKORN M. An experimental investigation of material removal rates in rotary ultrasonic machining [J]. Transactions of the North American Manufacturing Research Institution of SME, 1992, 21: 211-218.
[9] PEI Z J, FERREIRA P M, KAPOOR S G, HASELKORN M. Rotary ultrasonic machining for face milling of ceramics [J]. International Journal of Machine Tools and Manufacture, 1995, 35(7): 1033-1046.
[10] PEI Z J, FERREIRA P M. An experimental investigation of rotary ultrasonic face milling [J]. International Journal of Machine Tools and Manufacture, 1999, 39(8): 1327-1344.
[11] PEI Z J, PRABHAKAR D, FERREIRA P M, HASELKORN M. Rotary ultrasonic drilling and milling of ceramics [J]. Ceramic Transactions, 1995, 49: 185-196.
[12] SPURE G, HOLL E. Ultrasonic assisted of grinding ceramics [J]. Journal of Materials Processing Technology, 1996, 62: 287-293.
[13] YA G, QIN H W, YANG S C, XU Y W. Analysis of the rotary ultrasonic machining mechanism [J]. Journal of Materials Processing Technology, 2002, 129(1-3): 182-185.
(Edited by DENG Lü-xiang)
Foundation item: Project (NSC-94-2622-E-027-036-CC3) supported by National Science Council
Corresponding author: KUO Kei-lin; Tel: +886-2-27712171-3623; E-mail: klkuo@ntut.edu.tw
DOI: 10.1016/S1003-6326(12)61806-8