Trans. Nonferrous Met. Soc. China 24(2014) s29-s35
Thermal stability and mechanical properties of thick thermal barrier coatings with vertical type cracks
Zhe LU1, Min-Sik KIM1, Sang-Won MYOUNG1, Je-Hyun LEE1, Yeon-Gil JUNG1, In-Soo KIM2, Chang-Yong JO2
1. School of Nano & Advanced Materials Engineering, Changwon National University, Gyeongnam 641-773, Korea;
2. High Temperature Materials Research Group, Korea Institute of Materials Science, Gyeongnam 641-831, Korea
Received 18 June 2013; accepted 25 October 2013
Abstract: The thermal stability and failure mechanism of thick thermal barrier coatings (TBCs) with and without vertical type cracks were investigated through the cyclic thermal exposure and thermal-shock tests. The TBC systems with thickness of about 2000 μm in the top coat were prepared by an air plasma spray (APS) on the bond coat of about 150 μm in thickness prepared by APS. The adhesive strength values of the as-prepared TBCs with and without vertical type cracks were determined to be 24.7 and 11.0 MPa, respectively, indicating the better interface stability in the TBC with vertical type cracks. The TBC with vertical type cracks shows a better thermal durability than that without vertical type cracks in the thermal cyclic exposure and thermal-shock tests. The hardness values of the as-prepared TBCs with and without vertical type cracks were found to be 6.6 and 5.3 GPa, respectively, which were increased to 9.5 and 5.5 GPa, respectively, after the cyclic thermal exposure tests. These results indicate that the vertical type cracks developed in the top coat are important in improving the lifetime performance of thick TBC in high temperature environment.
Key words: thermal barrier coating; air plasma spray; vertical type crack; thermal durability
1 Introduction
Thermal barrier coatings (TBCs) are extensively employed in high temperature components of gas turbines, such as turbine and combustion, to increase the turbine inlet temperature, hence increasing the efficiency and performance of gas turbines [1]. TBCs can be considered a four-layered material system, consisting of the following aspects: 1) a substrate of nickel- or cobalt-based superalloy; 2) an oxidation-resistant metallic bond coat of MCrAlY formed by the air plasma spray (APS), vacuum plasma spray, and high velocity oxygen fuel (HVOF) methods; 3) thermally grown oxide (TGO) layer, typically α(Al) or spinel structure oxide, formed during heat treatment or in service; and 4) a ceramic top coat of 6%-8% (mass fraction) yttria-stabilized zirconia deposited by either APS or electron beam-physical vapor deposition processes [2,3]. There are three ways to enhance TBC performance, specially focused on the thermal conductivity of TBC: 1) developing feedstock powder with a low thermal conductivity; 2) controlling porosity of the top coat; and 3) increasing thickness of the top coat. Many factors, such as high melting point, thermal stability, low thermal conductivity, chemical inertness, good adhesion with the metallic substrate, low sintering rate, and thermo-mechanical properties, have to be considered for practical applications of TBCs. The increase in thickness of the top coat reduces the surface temperature of cooled components in gas turbine engines at the rate of 4-9 °C per 25.4 μm [4]. The vertical type crack increases the strain tolerance of TBC system and also reduces the thermal and residual stresses caused by the difference in thermo-mechanical properties between the top and bond coats [5-9]. Therefore, the vertical type crack is potential in improving the thermal-shock resistance and thermal durability, which should be employed in thick TBC [10].
Therefore, the present work dealt with the thermo-mechanical properties of the thick TBCs with and without vertical type cracks, as a new strategy for the advanced TBC system. The microstructure evolution and thermal durability of the thick TBCs with and without vertical type cracks were investigated through the cyclic thermal exposure and thermal-shock tests, including the effect of vertical type cracks created on the top coat on the delamination behavior or fracture behavior of thick TBC system. In addition, the relationship between the thermal durability and vertical type cracks was established based on the microstructure, adhesive strength, and hardness variation before and after the cyclic thermal exposure and thermal-shock tests.
2 Experimental
2.1 Preparation of TBC
The vertical-cracked TBCs employed in this study were prepared by a specialized APS coating system. A Ni-based superalloy was used as a substrate with the disk shape of 25.4 mm in diameter and 5 mm in thickness. The bond coat was coated on the substrates with about 150 μm thickness using a Ni-based intermetallic powder. The bond coats for the TBCs with and without vertical type cracks were prepared by the HVOF and APS coating systems, respectively. The top coat was coated on the bond coat with about 2000 μm thickness using a 7%-8% yttria stabilized zirconia powder. The fabrication parameters for the bond and top coats were recommended by manufacturers (Praxair Korea Co. Ltd. and Chrome-Alloying Co. Ltd.).
2.2 Microstructure and mechanical property
The selected specimens before and after the cyclic thermal exposure and thermal-shock tests were pre- processed to observe the cross-sectional microstructure and to evaluate the mechanical properties. The mounted specimens were given a final polish with diameter of 1 μm diamond paste. The cross-sectional microstructures of the TBC specimens were observed by a scanning electron microscope (SEM; Model JSM-5610, JEOL, Japan). The thickness of the TGO layer formed at the interface between the bond and top coats after the two tests was measured by SEM. The hardness values of the top coats before and after the tests were determined using a microindenter (HM-114, Mitutoyo Corp., Japan) with a Vickers tip for a load of 3 N, using the equation proposed by LAWN et al [11]. To obtain more reliable values, 15 points were indented for each result. Elemental analysis was performed for the TGO layer using energy dispersive X-ray analysis (EDX; S2700, Hitachi, Japan). The adhesive strength of each TBC was measured according to the ASTM standard (ASTM-C-633-01) [12]. The specimen for the adhesive strength test was prepared by bonding that to the jig fixture with an epoxy adhesive in the oven at 200 °C for 3 h.
2.3 Thermal fatigue and thermal-shock tests
A bottom-loading programmable cyclic furnace was used to determine the life cycles of TBC systems. The electric thermal fatigue (ETF) tests were performed for 1143 cycles at a surface temperature of 1100 °C with a temperature difference of 150 °C between the top and bottom surfaces of TBC specimen. In the ETF tests, the dwell time was 60 min and natural air cooling was allowed for 10 min at room temperature (25-30 °C), and the 25% buckling or spallation of the top coat was defined as a failure criterion. The TBC specimens in the ETF tests were removed at different fractions of their life for cross-sectional studies, while others were cycled until the failure criterion was met, to observe signs of failure. In the thermal-shock tests, when the furnace temperature reached 1100 °C, the specimens were placed in the furnace and held for 60 min, and then directly quenched in water for 5 min, the temperature of the water is about 20 °C throughout the tests. More than 50% buckling or spallation in the top coat was adopted as the criterion for failure. At least five specimens were tested for each condition [13-16].
3 Results and discussion
3.1 Microstructure of as-prepared TBCs
The cross-sectional microstructures of the as-prepared TBC specimens are shown in Fig. 1, which are the microstructures of the TBCs without and with vertical type cracks, respectively. The top coats are well deposited with the designed concept, without and with vertical type cracks. The thicknesses of the bond and top coats are (150±30) and (2000±100) μm (mean±standard deviation), respectively. The microstructures show intrinsic defects, such as pores, unmelted particles, splat boundaries, and oxide materials (Figs. 1(a2) and (b2)), as shown in the top coat prepared using a APS process. The length of vertical type cracks shown in Fig. 1(b1) is determined to be (1201±521) μm. There are many horizontal cracks on both sides of each vertical type crack and its length is determined to be (83±25) μm. The microstructure of TBC specimen with vertical type cracks is denser than that without vertical type cracks, for developing vertical type cracks.
3.2 Cyclic thermal exposure
The cross-sectional microstructures of TBCs after cyclic thermal exposure are shown in Fig. 2. After the tests, the top coat with vertical type cracks is densified, owing to re-sintering during thermal exposure for 1143 cycles. The TBC without vertical type cracks is delaminated near the interface between the bond and top coats after 25-30 cycles, as shown in Fig. 2(a). However, the TBC with vertical type cracks shows a better condition at the interface between the bond and top coat after 1143 cycles (Fig. 2(b)), even though the horizontal and vertical cracks thicken and lengthen, and the crack near the interface between the top coat and TGO layer is newly developed. Failure mechanism of the thick TBCs is different from that of traditional thin TBCs. Failure of the thick TBCs is related not only to thermal expansion mismatch between the coating and substrate but also microstructure species .
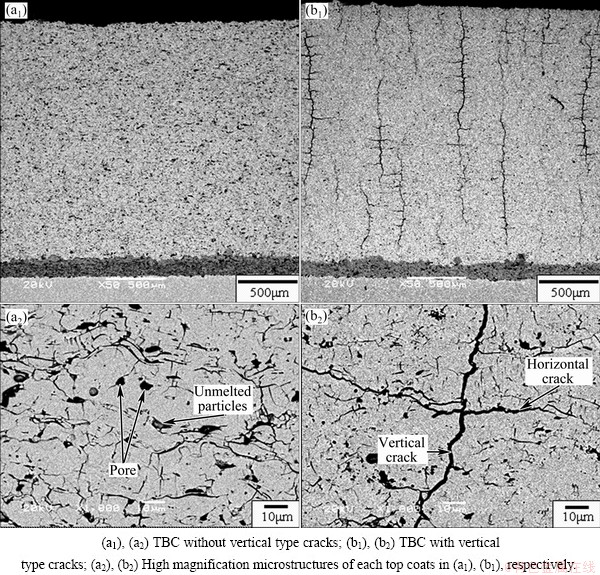
Fig. 1 Cross-sectional microstructures of as-prepared TBCs
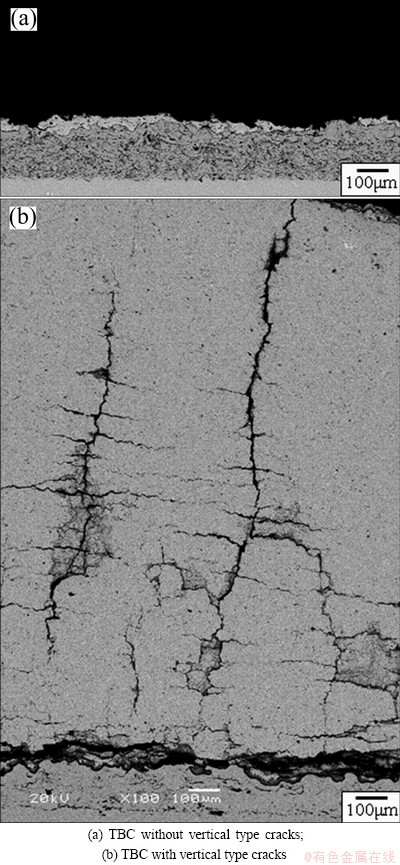
Fig. 2 Cross-sectional microstructures of TBCs after cyclic thermal exposure tests
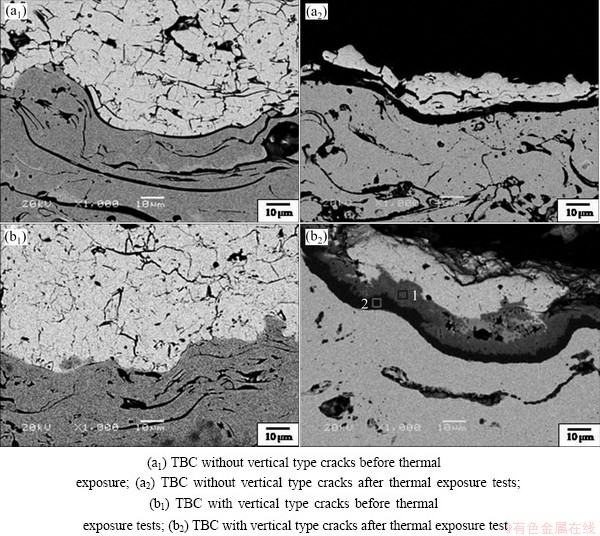
Fig. 3 Cross-sectional microstructures at interface between top and bond coats
The improvement in thermal durability of the TBC with vertical type cracks could be well observed in the magnified interface microstructure between the bond and top coats. The interface microstructures before and after cyclic thermal exposure are shown in Fig. 3 for the TBCs without and with vertical type cracks. The as-prepared TBC specimens show irregular shapes at the interface between the top and bond coats, without cracking at the interface (Figs. 3(a1) and (b1)). After the thermal exposure tests, the “rumpling” phenomena of the TGO layer are observed in both TBCs as shown in Figs. 3(a2) and (b2). The thickness of TGO layer is (17.6±1.7) μm for the TBC with vertical type cracks (Fig. 3(b2)), showing a relatively thin thickness of 4-5 μm for the TBC without vertical type cracks due to the relatively low number of cycle (delamination after 25-30 cycles). The longer exposure time enhances the “rumpling” at the interface of the top and bond coats. The thickness of the TGO layer is strongly dependent on the exposure time, consisting of two regions: gray color (point 1 in Fig. 3(b2)) formed later and black color (point 2 in Fig. 3(b2)) formed early. The TGO layer shown as gray contrast is more irregularly shaped and observed in the TBC with vertical type cracks after thermal exposure for 1143 cycles. The element analysis for the gray TGO layer indicates the presence of Ni, Co, Cr, O and Al, whereas the black TGO layer is only composed of Al and O. The elementary compositions of the TGO layers marked as 1 and 2 in Fig. 3(b2) are given in Table 1. The results are in good agreement with the previous study [17].
Table 1 Elementary composition in each TGO layer

3.3 Thermal-shock
The thermal-shock tests were performed for the two different specimens with and without vertical type cracks. The surface and cross-sectional microstructures of TBCs after the thermal-shock tests are shown in Fig. 4. After thermal shock tests, the spalling mode is similar in all specimens, showing a complete delamination near the interface between the bond and top coats. This may be due to the large temperature difference between the substrate and the top coat during the quenching and annealing processes. The thermal expansion mismatch between the top and bond coats or the oxidation of bond coat leads to failure. At high temperature, the thermal expansion difference between the top and bond coats increases, which generates great axial thermal stress at the interface. In the thermal-shock tests, the axial stress expanses and compresses the pores circularly, leading to microcracks [18]. In addition, the TBC without vertical type cracks is delaminated after 5-10 cycles, however, the TBC with vertical type cracks is delaminated after 200-250 cycles. The TGO layer is fully developed with the thickness of (12.6±2.1) μm for the TBC with vertical type cracks, owing to the relatively long thermal-shock period of 200-250 cycles. The bond coats in all specimens after the thermal-shock tests show many visible defects and higher oxide contents as shown in Figs. 4(a3) and (b3).
3.4 Adhesive strength
The adhesive strength is an important parameter in TBC performance, because the origin of delamination at the interface between the bond and top coats is strongly related to the adhesive strength. The adhesive strength values measured for the as-prepared specimens with and without vertical type cracks are determined to be (24.7±2.8) and (11.0±1.2) MPa, respectively. The surface and cross-sectional microstructures after measuring the adhesive strength values are shown in Fig. 5. The fracture morphologies of both TBC systems are entirely different in the adhesive strength tests.
Adhesive failure, such as cracking, fragmentation, and spallation, in the TBC without vertical type cracks, occurs near the interface between the top and bond coats, showing a complete delamination. However, mainly cohesive failure, such as peeling, chipping, and flaking, in the TBC with vertical type cracks, occurs within the top coat, showing the fracture path along horizontal cracks on both sides of vertical type cracks. The thicknesses of residual top coats at the edge of the fractured specimens with and without vertical type cracks are (1261±134) and (26±9) μm, respectively. The adhesive strength value of the TBC with vertical type cracks is significantly higher than that without vertical type cracks, indicating that the interface stability of the TBC with vertical type cracks is better than that without vertical type cracks. Therefore, the thermal durability and lifetime of the TBC with vertical type cracks will be longer than that without vertical type cracks, which is also evidenced from the thermal cyclic exposure and thermal-shock tests.
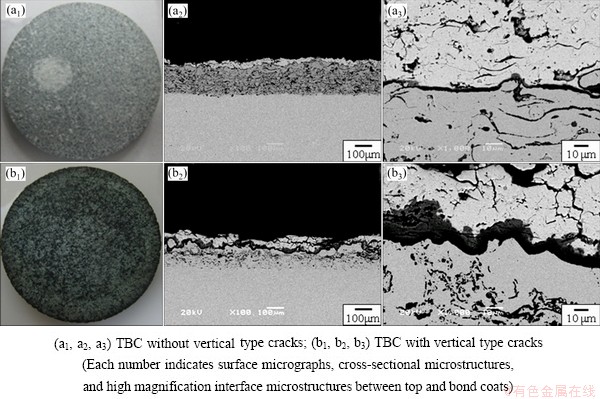
Fig. 4 Surface micrographs and cross-sectional microstructures of TBCs after thermal-shock tests
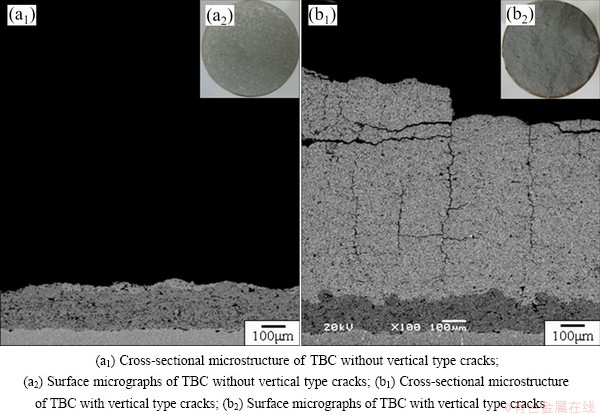
Fig 5 Surface and cross-sectional microstructures of TBCs after measuring adhesive strength
3.5 Hardness
The hardness values of top coats before and after the cyclic thermal exposure and thermal-shock tests were measured using Vickers indentation, which are shown in Fig. 6. The hardness values of the TBCs with and without vertical type cracks are determined to be (6.6±0.8) GPa and (5.3±0.6) GPa, respectively. After cyclic thermal exposure, the hardness values are determined to be (9.5±0.6) GPa and (5.5±0.2) GPa for the TBCs with and without vertical type cracks, respectively. Similarly, the hardness values are found to be (9.4±1.0) GPa and (5.5±0.5) GPa for the TBCs with and without vertical type cracks, respectively, after the thermal-shock tests. The hardness value of the as-prepared TBC with vertical type cracks is slightly higher than that without vertical type cracks, owing to re-heating process for developing vertical type cracks in the top coat. The TBC without vertical type crack does not show any significant improvement in the hardness values after the cyclic thermal exposure and thermal-shock tests due to the less number of cycle, i.e. 25-30 and 5-10 cycles, respectively. In the case of the TBC with vertical type crack shows a significant improvement in the hardness values due to the longer number of cycles, i.e. 1143 and 200-250 cycles in the cyclic thermal exposure and thermal-shock tests, respectively. The hardness values measured are in good agreement with the microstructure evolution as shown in Fig. 2. The microstructure of the TBC with vertical type cracks is denser than that without vertical type cracks, owing to re-sintering through thermal exposure for 1143 cycles, resulting in disappearance of pores and “splat” boundaries.
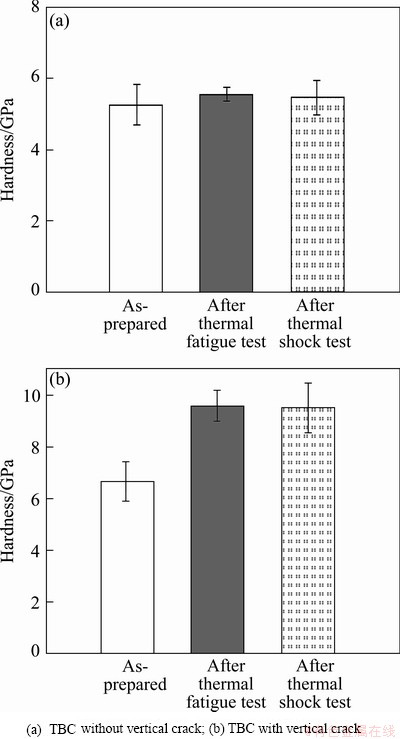
Fig. 6 Hardness values of top coats before and after cyclic thermal exposure and thermal-shock tests (Indentation was conducted on sectional plane with load of 3 N)
4 Conclusions
1) The microstructure of thick TBCs (thickness 2000 mm) could be well controlled in APS process, showing dense and vertical-cracked microstructure in the top coat.
2) The cyclic thermal exposure tests show a sound condition till 1143 cycles for the TBC with vertical type cracks, whereas the TBC without vertical type cracks is delaminated after 25-30 cycles. After cyclic thermal exposure, the thicknesses of TGO layer for the TBCs with and without vertical type cracks are determined to be 16-19 and 4-5 mm, respectively, showing the effect of microstructure.
3) Delamination or fracture of the TBC with vertical type cracks is initiated after 200-250 cycles in the thermal-shock tests, while that without vertical type cracks is delaminated after 5-10 cycles. The cyclic thermal exposure and thermal-shock tests reveal that the microstructure development including vertical type cracks is important in enhancing thermal durability, which is evidenced after the longer lifetime.
4) The adhesive strength values for the TBCs with and without vertical type cracks are determined to be (24.7±2.8) MPa and (11.0±1.2) MPa, respectively. The interface stability of the TBC with vertical type cracks is better than that without vertical type cracks. The hardness values of the as-prepared TBCs with and without vertical type cracks are determined to be (6.6±0.8) GPa and (5.3±0.6) GPa, respectively. After cyclic thermal exposure, the hardness values of the TBC with vertical type cracks is increased to (9.5±0.6) GPa. Consequently, the thick TBC system with vertical type cracks is more efficient in improving thermal durability, interface stability, and mechanical properties compared to the TBC without vertical type cracks, which can be verified with the results of cyclic thermal exposure, thermal-shock, and adhesion strength tests.
References
[1] TSIPAS S A, GOLOSNOY I O. Effect of substrate temperature on the microstructure and properties of thick plasma-sprayed YSZ TBCs [J]. Journal of the European Ceramic Society, 2011, 31: 2923-2929.
[2] MADHWAL M, JORDAN E H, GELL M. Failure mechanisms of dense vertically-cracked thermal barrier coatings [J]. Materials Science and Engineering A, 2004, 384: 151-161.
[3] WU Y N, KE P L, WANG Q M, SUN C, WANG F H. High temperature properties of thermal barrier coatings obtained by detonation spraying [J]. Corrosion Science, 2004, 46: 2925-2935.
[4] SCHILKE P W. Advanced gas turbine materials and coatings [M]. Schenectady, NY: GE Energy, 2004.
[5] GUO H B,  R,
R,  D. Thermophysical properties and thermal cycling behavior of plasma sprayed thick thermal barrier coatings [J]. Surface & Coatings Technology, 2005, 192: 48-56.
[6] JADHAV A D, PADTURE N P. Mechanical properties of solution-precursor plasma-sprayed thermal barrier coatings [J]. Surface & Coatings Technology, 2008, 202: 4976-4979.
[7] JADHAV A, PADTURE N P, WU F, JORDAN E H, GELL M. Thick ceramic thermal barrier coatings with high durability deposited using solution-precursor plasma spray [J]. Materials Science and Engineering A, 2005, 405(1-2): 313-320.
[8] EVANS A G, MUMM D R, HUTCHINSON J W, MEIER G H, PETTIT F S. Mechanisms controlling the durability of thermal barrier coatings [J]. Progress in Materials Science, 2001, 46(5): 505-553.
[9] PADTURE N R, GELL M, JORDAN E H, ERIC H. Thermal barrier coatings for gas-turbine engine applications [J]. Science, 2002, 296: 280-284.
[10] GUO H B,  R,
R,  D. Atmospheric plasma sprayed thick thermal barrier coatings with high segmentation crack density [J]. Surface & Coatings Technology, 2004, 186: 353-363.
[11] LAWN B R. Fracture of Brittle Solids [M]. 2nd ed. Cambridge, UK: Cambridge University Press, 1993.
[12] ASTM Standards C633-79. American Society of Testing and Materials [S]. Philadelphia, USA, 1999.
[13] TSANTRIZES P G, KIM G E, BREZINSKI T A. AGARD SMP meeting on thermal barrier coatings [C]//Denmark, 1997: 71-78.
[14] KNIGHT R, DING Z X, KIM E H, SMITH R H. Influence of bond coat surface characteristics on the performance of TBC systems [C]//Proceedings of the 15th International Thermal Spray Conference, Nice: ASM Thermal Spray Society, 1998: 1549.
[15] CHWA S O, OHMORI A. Microstructures of ZrO2-8wt.% Y2O3 coatings prepared by a plasma laser hybrid spraying technique [J]. Surface and Coatings Technology, 2002, 153: 304-312.
[16] MA X Q, TAKEMOTO M. Quantitative acoustic emission analysis of plasma sprayed thermal barrier coatings subjected to thermal shock tests [J]. Materials Science and Engineering A, 2001, 308(1-2): 101-110.
[17] SHILLINGTON E A G, CLARKE D R. Spalling failure of a thermal barrier coating associated with aluminum depletion in the bond-coat [J]. Acta Materialia, 1999, 47(4): 1297-1305.
[18] GUO H B,  R,
R,  D. Thermophysical properties and thermal cycling behavior of plasma sprayed thick thermal barrier coatings [J]. Surface and Coatings Technology, 2005, 192(1): 48-56.
含垂直裂纹的厚热障涂层的热稳定性及力学性能
Zhe LU1, Min-Sik KIM1, Sang-Won MYOUNG1, Je-Hyun LEE1, Yeon-Gil JUNG1, In-Soo KIM2, Chang-Yong JO2
1. School of Nano & Advanced Materials Engineering, Changwon National University, Gyeongnam 641-773, of Korea;
2. High Temperature Materials Research Group, Korea Institute of Materials Science, Gyeongnam 641-831, Korea
摘 要:采用循环热暴露及热震试验研究含或不含垂直裂纹的厚热障涂层的热稳定性和失效机制。先采用空气等离子喷涂技术在基体表面制备150 μm厚的连接涂层,再在该涂层上采用空气等离子喷涂技术制备2000 μm厚的热障涂层。含或不含垂直裂纹的热障涂层的粘附强度分别为24.7和11.0 MPa,表明含垂直裂纹的热障涂层的界面稳定性更高。循环热暴露及热震试验表明其热稳定性更高。含或不含垂直裂纹的热障涂层的硬度分别为6.6和5.3 GPa,经循环热暴露试验后分别升高至9.5和5.5 GPa。实验表明上层涂层中垂直裂纹的存在有利于延长热障涂层高温环境的寿命。
关键词:热障涂层;空气等离子喷涂;垂直裂纹;热稳定性
(Edited by Huai-zhong LONG)
Foundation item: Project (2011-0030058) supported by the National Research Foundation of Korea (NRF) Funded by the Korean Government (MSIP); Project (20134030200220) supported by the Human Resources Development Program of the Korea Institute of Energy Technology Evaluation and Planning (KETEP) Funded by the Korea Government Ministry of Trade, Industry and Energy and by the Korea Institute of Materials Science (KIMS) in 2013
Corresponding author: Yeon-Gil JUNG; Tel: +82-55-213-3712; Fax: +82-55-262-6486; E-mail: jungyg@changwon.ac.kr
DOI: 10.1016/S1003-6326(14)63284-2