Trans. Nonferrous Met. Soc. China 22(2012) s309-s314
Welded double sheet hydroforming of complex hollow component
LIU Wei1, 2, CHEN Yi-zhe2, LIU Gang1, 2, CUI Xiao-lei2
1. National Key Laboratory for Precision Hot Processing of Metals, Harbin Institute of Technology, Harbin 150001, China;
2. School of Materials Science and Engineering, Harbin Institute of Technology, Harbin 150001, China
Received 28 August 2012; accepted 25 October 2012
Abstract: A ‘bone-like’ hollow component with curved axis and complicated cross-sectional geometry was used as the object. The experimental setup for the hollow component by welded double sheet hydroforming was designed and used for the forming of the part. The formability influenced by blank shape and size, loading path combined by the clamping force and liquid pressure was explored, then the reasonable process parameters avoiding defects were obtained. The results show that the reasonable blank shape can not only save materials and reduce costs but also avoid fracture at the corner caused by the large expansion rate and wrinkle in the transition zone of different cross sections. The loading path has a serious effect on the material flow in the pre-forming stage. The complex hollow shell structure with curved axis and varied cross sections can be fabricated by double sheet hydroforming process more easily and efficiently than traditional stamping and welding method. The process can also solve the problem of the limitation of expansion rate by tube hydroforming for the structure with a large difference of cross sections.
Key words: hydroforming; hollow component; varied cross sections; curved axis; clamping force; liquid pressure; loading path
1 Introduction
Under the urgent require of low energy consumption and low emission, the structural components which are used in the transportation, aerospace and other industrial areas should meet the need of the lightweight structure while facing high strength and high stiffness [1]. These problems bring a higher demand on hollow components with high strength and lightweight materials [2,3]. For some hollow components with a small batch, varied cross sections and complex shape, the traditional forming method by stamping and welding has serious difficulties, such as high cost, low efficiency, more time and human resources used during the die designing, manufacturing and trouble solving.
In recent years, the hydroforming technologies, such as tube hydroforming and hydromechanical deep drawing, have made a great breakthrough. The theoretical results and engineering experiences of hydroforming are rich and the technology has become a good choice of manufacturing hollow components [4-6]. However, due to the limitation of material expansion rate, there is a great difficulty on the forming of hollow components with varied cross sections. So, the formability and reliability of this kind of component were restricted by the current methods [7-9].
Double sheet hydroforming is a new process of sheet metal forming which was developed by German based on the tube hydroforming and hydromechanical deep drawing in the 1990s. This process is one of the internal high pressure forming technologies, so it is also known as a sheet internal high pressure forming [10-12]. This process overcomes the problem of excessive thinning during tube hydroforming because of the large varied cross sections, and it is possible to produce some parts that have more complex cross sections [13-16]. Some researchers carried out more detailed studies on this process, and their researches are related on the deformation mechanism, seal method, the way of liquid filling, forming process window, numerical simulation and so on [17,18].
However, the current studies for some complex parts were only some results by finite element analysis, and the experimental results of complex parts with curved axis and various cross sections were not mentioned in current studies. So, it focuses on a complex hollow component with curved axis and varied cross sections in this work. The feasibility of the welded double sheet hydroforming process was explored and the influence on part formability of process parameters, such as blank shape and loading path was compared.
2 Process principle and characteristics
Welded double sheet hydroforming is a process that the upper blank and lower blank with same shape are welded together along peripheral edges before forming, then the welded double blanks will be put into the upper die and lower die. After this, high pressure liquid is filled into the middle of the two blanks through a docking system, and finally with the clamping force and the internal liquid pressure, the upper and lower blanks respectively fit to the upper die and lower die. By this way, the hollow shell can be formed. Figure 1 shows this forming procedure.
This process is a soft punch forming technology by using liquid instead of rigid punch, and it has a lot of advantages such as good flexibility, both drawing and stretching deformation, more continuous and uniform deformation, and significant improvement on the geometrical accuracy and rigidity. It also can help to reduce springback, control thinning of thickness, and improve the forming limitation. So, this process suits for the production of the large size and small quantity of hollow components with complicated cross sections. And it has a very large potential to become a main technology to produce the car body’s hollow structural members, such as bumper, beam, exhaust system and fuel tank.
3 Structure of hollow component
The three-dimensional model of the hollow component with curved axis and complex cross sections is shown in Fig. 2. The structure of the part is a ‘bone-like’ shape. The center axis is a curved line. At both sides of this part, the flange surface is flat; but in the middle of this part, the flange surface is a single curvature surface. There is an irregular change on the area of the cross sections along the center axis. There are three typical cross sections: Section 1, Section 2 and Section 3. The area ratio of the three typical cross sections is about 1.2:1.0:1.6. So, the maximum expansion rate is about 160% for Section 3. Section 1 and Section 3 are in rectangular shape. However, Section 2 is in ‘W’ shape. This means a reverse drawing deformation before calibrating. So, the changes are very large on the section area along the center axis.
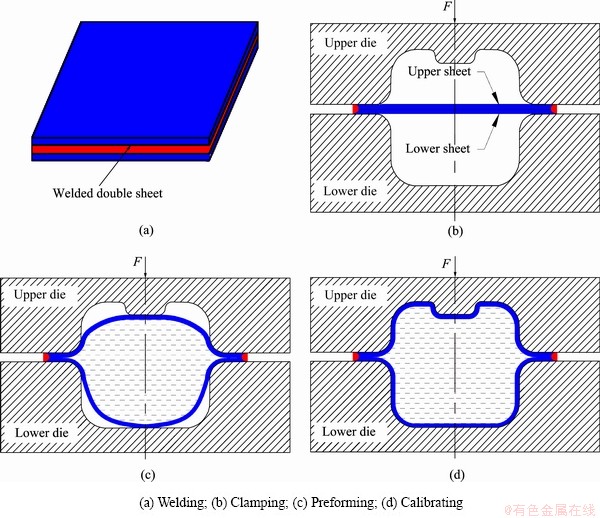
Fig. 1 Schematic diagram of welded double sheet hydroforming
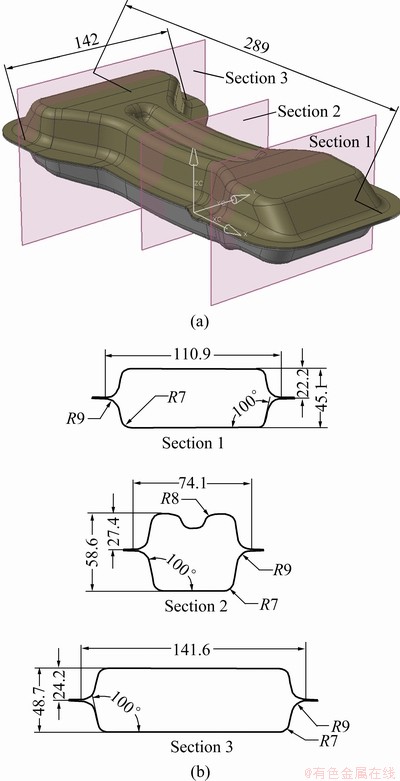
Fig. 2 Three-dimensional model(a) and three cross sections(b) of hollow component (unit: mm)
In general, this kind of hollow component was manufactured by stamping separately and then welding together. However, there are some troubles on the welding of curved flange surface and more costs on the manufacturing of punch and die for each part stamping. By contrast, the double sheet hydroforming process can replace the traditional procedure and decrease the cost and improve the formability.
4 Experimental procedure
The mould structure used for the above hollow component by welded double sheet hydroforming is composed of three parts, including an upper die, a lower die and a filling body as the docking system. The model established by CAD software is shown in Fig. 3(a). In order to replace the die more easily, the upper and lower dies are divided into three portions respectively. Two portions are combined into a die cavity, and the other one is used for filling body. The mould material is 45# low carbon steel. Figure 3(b) shows the mould picture. The die radius of upper die is 8 mm, the lower one is 9 mm, and other radii in die inner surface are all above 7 mm.
The experiments were carried out on the 5000 kN press machine, the filling of high-pressure liquid was completed using a supercharger supported by the hydroforming machine and the maximum liquid pressure can be 400 MPa. The experimental material used for this part forming is ST12 low carbon steel blanks with thickness of 1 mm, the forming steps and the parts corresponding to the forming procedure are shown in Fig. 4.
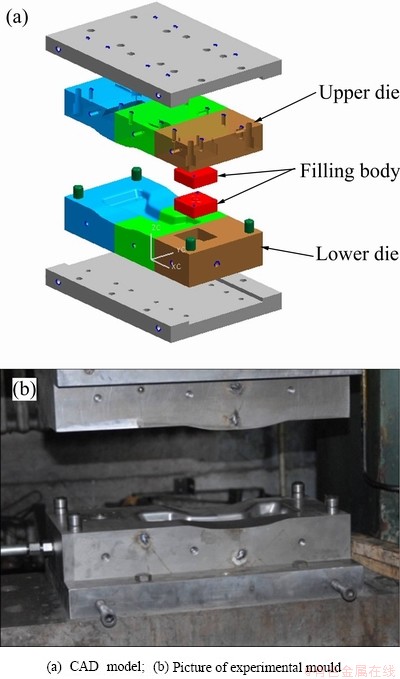
Fig. 3 Setup of experimental mould
5 Results
5.1 Influence of blank geometry on formability
As shown in Fig. 5, three different geometrical sheets were used for experimental study, which were designed according to the results of the numerical calculation. Sheet 1 is a rectangular blank, and Sheet 2 and Sheet 3 are optimized results based on the calculation of reverse algorithm.
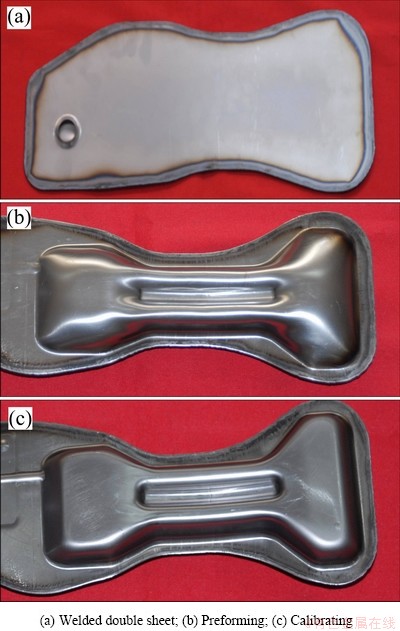
Fig. 4 Forming steps and parts of forming procedure
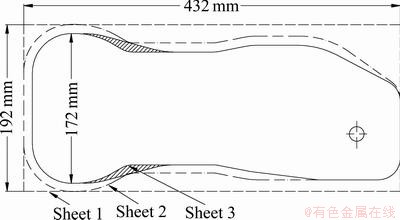
Fig. 5 Shape and size of blanks used in experimental study
Figure 6 shows the experimental forming parts obtained by double sheet hydroforming with different sheets. For Part 1 formed from Sheet 1, as shown in Fig. 6(a), the upper blank fracture at the reverse drawing corner when the liquid pressure increased to 15 MPa, the upper blank did not fully fit onto the die face, and the maximum flow distance of the edge was only about 12 mm. The reason may be the large flange area and the serious stretching force on blank. There is also a large deformation in the area of reverse drawing forming. For Part 2 formed from Sheet 2, the blanks fully fit onto the die face when the liquid pressure is 43 MPa and there is no defect on the part, the maximum flow distance of the blank on edge is about 33 mm, and the minimum size of the flange area of forming part is 18 mm, but there are more materials remaining on the whole flange. For Part 3 formed from Sheet 3, the blanks fully fit onto the die face when the liquid pressure is 43 MPa and most of flange edge is 5-10 mm, and there are some wrinkles found in the corner reverse drawing region. This is due to the smaller blank size, it is more easier for blank to be drawn into the die cavity during the preforming process, and the excessive material is deposited on the upper surface, so the wrinkles occur at last.
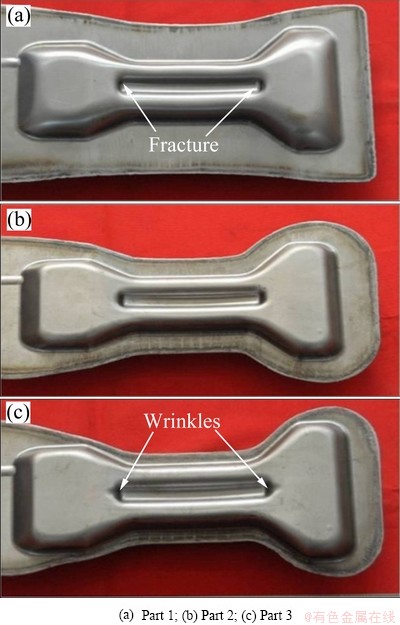
Fig. 6 Forming parts with different blank shape and size
From the above studies, Sheet 3 may be a good choice for blank shape and size. In order to avoid the stacking of excessive material in the corner region of reverse drawing, the sheet size was increased on the flange near the region of wrinkling to control the flow velocity of the sheet, thereby preventing the occurrence of wrinkles, as shown in Fig. 5.
5.2 Influence of loading path on formability
The clamping force of double sheet hydroforming comprises clamping force and liquid pressure. However, for the convenience of the engineering calculations, the relationship between clamping force and liquid pressure can be expressed by the following equation appropriately:
 (1)
(1)
where Fcl is the clamping force provided by the clamping press; λ is the coefficient of blank holder force, λ=1.1-1.3;p is the liquid pressure during forming, whose value in calibrating can be calculated according to 
 , where t is the blank thickness, rmin is the minimum corner radius of the part,
  is the material flow stress; the maximum liquid pressure is limited by the supercharger of hydroforming press; Seff is the surface area of the sheet compressed by liquid pressure on the projection direction, whose value decreases with the flow-in of blank.
The matching relationship between the clamping force and the liquid pressure of double sheet hydroforming process can be estimated by the formula (1). Here λ is taken at 1.2, and the matching relationship can be obtained. As shown in Fig. 7, the loading path can be given by the window restricted by the two dash lines and two dash-dot lines, where the dash lines refer to the fracture limit and liquid leakage and the dash-dot lines refer to the limit of press clamping force and limit of liquid pressure.
From Fig. 7, it can be seen that if the loading path matches along the given curve of the clamping force and the liquid pressure, it is not only to achieve a good seal of liquid in the forming procedure easily, but also to make blank form by stretching and deep drawing deformation. However, during the actual experimental process, it is difficult to do according to the calculated loading path. In this study, the step-loading paths with different clamping force and liquid pressure were used in stead of the calculated loading path.
Three typical step-loading paths were used in the experiments and these are shown in Fig. 8. The clamping forces in calibrating stage are all same, but the clamping force and the liquid pressure of the three paths in preforming stage are much different from each other.
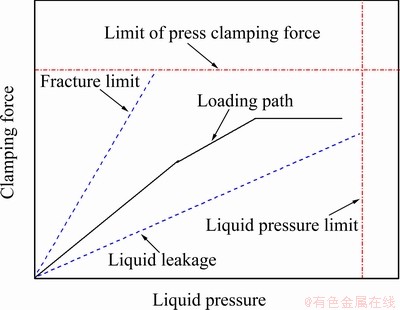
Fig. 7 Window of loading path
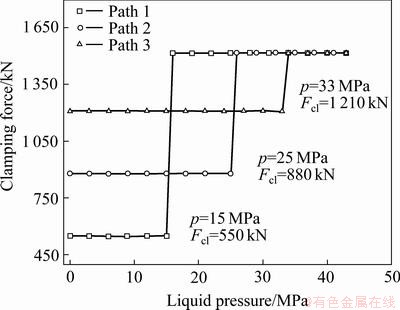
Fig. 8 Three typical loading paths
Figure 9 shows the hollow parts formed by three loading paths. It can be seen from Fig. 9 that by Path 1, there is a lower clamping force and liquid pressure during the preforming stage. Fracture can be seen on the part in the die corner, as shown in Fig. 9(a). This is because the liquid pressure of 15 MPa in the preforming stage is insufficient to fulfill the blank on the die face, and the blank is still at the original state of the end of the preforming. In fact, the sheets were actually drawn in the die cavity in the calibrating stage with the increase of liquid pressure, so that fracture occurred for the large clamping force in the calibrating stage. By Path 2, the sheets can be drawn by the liquid pressure in the preforming stage, blanks fill into the upper die and lower die cavity under a low clamping force during the preforming stage, and good quality can be obtained during calibrating stage, which is shown in Fig. 9(b). By Path 3, due to the large clamping force in the preforming stage, there is a large bulging deformation proportion in the preforming stage and serious thinning phenomenon, so fracture on the die corner can be found on the part, as shown in Fig. 9(c). It is caused by the higher liquid pressure and clamping force in calibrating stage.
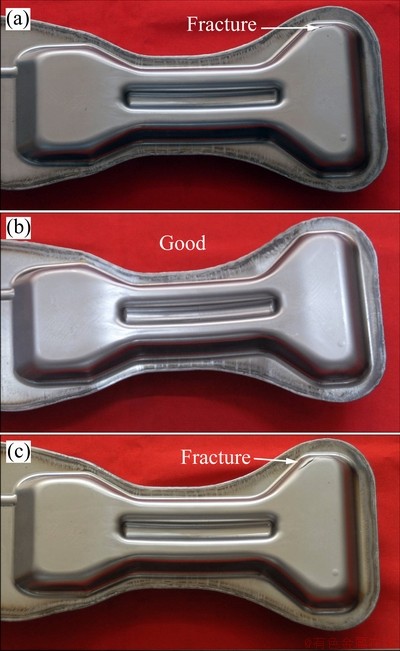
Fig. 9 Parts formed by Path 1(a), Path 2(b) and Path 3(c)
6 Conclusions
1) Blank shape and size have a large influence on the formability. Reasonable blank shape not only can save materials and reduce costs, but also can avoid fracture caused by bulging deformation and wrinkle caused by the large difference of cross sections. It is obvious that the increase of blank size on the wrinkling region can control the flow velocity of the sheet appropriately, thereby preventing the occurrence of wrinkles.
2) The clamping force and the liquid pressure are the two most important process parameters affecting the formability. During the preforming stage, reasonable loading path of clamping force and liquid pressure can ensure the material on flange zone to fill into the die cavity more easily and decrease the occurrence of fracture defects.
3) The complex hollow shell structure with curved axis and varied cross sections can be fabricated by double sheet hydroforming process more easily and efficiently than traditional stamping and welding method. The process can also solve the problem of the limitation of expansion rate for tube hydroforming for the structure with large difference of cross sections.
References
[1] TOLAZZI M. Hydroforming applications in automotive: A review [J]. Int J Mater Form, 2010, 3(s1): 307-310.
[2] TANG Z J, HE Z B, LIU G, YUAN S J, HU L. Hydroforming of AZ61A tubular component with various cross sections [J]. Transactions of Nonferrous Metals Society of China, 2009, 19(s2): s398-s402.
[3] LIU G, TANG Z J, HE Z B, YUAN S J. Warm hydroforming of magnesium alloy tube with large expansion ratio [J]. Transactions of Nonferrous Metals Society of China, 2010, 20(11): 2071-2075.
[4] OH S I, JEON B H, KIM H Y. Applications of hydroforming processes to automobile parts [J]. Journal of Materials Processing Technology, 2006, 174: 42-55.
[5] YUAN Shi-jian, HE Zhu-bin, LIU Gang, WANG Xiao-song, HAN Cong. New developments in theory and processes of internal high pressure forming [J]. The Chinese Journal of Nonferrous Metals, 2011, 21(10): 2523-2533. (in Chinese)
[6] LIU X, XU Y C, YUAN S J. Hydroforming of aluminum alloy complex-shaped components [J]. Transactions of Nonferrous Metals Society of China, 2011, 21(s2): s417-s422.
[7] YUAN W J, LIU X H, TIAN H B, WANG X S, YUAN S J. Thickness demarcation circle of double-cone tube during hydroforming [J]. Advanced Materials Research, 2011, 189-193: 2976-2979.
[8] HEIN P, VOLLERSTEN F. Hydroforming of sheet metal pairs [J]. Journal of Materials Processing Technology, 1999, 87: 154-164.
[9] VAHL M, HEIN P, BOBBERT S. Hydroforming of sheet metal pairs for the production of hollow bodies [J]. La Revue de Métallurgie, 2000, 10: 1255-1263.
[10] KREIS O, HEIN P. Manufacturing system for the integrated hydroforming, trimming and welding of sheet metal pairs [J]. Journal of Materials Processing Technology, 2001, 115: 49-54.
[11] SHIN Y S, KIM H Y, JEON B H, OH S I. Prototype tryout and die design for automotive parts using welded blank hydroforming [J]. Journal of Materials Processing Technology, 2002, 130-131: 121-127
[12] KIM T J, YANG D Y, HAN S S. Numerical Modeling of the multi-stage sheet pair hydroforming process [J]. Journal of Materials Processing Technology, 2004, 151: 48-53.
[13] GEIGER M, MERLIN M, COJUTTI M. Integrated tube and double sheet hydroforming technology-optimised process for the production of a complex part [J]. Key Engineering Materials, 2007, 344: 477-484.
[14] GEIGER M, COJUTTI M. Intergration of double sheet and tube hydroforming processes: Numerical investigation of the feasibility of a complex part [J]. International Journal of Computational Materials Science and Surface Engineering, 2009, 2(1-2): 110-117.
[15] COJUTTI M, MERKLEIN M, GEIGER M. Investigations on double sheet hydroforming with counter pressure [C]// The 2nd International Conference on New Forming Technology. Bremen, 2007: 1-10.
[16] GEIGER M, MERKLEIN M, COJUTTI M. Hydroforming of inhomogeneous sheet pairs with counter pressure [J]. Production Engineering, 2008, 3(1): 17-22.
[17] ASSMPOUR A, MOHAMMAD R E. Pressure estimation in the hydroforming process of sheet metal pairs with the method of upper bound analysis [J]. Journal of Materials Processing Technology, 2009, 209(5): 2270-2276.
[18] LIU W, LIU G, CUI X L, XU Y C, YUAN S J. Formability influenced by process loading path of double sheet hydroforming [J]. Transactions of Nonferrous Metals Society of China, 2011, 21(s2): s465-s469.
复杂空腔构件的焊接双板液压成形
刘 伟1, 2,陈一哲2,刘 钢1, 2,崔晓磊2
1. 哈尔滨工业大学 金属精密热加工国家级重点实验室,哈尔滨 150001;
2. 哈尔滨工业大学 材料科学与工程学院,哈尔滨 150001
摘 要:以一个弯曲轴线复杂变截面空腔构件为研究对象,设计并加工了周边焊接双板液压成形实验装置。研究板材尺寸和形状、合模力与液体压力相互匹配的加载路径对板材成形性能的影响,得到了避免试件产生缺陷的工艺参数。结果表明:合理的板材形状可以节约材料、降低成本,并避免因胀形变形为主而导致的圆角破裂以及横截面差异较大区域的堆料起皱;加载路径对预成形阶段法兰区板材流动的影响很大。与传统的冲压再焊接工艺相比,采用双板液压成形弯曲轴线复杂变截面空腔结构更容易且效率更高,可以突破内高压成形受管材截面最大膨胀率的限制。
关键词:液压成形;空腔构件;变截面;弯曲轴线;合模力;液体压力;加载路径
(Edited by LI Xiang-qun)
Foundation item: Project (50905041) supported by the National Natural Science Foundation of China; Project (20092302120079) supported by the Specialized Research Fund for the Doctroal Program of Higer Education, China; Project (09JD18) supported by Key Laboratory of Ministry Education for Conveyance and Equipment, East China Jiaotong University, China
Corresponding author: LIU Wei; Tel: +86-451-86418631; E-mail: liuw@hit.edu.cn
DOI: 10.1016/S1003-6326(12)61724-5