Thickness of metallic layers from
pulsed eddy-current nondestructive measurements
ZHAO Liang(赵亮), CHEN Deng-feng(陈登峰), LU Ying(卢英), LI Chang-hua(李昌华)
(Department of Information and Automation, Xi’an University of Architecture and Technology, Xi’an 710055, China)
Abstract: By using pulsed eddy-current (PEC), a neural network was adopted to forecast the thickness of metal and the distance between coil and metal. The relationship between the transient current induced and different metallic thickness was analyzed theoretically. The result shows that three features of the signal including the peak height, the time of occurrence of the first peak, and a zero-crossing time, are obtained. The measurement error is within 2%.
Key words: thickness of metal; pulsed eddy-current; nondestructive test
CLC number: TP212 Document code: A Article ID: 1672-7207(2011)S1-0698-04
1 Introduction
The testing of metallic thickness is applied in many aspects, such as testing of thickness on metal rolling, testing flaw in metal. Now, radioactive technology is commonly used. But the hazardous nature of radioactive radiation makes this technology particularly difficult to implement. Mechanical contact technology requiring mechanical contact with the workpiece, such as the use of wheels or points to measure dimensions, is too fragile to withstand the mechanically demanding conditions. In addition, its measurement accuracy diminishes at high speeds when workpiece surfaces are not perfectly smooth and clean. Ultrasonic technology testing precision is not satisfactory. Optical technology has difficulty in penetrating airborne dirt and steam and is diffracted in water. Optical components, such as lenses and lamps, are mechanically sensitive and easily soiled. Eddy current technology has been the subject of development for 50 a and has predominance, such as structure simpleness and low cost; it can be applied on some special surround that other technologies cannot be applied on. But it is also affected by material and temperature, so it cannot ensure high precision. Pulsed eddy current (PEC) technology is a new technology in recent years. The traditional eddy current technology is based on a conventional sine current operating principle. According to this concept, the material to be measured affects the amplitude and phase change of the electromagnetic field, yielding two parameters. PEC technology adopt square wave as excitation current, and it has more testing parameter than traditional eddy current technology. PEC technology can test thickness and distance of metal simultaneously. So adopting PEC to test the thickness of metal has more important meaning.
2 Testing theory of PEC
Excitation current of PEC is square wave of certain pulse width. Under the excitation current effect, the coil produces a fast attenuating magnetic, the magnetic induces eddy current, and eddy current also induces a reverse magnetic. At the same time, availability impedance of coil changes.
Commonly, the change of availability impedance of eddy current coil relates to conduction of conductor, geometry figure, geometry parameter of coil, frequency of excitation source and the distance between coil and conductor. If one parameter changes and the others are invariable, the impedance becomes a single value function of the parameter. No other than the conductor thickness or the distance between coil and conductor is changed, the change of impedance reflects the change of the conductor thickness or the distance between coil and conductor.
An air-cored coil of wire placed next to a metal layer and excited by a step function voltage is considered. The change of current in the coil is computed by the current when the coil is excited next to air. The hypothetical measurement is shown schematically in Fig.1.
The base of the coil is at a height l1(mm) above the surface. The coil parameters of importance are number of turns N, inner radius r1(mm) and outer radius r2(mm), and coil length l2-l1(mm). The conductivity of the layer is denoted by σ1. Only nonmagnetic materials are considered, hence we use the permeability of free space μ0[1]. The thickness of the layer is denoted by h(mm).
The calculation is sensitive to the thickness and conductivity of the metal layer. This sensitivity is used to determine these parameters from the measurements. The calculation is also sensitive to the lift-off (the distance from the bottom of the coil to the metal surface) and it is supposed that the lift-off is carefully controlled in the measurements[2-4].
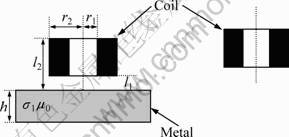
Fig. 1 Schematic diagram of hypothetical measurement
The calculation proceeds roughly as follows. Start in the frequency domain. First, the impedance of a right-cylindrical, air-cored eddy-current coil placed next to metal, is calculated as ZL. Then ZHSP, the impedance of the coil placed next to air is also calculated. The admittance difference ?Y is obtained by subtracting the inverse of ZHSP from the inverse of ZL. The current difference in the frequency domain, ?I(ω), is obtained by multiplying ?Y(ω) by the input voltage V(ω). Next, the inverse Fourier transform of ?I(ω) is taken to get the transient current response. The result ?i(ω) can then be compared with measurements.
For a right-cylindrical, air-cored eddy-current coil is placed next to metal, the metal conductance, thickness and other parameters are permitted[5]. But for analysis simplifying, the differential equation for the vector potential, A, in an isotropic, linear, and inhomogeneous medium due to an applied current density is:
 (1)
(1)
where  is δ function voltaic result of function GREEN; r0 is from 0 to r2, z0 is from l2 to h; J(r0, z0) is density current of (r0, z0). In isotropic, linear, and inhomogeneous medium, result of function GREEN of ω at (r0, z0) content differential equation[6] is:
 (2)
(2)
Eq.(2) is derived from Maxwell’s equations. μ, ε and σ are the magnetism, medium constant, conductance, respectively. Eq.(1) using the result of GREEN function from Eq.(2) can get vector A in every area from Fig.1. So it can also get every electromagnetism parameter[7-8].
The impedance of the coil over metal, ZL, is:

 (3)
(3)
where
 (4)
(4)
 (5)
(5)
J1(x) is one step Bessel function;
 (6)
(6)
 (7)
(7)
 (8)
(8)
The impedance of the coil over air is given by Zhsp:

 (9)
(9)
where the integration is over the spatial frequency, which can be interpreted as the free-space wave number. The transient current Δi(t) due to a step-function applied voltage is obtained from the inverse Fourier transform of ΔI(ω):
 (10)
(10)
where  ,
, is the admittance difference. Furthermore, ΔV(ω) is the Fourier transform of the step-function applied voltage v(t), which is defined by
 (11)
(11)
After some simple algebra, we have:
 (12)
(12)
The transient response is found by taking the inverse Fourier transform of ΔI(ω). One obtains
 (13)
(13)
The delta-function term in Eq.(11) does not contribute to the inverse Fourier transform since both ZL and ZHSP tend to be the same constant value as the frequency approaches zero. The above formula can be simplified as follows:

 (14)
(14)
The other parameters are not changed, only metal thickness or distance between metal and coil is changed. The direction of change of Δi(t) is obtained. By analyzing Δi(t), relation between Δi(t) and metal thickness or relation between Δi(t) and distance can be obtained.
3 Results and analysis
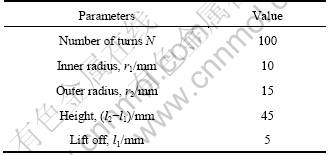
The coil physical dimensions are given in Table 1. The metal is aluminum, σ1=37.7 MS/m, μ0=4π×10-7 H/m[9].
Table 1 Coil and measurement parameters
From the process of mathematic ratiocination, the main difficulty is about Eq.(5), integral of Bessel function. And for integral of Eq.(3) and Eq.(9), upper and lower limit would have impact on the precision of count and time of count. So the upper limit decision must be synthetically considered by precision of count and time of count. We decide the upper limit on error of impedance less than 1%.
Other parameters are not changed, from Eq.(14) Δi on different thickness can be gotten. The results reveal that Δi-t curves exhibit three key features: the peak height, the peak arrival time, and the zero-crossing time. The peak height varies most strongly with layer thickness. Consequently, the peak height of Δi will be strongly correlated with metal thickness. The peak height of Δi can serve as a sensitive measure of layer thickness if the metal is uniform and its conductivity is known. As it is evident from the comparison of the two cases shown in Fig.2, the signal is sensitive to the thickness of the metal. Although the peak arrival time and zero-crossing time do not change so obviously with thickness, they can also be used as important parameters for inferring the thickness simultaneously. A rapid inversion method was developed to determine the thickness based on the three parameters.
From Fig.3, aluminum thickness is 1 mm. On change of distance between coil and aluminum, the result reveals that Δi-t curves exhibit that the peak height gradually diminishes with the lift-up of distance. This means that the more the lift-up of distance, the less influence the impedance and the less the change of current.
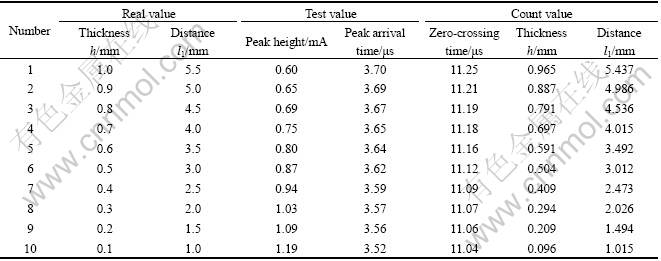
From Figs.2 and 3, the metal thickness and distance between metal and coil are most strongly related with three key features: the peak height, the peak arrival time, and the zero-crossing time. Based on data, three key features have nonlinearity with thickness and distance. So BP was used to test. From count 60 group values were gotten. 50 groups were used as training, and others as testing. The results are given in Table 2.
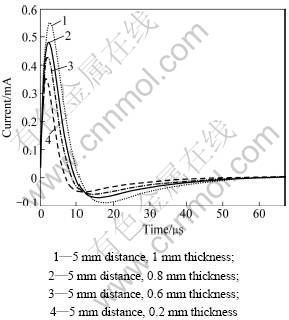
Fig.2 Curves of Δi with different thickness
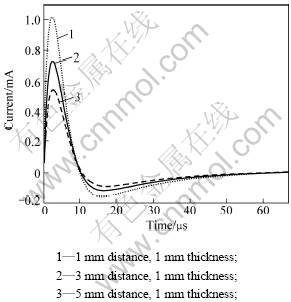
Fig.3 Curves of Δi with distance
From Table 2, the errors between real distance and testing distance, real thickness and testing thickness are small.
The change between the metal thickness, lift-up distance and pulse current was researched through analyzing numerical value. From results, it can be concluded that using PEC to test metal thickness is feasible and has extensive foreground of application.
Table 2 Result of examination
References
[1] TAI C C, Rose J H, Moulde J C. Thickness and conductivity of metallic layers from pulsed eddy-current measurements[J]. Rev Sci Instrum, 1996, 67(11): 3965-3972.
[2] Renken C J. The use of a personal computer to extract information from pulsed eddy currents[J]. Mater Eval, 2001, 59(3): 356-360.
[3] Blitz J. Electrical and magnetic methods of nondestructive testing[J]. Bristol: Adam Hilger, 1991, 5: 163-170.
[4] Stalenhoef J H J, Raad J A D. MFL and PEC tools for plant inspection[J]. Insight, 2000, 42(2): 74-77.
[5] Mandache C, Brothers M. Time domain lift-off compensation method for eddy current testing[J]. Journal of Nondestructive Testing, 2005, 10(6): 1047-1050.
[6] Allen B, Ida N, Lord W. Finite element modeling of pulse eddy current NDT phenomena[J]. IEEE Trans Magn, 1985, 21(6): 2250-2253.
[7] Shin Y K, Choi D M, Kim Y J, et al. Signal characteristics of differential pulsed eddy current sensors in the evaluation of plate thickness[J]. Independent Nondestructive Testing and Evaluation, 2009, 42(3): 215-221.
[8] Shin Y K, Choi D M. Design of shielded reflection type pulsed eddy current probe for the evaluation of thickness[J]. J KSNT, 2007, 27(5): 399-409.
[9] ZHAO Liang, CHEN Deng-feng, LU Ying, et al. Application of pulsed eddy-current in measuring thickness of aluminum[J]. Measurement & Control Technology, 2007, 26(12): 22-24. (in Chinese)
(Edited by CHEN Wei-ping)
Received date: 2011-04-15; Accepted date: 2011-06-15
Corresponding author: ZHAO Liang; Tel: +86-29-82207827; E-mail: tanatee@163.com