J. Cent. South Univ. (2017) 24: 1754-1761
DOI: https://doi.org/10.1007/s11771-017-3583-9

Effect of applied load on transition behavior of wear mechanism in Cu-15Ni-8Sn alloy under oil lubrication
ZHANG Shi-zhong(张世忠)1, GAN Xue-ping(甘雪萍)1, CHENG Jin-juan(成金娟)1,
JIANG Ye-xin(姜业欣)2, 3, LI Zhou(李周)2, ZHOU Ke-chao(周科朝)1
1. State Key Laboratory of Powder Metallurgy, Central South University, Changsha 410083, China;
2. School of Materials Science and Engineering, Central South University, Changsha 410083, China;
3. China Nonferrous Metal Mining (Group) Co., Ltd (CNMC), Albetter Albronze Co. Ltd, Shandong 252600, China
 Central South University Press and Springer-Verlag GmbH Germany 2017
Abstract: Tribological behavior of Cu-15Ni-8Sn (mass fraction, %) alloy against GCr15 ring under various loads was investigated on a ring-on-block tester in oil lubrication. The results showed that the wear rate increased slowly from 1.7×10⁻⁷ to 9.8×10⁻⁷ mm3/mm under the load lower than 300 N, and then increased dramatically to the climax of 216×10-7 mm3/mm under the load over 300 N, which indicated the transition of wear mechanism with the increase of applied load. The wear mechanism mainly was plastic deformation and abrasive wear under the load less than 300 N. As the applied load was more than 300 N, the wear mechanism of Cu-15Ni-8Sn alloy primarily was delamination wear. Besides, the transition can also be confirmed from the different morphologies of worn surface, subsurface and wear debris. It is distinctly indicated that the appearance of flaky debris at the applied load over 300 N may be a critical point for the change of wear mechanism.
Key words: Cu-15Ni-8Sn alloy; wear mechanism; applied load; oil lubrication
1 Introduction
Copper and copper alloys are widely used in many fields as bearing [1, 2], brush and sleeve due to their good corrosion resistance [3], wear resistance, anti- friction [4, 5], excellent thermal [6] and electrical conductivity [7]. The Cu-Ni-Sn alloys have gathered a considerable amount of interest since they were developed by Bell Telephone in 1970s [8-10]. Especially, the Cu-15%Ni-8%Sn alloy (mass fraction) is a commercial alloy (designed as C72900 ASTM B740-84), which was widely used as the anti-wear and friction- reducing materials to make high-performance bearings for roller cone rock bit, aerospace and heavy duty mobile industry equipment [11, 12]. The study on the tribological behavior of Cu-15Ni-8Sn alloy is rather important for both scientific and technological points of view and it has drawn an increased attention.
There are an increasing number of investigations on the tribological behavior of copper alloys. For example, SINGH et al [13] studied the wear behavior and microstructure of Cu-15%Ni-8%Sn (mass fraction) bronze under dry sliding condition, which demonstrated that the subsurface microstructure was related to the ambient medium. MA and LU [14] found that the tribological behavior of copper-graphite composite was affected markedly by sliding velocity. However, the transition behavior of wear mechanism of Cu15Ni8Sn alloy has not been well understood. Several wear mechanisms, such as abrasive wear [15], delamination wear [16], oxidative wear [17] and adhesive wear [18] have been reported during the process of friction. The dominant wear mechanism was different with the change of the sliding condition [19]. The transition of wear mechanism will result in the different tribological behavior of materials. Therefore, it is necessary to make clear the wear mechanism and their transition behavior in the process of friction. Generally, the wear mechanisms and their transition are closely related with the applied load, sliding speed, friction medium, ambient temperature as well as the microstructure and properties of the materials. In addition, the tribological behavior was distinctly affected by the friction heat, especially during the process of dry sliding. So, the sliding behavior of alloys mainly depends on the experimental conditions, especially the sliding velocity and applied load [20, 21]. Numerous studies on the transition of wear mechanism have been reported. For example, ASIH et al [22] reported the wear mechanism transition due to frictional heating of rail/wheel. WANG [23] had indicated that the sliding velocity resulted in the transition of wear mechanism in Cu-Zr-Al bulk metallic glass. However, up to now, few researchers have reported the effect of load on the friction process and no in-depth analysis of the transition behavior caused by the applied load was clarified. Moreover, the accumulation of friction heat on the worn surface was reduced greatly under the oil lubrication. In fact, the lubricating oil would play a role of friction- reducing and the thickness of the lubricating oil film was sensitive to the applied load. Therefore, the effect of applied load on the wear mechanism under oil lubrication was rather different from that in the process of dry sliding. The in-depth investigation on the transition behavior of wear mechanism under oil lubrication provides a great advantage and benefit for the present study.
In this work, the transition behavior of wear mechanism in Cu-15Ni-8Sn alloy against GCr15 ring under oil lubrication was investigated on a ring-on-block tester. Particularly, the role of applied load in the transition of wear mechanism was presented. The morphology of worn surface, subsurface and debris particle of Cu-15Ni-8Sn alloy were investigated.
2 Experimental procedures
2.1 Materials
The Cu-15Ni-8Sn alloys were prepared by spark plasma sintering (SPS) process under the pressure of 30 MPa with the temperature of 800 °C and the sintering time of 5 min in vacuum. Then, the samples were cooled down to room temperature with the help of condensation water in the furnace cavity. The composition of powder particles (<150 μm, Hunan Henji Technology Co., Ltd China) is shown in Table 1. Table 2 shows the physical and mechanical properties of the Cu-15Ni-8Sn alloy.
Table 1 Composition of Cu-Ni-Sn alloy

Table 2 Physical and mechanical properties of Cu-15Ni-8Sn alloy

2.2 Friction and wear tests
Prior to wear tests, test blocks were cut into dimensions of 12.30 mm×12.30 mm×19.05 mm by spark cutting. Then, the contacting surface of each block was polished with 600 grit, 1000 grit, 2000 grit water- abrasive WC papers and 0.5 μm diamond polishing compounds to achieve an average surface roughness (Ra) less than 0.5 μm. Finally, these specimens were cleaned in an acetone ultrasonic bath for 15 min and dried in a vacuum drying oven at 75 °C for 1 h. The samples were then weighed to an accuracy of 0.1 mg.
The friction and wear tests were carried out on a MRH-1A (Yihua Tribology Testing Technology Co., Ltd China) wear tester using a block-on-ring geometry at the loads of 100-700 N and the rotation velocity of 0.26 m/s with the sliding time of 60 min under a SAE5W-40 (FAW-Volkswagen Automotive Co.,Ltd China) oil lubrication. The volume of lubricating oil in each friction test was fixed to 50 mL. All tests were carried out at room temperature in air. These wear test blocks of Cu-15Ni-8Sn alloy were sliding against a stationary GCr15 bearing steel ring (HRC 60) with the outer diameter of 49.22 mm and the width of 13.06 mm. During the test, the friction coefficient was recorded continually by wear tester and the average value was calculated for each test within the test duration of 60 min. After each test, the wear block was cleaned in a petroleum ether ultrasonic bath for 15 min and dried in a vacuum drying oven at 75 °C for 1 h. These blocks were then weighed to an accuracy of 0.1 mg. Wear rate (mm3/mm) was calculated by dividing the volume wear capacity by sliding distance expressed as
W=△m/(ρS) (1)
where △m is the mass loss of the block after each of the wear test with an accuracy of 0.1 mg; ρ is the density of specimens; S is the sliding distance and W is the wear rate.
2.3 Debris particle collection and sample characterization
The debris particles were obtained from the mixture of debris particles and the lubricating oil by cleaning and centrifugal treatment. Then, the debris particles were placed into the ethyl alcohol and were dispersed by ultrasound for 15 min. It should be mentioned that two types of particles were observed during the collection of the debris particles. The fine dark particles were well dispersed in the alcohol and the large flaky particles were settled down after ultrasonic dispersion. The fine dark particles suspended in the alcohol were fished out on holey carbon film coated Cu grids to be directly observed by the transmission electron microscope (TEM). The large flaky particles were prepared by gluing the particles in the sample holder before SEM observation.
The worn surfaces, subsurface and debris particles were observed by scanning electron microscope (FEI Nova NanoSEM 230) equipped with energy dispersive analysis of X-ray (Kevex EDS). Microstructural characterization of fine debris particle was carried out using transmission electron microscope (JEM-2100F). Nano-area electron diffraction of individual debris particles was taken using a 100 nm size electron beam to probe small selected volumes of particles.
3 Results and discussion
3.1 Friction and wear properties
Figure 1 shows the friction coefficient curves of Cu-15Ni-8Sn alloy against GCr15 bearing steel ring under the applied of 100-700 N with the sliding velocity of 0.26 m/s (50 r/min) in oil lubrication. The friction coefficient versus time curves show similar characteristic for all tests. A transient period followed by a single steady-state was observed. The friction coefficient is larger for the contact of hard asperities bodies on the surface of the grinding metal in the initial stage of friction. Continued friction process would make the worn surface smooth, which led to the decrease of the friction coefficient. Therefore, the friction coefficient keeps a relatively stable value in the late stage of friction.
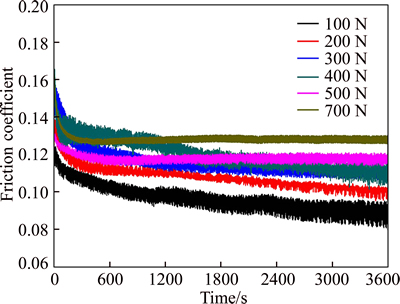
Fig. 1 Friction coefficient curves of Cu-15Ni-8Sn alloy block under different applied loads at sliding velocity of 0.26 m/s (50 r/min) in condition of oil lubrication
Figure 2 shows the average friction coefficient and the wear rate of Cu-15Ni-8Sn alloy. It can be seen from Fig. 2 that the average friction coefficient and wear rate increased with the applied load increasing. The indentation depth of worn surface asperity increased and the lubricating oil film between the pair of rubbed metal surface became thinner when the applied load increased, which resulted in an increase of the actual contact area between the pair of rubbed metal surface. The wear rate increased slowly from 1.7×10⁻⁷ to 9.8×10⁻⁷ mm3/mm with the increase of applied load when the load was less than 300 N. However, there was a dramatically increase by orders of magnitude (up to 216×10-7 mm3/mm under the load of 700 N) with the increase of applied load under the applied load over 300 N. It could be attributed to the following reasons. Firstly, the actual contact area between the pair of rubbed metal surface increased when the applied load increased, which led to the increase of the wear rate caused by abrasive wear mechanism. Secondly, the accumulation of deformation stress resulting from the increase of applied load led to the formation of cracks. The delamination of the material between the subsurface crack and the sliding surface layer appeared due to the nucleation and propagation of cracks (see Section 3.2), which caused the appearance of large flaky debris under the applied load over 300 N (see Section 3.3). The formation of flaky debris gave rise to a drastic increase of the wear rate.
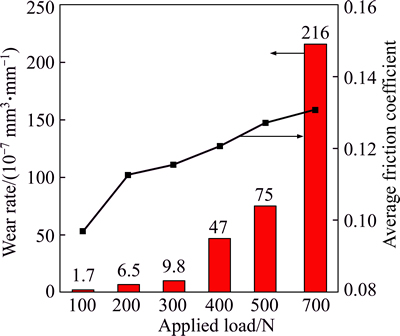
Fig. 2 Average friction coefficient and wear rate of Cu-15Ni-8Sn alloy block under different applied loads at sliding velocity of 0.26 m/s (50 r/min) in condition of oil lubrication
3.2 Evolution of worn surface and subsurface
Figure 3 shows the SEM photographs of the worn surface of Cu-15Ni-8Sn alloy under the loads of 300 N, 400 N and 700 N with the sliding velocity of 0.26 m/s. Figures 3(b), (d) and (f) shows the magnification images of Figs. 3(a), (c) and (e), respectively. The morphology of the worn surface was obviously different under the load of 300 N and the load over 300 N (400 N and 700 N). The continuous fine grooves were observed to be parallel to the sliding direction as shown in Fig. 3(a) under the load of 300 N, which presented the evidence of abrasive wear and plastic deformation induced by the hard asperities on the softer surface [24]. Under the applied load less than 300 N, the lubricating oil film was covered uniformly on the contact surfaces and decreased the contact of hard asperities, which led to the formation of grooves by plowing. The serious surface delamination besides aggravated plastic deformation and deeper grooves on the worn surface were observed under the loads of 400 N and 700 N, as shown in Figs. 3(c) and (e). The above results indicated that the wear mechanism transformed from abrasive wear (under applied load lower than 300 N) to the combination of abrasive wear and delamination wear (under applied load over 300 N). During the test, the interfacial temperature increased with the increase of the applied load, which led to a decrease of the oil viscosity and the oil film thickness and even caused the destruction of the lubricant film. The actual contact area of the worn surface increased. Therefore, the aggravated plastic deformation and deeper grooves were observed on the worn surface. What’s more, aggravated plastic deformation led to the formation of cracks in the subsurface layer. Then, these subsurface cracks would propagate to the surface, which led to the delamination of the material between the subsurface crack and the sliding surface.
Figure 4 shows the SEM photographs of the subsurface of Cu-15Ni-8Sn alloy after sliding under the loads of 300 N, 400 N and 700 N, respectively. Figures 4(b), (d) and (f) are the magnification images of Figs. 4(a), (c) and (e), respectively. The slip bands with a depth of about 20 μm were observed in Fig. 4(a), which present the evidence of plastic deformation. Meanwhile, no sign of delamination was observed. The deeper slip bands about 30 μm and the subsurface crack at depth ranging from 1 to a few microns below the contact surface were observed in Fig. 4(c) and (e) under the loads of 400 N and 700 N, which indicated the existence of plastic deformation and delamination wear [25]. According to the delamination wear theory, the wear of materials is a result of several sequential and independent processes, namely subsurface deformation, crack nucleation and crack propagation [26]. The plastic deformation layer was formed by the hard surface of the GCr15 ring sliding on the soft surface of the Cu-15Ni-8Sn block during the friction process. The extent of plastic deformation would be aggravated when the applied load increased and the dislocation piled up in a certain depth below the soft surface. Then, the cracks may be nucleated at defects in the region of the maximum cyclic shear stress under the subsurface layer [27]. These subsurface cracks would grow parallel to the sliding surface and would finally shear to the surface, which caused the delamination of the material between the subsurface crack and the sliding surface, as shown in Fig. 5. The applied load and the friction traction force had important influence on the depth of the crack nucleation. The smaller applied load or the friction traction force on the frictional parts resulted in the smaller area of crack nucleation; even it is too difficult to form the crack when the load was too small [28]. Therefore, the subsurface delamination disappeared and a plastic deformation layer just formed under the load of 300 N, as shown in Fig. 4(a). The phenomenon in Fig. 4 was consistent with delamination wear mechanism and suggested that a delaminated debris particle would be produced when the crack turned up to the sliding surface (see Section 3.3).
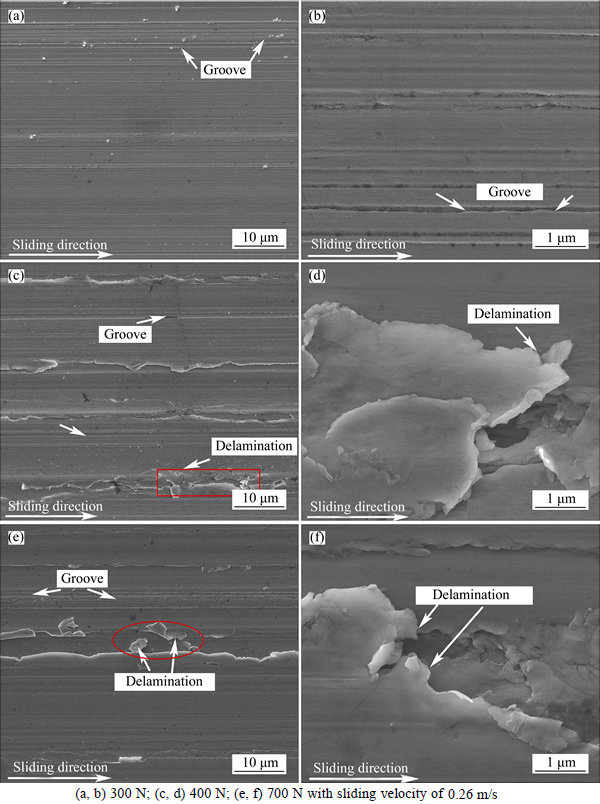
Fig. 3 SEM micrographs of worn surface sliding under applied load:
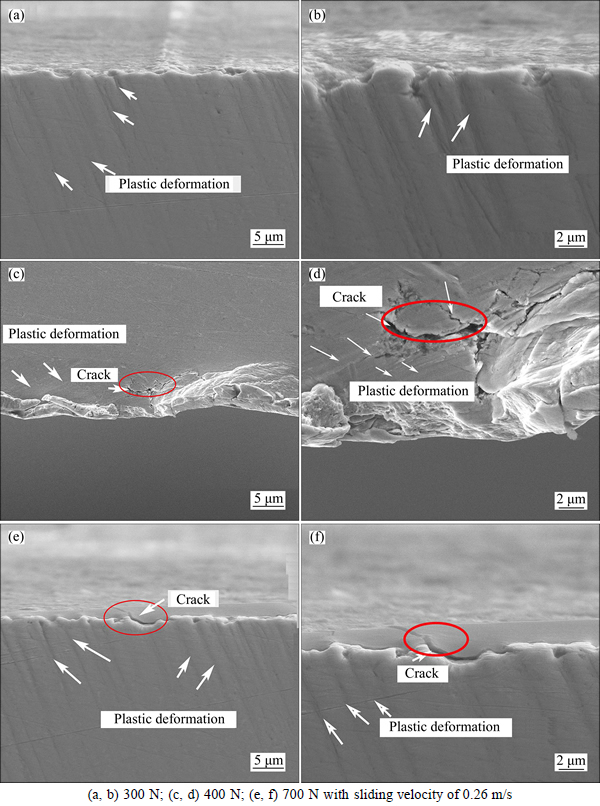
Fig. 4 Cross-section SEM micrographs of worn subsurface sliding under applied load:
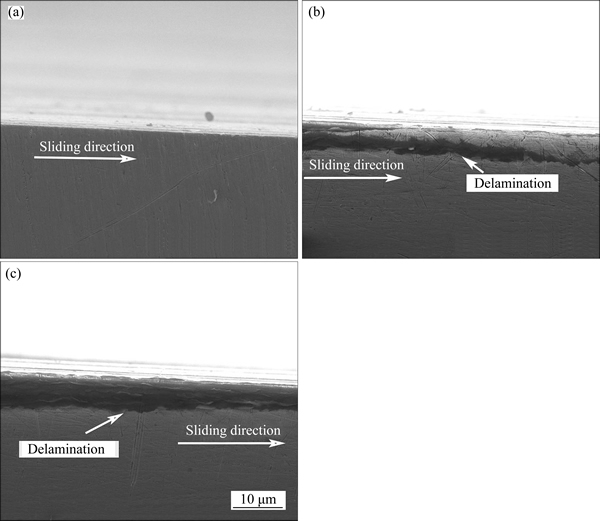
Fig. 5 Longitudinal-section SEM micrographs of worn subsurface sliding under applied load of 300 N (a), 400 N (b) and 700 N (c) with sliding velocity of 0.26 m/s
3.3 TEM and SEM characterization of wear debris
Two types of particles were observed during the collection of the debris particles. The fine dark particles were obtained under all test loads in this work, which were well dispersed in the alcohol. The large particles were obtained just under the load over 300 N, which were settled down after ultrasonic dispersion.
The morphology and nanobeam electron diffraction of fine dark debris particles obtained under the loads of 300 N and 700 N were both investigated by TEM as shown in Fig. 6. Figures 6(a) and (c) show that all the particles were comprised of nanocrystallites with a typical size of 50-100 nm. The diffraction pattern of these fine particles revealed the existence of Fe2O3 and CuO phase, as shown in Figs. 6(b) and (d), respectively. It should be emphasized that none of the phase observed during the present study was pure. For example, the CuO phase is not pure CuO rather (Cu, Ni, Sn)O phase. Likewise, Fe2O3 is a (Fe, Cr)2O3 oxide [13]. The elements of these fine debris particles were detected by EDS, as shown in the inset of Figs. 6(a) and (c). The elements Cu, Ni and Sn were from the block of Cu15Ni8Sn alloy. The existence of Fe element suggested the pick-up of these elements from the counter ring of GCr15 alloy and the O element suggested the occurrence of oxidation reaction during the sliding process.
The SEM micrographs of large debris particles produced under the load of 700 N are shown in Fig. 7. It can be found that the length of wear debris was 200-400 μm and the width was 10-40 μm. Figure 7(b) shows the high magnification images of region A in Fig. 7(a), which indicated the flaky morphology of these large debris particles. The EDS spectrum from one of these flaky particles is shown in the inset of Fig. 7(a), which shows a strong Cu Kα peak along with Ni Kα and Sn L peaks. Quantitative analysis restricted that these three elements gave a composition of 76.1% Cu, 15.7% Ni and 8.2% Sn, which was in agreement with the composition of the Cu-15Ni-8Sn alloy. The EDS results suggested that these flaky debris particles were made up of metallic particles. These large flaky debris particles led to a sharp increase of the wear rate, which also confirmed the transition of wear mechanism from abrasive wear to the combination of abrasive wear and delamination wear under applied load of 700 N.
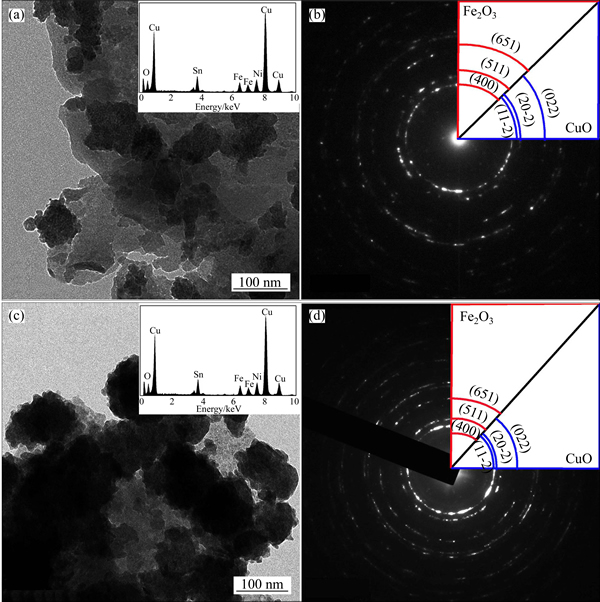
Fig. 6 TEM bright field micrographs and nanobeam electron diffraction pattern of fine debris particles obtained under applied load of 300 N (a, b) and 700 N (c, d) at sliding velocity of 0.26 m/s (Inset shows the EDS spectrum of fine debris particles)

Fig. 7 SEM micrographs of large flaky debris particles obtained under applied load of 700 N at sliding velocity of 0.26 m/s (a) and high magnification images of region A (b) (Inset shows an EDS spectrum from one of these large flaky particles)
4 Conclusions
1) The friction coefficient and wear rate increased with the increase of applied load. Moreover, the wear rate increased slowly from 1.7×10⁻⁷ to 9.8×10⁻⁷ mm3/mm under the applied load less than 300 N and then presented a sharp increase by orders of magnitude (up to 216×10-7 mm3/mm under the applied load of 700 N) with the increase of applied load when the load was more than 300 N.
2) There are obvious differences in morphology of the worn surface, subsurface and debris particles with the increased applied load. The fine grooves and equiaxed debris particles were observed when the load was less than 300 N. With the increase of the applied load, the extent of plastic deformation on the worn surface was aggravated, which led to the formation of subsurface crack and large flaky particles under the load of more than 300 N.
3) The wear mechanism of Cu-15Ni-8Sn friction block transformed from abrasive wear to the combination of abrasive and delamination wear when the applied load increased from 300 N to 700 N.
References
[1] EMGE A, KARTHIKEYAN S, KIM H J, RIGNEY D A. The effect of sliding velocity on the tribological behavior of copper [J]. Wear, 2007, 263(1): 614-618.
[2] STRAFFELINI G, MAINES L, PELLIZZARI M, STRAFFLINI G. Dry sliding wear of Cu-Be alloys [J]. Wear, 2005, 259(1): 506-511.
[3] YIN B, YIN Y, LEI Y, DONG L H, ZHANG Y J. Experimental and density functional studies on the corrosion behavior of the copper-nickel-tin alloy [J]. Chemical Physics Letters, 2011, 509(4): 192-197.
[4] CHEN B, BI Q, YANG J, XIA Y Q, HAO J C. Tribological properties of solid lubricants (graphite, h-BN) for Cu-based P/M friction composites [J]. Tribology international, 2008, 41(12): 1145-1152.
[5] MA X C, HE G Q, HE D H, CHEN C S, HU Z F. Sliding wear behavior of copper- graphite composite material for use in maglev transportation system [J]. Wear, 2008, 265(7): 1087-1092.
[6] KOVALCHENKO A M, FUSHCHICH O I, DANYLUK S. The tribological properties and mechanism of wear of Cu-based sintered powder materials containing molybdenum disulfide and molybdenum diselenite under unlubricated sliding against copper [J]. Wear, 2012, 290: 106-123.
[7] TAKATA N, LEE S H, TSUJI N. Ultrafine grained copper alloy sheets having both high strength and high electric conductivity [J]. Materials Letters, 2009, 63(21): 1757-1760.
[8] CARIS J, LI D, STEPHENS J J, LEWANDONSKI I J. Microstructural effects on tension behavior of Cu-15Ni-8Sn sheet [J]. Materials Science and Engineering A, 2010, 527(3): 769-781.
[9] SCHWARTZ L H, MAHAJAN S, PLEWES J T. Spinodal decomposition in a Cu-9wt%Ni-6wt% Sn alloy [J]. Acta Metallurgica, 1974, 22(5): 601-609.
[10] van HUNNIK E W J, COLIJN J, SCHADE VAN WESTRUM J A F M. Heat treatment and phase inter-relationships of the spray cast Cu-15% Ni-8% Sn alloy [C]// Materials Science Forum. Trans Tech Publications, 1992: 115-124.
[11] KAR N J. Copper-based spinodal alloy bearings: US, 4641976 [P]. 1987-02-10.
[12] CRIBB W R, RATKA J O. Copper spinodal alloys [J]. Advanced Materials & Processes, 2002, 160(11): 27-30.
[13] SINGH J B, CAI W, BELLON P. Dry sliding of Cu-15% Ni-8% Sn bronze: Wear behaviour and microstructures [J]. Wear, 2007, 263(1): 830-841.
[14] MA Wen-lin, LU Jin-jun. Effect of sliding speed on surface modification and tribological behavior of copper-graphite composite [J]. Tribology Letters, 2011, 41(2): 363-370.
[15] CANAKCI A, ARSLAN F. Abrasive wear behaviour of B4C particle reinforced Al2024 MMCs [J]. The International Journal of Advanced Manufacturing Technology, 2012, 63(5-8): 785-795.
[16] HONG E, KAPLIN B, YOU T, SUH M S, KIM Y S, CHOE H. Tribological properties of copper alloy-based composites reinforced with tungsten carbide particles [J]. Wear, 2011, 270(9): 591-597.
[17] WEI M X, WANG S Q, WANG L, CUI X H, CHEN K M. Effect of tempering conditions on wear resistance in various wear mechanisms of H13 steel [J]. Tribology International, 2011, 44(7): 898-905.
[18] DWIVEDI D K. Adhesive wear behaviour of cast aluminium-silicon alloys: overview [J]. Materials & Design, 2010, 31(5): 2517-2531.
[19] MAO Y S, WANG L, CHEN K M, WANG S Q, CUI X H. Tribo-layer and its role in dry sliding wear of Ti-6Al-4V alloy [J]. Wear, 2013, 297(1): 1032-1039.
[20] UTHAYAKUMAR M, ARAVINDAN S, RAJKUMAR K. Wear performance of Al-SiC-B4C hybrid composites under dry sliding conditions [J]. Materials & Design, 2013, 47: 456-464.
[21] TENG Jie, LI Hua-pei, CHEN Gang. Wear mechanism for spray deposited Al-Si/SiCp composites under dry sliding condition [J]. Journal of Central South University, 2015, 22(8): 2875-2882.
[22] ASIH A M S, DING K, KAPOOR A. Modelling rail wear transition and mechanism due to frictional heating [J]. Wear, 2012, 284: 82-90.
[23] WANG Y, ZHANG L, WANG T, HUZ X, CHEN W, FENG C. Effect of sliding velocity on the transition of wear mechanism in (Zr, Cu)95Al5 bulk metallic glass [J]. Tribology International, 2016, 101: 141-151.
[24] ALIDOKHT S A, ABDOLLAH A, SOLEYMANI S, SAEID T, ASSADI H. Evaluation of microstructure and wear behavior of friction stir processed cast aluminum alloy [J]. Materials Characterization, 2012, 63: 90-97.
[25] JISHENG E, GAWNE D T. Influence of lubrication regime on the sliding wear behaviour of an alloy steel [J]. Wear, 1997, 211(1): 1-8.
[26] SUH N P. An overview of the delamination theory of wear [J]. Wear, 1977, 44(1): 1-16.
[27] GONG T, YAO P, XIAO Y, FAN K, TAN H, ZHANG Z, ZHAO L, ZHOU H, DENG MAO. Wear map for a copper-based friction clutch material under oil lubrication [J]. Wear, 2015, 328: 270-276.
[28] JAHANMIR S, SUH N P. Mechanics of subsurface void nucleation in delamination wear [J]. Wear, 1977, 44(1): 17-38.
(Edited by YANG Hua)
Cite this article as: ZHANG Shi-zhong, GAN Xue-ping, CHENG Jin-juan, JIANG Ye-xin, LI Zhou, ZHOU Ke-chao. Effect of applied load on the transition behavior of wear mechanism in Cu-15Ni-8Sn alloy under oil lubrication [J]. Journal of Central South University, 2017, 24(8): 1754-1761. DOI: https://doi.org/10.1007/s11771-017-3583-9.
Foundation item: Project(2016YFB0301402) supported by the National Key Research and Development Program of China; Project(CSU20151024) supported by the Innovation-driven Plan in Central South University, China
Received date: 2017-01-05; Accepted date: 2017-04-08
Corresponding author: GAN Xue-ping, Associated Professor, PhD; Tel: +86-731-88836303; E-mail: ganxueping@csu.edu.cn