Determination of wax pattern die profile for investment casting of turbine blades
来源期刊:中国有色金属学报(英文版)2011年第2期
论文作者:董一巍 卜昆 窦杨青 张定华
文章页码:378 - 387
关键词:涡轮叶片;数值模拟;位移场;蜡模模具型面;熔模精铸
Key words:turbine blade; numerical simulation; displacement field; wax pattern die profile; investment casting
摘 要:提出一种基于有限元法的精铸涡轮叶片蜡模模具型腔优化设计方法。首先,计算出涡轮叶片在凝固和冷却过程中的非均匀、非线性收缩变形量;然后,基于本文提出的位移场反向迭代算法,确定优化的蜡模模具型腔。以A356合金涡轮叶片为例,采用提出的涡轮叶片模具型腔优化设计系统,经过精度评估,尺寸误差得到了大幅度降低。数值模拟与实验结果吻合良好,经过4次迭代优化,涡轮叶片的总体形状误差从0.515 815 mm降低至0.001 978 mm。
Abstract: In order to conform to dimensional tolerances, an efficient numerical method, displacement iterative compensation method,g axis of the puch based on finite element methodology (FEM) was presented for the wax pattern die profile design of turbine blades. Casting shrinkages at different positions of the blade which was considered nonlinear thermo-mechanical casting deformations were calculated. Based on the displacement iterative compensation method proposed, the optimized wax pattern die profile can be established. For a A356 alloy blade, substantial reduction in dimensional and shape tolerances was achieved with the developed die shape optimization system. Numerical simulation result obtained by the proposed method shows a good agreement with the result measured experimentally. After four times iterations, compared with the CAD model of turbine blade, the total form error decreases to 0.001 978 mm from the previous 0.515 815 mm.

DONG Yi-wei, BU Kun, DOU Yang-qing, ZHANG Ding-hua
Key Laboratory of Contemporary Design and Integrated Manufacturing Technology, Ministry of Education,
Northwestern Polytechnical University, Xi’an 710072, China
Received 11 March 2010; accepted 9 July 2010
Abstract: In order to conform to dimensional tolerances, an efficient numerical method, displacement iterative compensation method,g axis of the puch based on finite element methodology (FEM) was presented for the wax pattern die profile design of turbine blades. Casting shrinkages at different positions of the blade which was considered nonlinear thermo-mechanical casting deformations were calculated. Based on the displacement iterative compensation method proposed, the optimized wax pattern die profile can be established. For a A356 alloy blade, substantial reduction in dimensional and shape tolerances was achieved with the developed die shape optimization system. Numerical simulation result obtained by the proposed method shows a good agreement with the result measured experimentally. After four times iterations, compared with the CAD model of turbine blade, the total form error decreases to 0.001 978 mm from the previous 0.515 815 mm.
Key words: turbine blade; numerical simulation; displacement field; wax pattern die profile; investment casting
1 Introduction
Turbine blade is one of the critical components of aero-engine. Due to the significant influence of the geometrical shape and dimension of the turbine blade on the performance of engine, close dimensional tolerances are specified for the machining process of the turbine blade. The accurate and effective machining technology is essential for the machining of turbine blade. To do this, the shell-mould investment casting is widely used[1-3].
An appropriate die profile, which takes into account of the various shrinkages involved in casting process, is important for enhancing the quality of net-shaped products. Due to the shrinkages of the wax and solidifying alloy material, the geometrical size of the part produced by the investment casting process is smaller than that by the die cavity. In order to ensure the dimension accuracy, the position accuracy and the surface roughness, the wax pattern die profile design for turbine blade needs to consider the compensation of shrinkages brought by the solidification process[4-5].
Due to the complex, time-consuming and expensive process of investment casting, traditional methods for designing die profile assume constant shrinkage rate. However, the complex shape and structure cause uneven heat dissipation during cooling, and thus the non-linear and non-uniform shrinkage distribution. Further considerations have to be given to the shrinkage of wax pattern during preparation, ceramic shell shrinkage during drying and the expansion during casting, the shrinkage of super-alloy materials (if applicable) during solidification, as well as cooling from the solidus to room temperature. The dimensional changes associated with the wax, the shell mold, or the alloy are thereafter referred to wax, shell mold, or alloy shrinkage factors (SFs) (or tooling allowances), respectively[6], and the casting deforms due to the mold constraint stress and the thermal stress. By taking the cast steel and cast iron materials, solid shrinking causes the most accuracy loss during casting. For example, the geometrical shrinkage can be in the range of several millimeters.
As is known, the traditional method for designing the wax pattern die profile assumes that each part of the casting has the same shrinkage after deformation. Thus, the die profile is determined by the constant shrinkage rate[7]. Obviously, this method for designing profile is not suitable. Because of the complex geometrical shape, the heat dissipation is uneven during the casting cooling process. Therefore, the shrinkage of the casting is non-linear and non-uniform.
The shrinkage of casting lies on the integrate operation of many factors. Even for one certain casting, different parts have different shrinkages. Hence, the design of die profile is very important. The principle of the design procedure is to compensate certain deformation at the positions where deformation occurs via establishing the shrinkage. At present, the establishment process is usually based on the linear scaling method, which can be further classified into the following methods: uniform scaling method, chord length scaling method, mean camber line scaling method and shrinkage center scaling method[8]. However, the shrinkage ratio is still constant to design the profile. Disadvantages are hereby apparent, which mainly focus on the neglect of the flexural-torsional deformation and the shrinkage established by linear scaling method. ITO et al[9] and FERREIRA and MATEUS[10] carried out a method with different shrinkages given along directions, but shrinkage used did not consider the influence caused by the structure and constraint conditions of the casting. With the development of technology of numerical simulation, some large-scale finite element analysis software has been widely used. If appropriate data of thermal properties and boundary conditions are provided, some commercial solidification simulation software can be used to obtain reliable simulation results[11-13]. The deformation amount and deformation tendency could be obtained by numerical simulation method accordingly, which would provide the evidence for designing the die profile. ZHANG et al[14] carried out a simple reversing methodology of adjusting featured parameters for the casting die profile design of turbine blades, and the results shows that the die profile obtained can satisfy the design requirement accurately. However, the calculation of this method was based on the two-dimensional section, thus, along the vertical direction (z direction), the casting deformations were neglected, so the accuracy and reliability of die profile would be affected.
The primary objective of this study is to find a simple but universal methodology for designing the mould die profile of investment casting of turbine blades. By considering the existing commercial numerical simulation software such as ProCAST and I-DEAS, the methodology is helpful to design the wax pattern die profile for investment casting based on the simulation results.
2 Optimum design method of die profile
2.1 Basic principles of reverse deformation
In order to efficiently reduce the deformation generated in the solidification process, the traditional technology for designing the die profile is to give some proper previous reverse deformation dimensions obtained through numerical simulation or experience opposite the deformation directions. Fig.1 illustrates the basic principle of reverse deformation method: line p can be assumed to be the initial shape of the casting, line q represents the shape after deformation, and line r refers to the shape after reverse deformation. This method can also be used in the design of die profile for investment casting. However, due to the complicated shape of turbine blades, the accuracy requirement cannot be satisfied if only “one step compensation” is adopted. In the present study, the iteration method was used for reverse deformation, which could approach the target shape more precisely.
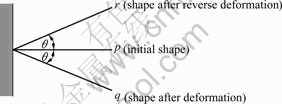
Fig.1 Sketch for basic principles of reverse deformation
2.2 Principles of iteration method
Fig.2 shows the procedure of iteration method for reverse deformation. Let D be the objective function for surface profile of wax pattern of turbine blade, P be the shape function of the turbine blade before investment casting, and Q be the shape function of blade after investment casting. The displacement field function, noted as W, is the deformation function.
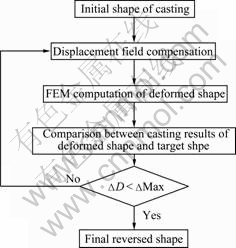
Fig.2 Flow chart of solution algorithm of reverse deformation
D(x, y, z), P(x, y, z), Q(x, y, z) and W(x, y, z) can be the coordinates of each node of the finite element model, and the initial shape can be noted as Pi(xi, yi, zi), which will be changed to the deformed shape after inverse operation i times, marked as Qi(xi, yi, zi). To do the casting process once is based on the shape of the casting which has adopted reverse deformation operation i times. By comparing the casting result with the target shape, obviously, the error noted as ?Di(xi, yi, zi) can be described as follows:
?Di(xi, yi, zi)= Qi(xi, yi, zi)-Di(xi, yi, zi) (1)
If the error ?Di is less than the maximum form error ?Max, Pi(xi, yi, zi) could be considered the ideal deformed shape; otherwise, the deformed shape should be modified again. According to the reverse result from the former step, reverse compensates the error ?Di:
Pi+1=-?Di+Pi (2)
By calculating Pi+1 and Qi+1 using the iterative method, the casting form error ?Di+1 can be obtained form Eq.(2). If the error satisfies the requirement of form error precision, the program terminates. The final reverse deformation function can be obtained as follows:
P(x, y, z)= Pi(xi, yi, zi) (3)
2.3 Displacement field compensation of turbine blades
With the help of the above-mentioned contents, the basis of iterative method is established. For the form error is related to the structure of the casting, it is noticed that each form error shows some similarities. Hence, a shape coefficient noted as λ is introduced and Eq.(2) can be written as:
P(x, y, z)=-(1+λ)×?D(x, y, z)+ P0(x0, y0, z0) (4)
where P0(x0, y0, z0) represents the coordinate of each node of the initial FEM model and ?D(x, y, z) is the error of each node, and x, y, z represent three directions.
By introducing the shape coefficient λ, the multiple compensation can be converted into single compensation. Thus, the accuracy requirement can be satisfied by only one times compensation. The physical significance of Eq.(4) is that for the large deformation castings, the displacement increment of the compensation can cause even large deformation which also needs a compensation.
The deformation characteristics of turbine blades should be considered when the value of the shape coefficient is established. It is indicated in Ref.[15] that the particles in blade have two motions in the solidification process: mass displacement and angular displacement. Macroscopically, blade has two kinds of displacements: shrinkage and torsion. For shrinkage deformation, the volume of turbine blade should be increased; and for torsion deformation, the compensation of bending and torsion should be considered.
From the physical significance, we can see that for shrinkage deformation, the shape coefficient λ is used to compensate the deformation which is brought about by the shrinkage; and the increased part size can cause deformation, which also needs to be compensated. Obviously, the shape coefficient here is related to the shrinkage rate of the material which is noted as K.
By replacing the shape coefficient λ with the shrinkage rate K, one obtains the following relationship:
![]() (5)
(5)
where ![]() is the displacement increment of node, also called form error.
is the displacement increment of node, also called form error.
In order to satisfy the requirement of acronymic design, the surface turbine blade is always designed as twisted structure which has complicated geometry. The original data of the turbine blade used for geometric modeling, obtained from the section data points along the blade height direction, accord to the hydrokinetics theory[16-17]. As illustrated in Fig.3, the solid line represents the schematic diagram of the blade section and the dashed line represents the section after distortion. During the solidification process, the middle part of the section is subjected to tensile stress, while the front and back sides are subjected to compressive stress. The different radii and thicknesses of the front and back sides lead to the different stress statuses and hence the deflection and torsion are formed within the blade. Furthermore, it should be indicated that the increase of the radius of blade leading edge will lead to the decrease of pressure and hence increase the distortion effect of the blade trailing edge.
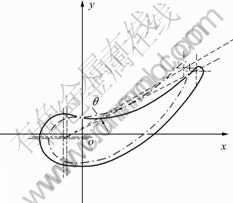
Fig.3 Deflection and torsion of section line discrete points
The compensation of torsion deformation should consider the value of shape coefficient λ, which is the compensation of the displacement increment. Let θ be the angle of section bending torsion, the following expression can be then derived with reference to Eq.(4):
![]() (6)
(6)
where tan θ represents the torsion degree of the angle and can be represented by the deformation of the blade leading edge and the trailing edge:
![]() (7)
(7)
where ΔR represents the increment along the thickness direction of leading edge; Δr is the increment along the thickness direction of the trailing edge; and B is the chord length.
During the solidification process, shrinkage and torsion deformation are simultaneous. Hence, both of them should be considered in the compensation method, as shown in Fig.4 with assuming that the shrinkage deformation occurs along the thickness direction and the torsion deformation occurs around the center of section shrinkage. The shrinkage deformation will be firstly compensated and then the torsion deformation will occur. With reference to Eq.(5) and Eq.(6), the shrinkage and torsion coupling compensation method can be expressed as:
![]() (8)
(8)
where K is the shrinkage rate and ΔD(x, y, z) is the displacement increment of each node.
For a small size of turbine blade, the shrinkage is small according to Eq.(5) and thus the re-compensation amount is small, which means that Eq.(6) has a good convergence. However, if the casting has a big size, ΔD would be large and the displacement increment λΔD would be oversize. Therefore, the compensation of the displacement increment can be compensated again:
![]()
![]() (9)
(9)
In the shrinkage deformation, λ equals the shrinkage rate K. The value of K ranges from 0 to 1, so
λ<1. According to Eq.(9), the limit of ![]() can be calculated as:
can be calculated as:
![]() (10)
(10)
For torsion deformation, the bending torsion angle θ is small compared with the casting size, so
![]() (11)
(11)
The further optimized compensation method can be
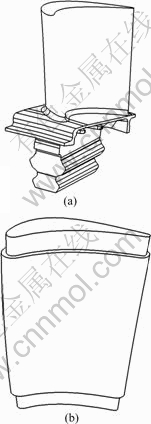
Fig.4 Typical turbine blade model (a) and simplified turbine blade model (b) for numerical simulation
written as:
![]() (12)
(12)
3 Numerical simulation for investment casting process of turbine blade
3.1 Establishment of FEM model and gating system design
A certain type of turbine blade for numerical simulation is considered, which is depicted in Fig.4(a). Since the real turbine blade model is very complicate, necessary simplifications are made for the turbine blade modeling, as shown in Fig.4(b). The rabbet of blade produced by mechanical machining is ignored and only blade surfaces that should meet the highest precision of aerodynamic requirement are considered. The geometrical parameters of the blade used are: the length of blade 101 mm; the biggest chord length 59.21 mm; the maximum radius of the maximum inscribed circle 5.67 mm; the leading edge radius 4.22 mm; and the trailing edge radius 1.27 mm.
In the study, the finite element analysis software ProCAST is adopted for the numerical simulation. Here, it should be indicated that the blade model is constituted by a large quantity of complicated high order surfaces. Experiment shows that, if mesh is generated by MeshCAST, which is the mesh generation module of ProCAST, a lot of surface mesh repairing work needs to be done. This work adopts Nastran module of Unigrahpics NX 5 to generate the tetrahedral mesh, after data format conversion, the high quality mesh can be generated and accepted by ProCAST.
According to a foundry shop’s pouring type, a gating system for the typical blade is designed, as illustrated in Fig.5 (Note that five blades as a group). Liquid metal is poured from the top. Feeding channel is set at the bottom of the blade near the maximum inscribed circle of blade section line. The mold shell thickness is 6 mm.
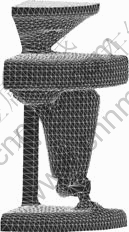
Fig.5 Gating system design and mesh generation
3.2 Boundary conditions and thermal physical parameters
Single-crystal turbine blades have been used widely in advanced propulsion systems currently, whose parts are manufactured by the unidirectional solidified investment casting process. In this work, to verify the approach proposed and decrease cost as well, aluminum alloy A356 is used instead of super-alloy. Moreover, the gravity casting process is adopted to decrease experimental cost. In turbine blade castings, the filling time is short (a few seconds) compared to the overall solidification time and the mould is preheated to a temperature higher than that of the liquids. Therefore, the pouring stage can be neglected. The mold material is silica sand whose thermal expansion coefficient is 4.6×10⁻⁶ °C-1. At the beginning of simulation, the initial temperature is 650 °C and the temperature of the shell mould is 500 °C. The calculation termination temperature is 400 °C. The constraints for displacement are designed according to the casting system: the bottom of the turbine blade is fixed and the displacements of shell mould in xy plane are also constrained.
In the process of numerical simulation of turbine blade, some parameters, such as thermo-physical parameters and mechanical properties, can be obtained from the database of ProCAST. However, during solidification process, the interfacial heat transfer (IHTC) between the casting and the mould is one of the most important factors that influence the solidification process, the resulting mechanical properties and the soundness of the cast product. The mathematic model for solving IHTC is written as follows:
![]() (13)
(13)
where T′ is the measured temperature; T(hc) is the simulation temperature; ![]() represents the unknown IHTC number. Material thermal conductivity and structure are already known, but only IHTC is the objective solution. When differences of measured and computed temperatures meet accuracy requirements, we can hold the right IHTC value, which is denoted by hc and is corresponded to the actual value. The recurrence relations are established as follows:
represents the unknown IHTC number. Material thermal conductivity and structure are already known, but only IHTC is the objective solution. When differences of measured and computed temperatures meet accuracy requirements, we can hold the right IHTC value, which is denoted by hc and is corresponded to the actual value. The recurrence relations are established as follows:
![]() (14)
(14)
where Tk is the kth iterative result; Tk+1 is the (k+1)th iterative result; ΔT represents the iteration modified data. Suppose T ′ is the measured temperature at the corresponding position, when Tk+1 equals T ′, which means the iterative results approach measured temperature data, then the IHTC can be established. The flow chart shown in Fig.6 gives an overview of the solution procedure.
In order to determine the accurate IHTC, an experiment is to set up the investment casting process of a blade. The relevant properties and chemical composition of aluminum alloys are widely available in Ref.[18], but there is relatively little accurate information available on the manufacture investment casting shell mould. In this work, the thermal data of the shell mould reference the thermo-physical properties given in database of the ProCAST and Ref.[19].
Although the thermal radiation exists between the casting and mold, the outer surface temperature is low after pouring a period of time, and the temperature of riser is high, but the surface area is small, so the radiation heat transfer occupies a small proportion. Moreover, due to the fact that in casting process, the nonlinearity of the analysis of radiation can consume a large amount of computational resources[20]. So, the thermal radiation can be ignored in the experiment. Main solving area is between the casting and the mold.
The procedure starts with a blade fabricated by investment casting wax (the pattern). The wax is heated just above its melting temperature and then pressed into a
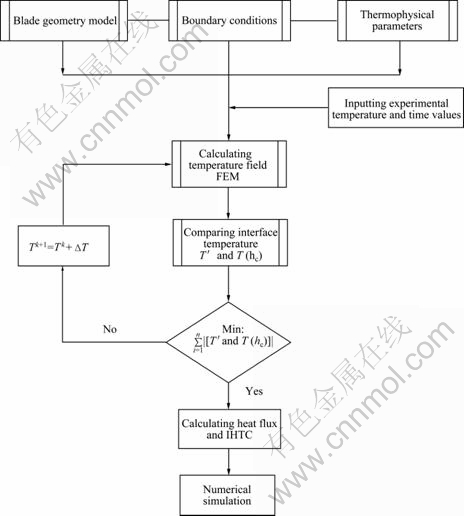
Fig.6 Flow chart for determination of IHTC generation
steel die by a rocker-arm plunger. After the wax is solidified, the steel die is opened, and the wax blade is taken out of the die. To decrease the shrinkage of the wax, the wax pattern prepared is made up of two parts: the core and the exterior, as shown in Fig.7. So, two steel dies are needed. After the wax core is finished, it is then put into the other die to achieve the final wax pattern.
Six wood sticks with a radius slightly larger than that of ceramic tubes used to wrap thermocouples are selected to drill holes of 1.5 mm in diameter located in six positions. Then these sticks are inserted into six holes of the wax blade that is fixed to the feed system, and 12 K-type thermocouples are placed into the small holes with a depth of about 2.0 mm from the interface to metal region and from the interface to the mould region, as shown in Fig.8.
The thermocouples are wrapped in plastic tubes to distinguish chromel and alumel. Therefore, the mould shell is not preheated in gas furnace. Molten aluminum alloy is poured into the mould shell at a temperature of approximately 624 °C by the gravity method, and the
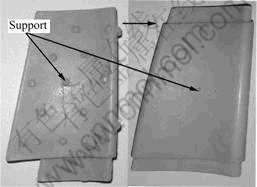
Fig.7 Core and exterior of wax pattern
mould shell is cooled in air with heat insulating materials on the top and the bottom to ensure that heat flux from the casting to the mould shell can only take place along the periphery of the turbine blade cross-section. The temperature of the thermocouple is recorded by sampling
frequency of 1 Hz using a temperature instrument HR3200 (YOKOGAWA, Japan). Before the thermal profiles measured can be used, they must be firstly
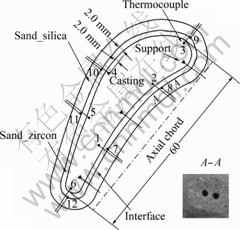
Fig.8 Cross-section of blade and thermocouple positions
smoothed out with a digital filter.
Although the experimental setup should be designed as representative of the real process, one should realize that it is impossible to consider performing an inverse calculation on a real 3D casting geometry due to the prohibitive computing time. Thus, a 2D geometry is used in parameter establishment process. In addition, a certain number of thermocouples have to be properly located rather than "flooding" the experiments with many thermocouples.
The measured temperature data of certain nodes were compared with the simulated temperature results, as depicted in Fig.9 where abscissa represents the time, and ordinate represents the temperature (°C).
Based on inverse module of ProCAST, with 15 iterations, the IHTC of the casting-shell mold calculated
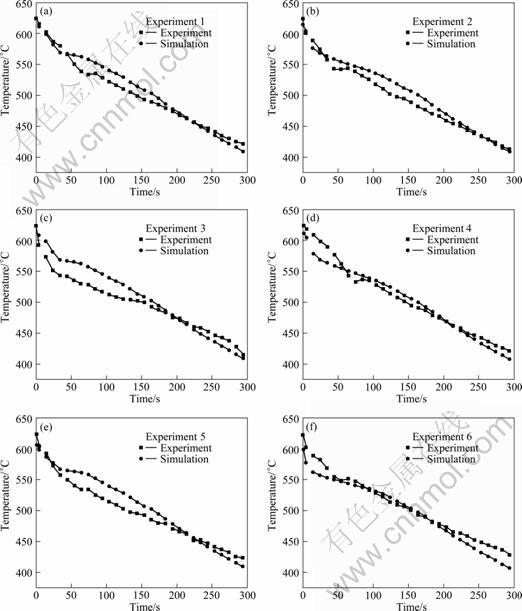
Fig.9 Comparison between experimental temperature and simulated temperature
by the inverse process is shown in Fig.10. Fig.10 indicates that exponential function can show the abrupt changes and slowly decreased stages of IHTC. We can get a linear relationship between casting and the shell mold. The function expression for IHTC can be written as follows:
![]() (15)
(15)
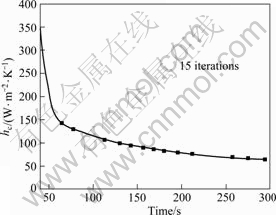
Fig.10 IHTC between metal and shell mold
3.3 Numerical simulation of displacement field
The casting process is simulated by ProCAST. The calculation is based on thermo-elastic-plastic material. Interface heat-transfer coefficient is obtained from Eq.(15) and the final temperature for calculation is 400 °C.
The displacement field of the turbine blade represents the summation of node displacement. It is determined by the structure of the blade and the boundary conditions (reflecting the blade and casting process). However, the casting dimensional change is also associated with wax pattern, wax property, wax temperature, wax flow and the manufacturing process, etc. In this work, we assume that the wax pattern is fixed with less distortion or even no distortion. The influence of wax pattern dimensional changes is negligible. So, the displacement can represent information about blade and casting process. The blade section lines after shrinkage can be obtained via the reconstruction of the nodes from the sections of blade mesh model.
The shrinkage of the section deformation occurs at the position where locates 4/5 to the blade root. Fig.11 illustrates the deformation of this blade section. The solid line represents the initial design profile line. The dashed line represents the profile of the section after deformation, which has been amplified 1.5 times. It can be seen that the deformation is non-uniform. The leading and trailing edges have larger shrinkages compared with the other parts, and the shrinkage of the pressure part is larger than that of the blade back.
The point cloud data can be obtained through CMM measurement. After the reconstruction of the solid model through the point cloud data, the same sections are intercepted based on the simulation results and then dispersed into 200 discrete points, which can be used for the analysis of the displacement field. The numbers in Fig.12 represent the point numbers and Ⅰ, Ⅱ, Ⅲ and Ⅳ represent the trailing edge, the pressure side, the leading edge and the back area of the blade, respectively. Based on the analysis of the displacement field of 19 groups of turbine blades, each point error of the sections can be obtained by error distribution graph, as shown in Fig.13. It can be seen that the numerical simulation results agree well with the experimental ones.
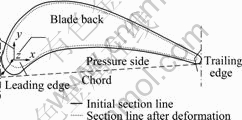
Fig.11 Blade profiles deformation

Fig.12 Sketch of discrete points
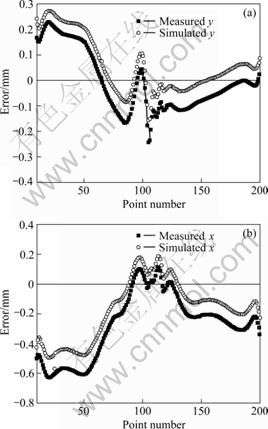
Fig.13 Comparison of section displacement (Displacement of numerical simulation and measurement)
4 Virtual modifying mould for turbine blade
4.1 Initial design of mould cavity and optimization method
According to the process model, the initial mould cavity can be designed by using the numerical simulation technology. Initial mould cavity can be established via the reverse of the predicted displacement field. However, the cavity’s availability obtained by this method needs to be further investigated by numerical simulation.
4.2 Virtual modifying mould system
Based on compensation method discussed above, the coordinates of scatter data points of the mould profile are acquired by programming with C++ language.
The system can extract the node information through the files which are generated by the simulation process, and then the disordered grids are changed into order ones. Based on the displacement compensation method, new surface point cloud of the die profile can be obtained.
In order to identify the optimized result, the simulate process is carried out again. A new turbine blade model based on the optimized die cavity is established. In this study, the form error defined in Eq.(1) is used to assess result of compensation.
 (16)
(16)
where Di is the ith node’s CAD coordinate; Qi is the ith node’s simulation coordinate; and n denotes the total number of surface node.
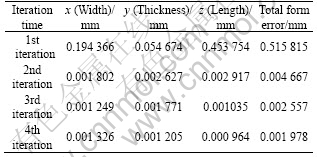
The value of form error M reflects the coincidence degree of two surface meshes. The smaller the form error is, the higher the surface’s coincide degree is. As seen in Table 1 (x, y, z represent the average form errors of three directions), the synthetic form error of turbine blade has decreased from 0.515 815 mm to 0.001 978 mm after iteration four times.
Table 1 Change of form error with increasing iteration times
5 Conclusions
1) A reasonably accurate determination of the die profile for the investment casting of turbine blades is obtained by the simply FEM-based methodology. By considering the preciously control of the geometrical shape for turbine blades in the investment casting process, the die-casting mould cavity optimization is studied, the mechanism of casting deformation is analyzed, and a compensation method is proposed for die design.
2) The interface heat-transfer coefficients of the solidification process for investment casting of turbine blade are obtained by inverse process from experimental data, and the displacement field of turbine blade based on the numerical simulation is established.
3) The mould cavity anti-deformation system is built to reverse the deformation based on the displacement field. The numerical example proves the better effect on mould design of turbine blade.
4) The presented method may be applicable to obtain accurate IHTC during unidirectional solidification process, and to design the investment casting mould profile of the super-alloy turbine blades which are manufactured by the unidirectional solidified investment casting process.
References
[1] LOMBARDAS P, CARBUNARU A, MCALARNEY M E, TOOTHAKER R W. Dimensional accuracy of castings produced with ringless and metal ring investment systems [J]. Journal of Prosthetic Dentistry, 2000, 84(1): 27-31.
[2] GALANTUCCI L M, L TRICARICO. A computer-aided approach for the simulation of the directional-solidification process for gas turbine blades [J]. Journal of Materials Processing Technology, 1998, 77(1-3): 160-165.
[3] RUTTO H, FOCKE W W. Thermo-mechanical properties of urea-based pattern molding compounds for investment casting [J]. International Polymer Processing, 2010, 25(1): 15-22.
[4] BAKHSHI-JOOYBARI M, SABOORI M, HOSSEINIPOUR S J, SHAKERI M, GORJI A. Experimental and numerical study of optimum die profile in backward rod extrusion [J]. Journal of Materials Processing Technology, 2006, 177(1-3): 596-599.
[5] JONES S, YUAN C. Advances in shell moulding for investment casting [J]. Journal of Materials Processing Technology, 2003, 135(2-3): 258-265.
[6] REZAVAND S A M, BEHRAVESH A H. An experimental investigation on dimensional stability of injected wax patterns of gas turbine blades [J]. Journal of Materials Processing Technology, 2007, 182(1-3): 580-587.
[7] HARRIS R A, HAGUE R J M, DICKENS P M. The structure of parts produced by stereolithography injection mould tools and the effect on part shrinkage [J]. International Journal of Machine Tools and Manufacture, 2004, 44(1): 59-64.
[8] MODUKURU S C, RAMAKRISHNAN N, SRIRAMAMURTHY A M. Determination of the die profile for the investment casting of aerofoil-shaped turbine blades using the finite-element method [J]. Journal of Materials Processing Technology, 1996, 58(2-3): 223-226.
[9] ITO M, YAMAGISHI T, OSHIDA Y. Effect of selected physicalproperties of waxes on investments and casting shrinkage [J]. The Journal of Prosthetic Dentistry, 1996, 75: 211-216.
[10] FERREIRA J C, MATEUS A. A numerical and experimental study of fracture in RP stereolithography patterns and ceramic shells for investment casting [J]. Journal of Materials Processing Technology. 2003, 134: 135-144.
[11] RAFIQUE M, IQBAL J. Modeling and simulation of heat transfer phenomena during investment casting [J]. International Journal of Heat and Mass Transfer, 2009, 52(7-8): 2132-2139.
[12] ATWOOD R C, LEE P D, CURTIS R V, MAIJER D M. Modeling the investment casting of a titanium crown [J]. Dental Materials, 2007, 23(1): 60-70.
[13] ZHANG X P, XIONG S M, XU Q Y. Numerical methods to improve the computational efficiency of solidification simulation for the investment casting process [J]. Journal of Materials Processing Technology, 2006, 173(1): 70-74.
[14] ZHANG Dan, ZHANG Wei-hong, WAN Min, WANG Ji-feng, BU Kun. Reversing design methodology of the die profile in investment casting based on the simulation of displacement field and identification of featured parameters [J]. Acta Aeronautica et Astronautica Sinica, 2006, 27(3): 509-514. (in Chinese)
[15] HOOGEDOORN E, JACOBS G B, BEYENE A. Aero-elastic behavior of a flexible blade for wind turbine application: A 2D computational study [J]. Energy, 2010, 35(2): 778-785.
[16] XI Ping, SUN Xiao-xia. Error analysis system of turbine blade based on CAD model [J]. Journal of Beijing University of Aeronautics and Astronautics, 2008, 34(10): 1159-1162. (in Chinese)
[17] CHENG Yun-yong, ZHANG Ding-hua, WANG Kai, LIU Jing, ZHAO Xin-bo. Hollow turbine blade wall thickness inspection technology based on CBVCT image sequence [J]. Aeronautical Manufacturing Technology, 2005(11): 52-54, 79. (in Chinese)
[18] LIU Zheng, MAO Wei-min, ZHAO Zhen-duo. Effect of local chilling on morphology of primary [alpha] (Al) in semi-solid A356 alloy [J]. Transactions of Nonferrous Metals Society of China, 2008, 18(3): 573-579.
[19] CARTER P, COX D C, GANDIN C A, REED R C. Process modelling of grain selection during the solidification of single crystal superalloy castings [J]. Materials Science and Engineering A, 2000, 280(2): 233-246.
[20] RAI J K, LAJIMI A M, XIROUCHAKIS P. An intelligent system for predicting HPDC process variables in interactive environment [J]. Journal of Materials Processing Technology, 2008, 203(1-3): 72-79.
董一巍, 卜 昆, 窦杨青, 张定华
西北工业大学 现代设计与集成制造技术教育部重点实验室,西安 710072
摘 要:提出一种基于有限元法的精铸涡轮叶片蜡模模具型腔优化设计方法。首先,计算出涡轮叶片在凝固和冷却过程中的非均匀、非线性收缩变形量;然后,基于本文提出的位移场反向迭代算法,确定优化的蜡模模具型腔。以A356合金涡轮叶片为例,采用提出的涡轮叶片模具型腔优化设计系统,经过精度评估,尺寸误差得到了大幅度降低。数值模拟与实验结果吻合良好,经过4次迭代优化,涡轮叶片的总体形状误差从0.515 815 mm降低至0.001 978 mm。
关键词:涡轮叶片;数值模拟;位移场;蜡模模具型面;熔模精铸
(Edited by YANG Hua)
Foundation item: Project (2008ZE53042) supported by National Aerospace Science Foundation of China
Corresponding author: DONG Yi-wei; Tel: +86-29-88493232-229; Fax: +86-29-88491576; E-mail: dongyiwei@mail.nwpu.edu.cn
DOI: 10.1016/S1003-6326(11)60725-5

