


Trans. Nonferrous Met. Soc. China 22(2012) 147-156
Significance-based optimization of processing parameters for thin-walled aluminum alloy tube NC bending with small bending radius
XU Jie, YANG He, LI Heng, ZHAN Mei
State Key Laboratory of Solidification Processing, School of Materials Science and Engineering,
Northwestern Polytechnical University, Xi’an 710072 China
Received 24 December 2010; accepted 27 June 2011
Abstract: Thin-walled aluminum alloy tube numerical control (NC) bending with small bending radius is a complex process with multi-factor coupling effects and multi-die constraints. A significance-based optimization method of the parameters was proposed based on the finite element (FE) simulation, and the significance analysis of the processing parameters on the forming quality in terms of the maximum wall thinning ratio and the maximum cross section distortion degree was implemented using the fractional factorial design. The optimum value of the significant parameter, the clearance between the tube and the wiper die, was obtained, and the values of the other parameters, including the friction coefficients and the clearances between the tube and the dies, the mandrel extension length and the boost velocity were estimated. The results are applied to aluminum alloy tube NC bending d50 mm× 1 mm×75 mm and d70 mm×1.5 mm×105 mm (initial tube outside diameter D0 × initial tube wall thickness t0 × bending radius R), and qualified tubes are produced.
Key words: thin-walled aluminum alloy tube; optimization; finite element (FE); numerical control bending; processing parameters; significance analysis; small bending radius
1 Introduction
Numerical control (NC) bending of thin-walled (D0/t0>20, D0 is the initial outside diameter of tube, t0 is the initial wall thickness of tube) aluminum alloy tubes (TAATs) is widely used in aerospace, aviation and other high technology industries, due to the fact that it satisfies the increasing needs for lightweight and high specific strength of products, and its characteristics of high forming limits and precision [1]. However, it is a complex nonlinear forming process with strict cooperation of dies, including a bending die, a clamp die, a pressure die, a mandrel composed of a mandrel shank and balls, and a wiper die, as shown in Fig. 1. Some common defects, such as excessive wall thinning even cracking, cross section distortion, and wrinkling, will occur easily with inappropriate processing parameters, especially for small bending radius (R/D0<2, R is the bending radius).
Many scholars have done much research on the plastic forming process of tube bending. TANG [2] developed some practical formulae to analyze plastic deformation in tube bending. The results explained tube bending phenomena well and provided an initial technical guide. However, multi-constraint actions by dies were not referred. NORMANI [3] established an analytic model to predict the strain and thickness distribution after tube bending considering the effect of the mandrel, which was in accordance with the experimental and the numerical results. However, the friction conditions were neglected in the model. Much research was done on the wrinkling phenomenon in the plastic bending of thin-walled tubes by the theoretical method or FE simulation [4-7]. The results are helpful to design and optimize relevant processing parameters without wrinkling in practice. YAN et al [8] put forward a search algorithm of the minimum bending factors under the multi-index constraints for bending processes of aluminum alloy thin-walled tubes with large diameters, based on a 3D elastic-plastic FE model and a wrinkling energy prediction model. Effects of the clearances and friction between the tube and the dies, the mandrel ball thickness and diameter on the limit bending factors were studied. LI et al [9] and YAN et al [10] analyzed the forming characteristics of the NC tube bending. Influences of the parameters on the forming quality in NC tube bending were studied [11-16], which supplied an initial experiential database for further optimization. STRANO [17] presented a process design system for rotary draw bending; however, it was based on much experiential data of the steel tube bending. Tube and pipe bending manual provided a guide for choosing the initial tooling parameters [18]; however, further precise and complete design would be needed for thin-walled aluminum alloy tube bending with small bending radius. Above research results have supplied rules for determining the initial values of the parameters, and it is proved that finite element method (FEM) is effective to study the complex forming process of NC bending with multi-factor interactive influence.
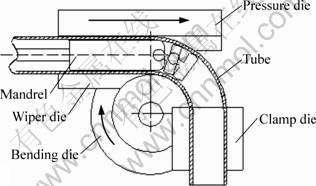
Fig. 1 Schematic diagram of thin-walled aluminum alloy tube NC bending
The FEM simulations have been extensively used in civil engineering and aeronautical engineering to solve complex engineering problems on complex domains like cars and airplanes [19]. However, they are, in general, very time consuming to execute. So, how to optimize the parameters more effectively applying FEM is a hot project nowadays. Scholars adopted FEM combined with the optimization strategies including approximate model, optimization algorithm, and experiment-based design to obtain the optimum processing parameters [20, 21]. BONTE [22] proposed a generally applicable optimization strategy for industrial metal forming processes using FEM simulations combined with the design of experiments and the mathematical optimal methods, which was proved to be efficient. By considering the characteristics of thin-walled tube NC bending, a stepwise optimizing strategy was proposed to solve the optimization design of the forming parameters [23]; however, for NC bending of TAATs, especially for small bending radius, the forming quality is influenced more sensitively by the change of the parameters, common numerical optimization methods are difficult to solve the problem, and more details should be concerned. Thus, in the present work, applying FE-based significance analysis, a significance-based optimization method is proposed and implemented to obtain the optimum parameters for the two specifications of aluminum alloy tube bending with relative bending radius of 1.5, which are d50 mm×1 mm×75 mm and d70 mm×1.5 mm×105 mm (D0×t0×R).
2 Significance-based optimization method
The significance-based optimization method is proposed based on the established optimization model and the FE model. The optimization problem is formulated for minimizing the wall thinning ratio with free wrinkling and the allowed cross section distortion degree as the constraints, and the method of qualitative predicting wrinkling occurring was proposed and described before [4], and was used in the work applying the FE model. The nine parameters, the friction coefficient between the tube and the pressure die (fp), the clearance between the tube and the pressure die (cp), the friction coefficient between the tube and the wiper die (fw), the clearance between the tube and the wiper die (cw), the friction coefficient between the tube and the bending die (fb), the clearance between the tube and the bending die (cb),the friction coefficient between the tube and the mandrel (fm), the mandrel extension length (e) and the boost velocity (vp), which can be adjusted or improved practically under the given tube geometry dimensions, material and bending radius, are determined as the main variables to be optimized. Influence and significance of them on the wall thinning and the cross section distortion are analyzed by the fractional factorial design, and they are optimized according to the significance analysis results.
2.1 Optimization model
With the given bending radius and bending angle, minimizing the maximum wall thinning ratio (T) is determined as the optimization objective for aluminum alloy tube NC bending, which is described in Eq. (1). The maximum cross section distortion degree of the tube (Q) is determined as the response of constraint, expressed by the ovalization ratio as shown in Eq. (2).
 (1)
(1)
 (2)
(2)
where t0 represents the initial wall thickness of the tube; tmin is the minimum wall thickness of the tube after bending; D0 is the initial outside diameter of the tube; D' is the minimum outer layer length of vertical axes of the tube cross-section after bending.
The initial bounds of the friction coefficients are obtained according to the twist compression test results [4]. The ranges of the other parameters are determined by the experiential data from the former research. And then the resulting mathematically formulated optimization model is shown as follows [16]:
min T
s.t.  ;
;
0p, fw, fm, fb<0.5;
fc≥0.6;
0p, cw, cm, cb<0.5;
 (3)
(3)
where fc represents the friction coefficient between the tube and the clamp die; cm is the clearance between the tube and the mandrel; e is the mandrel extension length; emax is the obtained maximum mandrel extension length; R is the bending radius; d is the mandrel diameter; rnose is the mandrel nose radius. The clearance between the tube and the mandrel cw is related to the mandrel diameter, so it is not considered in the work, and the friction between the tube and the clamp die should be large enough to resist the relative slip. Then, the FEM simulations are done to acquire the range of the other parameters for no defects in order to do the subsequent significance analysis in the range.
2.2 Establishment and verification of FE model
The whole process of NC bending for TAATs with small bending radius is simulated by a half 3D elastic-plastic FE model using ABAQUS/Explicit, including bending, mandrel retracting and unloading process, as shown in Fig. 2. Coulomb friction model is chosen to represent the friction behavior. The aluminum alloy tube bending of d50 mm×1 mm×75 mm is simulated to verify the model. The tube material is 5A02O, and its strain hardening model is applied as  The initial parameters obtained according to the specification are shown in Table 1. Experiments are done to validate the model, and the comparative results between the experiment and the simulation are shown in Fig. 3, and the simulation results agree with the experiment results, which has shown the reliability of the model.
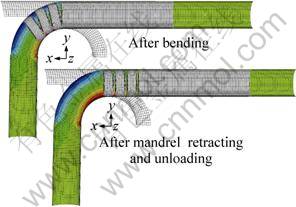
Fig. 2 FE model for NC bending of TAATs
Table 1 Initial parameters for aluminum alloy tube NC bending of d50 mm×1 mm×75 mm

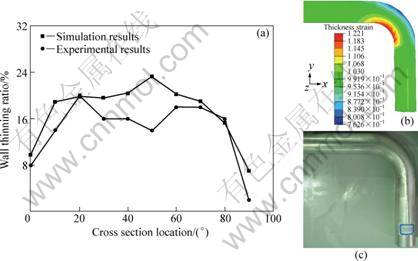
Fig. 3 Comparative results between simulation and experiment: (a) Comparison of wall thinning ratio between simulation and experimental results; (b) Contour plot of thickness strain in simulation; (c) Obtained tube part in experiment
2.3 Optimization method
Based on the above FE model, the significance-based optimization method for the NC bending of TAATs with small bending radius is put forward as the following descriptions, and it is applicable for its characteristics, which is accompanied by multi-factor interactive effects, and the forming quality is more sensitive from the change of the processing parameters. The flow chart of the whole optimization process is shown in Fig. 4.
1) Establish the FE model under the initial parameters obtained by the database of rules for designing the forming parameters.
2) Further analyze the influence of the processing parameters on the forming quality to determine the reasonable ranges without defects.
3) Do the significance analysis of the processing parameters in the ranges which are determined in step 2).
4) Optimize the significant parameters by iterative calculations using the FE simulation, and set the best values of the other parameters.
5) Put forward a systemic process for another related specification of aluminum alloy tube bending.
6) Estimate if wrinkling, if yes, judge if the relative tube diameter (D0/t0) or the tube diameter is larger than
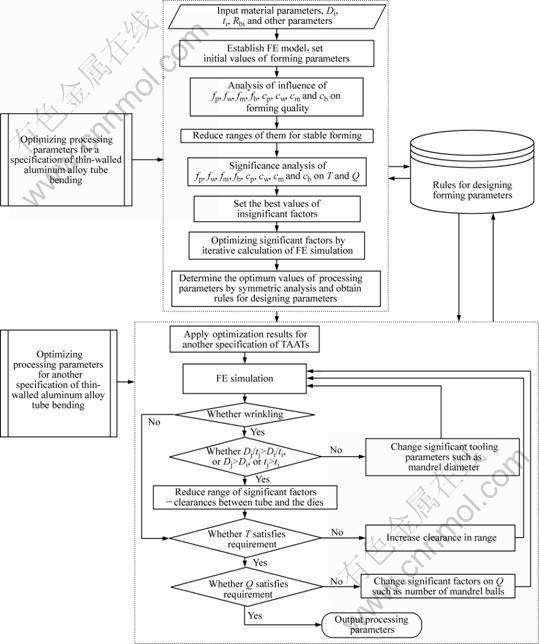
Fig. 4 Flow chart of significance-based optimization method of processing parameters for NC bending of TAATs with small bending radius
that of the former specification; if yes, reduce the ranges of the clearances between the tube and the dies; and if not larger, change the significant factors for free wrinkling, such as increasing the mandrel diameter; and if no wrinkling, go to the next step.
7) Conclude if the maximum wall thinning ratio satisfies the requirement; if not, increase the clearances between the tube and the dies in the range of free wrinkling, and the increasing step length is half of the former increasing step length; and if yes, go to the next step.
8) Conclude if the maximum cross section distortion degree satisfies the requirement, if not, change the significant factors, such as increasing the number of mandrel balls; and if yes, output the results and save them in the rule database.
3 Results and discussion
3.1 Influence of processing parameters on forming quality
The aluminum alloy tube bending of d50 mm× 1 mm×75 mm is selected as the reference process. The influence laws of fp, fw, fm, fb, cb, cp, cw, e, vp on T and Q are studied as shown in Fig. 5 and Fig. 6, in which the coefficient of boost velocity (kvp) represents the ratio of the boosting velocity of the pressure die to the tangential velocity of the rotating bend die (vb). From Figs. 5(a), (b), and (c), it is shown that when fm is larger than 0.45, or cw is smaller than 0.05, or e is larger than 8 mm, or vp is smaller than the tangential velocity of the rotating bend die, cracking may occur easily or the forming quality cannot satisfy the requirement. However, these parameters have no obvious influence on the cross- section distortion. Therefore, the ranges of these parameters for stable forming can be obtained by combining with the above results and the obtained experiential data and knowledge, as shown in Table 2. Then, the significance analysis is done below in the ranges to make the scheme of the optimization order and determine the optimum values of the parameters.
3.2 Significance analysis results of processing parameters
In order to reduce the number of calculations, a fractional factorial design is applied to analysis of the significance of the processing parameters. The maximum wall thinning ratio and the maximum cross-section
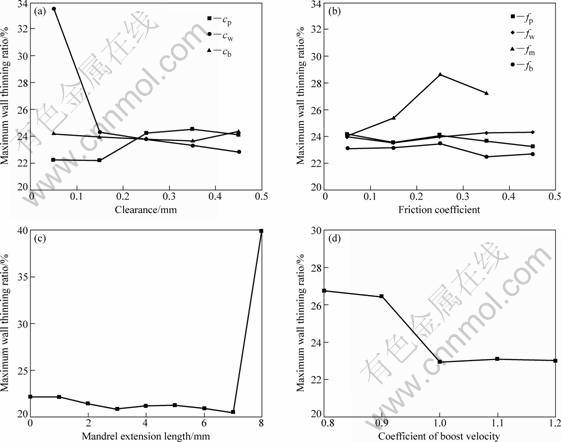
Fig. 5 Influence of processing parameters on wall thinning ratio: (a) Clearances between tube and dies; (b) Friction coefficients; (c) Mandrel extension length; (d) Coefficient of boost velocity
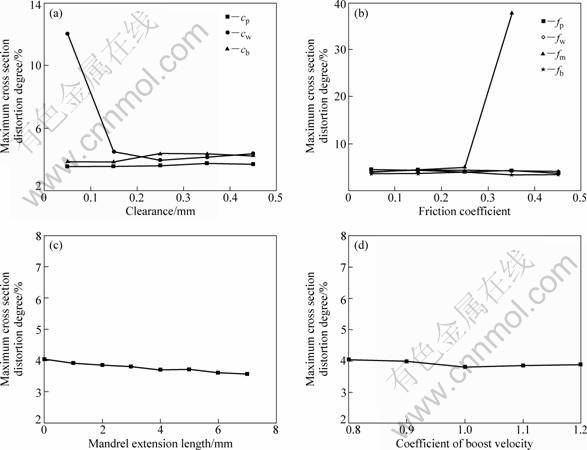
Fig. 6 Influence of processing parameters on cross-section distortion degree: (a) Clearances between tube and dies; (b) Friction coefficients; (c) Mandrel extension length; (d) Coefficient of boost velocity
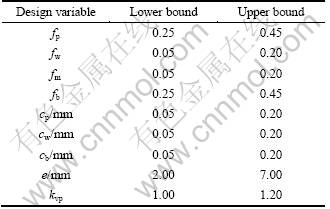
Table 2 Determined ranges of processing parameters for significance analysis
distortion degree are determined as the responses.
The  fractional factorial design of experiments is applied to screening the importance of the processing parameters [24]. The levels of the design variables are applied, as shown in Table 2. And then, the main effect plots and the Pareto plots of standard effect for T and Q are obtained, as shown in Fig. 7 and Fig. 8, respectively. It is found that the influence of fw and cw is in the same direction for T and Q, i.e. the larger the fw is, the larger the T and Q are, and the larger the cw is, the smaller the T and Q are. It is also indicated that cw has significant influence on the wall thinning, and is an insignificant factor for the cross section distortion. The other parameters have no significant influence on wall thinning and cross section distortion in the range, so their best values can be set according to the main effect analysis. The larger the cw is, the larger the risk of wrinkling is [4]. Therefore, it should be first determined to ensure no wrinkling. The smaller the friction between the mandrel and the tube is, the better the forming quality is; the smaller the cb is; the better the value of vp is, larger than the value of the tangential velocity of the rotating bending die (vp≥vb, kvp≥1.00); but e has a slight influence on the forming quality in the range. According to the synthetic analysis, the best values of fp, fw, fm, fb, cb, cp, e, kvp are obtained as 0.45, 0.05, 0.05, 0.45, 0.05 mm, 0.05 mm, 7.00 mm and 1.00, respectively, and the optimum value of cw is 0.20 mm for the aluminum alloy tube bending of d50 mm×1 mm×75 mm.
3.3 Optimization results and verification
According to the above significance analysis of the parameters for the bending of d50 mm×1 mm×75 mm, fp, fw, fm, fb, cb, cp, e, vp have no obvious influence on T and Q in the reasonable range, therefore, the obtained best values of them are used for the initial processing of another tube bending of d70 mm×1.5 mm×105 mm, whose relative bending radius (R/D0) is 1.5 as well. So, more attention is paid to optimizing the significant parameter, the clearance between the tube and the wiper die (cw). The initial parameters for the bending of d70 mm×1.5 mm×105 mm are shown in Table 3, and the obtained optimum value of cw is 0.15 mm. In the experiments, the maximum wall thinning ratios of the two specifications are 20.00% and 25.10%, respectively.
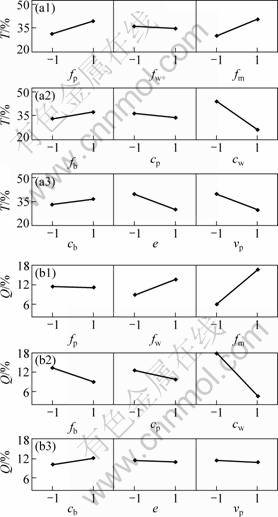
Fig. 7 Main effects of processing parameters for responses: (a1), (a2), (a3) T; (b1), (b2), (b3) Q
The comparative results are shown in Table 4. And the tube equivalent plastic strain contour plots after bending are demonstrated in Fig. 9. It is found that the larger the relative tube diameter (D0/t0) is, the smaller the reasonable extent of the clearance between the tube and the wiper die is. Qualified products obtained by the experiments are shown in Fig. 10. The results show that the deformation is more uniform after optimization and the optimization method is applicable for different specifications of thin-walled aluminum alloy tube NC bending with small bending radius.
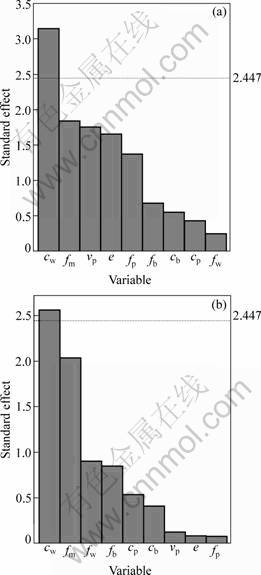
Fig. 8 Pareto plots of standard effect of processing parameters of T (a) and Q (b) for responses
Table 3 Initial parameters for aluminum alloy tube NC bending of d70 mm×1.5 mm×105 mm

Table 4 Comparative results of two specifications

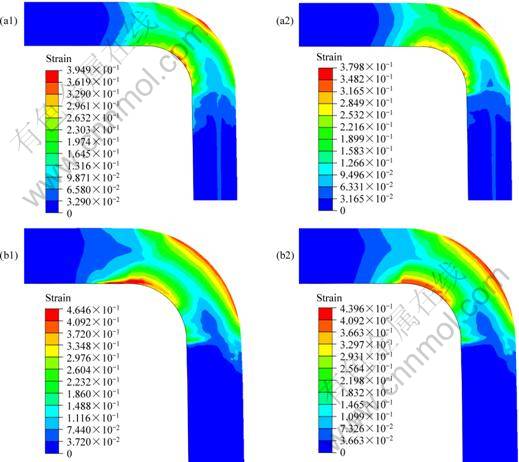
Fig. 9 Equivalent plastic strain contour plots of initial results and optimization results for specifications: (a1), (a2) d50 mm× 1 mm×75 mm; (b1), (b2) d70 mm×1.5 mm×105 mm; (a1), (b1) Initial results; (a2), (b2) Optimization results
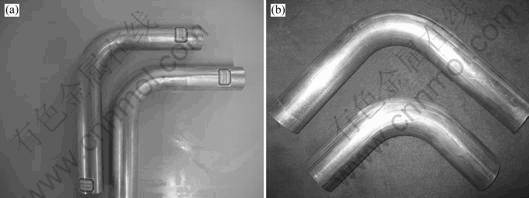
Fig. 10 Qualified products by experiments: (a) d50 mm×1 mm×75 mm; (b) d70 mm×1.5 mm×105 mm
4 Conclusions
1) NC tube bending of thin-walled aluminum alloy tubes with small bending radius needs more strict cooperation of the dies. The forming quality is more sensitive to the change of the processing parameters, and defects such as wrinkling, cracking, collapse may occur more easily, so the significance-based optimization method combined with FE simulation is applicable for optimizing the processing parameters.
2) The optimum processing parameters are obtained by the significance-based optimization method for minimizing the maximum wall thinning ratio with the allowed cross-section distortion degree and without wrinkling. The clearance between the tube and the wiper die is mainly optimized as it is one of the most significant factors for the forming quality.
3) The significance-based optimization method is applicable and reliable for different specifications of thin-walled aluminum alloy tube bending with small bending radius. The obtained optimal value of the clearance between the tube and the wiper die is 0.20 mm for the tube bending of d50 mm×1 mm×75 mm, and for the tube bending of d70 mm×1.5 mm×105 mm, it is 0.15 mm. And the maximum wall thinning ratios are 20.00% and 25.10% in experiments applying the optimization results, respectively.
References
[1] YANG He, SUN Zhi-chao, LIN Yan, LI Ming-qi. Advanced plastic processing technology and research progress on tube forming [J]. Journal of Plasticity Engineering, 2001, 8(2): 86-88. (in Chinese)
[2] TANG N C. Plastic-deformation analysis in tube bending [J]. International Journal of Pressure Vessels and Piping, 2000, 77: 751-759.
[3] NORMANI F V. Analytical modeling of tube bending with hydroforming [D]. Waterloo: University of Waterloo, 2004: 60-82.
[4] LI Heng. Study on wrinkling behaviors under multi-die constraints in thin-walled tube NC bending [D]. Xi’an: Northwestern Polytechnical University, 2007: 57-125. (in Chinese)
[5] WANG X, CAO J. Wrinkling limit in tube bending [J]. Transaction of the ASME, 2001, 123: 430-435.
[6] YANG He, LIN Yan. Wrinkling analysis for forming limit of tube bending processes [J]. Journal of Materials Processing Technology, 2004, 152: 363-369.
[7] YANG He, YAN Jing, ZHAN Mei, LI Heng, KOU Yong-le. 3D numerical study on wrinkling characteristics in NC bending of aluminum alloy thin-walled tubes with large diameters under multi-die constraints [J]. Computational Materials Science, 2009, 45: 1052-1067.
[8] YAN Jing, YANG He, ZHAN Mei, LI Heng. Forming limits under multi-index constraints in NC bending of aluminum alloy thin-walled tubes with large diameters [J]. Science China: Technological Sciences, 2010, 53(2): 326-342.
[9] LI Heng, YANG He, ZHAN Mei, GU Rui-jie. Forming characteristics of thin-walled tube bending process with small bending radius [J]. Transactions of Nonferrous Metals Society of China, 2006, 16: s613-s623.
[10] YAN Jing, YANG He, ZHAN Mei, LI Heng. Forming characteristics of aluminum alloy thin-walled tubes with large diameters in NC bending under axial compression loading [J]. Chinese Journal of Aeronautics, 2010, 23: 461-469.
[11] LIN Yan, YANG He, LI Heng, ZHAN Mei. Influences of forming parameters on wrinkling in NC thin-walled tube bending [J]. Acta Aeronautica et Astronautica Sinica, 2003, 24(5): 456-461. (in Chinese)
[12] WANG Guang-xiang. Experimental study on influence of process parameters on forming quality of thin-walled tube NC bending [D]. Xi’an: Northwestern Polytechnical University, 2005: 39-63. (in Chinese)
[13] OLIVEIRA D A, WORSWICK M J, GRANTAB R. Effect of lubricant in mandrel-rotary draw tube bending of steel and aluminum [J]. Canadian Metallurgical Quarterly, 2005, 44: 71-78.
[14] GU Rui-jie, YANG He, ZHAN Mei, LI Heng, WANG Guang-xiang. Effect of mandrel on cross section quality of thin-walled tube NC bending [J]. Transactions of Nonferrous Metals Society of China, 2005, 15: 1264-1274.
[15] YANG He, GU Rui-jie, ZHAN Mei, LI Heng. Effect of frictions on the cross section quality of thin-walled tube NC bending [J]. Transactions of Nonferrous Metals Society of China, 2006, 16(4): 878-886.
[16] LI Heng, YANG He, ZHAN Mei, SUN Zhi-chao, GU Rui-jie. Role of mandrel in NC precision bending process of thin-walled tube [J]. International Journal of Machine Tools & Manufacture, 2007, 47: 1164-1175.
[17] STRANO M. Automatic tooling design for rotary draw bending of tubes [J]. International Journal of Advanced Manufacturing Technology, 2005, 26(7-8): 733-740.
[18] STANGE R R. Tube and pipe bending [EB/OL]. [2007-12-04]. http://www.toolsforbending.com.
[19] COOK R, MALKUS D, PLESHA M, WITT R. Concepts and applications of finite element analysis [M]. New York, USA: John Wiley & Sons, Inc, 2002: 1-17.
[20] BAHLOUL R, MKADDEM A, SANTO D P, POTIRON A. Sheet metal bending optimisation using response surface method, numerical simulation and design of experiments [J]. International Journal of Mechanical Sciences, 2006, 48: 991-1003.
[21] ROY R, HINDUJA S, TETI R. Recent advances in engineering design optimisation: Challenges and future trends [J]. CIRP Annals―Manufacturing Technology, 2008, 57: 697-715.
[22] BONTE M H A. Optimisation strategies for metal forming process of metal forming processes [D]. Enschede: University of Twente, 2007: 4-49.
[23] XU Jie, YANG He, ZHAN Mei, LI Heng. A study on stepwise optimization of forming parameters for thin-walled tube NC bending [J]. Journal of Advanced Manufacturing Systems, 2008, 7(1): 15-20.
[24] MONTGOMERY D C. Design and analysis of experiments [M]. Hoboken, NJ: John Wiley & Sons, Inc. 2005: 203-254.
基于显著性的薄壁铝合金管小弯曲半径
数控弯曲工艺参数优化
许 杰,杨 合,李 恒,詹 梅
西北工业大学 材料学院 凝固技术国家重点实验室,西安 710072
摘 要:薄壁铝合金管小弯曲半径数控弯曲是个多因素耦合、多模具约束下的复杂过程。提出以有限元模拟为基础,基于显著性的工艺参数优化方法,即采用析因因子设计分析工艺参数对成形质量,即最大壁厚减薄率和最大截面畸变变化率影响的显著性,获得影响显著的参数,即管与防皱模间间隙的最优值,并确定其他影响不显著的参数值,包括管与模具间的间隙和摩擦、芯棒伸出量和助推速度。结果应用于规格为d50 mm×1 mm×75 mm和d70 mm×1.5 mm×105 mm (管外径D0×管壁厚t0×弯曲半径R)的铝合金管弯曲,获得了合格的管件。
关键词:薄壁铝合金管;优化;有限元;数控弯曲;工艺参数;显著性分析;小弯曲半径
(Edited by YANG Hua)
Foundation item: Projects (50905144, 50875216) supported by the National Natural Science Foundation of China; Project (09-10) supported by the State Key Laboratory of Materials Processing and Die & Mould Technology, China; Project (JC201028) supported by the Northwestern Polytechnical University Foundation for Fundamental Research, China
Corresponding author: YANG He; Tel/Fax: +86-29-88495632; E-mail: yanghe@nwpu.edu.cn; jennyxjl_2931@126.com
DOI: 10.1016/S1003-6326(11)61154-0