Crack stop holes in steel bridge decks: Drilling method and effects
��Դ�ڿ������ϴ�ѧѧ��(Ӣ�İ�)2017���10��
�������ߣ������� ������ л��� ������
����ҳ�룺2372 - 2381
Key words��steel bridge deck; fatigue crack; stop hole; drilling method; hole position
Abstract: Force analysis using a compact tension model, as recommended by ASTM, was carried out on a crack stop hole. The stress before, and after, drilling the hole was compared in terms of stress concentration and stress gradient. The optimum drilling location and diameter were studied through analysis of different locations and diameters. By analyzing the effects of flank holes and an additional hole, drilling advice was proposed and fatigue testing of the cracks in a steel bridge deck with a crack stop hole was conducted. The results show that the stress at the crack tip with a crack stop hole decreased, and the major principal stress around the hole was distributed accordingly. The optimum position of the crack stop hole centre was where the centre of the crack stop hole was situated behind the crack and the hole edge coincided with the crack tip. Therefore, hole diameters larger than 8 mm, or those weakening the section by 10%, were suggested as the best diameters. In terms of multi-hole crack stopping, a flank hole was not recommended. The optimum horizontal position of flank holes was at a distance of 1/4 of a single hole diameter from, and in front of, the single hole. Besides, the experiment showed that crack stop hole could only prevent cracks from growing and had no influence on crack growth rate.
Cite this article as: FU Zhong-qiu, JI Bo-hai, XIE Shu-hui, LIU Tian-jia. Crack stop holes in steel bridge decks: Drilling method and effects [J]. Journal of Central South University, 2017, 24(10): 2372�C2381. DOI: https://doi.org/ 10.1007/s11771-017-3649-8.
J. Cent. South Univ. (2017) 24: 2372-2381
DOI: https://doi.org/10.1007/s11771-017-3649-8

FU Zhong-qiu(������), JI Bo-hai(������), XIE Shu-hui(��), LIU Tian-jia(������)
College of Civil and Transportation Engineering, Hohai University, Nanjing 210098, China
 Central South University Press and Springer-Verlag GmbH Germany 2017
Abstract: Force analysis using a compact tension model, as recommended by ASTM, was carried out on a crack stop hole. The stress before, and after, drilling the hole was compared in terms of stress concentration and stress gradient. The optimum drilling location and diameter were studied through analysis of different locations and diameters. By analyzing the effects of flank holes and an additional hole, drilling advice was proposed and fatigue testing of the cracks in a steel bridge deck with a crack stop hole was conducted. The results show that the stress at the crack tip with a crack stop hole decreased, and the major principal stress around the hole was distributed accordingly. The optimum position of the crack stop hole centre was where the centre of the crack stop hole was situated behind the crack and the hole edge coincided with the crack tip. Therefore, hole diameters larger than 8 mm, or those weakening the section by 10%, were suggested as the best diameters. In terms of multi-hole crack stopping, a flank hole was not recommended. The optimum horizontal position of flank holes was at a distance of 1/4 of a single hole diameter from, and in front of, the single hole. Besides, the experiment showed that crack stop hole could only prevent cracks from growing and had no influence on crack growth rate.
Key words: steel bridge deck; fatigue crack; stop hole; drilling method; hole position
1 Introduction
Steel bridge decks are widely used for their superior mechanical performance. Fatigue cracks on the deck are easily generated under cyclic vehicle loading because of the complex joint structure details [1, 2]. Practical engineering shows that fatigue cracks exist in steel bridges, especially in steel bridge decks [3]. As fatigue cracks are hard to avoid in steel structures, it is important to conduct maintenance after crack detection. Crack stop holes are a temporary maintenance measure [4], which entails drilling a hole at the crack tip to eliminate the stress concentration, thus the extension of the crack is prevented or postponed and the service life of the structure is prolonged. The crack stop hole is simple to install, and cheap, so it is widely used in the maintenance of metal structures [5, 6].
A crack stop hole was verified as having enhancing the fatigue service life of a structure [7, 8]. The effect of hole diameter on crack arrest behaviour was analyzed by HE et al [9], who proposed a reasonable hole diameter. The effect of hole diameter on the recycled service life of a fatigue crack was also analyzed by SONG and SHIEH [10]. In addition, the crack arrest behaviour is also influenced by the mechanical behaviour of the structure [11], as found by AYATOLLAHI et al [12, 13], who focused on crack arrest behaviour under pure bending and pure shear. As an accurate location of crack tips is required in crack stop hole design, some scholars proposed that the effects of a single stop hole could be enhanced by improvement of hole shape as well as their arrangement. FANNI et al [14] simulated a reasonable stop hole shape in view of optimizing the structural stress. SHIN et al [15] found that it was best to set the flank hole in front of a crack tip. AYATOLLAHI et al [16] believes that the improvement of fatigue service life reached its best when the holes were set vertically and symmetrically on both sides of the crack tip. Besides, MAKABE et al [17] experimentally verified that a stop hole, in the appropriate location, could change the growth direction of a crack when several cracks existed in the material, so as to prevent the joining of several cracks. They also find that different diameters and locations of any additional holes would have an uncertain influence on their crack stopping effects [18�C20].
However, a large number of application problems still remain with crack stop hole techniques used on steel bridges while research from other fields cannot be applied directly. For finding the most reasonable diameter and location of crack stop holes, suggestions from researchers differ: hole diameters range from 6 to 24.5 mm [21]. In addition, a lack of numerical analysis,the multiplicity of parameters, as well as the diversity of loading models pose a challenge confronting crack stop hole design. The standard sample recommended by ASTM [22] was adopted in this research to analyze the behaviour of crack stop holes, which was verified by an experiment involving fatigue cracks on vertical stiffening rib welds in a steel bridge deck.
2 Effect of crack stop hole
2.1 Analysis model
The spatial extent of a steel bridge deck is difficult to simulate. Like many other studies, this model was simplified into planar models. According to the standard samples recommended by American Society for Testing Materials (ASTM), the compact tension model (CT model) in Fig. 1 was adopted for a finite element model. As the model is symmetrical, only half of the model was analyzed. The length of the crack was 50 mm, on the tip of which a crack stop hole was set with a diameter of 6mm. Coinciding with the centre of the hole, lay the crack tip. The modulus of elasticity E=206 GPa and Poisson ratio ��=0.3; the load F=125 kN; the thickness of the plane t=5 mm. The singular element was set in the vicinity of the crack tip in the process of mesh generation while the plane quadrilateral element PLANE183 with eight nodes was used in other regions.
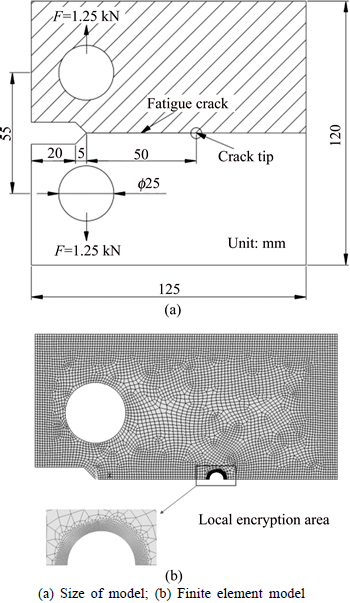
Fig. 1 Analysis model:
The influence of stress concentration on the fatigue strength is decided by the fatigue gap coefficient Kf which represents the decline time of fatigue strength, instead of the stress concentration coefficient Kt, showing the increase of peak stress of the gap. Compared with the stress concentration coefficient, the fatigue gap coefficient takes both geometric condition of any gaps and types of material into consideration.
The crack stopping performance of the hole was assessed by Kt and Kf of the model. Kt and Kf can be obtained, respectively, by Eqs. (1) and (2).
 (1)
(1)
where ��max is the practical maximum stress obtained by calculation; ��nom is the nominal stress obtained by Eq. (3).
 (2)
(2)
 (3)
(3)
where c is a constant related to the material, for steel of type Q345qD, c=0.45; �� is the radius of curvature and diameter of the hole; F is the applied load; W is the width of the model; t is the thickness of the model; and a is the length of the crack.
2.2 Stress concentration
The crack usually grows vertically with the principal stress and is generated from the position where the local stress concentration is maximized, which can be achieved by studying the distribution of stress at the edge of the hole. The major principal stress ��1 around the edge of the hole is calculated (Fig. 2(a)), so is the slope k of the curve, where 0�� is the positive direction of the x-axis.
The distribution of major principal stress in Fig. 2(a) shows that the major principal stress is symmetrical along the hole wall. It decreases as the angle of the tip ranges from 0�� to 180��, and the stress reaches zero from 135�� to 180��. The slope of the curve reaches a minimum at an angle of 70��, which is the inflection point of the curve and the rate of decrease of stress also decelerates. The stress distribution at the edge of the hole is shown in Fig. 2(b): the stress is zero in the quadrant behind the crack tip and it is distributed along the contours shown. The maximum stress, namely MX, occurs at 0��. New fatigue cracks will be generated at this spot under cyclic The growth path of the crack is ascertained by the stress condition in the vicinity of MX. Points along the x-axis near MX have stresses as shown in Fig. 3: the sample is under tension, the value of stress ��y in the Y-direction is much the same as that of the major principal stress ��1 and the value of shear stress ��xy is about zero, while the value of ��x in the X-direction is between that of ��y and ��xy. Therefore, the direction of the major principal stress around MX lies along the Y-axis and crack growth is along the positive X-axis.
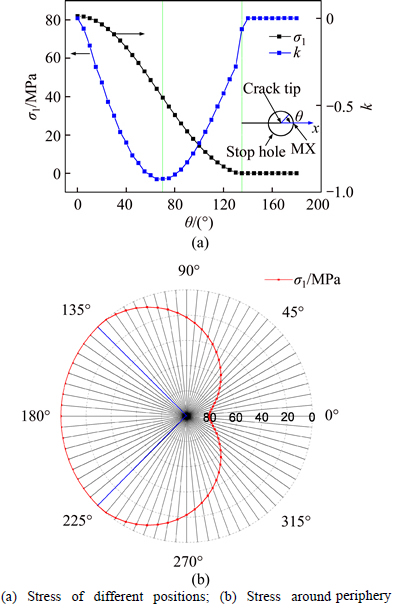
Fig. 2 Major principal stress distribution at edge of crack stop hole:
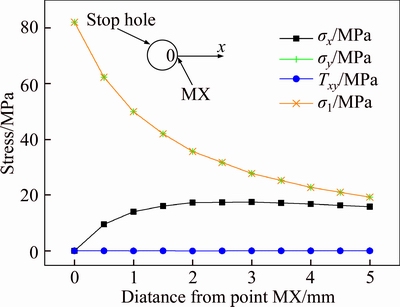
Fig. 3 Stress state in vicinity of a stress concentration
2.3 Stress gradient
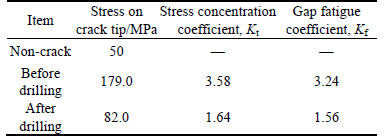
A crack stop hole was set in the path of the crack growth and stress ��y at the crack tip before, and after, drilling, in the y-direction, was substituted into Eq. (1) as ��max, and the calculated results are shown in Table 1. The stress at MX is only 50 MPa without cracks under the same conditions, while local stress increases to 179.0 MPa, showing remarkable stress concentration at the crack tip. The stress amplitude at MX decreases to 82.0 MPa after drilling: the stress at the crack tip falls by 54.2%, relieving this stress concentration.
Table 1 Comparison of mechanical behavior before and after drilling
The stress gradient of ��y before, and after, drilling, in the y-direction and with crack growth, is shown in Fig. 4: the stress was larger in the vicinity of the crack tip than that at a distance from crack tip and the stress concentration is prominent in the crack tip before drilling. Stress within 1 mm of the crack tip after drilling decreases and the stress concentration is relieved, while the stress at 1 mm from the crack tip was slightly larger, showing that crack stop holes eliminate the influence of the plastic zone around a crack tip and result in some stress redistribution. The average stress across the section increases owing to the crack stop hole and all materials working together to bear load. Here, the average stress at 1 mm from the crack tip increased from 11.63 MPa to 13.58 MPa, which is an increase of 16.8%.
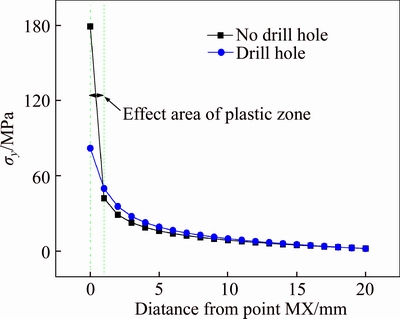
Fig. 4 Stress gradient of ��y before and after drilling
3 Drilling method for a single hole
3.1 Hole position
The first step for drilling is to identify the hole position. The crack tip is the best position for a crack stop hole so its plastic zone can be eliminated completely. However, in practical engineering, the crack tip sometimes extends obliquely along the direction of the plate thickness, thus is difficult to find on the surface. Besides, errors may exist in the drilling. So, the crack stop hole is usually set in front of the crack tip. For crack stop holes with 6 mm diameter, different hole positions were selected to modify the possible conditions that may occur in the process of drilling. The maximum stress ��max, stress concentration coefficient Kt and fatigue gap coefficient Kf were calculated for different positions. The hole position is described by X, which is the distance between the crack tip and centre of the hole (Fig. 5).
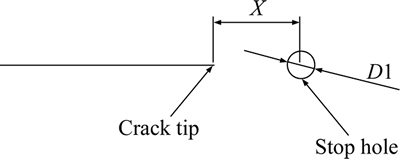
Fig. 5 Schematic of single crack stop hole
The stress corresponding to different hole positions is shown in Table 2 and Fig. 6. For a crack stop hole with 6 mm diameter, when its centre is within 3 mm of both sides of the crack top, i.e., �C3 mm
When the crack stop hole is set behind the crack tip, i.e., X<�C3 mm, the shape of the crack changes while the crack tip still exists. When X=�C4 mm, the instant stress at the crack tip reaches 262.42 MPa, intensifying the stress concentration compared with that without a crack stop hole. When X=�C5 mm, the stress at the crack tip decreases, while it increases gradually with increasing distance between the hole centre and crack tip, tending to 100 MPa.
Table 2 Calculation results of different positions
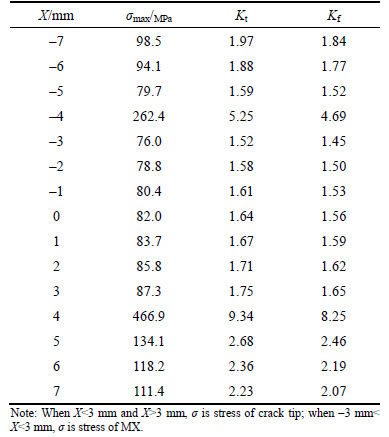
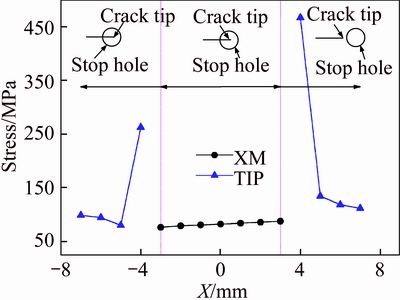
Fig. 6 Stress corresponding to different hole positions
It can be concluded that the crack arrest behaviour is obvious when a crack stop hole is set in an area sensitive to crack tip stress. The optimum hole location is where the crack stop hole was set on the crack and the hole edge coincides with the crack tip. Combined with stress distribution around the hole in front of, and behind, the crack tip, the crack stop hole only decreases the local stiffness of the component, resulting in stress redistribution while the stress concentration of crack tip improves to some extent.
3.2 Hole diameter
The diameter of a crack stop hole should be found after settling on the best hole position. An alignment of the centre of a hole with the crack tip and holes of different diameters were selected. The maximum stress ��max, stress concentration coefficient Kt, and fatigue gap coefficient Kf with different diameters were calculated (Table 3).
Table 3 Stress of MX with different diameters
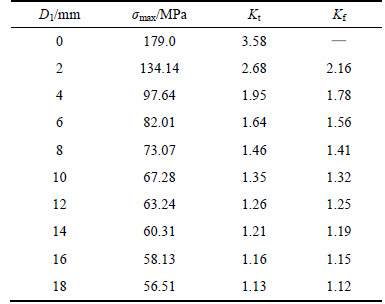
Figure 7 shows stress concentration at different diameters, where k is the slope of the curve showing how ��max changes with diameter. With increasing hole diameter, the stress coefficient Kt at the crack tip decreases and the downward change trend slows. When the hole diameter is greater than 8 mm, the decrease in maximum stress gradually stops, which shows that with increasing hole diameter, the plastic area is gradually eliminated and the effects of plastic deformation are diminished. When the plastic area has been eliminated completely, the stress concentration coefficient is less sensitive to changes in diameter. A crack stop hole can prevent crack growth and extend the fatigue service life of a structure, yet it weakens the stiffness of the section around the hole. Therefore, an excessive hole diameter may result in the destruction of a component of insufficient strength. The rate of section weakening reaches 10% when the hole diameter is 12 mm. If we continue to increase the hole diameter, over-weakening of the section stiffness will cause potential risk of failure of the component, although the stress concentration coefficient at the crack tip decreases. Considering construction errors, a diameter greater than 8 mm, or with 10% section weakening, is proposed here.
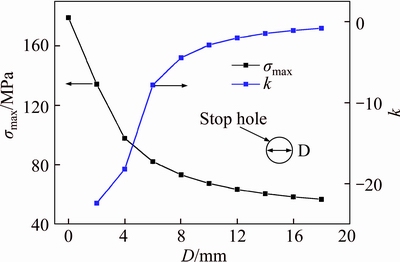
Fig. 7 Stress corresponding to different diameters
4 Drilling method for multiple holes
4.1 Analysis model
A crack stop hole can guide crack growth when set in front of the crack, thus a crack is able to change its growth direction and converge with the hole, preventing crack growth. The larger the diameter of the hole the more its contribution to better crack arrest behaviour, while over-weakening of the section affects the stiffness thereof. In engineering practice, failing to judge the growth path of crack results in the failure of crack stop holes.
Uncertainty at the crack tip causes the probability of a single hole changing the crack growth to be small, so it is more efficient to drilling flank holes and additional holes on both sides of the crack as errors occur in judgment and operation (Fig. 8). Among which, the additional hole is the equal of a single hole and the flank hole.
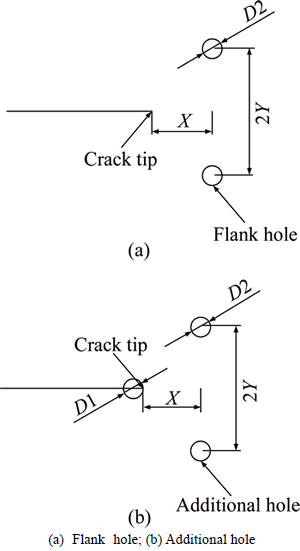
Fig. 8 Drilling method for multiple holes:
4.2 Flank hole
Considering the weakening influence of double holes on the section, the diameters of the flank holes were selected as 4, 5 and 6 mm, and the crack arrest behaviour of different hole positions was analysed (Fig. 9). Here Y is the vertical distance between the position of a flank hole and the crack tip, the upper horizontal line represents the stress concentration coefficient of a crack tip without a crack stop hole; the lower line represents the stress concentration coefficient of a crack tip with an optimally located single hole.
As seen in Fig. 9, when the hole position is set behind the crack (X<0), the stress concentration coefficient of the crack tip is smaller than that without a crack stop hole. With decreasing vertical distance (Y) between the central flank hole and the crack tip, the stress concentration coefficient decreases and the crack arrest behaviour of the flank hole is more obvious. When the hole position is set in front of the crack (X>0), the stress concentration coefficient of the crack tip is larger than that without a crack stop hole: the flank hole thus facilitates crack growth. With a decreased vertical distance between the central flank hole and crack tip, as well as the width of steel plate between the crack tip and flank hole, the stress concentration coefficient increased. Besides, the increase in Y shifted the best hole centre position towards the crack, although this trend was not pronounced.
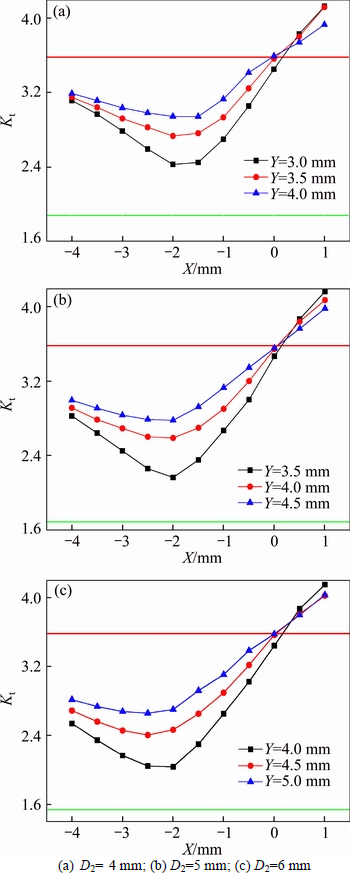
Fig. 9 Stress concentration coefficient of flank hole:
The rigidity of a section is weakened and nominal stress increases as there is certain distance between the position of each flank hole and the crack tip, thus having little influence on the plastic deformation area around the crack tip. As the plastic deformation area around the tip is directly eliminated by a single hole, the stress concentration coefficient of a crack tip with a flank hole is larger than that with a single hole. A single hole behaves better in initial crack arrest mode than a flank hole while a flank hole plays a role in secondary crack arrest.
Figure 10 shows stress concentration coefficients for different hole diameters at Y=4mm. When a flank hole is set behind the crack (X<0), the larger diameter thereof decreases the stress coefficient and provides better crack arrest behaviour. When the flank hole is set in front of the crack (X>0), the stress concentration coefficient increases with the diameter of the flank hole.
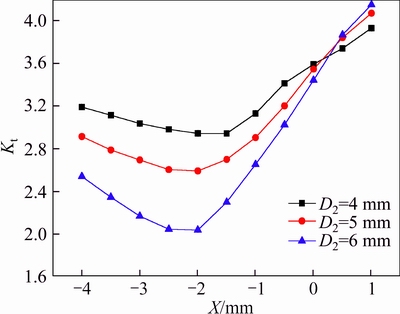
Fig. 10 Stress concentration coefficient of flank holes of different diameters (Y=4 mm)
4.3 Additional hole
In Fig. 8(b), the additional hole set on the crack tip had D1=4 mm and the stress concentration coefficient at the crack tip corresponding to a different diameter D2 of an additional hole is shown in Fig. 11, where the horizontal line represents the concentration coefficient at the crack tip with the optimum single hole position. The values of diameter D2 are small, (3, 4 and 5 mm) for there are three additional holes and section weakening is of greater concern.
As an additional hole actually consists of a single hole and flank hole, the distribution of stress concentration coefficient at the crack tip has both features of single, and flank, holes. As seen in Fig. 11, the stress concentration coefficient of a crack tip with an additional hole is smaller than that with a single hole when the additional hole is set close to, and in front of, the crack tip (X>0), preventing or slowing down the crack growth.
When the additional hole is set far from, and in front of, the crack tip, crack arrest effects are reduced due to section weakening. The crack arrest behaviour of additional holes is more prominent than that of a single hole. With increasing diameter D2, the plastic area of the crack tip is covered by hole D2. When D2 is big enough (Figs. 11(b) and (c)), connectors between additional holes and crack stop holes are cut short, resulting in larger stress concentration coefficients compared with that of a single hole and crack growth through the connectors: this is similar to the crack arrest behaviour of a single hole.
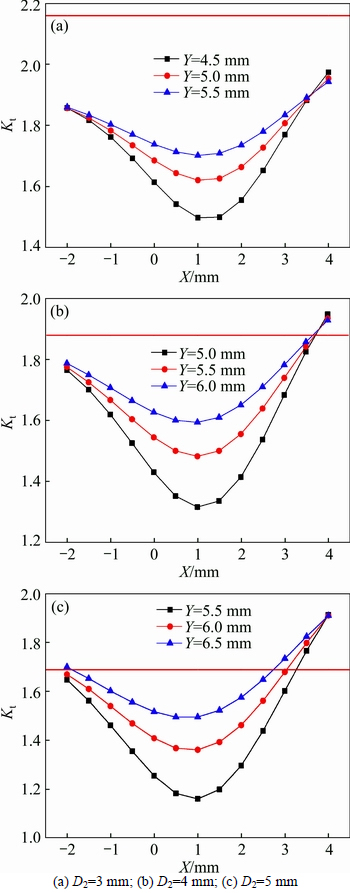
Fig. 11 Stress concentration coefficient for an additional hole:
Figure 12 shows the stress concentration coefficient of an additional hole with different diameters when Y=5.5 m. As seen in Fig. 12, stress concentration coefficients decrease with increasing additional hole diameter, showing more favourable crack arrest behaviour. What differs from a flank hole is that crack arrest behaviour is optimal when the additional hole is set close to and in front of the crack tip (X>0). Combined with Figs. 11 and 12, stress concentration coefficients reached a minimum at X=1 mm (D1/4) and were independent of diameter D2 and vertical distance Y. To explore the link between optimum horizontal position of hole D2 and the value of D1, the stress concentration coefficient for different hole positions at Y=5 mm, D1=D2=4mm; Y=7 mm, D1=D2=6 mm; Y=9 mm, D1=D2=8 mm is shown in Fig. 13.
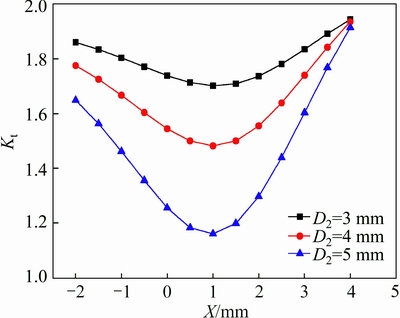
Fig. 12 Stress concentration coefficient with different additional hole diameters (Y=5.5 mm)

Fig. 13 Relationship between additional hole position and crack stop hole diameter
As seen in Fig. 13, the point of minimum stress concentration coefficient (optimum position) moves gradually to the right with increasing additional hole diameter D. Besides, the minimum is in the vicinity of 1.0 mm with D=4 mm, 1.5 mm with D=6 mm and 2 mm with D=8 mm. It can be concluded that the optimum horizontal position of additional holes is at D1/4 from and in front of the single hole.
5 Experimental verification
5.1 Experimental method
It is hard to simulate fatigue cracks in real conditions on a plate deck, thus a crack stop hole was set in samples featuring a real bridge at full-scale to provide a more favourable reference for real bridge application. The fillet weld connecting the steel bridge deck and its vertical stiffener was adopted: both member sizes and welding technology replicated that of the actual bridge (Fig. 14), i.e., special steel Q345qD and a weld foot of 6 mm for all steel fillet welds were used. Fatigue cracks were obtained by fatigue experiment at an early stage with a crack length on both sides of 30 mm.
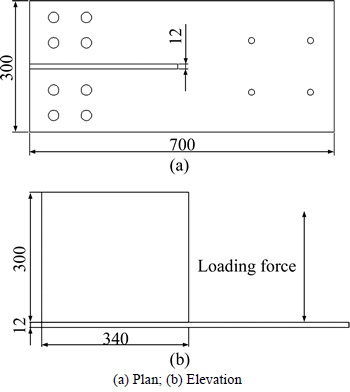
Fig. 14 Specimen size (Unit: mm):
Mechanical vibration fatigue testing was used and after fatigue arresting, fatigue loading was carried out. The cyclic loading provided by the apparatus was sinusoidal. The stress amplitude was 120 MPa.
5.2 Processing of crack arresting
Crack stop holes with different diameters were selected for this crack arrest experiment considering the diversity of crack arrest behaviour of different diameters, among which an additional hole was set in sample SJ5. The central flank hole of the additional hole was set at a distance of D1/4 in front of the single hole. The crack arrest mode of different samples is shown in Table 4. As each crack has two tips, the same processing was carried out on them both. Aligning the edge of the hole with the crack tip, the inner wall and edges were polished by round file and sandpaper after drilling. The crack arrest data are shown in Fig. 15. The crack arrest behaviour of a flank hole was less favourable than that of a single hole according to the analysis above, thus it was overlooked here.
Table 4 Processing way of crack arrest
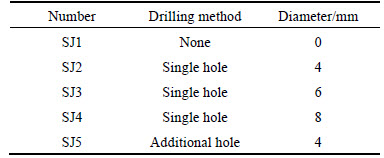
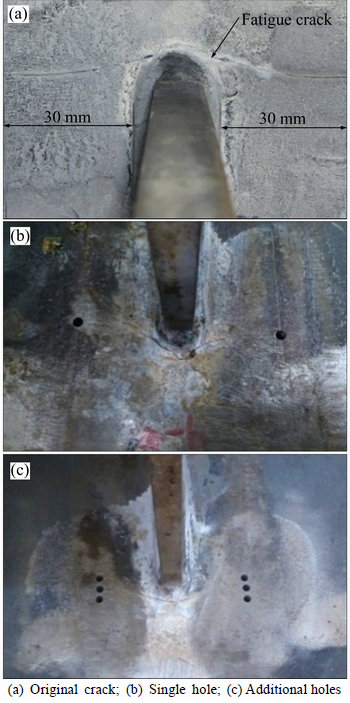
Fig. 15 Drilling method:
5.3 Experimental phenomenon
Crack forms of all samples were reflected by magnetic tester after fatigue loading. Figure 16 shows a cross-sectional view of the sample.
Fatigue cracks in samples SJ1 and SJ2 grew at both sides of the crack stop hole while those in samples SJ3, SJ4, and SJ5 grew at one side of the hole (Fig. 17). In particular, fatigue cracks in sample SJ5, which had an additional hole, were generated at the edge of the additional hole instead of at the crack stop hole or connectors between them. This was because the section at the three holes was weakened to the same extent thus the section far from the load bore more force, leading to crack regeneration.
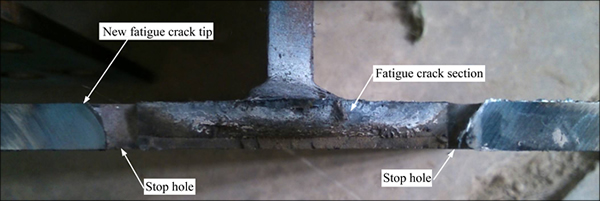
Fig. 16 Cross-sectional view of sample after crack arrest processing
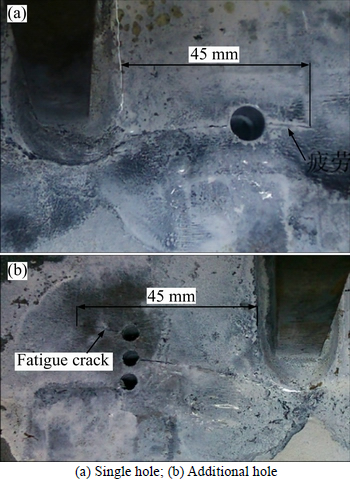
Fig. 17 Crack growth:
5.4 Discussion
Cycle times for fatigue loading corresponding to regeneration, 5 mm, and 15 mm of crack growth were recorded (Table 5). The total length of crack growth was 45 mm.
Table 5 Loading cycle times corresponding to growth of cracks (��100)

As seen in Table 5, the cycle times for crack regeneration increased with increasing hole diameter in SJ2, SJ3, and SJ4, thus extending their fatigue life. This verified the conclusion above, i.e., the larger diameter crack stop holes prevented cracks from growing and provided better crack arrest behaviour. The cycle time of sample SJ5 was 3.6 times that of sample SJ1 without additional holes when the crack grows to as much as 15 mm, showing the benefit of the additional hole.
We divided the process of crack growth into two stages: crack growth from regeneration to 5 mm-long, and that from 5 mm-long to 15 mm-long. The growth rate of each stage is shown in Table 6.
Table 6 Crack growth rate in two stages (10�C8m/C)
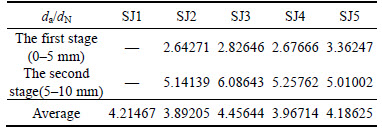
As seen in Table 6, crack growth rates in both stages were in the 10�C8m/C order of magnitude, namely, a moderate rate. The crack growth rate in the second phase is much larger than that in the first stage. The average rate of crack growth was similar for both stages, i.e., crack stop holes can only prevent cracks from growing, yet have little influence on their growth rate after regeneration.
6 Conclusions
1) The major principal stress around crack stop holes had a symmetrical distribution around the hole circumference and that in front of the crack tip reached its maximum under loading normal to the direction of crack growth. Stress in the vicinity of the crack tip decreased significantly while the average stress on sections far from the crack tip increased upon insertion of a crack stop hole.
2) Covering the crack tip by a crack stop hole could reduce the stress concentration, and vice versa. The optimum hole position, causing the maximum decrease in stress concentration coefficient, was where the centre of the crack stop hole was situated behind the crack and the hole edge coincided with the crack tip.
3) With increasing crack stop hole diameter, the stress concentration at the crack tip was reduced significantly and the cyclic service life was enhanced while the trend of stress concentration decline decelerated. Considering the negative effects of section weakening and construction error, diameters larger than 8 mm, or with 10% section weakening, were proposed.
4) In terms of multi-hole crack stopping methods, the behaviour of flank holes was not as pronounced as that of a single hole and its effect on the crack tip, thus was not suggested. For additional holes, which consisted of both single, and flank, holes, an increasing hole diameter resulted in a smaller stress concentration coefficient and more favourable crack arrest behaviour. The optimum horizontal position for flank holes was at a distance of a quarter of the single hole diameter from, and in front of, the single hole.
5) The experiment showed that a crack stop hole could only prevent cracks from growing. The crack growth rate at later stages was faster than that in the earlier stage after regeneration. Thus a crack stop hole, and the manner of its insertion, had no influence on crack growth rate.
References
[1] MIKI C. Fatigue damage in orthotropic steel bridge decks and retrofit works [J]. International Journal of Steel Structures, 2006, 6(4): 255�C267.
[2] CONNOR R J, FISHER J W. Results of field measurements on the williamsburg bridge orthotropic deck-final report [R]. Bethtehem, PA: Lehigh University, 2001.
[3] FISHER J W, ROY S. Fatigue of steel bridge infrastructure [J]. Structure and Infrastructure Engineering, 2011, 7(7): 457�C475.
[4] CHOI J H, KIM D H. Stress characteristics and fatigue crack behaviour of the longitudinal rib-to-cross beam joints in an orthotropic steel deck [J]. Advances in Structural Engineering, 2008, 11(2): 189�C198.
[5] MAKABE C, KAITO N, FERDOUS M S. Method of arresting crack growth for application at a narrow working space [J]. Mechanical Engineering Journal, 2014, 1(6): 1�C12.
[6] WANG Yi-lin, PAN Qing-lin, WEI Li-li, LI Bo, WANG Ying. Fracture toughness and fatigue crack growth analysis of 7050-T7451 alloy thick plate with different thicknesses [J]. Journal of Central South University, 2014, 21(8): 2977�C2983.
[7] WU H, IMAD A, BENSEDDIQ N, CASTRO J T P D, MEGGIOLARO M A. On the prediction of the residual fatigue life of cracked structures repaired by the stop-hole method [J]. International Journal of Fatigue, 2010, 32(4): 670�C677.
[8] CRAIN J S, SIMMONS G G, BENNETT C R, BARRETT- GONZALEZ R, MATAMOROS A B, ROLFE S T. Development of a technique to improve fatigue lives of crack-stop holes in steel bridges [J]. Transportation Research Record: Journal of the Transportation Research Board, 2010, 2200: 69�C77.
[9] HE Shu-yun, CHEN Li-jun, DU Hong-zeng. Effectiveness varying in dimension of crack-stopping holes [J]. Journal of Civil Aviation University of China, 2004, 22(3): 29�C31. (in Chinese)
[10] SONG P S, SHIEH Y L. Stop drilling procedure for fatigue life improvement [J]. International Journal of Fatigue, 2004, 26(12): 1333�C1339.
[11] YA S, YAMADA K, ISHIKAWA T. Fatigue evaluation of rib-to-deck welded joints of orthotropic steel bridge deck [J]. Japan Bridge Engineering, 2011, 16(4): 492�C499.
[12] AYATOLLAHI M R, RAZAVI S M J, CHAMANI H R. Fatigue life extension by crack repair using stop-hole technique under pure mode-I and pure mode-II loading conditions [J]. Procedia Engineering, 2014, 74: 18�C21.
[13] AYATOLLAHI M R, RAZAVI S M J, YAHYA M Y. Mixed mode fatigue crack initiation and growth in a CT specimen repaired by stop hole technique [J]. Engineering Fracture Mechanics, 2015, 145: 115�C127.
[14] FANNI M, FOUDA N, SHABARA M A N, AWAD M. New crack stop hole shape using structural optimizing technique [J]. Ain Shams Engineering Journal, 2015, 6(3): 987�C999.
[15] SHIN C S, WANG C M, SONG P S. Fatigue damage repair: a comparison of some possible methods [J]. International Journal of fatigue, 1996, 18(96): 535�C546.
[16] AYATOLLAHI M R, RAZAVI S M J, CHAMANI H R. A numerical study on the effect of symmetric crack flank holes on fatigue life extension of a SENT specimen [J]. Fatigue & Fracture of Engineering Materials & Structures, 2014, 37(10): 1153�C1164.
[17] MAKABE C, MURDANI A, KUNIYOSHI K, IREI Y, SAIMOTO A. Crack-growth arrest by redirecting crack growth by drilling stop holes and inserting pins into them [J]. Engineering Failure Analysis, 2009, 16(1): 475�C483.
[18] MURDANI A, MAKABE C, SAIMOTO A, IREI Y, MIYAZAKI T. Stress concentration at stop-drilled holes and additional holes [J]. Engineering Failure Analysis, 2008, 15(7): 810�C819.
[19] MURDANI A, MAKABE C, SAIMOTO A, KONDOU R. A crack-growth arresting technique in aluminum alloy [J]. Engineering Failure Analysis, 2008, 15(4): 302�C310.
[20] MURDANI A, MAKABE C, SAIMOTO A, MIYAZAKI T, KONDOU R. A new proposal for retarding fatigue crack reinitiation and growth from crack-tip introduced stop-drilled hole by providing additional holes [J]. Journal of the Society of Materials Science Japan, 2007, 56(12): 1139�C1144. (in Japanese)
[21] ISHIKAWA T, MATUMOTO R, HATTORI A, KAWANO H, YAMADA K. Reduction of stress concentration at edge of stop hole by closing crack surface [J]. Journal of the Society of Materials Science, 2013,62(1): 33�C38. (in Japanese)
[22] ASTM E2472-06. Standard test method for determination of resistance to stable crack extension under low constraint conditions [S]. 2007.
(Edited by HE Yun-bin)
Cite this article as: FU Zhong-qiu, JI Bo-hai, XIE Shu-hui, LIU Tian-jia. Crack stop holes in steel bridge decks: Drilling method and effects [J]. Journal of Central South University, 2017, 24(10): 2372�C2381. DOI: https://doi.org/ 10.1007/s11771-017-3649-8.
Foundation item: Projects(51278166, 51478163) supported by the National Natural Science Foundation of China; Project(2015B17414) supported by the Fundamental Research Funds for the Central Universities, China
Received date: 2015-12-14; Accepted date: 2016-05-11
Corresponding author: FU Zhong-qiu, PhD, Associate Professor; Tel: +86�C25�C83786633; E-mail: fumidaut@163.com

