
Amorphization of Fe38Ni30Si16B14V2 surface layers by laser cladding
ZHU Qing-jun(朱庆军), WANG Xin-hong(王新洪), QU Shi-yao(曲仕尧), ZOU Zeng-da(邹增大)
School of Materials Science and Engineering, Shandong University, Ji’nan 250061, China
Received 21 May 2007; accepted 23 August 2007
Abstract: Fe38Ni30Si16B14V2 amorphous composite coatings were fabricated by laser cladding on AISI 1045 steel in order to increase the wear resistance. The phase and microstructure of the coatings were analyzed by X-ray diffractometry and transmission electron microscopy. The wear properties of the coatings were also investigated by means of sliding wear test. The results show that the coating consists of amorphous phase in majority and nanocrystalline phase in minority. The amorphous coatings can be obtained while the scanning speed is 3 500 mm/min and the laser power is 4.8 kW. With increase of the laser power, the amorphous phase in the coating increases when it is lower than 4.8 kW. A gradient distribution of the microhardness ranges from Hv0.2 1 208 to Hv0.2 891 in the coating from top surface of the coating to the substrate. The amorphous coating is found to possess better property of wear than AISI 1045 steel substrate.
Key words: amorphization; laser cladding; wear resistance
1 Introduction
It is well known that the amorphous alloys have excellent wear resistance in a variety of environments. Among them, Fe-based amorphous alloys have promising application prospects not only for their excellent physical, chemical and mechanical properties, but also for the cheapness of the materials[1-4]. However, different from other bulk metallic glasses(BMGs), such as Zr-based[5], Pd-based[6] and Mg-based[7] BMGs, their critical cooling rate, glass forming ability(GFA) and toughness are poor, which restricts their further utilization[8].
Laser cladding is a promising way to modify the surface properties of metallic machine parts locally. Materials with excellent properties can be bonded to a low-cost substrate by means of laser cladding. The rate of dilution can be controlled as small as possible to utilize the performance of the coating materials effectively. Therefore, it is useful to coat an amorphous composite layer on a massive crystalline material by laser cladding. Since the amorphous coating prepared by laser cladding was first reported by YOSHIOKA et al in 1987[9], it has been reported that various alloys had been cladded on different substrates[10-14]. At the same time, it can be seen that the much cheaper Fe- and Cu-based BMGs were the most recently developed and had attracted extensive interests[15]. However, there is a lack of Fe-based amorphous alloys cladded on carbon steel and a limited application of this process is updated in the literature.
In this work, an attempt has been made to explore the feasibility of preparing Fe-Ni-Si-B-V amorphous composite coating on AISI 1045 steel by laser cladding.
2 Experimental
AISI 1045 steel with size of 50 mm?20 mm?10 mm was used as substrate. The samples were polished with waterproof abrasive paper and cleaned with acetone carefully before laser cladding. The grain size and purity of Fe, Ni, Si, B and V were in the ranges from 75 μm to 150 μm and from 98.5% to 99.99% (mass fraction), respectively. The nominal composition of the alloy was Fe38Ni30Si16B14V2. Before cladding, the powders were mixed evenly. The mixed powders were pre-placed onto the specimen surface homogeneously using waterglass. The thicknesses of the pre-placed coatings were about 1 mm. And then, the samples were dried by electric hair dryer.
The coatings were cladded by 5 kW continuous CO2 laser processing equipment (HL-T5000). The laser processing was divided into three sections. Firstly, the coatings were melted on the substrate. In this section, the fusion power was 2 kW and the scanning velocity was 300 mm/min, and the laser beam diameter was 3mm. Secondly, the coatings were re-melted while the laser power was 2.5 kW and the scanning velocity was 600 mm/min. At last, the values of laser power, laser beam diameter and scanning speed were 3.500-5.0 kW, 2 mm, and 3 500 mm/min, respectively. During the cladding, surface oxidation was prevented by pure argon with the flow rate of 25 L/min.
The amorphous composite coatings were classified by X-ray diffractometry(XRD). The microstructures of the coatings were identified with H-800 transmission electron microscopy(TEM). Vickers hardness tester (MH-6) was used to measure the microhardness of the coatings. The wear resistance of the coatings was tested by M-2000 abrasive tester with a normal load of 49 N.
3 Results and discussion
3.1 Phase structure of coating
Fig.1 shows the XRD pattern of the superficial coating at a distance of 0.4 mm away from the top surface of the coating. The coating was prepared under the condition that the laser power and the scanning speed were 4.8 kW and 3 500 mm/min, respectively. A broad diffraction peak appearing at 2q equal to 42?-48? indicates the presence of an amorphous phase. Although the diffraction peaks corresponding to the crystalline phase is feeble, the XRD pattern is not a perfect amorphous one. This means the coating is composed of amorphous phase in majority and crystalline phase in minority.
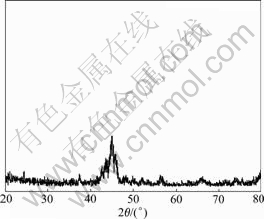
Fig.1 XRD pattern of laser cladded superficial coating
Fig.2(a) shows the TEM image of the region at the middle of the laser cladded coating. The microstructure indicates the specific characteristic of the amorphous phase. Fig.2(b) shows the selected area diffraction pattern(SADP) of the coating. The pattern indicates that amorphous phase exists in the coating. In addition, it can be found that few nanocrystalline grains embed on amorphous phase, marked as A in Fig.2(a). All of these show the nanocrystalline phase is co-existed with the amorphous phase in the coating. The priority phase in the coating is amorphous phase. This means crystalline cannot be suppressed totally in laser cladding.
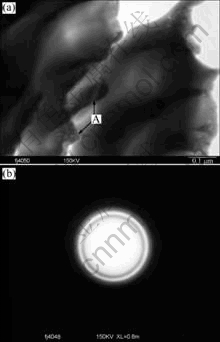
Fig.2 TEM image(a) and corresponding SAD pattern(b) of laser cladded coating (A is nanocrystalline grains)
3.2 Influence of laser power on amorphization
Fig.3 shows the XRD patterns of the laser cladded superficial coatings. The laser powers were 3.5, 4.0, 4.5, 4.8 and 5.0 kW, respectively. All of these coatings were developed under a fixed scanning speed and laser beam diameter. From Fig.3, we can see that the amorphous phase in the coatings increases with the laser power increasing when the laser power is lower than 4.8 kW. When the parameter is 3.5 kW, diffraction peaks corresponding to crystalline phases are apparent and the broad diffraction peak is small, which indicates that the coating is composed of crystalline phases basically. The crystalline phase couldn’t be compressed no matter how to alternate the scanning speed. When the laser power increases to 4.0 kW, the layer still keeps its crystalline structure and the two main diffraction peaks are still imposed on the broad diffraction peak. However, when the laser power is 4.7 kW, the two main diffraction peaks become weaker and a small broad halo peak can be seen at 2q=42?-48?. The coatings are composed of crystalline phase in majority and amorphous phase in minority. Most important, the layers consist of amorphous phase basically when the laser power is 4.8 kW. As can seen from Fig.3, diffraction peaks corresponding to crystalline are very weak and the broad halo peak is evident. However, this tendency does not go on. When the laser power is 4.9 kW or 5.0 kW, the diffraction peaks of crystalline boost again, which states the coatings begin to crystallize once more.
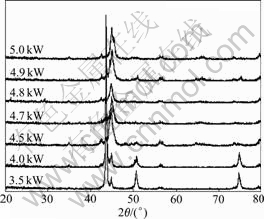
Fig.3 Influence of laser power on amorphization
When the laser power is lower than 4.0 kW, the laser power can’t melt the powders timely. Low power densities result in heterogeneous nucleation, which provides phase fluctuation and energy fluctuation in supercooled fused mass. This will depress the glass forming ability(GFA) of the amorphous alloys. Only when the laser power is high enough to melt all of the pre-coated powders and give the molten pool a uniform composition, can the amorphization bring into effect. With the laser power increasing, the interval between the maximum temperature and the liquid line becomes larger. This gives the molten pool sufficient time to achieve homogeneity. When the liquid bath begins to solidify, the homogeneous pool will freeze to amorphous phase under high cooling rate.
On the other hand, exorbitant laser power densities do not agree with this trend. For example, as seen in Fig.3, when the laser power is 5.0 kW, the amorphous phase in the coatings decreases. If the laser power is too high, the molten pool and the substrate metal will be over-melted. This follows a high rate of dilution and deviation of the amorphous alloys from eutectic composition, and will tarnish the GFA of the amorphous alloys and increase the crystalline nucleation in the molten pool.
3.3 Microhardness of coating
Fig.4 shows the microhardness of the amorphous composite coating from the top surface of the coating to the substrate. Each of the data points in Fig.4 is the average of five measurements. A gradient distribution of the microhardness can be seen ranging from Hv0.2 891 to 1 208 in the coating. The middle zone of the coating reveals the highest hardness value. It is also seen from Fig.4 that the value of microhardness in the coating increases from Hv0.2 1 177 at the surface to Hv0.2 1 208 in the middle. This indicates that the amorphous phase is concentrated in this area and reveals higher microhardness. On the contrary, the area near the substrate is diluted by the matrix. Therefore, this area shows lower microhardness than the middle of the coating and the value of microhardness decreases along the depth.
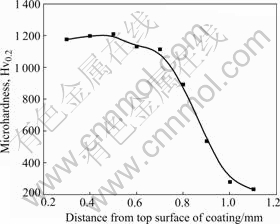
Fig.4 Variation of microhardness with depth
3.4 Wear resistance of coatings
Fig.5 shows the variation of the wear volume loss of the coating with the sliding time. The abrasive wear property is different obviously between the coatings and the substrate. It can be found that the wear volume loss of the coating is lower than that of the substrate because of the existence of the amorphous phase and nanocrystalline phase, which benefits the resistance of abrasion of the coating.
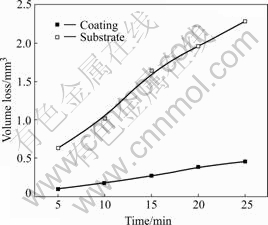
Fig.5 Wear property of coating
Fig.6 shows the worn surface of the substrate and the coating. In Fig.6(a), it can be seen that some peel holes, adhesive zone and ploughed grooves formed on the substrate during the friction process. In the course of friction, the cracks originate and expand in weak spots and result in the formation of some peel holes. As a result, some of the hard rubbish participate in the wear process and act as wear particles. Abrasive wear and adhesive wear co-exist in the worn scar. However, in Fig.6(b), the amorphous phase in the coatings is disadvantageous to peeling wear. The wear track of the coating reveals pits and grooves. In the course of test, the pits result from the disengaging of the micro-particles from the surface. Compared with the substrate, the adhesive wear is feeble in the coating and the ploughed grooves are much lighter. That is, the coating shows more excellent properties of wear resistance than the substrate.
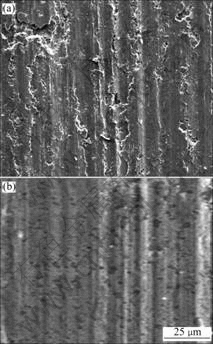
Fig.6 Morphologies of worn surface: (a) Substrate; (b) Coating
4 Conclusions
1) Fe38Ni30Si16B14V2 amorphous composite coatings can be cladded on AISI 1045 steel by laser processing. The coatings are composed of amorphous phase and nanocrystalline phase.
2) The suitable laser power, scanning speed and laser beam diameter of fabrication of Fe38Ni30Si16B14V2 amorphous composite coatings are 4.8 kW, 3 500 mm/min and 2 mm, respectively.
3) The amorphous composite coating reveals high microhardness of Hv0.21 208 and the maximum value is in the middle of the coating. The layers show lower wear volume loss than the substrate.
References
[1] WILLIAM L J. Bulk metallic glasses―A new engineering material [J]. Solid State & Materials Science, 1996, 1: 383-386
[2] INOUE A, ZHANG T, TAKEUCHI A. Bulk amorphous alloys with high mechanical strength and good soft magnetic properties in Fe-TM-B (TM=IV-VIII group transition metal) system [J]. Appl Phys Lett, 1997, 71: 464-466.
[3] JOSEPH P S, SHIFLET G J, GUO F Q, PONNAMBALAM V. Glass formability of ferrous- and aluminum-based structural metallic alloys [J]. Journal of Non-Crystalline Solids, 2003, 317: 1-9.
[4] INOUE A, SHEN B L, CHANG C T. Super-high strength of over 4000 MPa for Fe-based bulk glassy alloys in [(Fe1-xCox)0.75B0.2Si0.05]96Nb4 system [J]. Acta Materialia, 2004, 52: 4093-4099.
[5] ZHANG Ke-qin, LU Qi-zhu. Deformation of Zr41Ti14Cu12.5Ni10Be22.5 bulk amorphous alloy under isobaric pressure in super-cooled liquid region [J]. Trans Nonferrous Met Soc China, 2005, 15(3): 612-614.
[6] PU Jian, WAN Jian-feng, XIAO Jian-zhong, CUI Kun. Formation and crystallization of bulk Pd82Si18 amorphous alloys [J]. Trans Nonferrous Met Soc China, 2003, 13(5): 1056-1061.
[7] KIM S G, INOUE A, MOSUMOTC T. High mechanical strengths of Mg-Ni-Y and Mg-Cu-Y amorphous alloys with significant supercooled liquid region [J]. Mater Trans JIM, 1990, 31: 929-934.
[8] L?FFLER J F. Bulk metallic glasses [J]. Intermetallics, 2003, 11: 529-540.
[9] YOSHIOKA H, ASAMI K, KAWASHIMA A, HASHIMOTO K. Laser-processed corrosion-resistant amorphous Ni-Cr-P-B surface alloys on a mild steel [J]. Corrosion Science, 1987, 27: 981-995.
[10] WANG Yan-fang, LI Gang, WANG Cun-shan, XIA Yuan-liang, SANDIP B, DONG Chuang. Microstructure and properties of laser clad Zr-based alloy coatings on Ti substrates [J]. Surface and Coatings Technology, 2004, 176: 284-289.
[11] WU Xiao-lei, HONG You-shi. Fe-based thick amorphous-alloy coating by laser cladding [J]. Surface and Coatings Technology, 2001, 141: 141-144.
[12] CARVALHO D, CaRDOSO S, VILARB R. Amorphisation of Zr60A115Ni25 surface layers by laser processing for corrosion resistance [J]. Scripta Matcrialia, 1997, 31: 523-527.
[13] YUE T M, SU Y P, YANG H O. Laser cladding of Zr65Al7.5Ni10Cu17.5 amorphous alloy on magnesium [J]. Materials Letters, 2007, 61: 209-212.
[14] WU X, XU B, HONG Y. Synthesis of thick Ni66Cr5Mo4Zr6P15B4 amorphous alloy coating and large glass-forming ability by laser cladding [J]. Materials Letters, 2002, 56: 838-841.
[15] WANG W H, DONG C, SHEK C H. Bulk metallic glasses [J]. Materials Science and Engineering R, 2004, 44: 45-89.
Foundation item: Project(20060422020) supported by the Research Fund for the Doctoral Program of Higher Education; Projects(06GG3204015, 06GG3203009) supported by the Development Program of Shandong Province, China
Corresponding author: WANG Xin-hong; Tel: +86-531-88392208; E-mail: xinhongwang@sdu.edu.cn
(Edited by YANG Bing)