J. Cent. South Univ. Technol. (2011) 18: 711-717
DOI: 10.1007/s11771-011-0752-0
Development of analysis model for geometric error in turning processes
LEE Mun-jae, LEE Choon-man
Department of Mechanical Design and Manufacturing Engineering, Changwon National University,
Changwon 641-773, Korea
? Central South University Press and Springer-Verlag Berlin Heidelberg 2011
Abstract: A finite element model was established for analyzing the geometric errors in turning operations and a two-step analyzing process was proposed. In the first analyzing step, the cutting force and the cutting heat for the cutting conditions were obtained using the AdvantEdge. Also, the deformation of a workpiece was estimated in the second step using the ANSYS. The deformation was analyzed for a 150 mm-long workpiece at three different measuring points, such as 10, 70 and 130 mm from a reference point, and the amounts of the deformation were compared through experiments. In the results of the comparison and analysis, the values obtained from these comparison and analysis represent similar tendencies. Also, it is verified that their geometric errors increase with the increase in temperature. In addition, regarding the factors that affect the deformation of a workpiece, it can be seen that the geometric error in the lathe is about 15%, the error caused by the cutting force is about 10%, and the deformation caused by the heat is about 75%.
Key words: geometric error; machining accuracy; finite element analysis; turning; cutting force, cutting temperature
1 Introduction
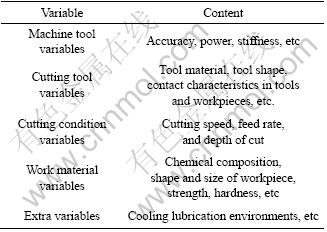
Machining errors that degrade the quality of turning workpieces are largely related to geometric errors in machining tools, thermal deformation errors, and deformation errors in tools caused by cutting force. In general, the machining errors can be considered by dividing them into dimension errors, geometric errors, and surface roughness. In particular, the structural deformation caused by the geometric error and cutting force of the composition elements in machining tools largely affects the dimensional and shape accuracies. For achieving precise cutting, it is necessary to verify the effects of the variables in machining tools, cutting conditions, and machining workpieces on such dimensional and shape accuracies and surface roughness. Table 1 lists the variables that affect the machinability where some cutting conditions, such as cutting speed, feed rate, and depth of cut, directly affect the machining errors. Thus, it is necessary to evaluate the machinability according to the change in the cutting conditions. Studies on the evaluation of the machinability have been conducted using some methods through investigating the cutting force, the shape of chips, the cutting temperature and the tool wearing generated during a cutting process [1-6]. Recently, lots of studies on the estimation of the temperature distribution, cutting force and residual stress in workpieces and tools caused by the plastic deformation and frictional heat during a cutting process have also been conducted through a finite element method [7-17].
Table 1 Variables affecting machinability
However, most of these studies have been focused on the cutting process itself, and there are few studies on the change in actual depth of cut caused by the relative deformation in a workpiece and tools that have a direct relation to the machinability. In the previous study [18], the deformation generated by the cutting force was estimated using empirical equations. However, it was difficult to accurately measure the errors due to the use of a shape tester in experiments and could not provide a thermal deformation analysis model.
Therefore, the objective of this study is to estimate the amount of deformation in a workpiece by establishing a finite element analysis model that is able to estimate the cutting force, cutting heat and tool temperature distribution according to the change in cutting conditions for the material of Al6061. Thus, the errors were measured using a three-dimensional coordinate measuring machine. Also, it was attempted to verify the reliability of the finite element analysis model by comparing the experimentally obtained values with the estimated values. Moreover, the influence of the cutting force and cutting heat on the total amount of deformation was analyzed.
2 Finite element analysis
In this study, the following two analysis steps were considered in order to estimate the deformation caused by the cutting force and cutting heat generated in the Al6061 turning operation.
Step 1: The temperature distribution and cutting force at a cutting face are estimated using a commercial cutting analysis program, AdvantEdge.
Step 2: The deformation of a workpiece in the ANSYS is estimated using the temperature distribution and cutting force obtained in Step 1.
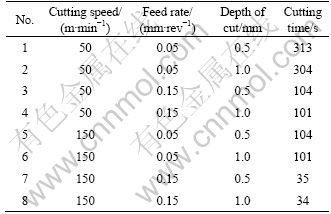
The experiment was configured as a level-two class by configuring the cutting speed, feed rate and depth of cut as experimental factors for the finite element analysis.
Table 2 lists the machining conditions for computation and experiment.
Table 2 Machining conditions for computation and experiment [7]
2.1 Step 1
A commercial cutting analysis program, AdvantEdge, was used to perform the 3D turning operation analysis. The cutting tool used in the analysis was a carbide insert with the nose radius of 0.4 mm.
Figure 1 shows the results of the analysis of computational temperature distribution for the machining condition No.2 (50 m/min, 0.05 mm/rev, and 1 mm). The highest temperature was 519 °C and presented at the end of the tool. Also, it was verified that most of cutting heat was dissipated through chips.
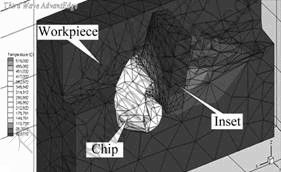
Fig.1 Computational temperature distribution of machining condition No.2
Figure 2 shows the cutting force for the machining condition No.2. As shown in Fig.2, Force-X, Force-Y, and Force-Z represent the principal force, radial force, and feeding force, respectively. Table 3 represents the results of the analysis of cutting force for each machining condition. It is shown that the cutting force decreases with the increase in the cutting speed. It can be seen that the discharge of chips becomes easy due to the decrease in the tensile force of a workpiece with the increase in the cutting speed of processing, and the cutting force decreases as a built-up-edge, which is largely generated in the cutting processing of aluminum, decreases significantly in high-speed processing.
Figure 3 illustrates the highest temperature at the end of the tool. It is shown that the highest temperature shows a high level with the increase in depth of cut and feed rate and decreases with the increase in cutting speed.
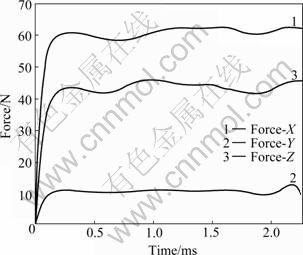
Fig.2 Results of variation in cutting forces
Table 3 Cutting forces by computation
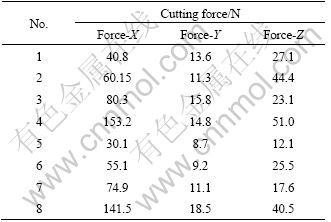
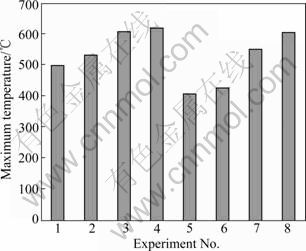
Fig.3 Maximum temperature in each cutting condition
2.2 Step 2
The analysis of the amount of deformation was performed in the ANSYS using the cutting force and temperature obtained in Section 2.1.
Figure 4 shows the diagram of the turning operation. The motion of the turning operation can be classified as the rotational motion of a workpiece in a spindle system and the tool feeding to the spindle. The cutting speed along the tangential direction can be determined by the rotational speed and diameter of a workpiece. The area of the machining face can be determined by the feed rate and depth of cut, as shown in Fig.4. In this study, the analysis is implemented by assuming that the cutting force and temperature are input through the area of the machining face of a workpiece.
Figure 5 shows the finite element model with 171 124 nodes and 47 693 elements. As shown in Fig.5, the workpiece used in the analysis is determined to have a diameter of 33 mm and a length of 150 mm. The amounts of deformation are obtained at three measuring points, such as 10, 70, and 130 mm from the starting point of the cutting.
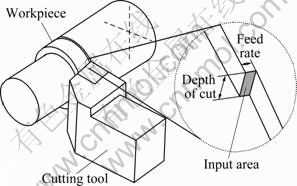
Fig.4 Turning of cylindrical workpiece
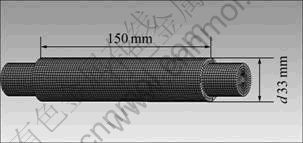
Fig.5 Finite element model of workpiece
Based on the temperature data obtained in Section 2.1, a transient thermal analysis was performed. Heat was applied to the machining area according to the feed rate and depth of cut for each determined cutting time for the measuring points of 10, 70, and 130 mm from the reference point in which the gravity was applied to the entire workpiece. Because both ends of the workpiece were fixed by chucks and tailstocks, the constraint condition was applied to the both ends for preventing some rotations and movements.
Figure 6 shows the amount of deformation at the point of 130 mm from the reference point for the machining condition No.4. Table 4 represents the results of the analysis of deformation for each machining condition. The largest amount of deformation is recorded at the point of 130 mm. It is also considered that the thermal deformation increases with the increase in cutting time.
2.2.1 Verification analysis of heat input area
The verification analysis for an analysis model in which the temperature is input through a machining area was performed. It is difficult to measure the temperature of a workpiece directly because the workpiece is rotated during the machining process. Thus, the results of the analysis of a tool, which applies an analysis model, are compared with the results of the measurement of the temperature of the tool [18].
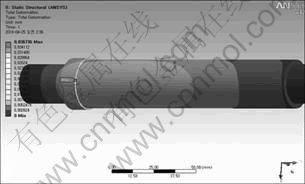
Fig.6 Deformation distribution of workpiece
Table 4 Computational deformations
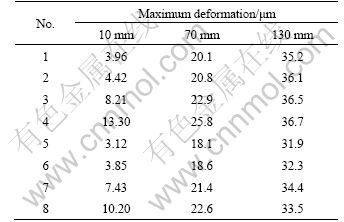
Figure 7 shows the heat input area of the tool. A transient thermal analysis was performed, and the temperature distribution of the AdvantEdge was applied as a heat input condition for the cutting time in each machining condition. The initial temperature was 11.5 °C, and the convection condition was applied for the entire tool. Figure 8 represents the results of the analysis of the temperature distribution for the machining condition No.8. As shown in Fig.8, the temperature estimation is implemented at point 3 of the tool holder.
Fig.9 shows the estimated temperature at each measuring point for machining condition. By comparing it with the experimental results [18], the error is about 10% maximum. It can be seen that the analysis model represents the reliability in the results.
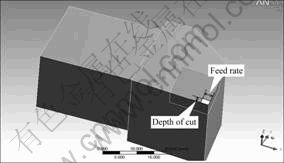
Fig.7 Heat input area of tool holder
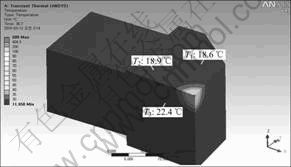
Fig.8 Temperature distribution of tool holder
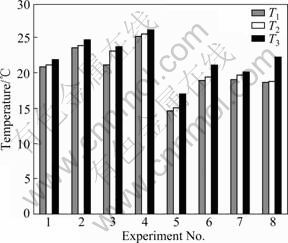
Fig.9 Computational temperature in each condition
3 Estimation of deformation of workpiece
The deformations caused by the cutting force and heat were estimated based on the results of the analysis performed in Section 2. In the previous study [18], the amount of deformation caused by the radial force was obtained using the empirical equations of a workpiece.
In this study, the deformation caused by the cutting force was obtained using a finite element analysis. For the finite element model presented in Fig.5, the analysis was performed by considering the cutting force only except for the temperature at the measuring points of 10, 70 and 130 mm from the reference point. Also, both ends of the workpiece were fixed, and the cutting force estimated by using the AdvantEdge was input as a load condition.
Figure 10 shows the results of the analysis of the amount of deformation for the machining condition No.2 (50 m/min, 0.05 mm/rev, and 1 mm). The maximum deformation at the point of 70 mm is 2.79 μm and generated at the contact point of the tool.
Figure 11 shows the amount of deformation in a workpiece caused by the cutting force. The deformation increases with the increase in cutting force. In all machining conditions, the largest deformation is measured at the point of 70 mm. Figure 12 shows the amount of deformation caused by heat except for the deformation caused by the cutting force in the whole deformation listed in Table 4. Also, the deformation increases with the increase in temperature.
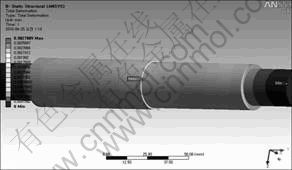
Fig.10 Deformation distribution of workpiece
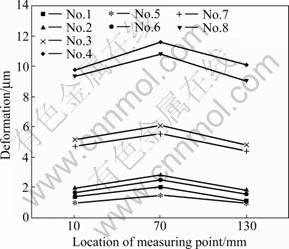
Fig.11 Deformations caused by cutting force
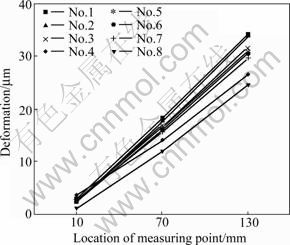
Fig.12 Deformations caused by temperature
The portion of the deformation caused by the cutting force in the whole deformation was calculated as an average value. The portion of the deformation caused by the cutting force at the point of 10 mm is about 50%, and the portions at the points of 70 and 130 mm are about 20% and 10%, respectively. It is verified that the portion of the thermal deformation in the whole deformation increases with the increase in cutting temperature.
4 Experimental devices and results
The workpiece used in this experiment was the same one used in the previous study [18]. The geometric error was measured using a three-dimensional coordinate measuring machine. The errors were calculated at the specific depth of cut after measuring the diameters of three measuring points, such as 10, 70, and 130 mm from the starting point of the cutting. Figures 13 and 14 represent the pictures of the measurement of geometric errors and measuring points.
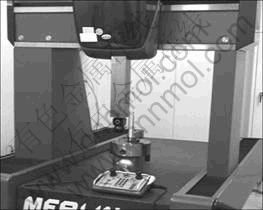
Fig.13 Measurement of geometric errors
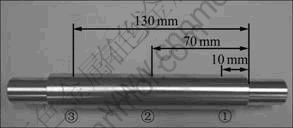
Fig.14 Measuring points
Figure 15 shows the cutting errors for each measuring point. The value that is closer to zero represents the more precise machining process. The minus value in errors shows that the measured diameter is larger than that of the actual cutting diameter and this represents a section that is not processed. It can be seen that the section, which represents a minus value, is due to the lathe error itself and the wrong arrangement of the workpiece. Also, it is verified that the geometric errors increase continuously from the point of 10 mm. As the same with the results of the finite element analysis implemented in the previous section, it is regarded that the thermal deformation increases due to the increase in the cutting temperature in the machining processes.
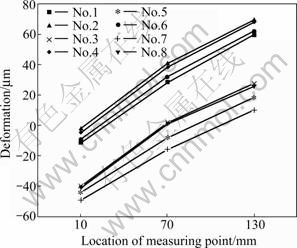
Fig.15 Geometric errors
The amounts of deformation from the points of 10 mm to 130 mm were compared with the estimated values. Figure 16 shows the results of the comparison of the amounts of deformation between the experimental values and the estimated values. Because the estimated values obtained by the finite element analysis do not consider the deformation of the opposite side, the estimated values are multiplied by 2 for comparing these values with the actual measured values.
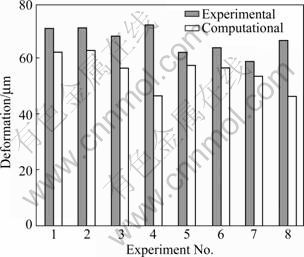
Fig.16 Comparison of computational and experimental values
In the difference between the estimated values and the experimental values, the errors are about 30% and 35% for the machining conditions No.4 and No.8, respectively. However, except for the conditions No.4 and No.8, errors are recorded by about 16% maximum in other machining conditions. Also, it is shown that the tendencies in the machining conditions agree with each other. Regarding the errors presented by about 16%, it can be seen that there are some other errors in the experiment besides the estimated values. It can then be verified as the static deformation of the lathe itself and the geometric errors in the lathe, such as misalignment of machine elements, mechanical wears. In addition, the machining conditions No.4 and No.8 show the principal force more than 100 N. Thus, it can be seen that such a force range represents a high increasing rate in the deformation caused by the cutting force.
In the comparison of the factors, which affect the deformation of a workpiece based on the measuring point of 130 mm, the geometric error caused by the lathe itself, the error caused by the cutting force, and the error due to the thermal deformation are measured to be about 15%, 10%, and 75%, respectively. By estimating the deformation of a workpiece caused by the temperature and cutting force, a precise machining process is performed through compensating some deflections in machine tools.
5 Conclusions
1) A two-step process was proposed for estimating the geometric errors. In Step 1, the cutting force and cutting heat were obtained by considering the cutting conditions. In Step 2, the deformation of a workpiece was estimated by considering the cutting force and cutting heat.
2) An analysis model where the cutting force and cutting hear are to be input through a machining area, which can be determined by the depth of cut and feed rate, was proposed. By applying the model to cutting tools, the results of the analysis of this model agree with the experimental values within the error range of 3%-10%.
3) The amounts of deformation at the measuring points of 10, 70, and 130 mm in the workpiece were estimated using the analysis model. The largest deformation is measured at the point of 130 mm, and the maximum deformation is recorded to be 36.7 μm for the machining condition No.4. It can be seen that the deformation is measured to be 73.4 μm because the analyzed value is expected to be double for the workpiece as the workpiece is rotated.
4) The geometric errors were measured using a contact type three-dimensional coordinate measuring machine. The workpiece used in this experiment was the same one used in the previous study. It is verified that the errors increase from the points of 10 mm to 130 mm continuously. This is due to the errors caused by the increase in thermal deformations with the increase in temperature during the cutting process.
5) In the comparison of the factors, which affect the deformation of a workpiece based on the measuring point of 130 mm, it is considered that the geometric error caused by the lathe itself, the error caused by the cutting force, and the error due to the thermal deformation are measured to be about 15%, 10%, and 75%, respectively.
6) By the results of this study, it is possible to implement precise machining processes in the turning operation of Al6061 by compensating the amount of deformation using a finite element analysis without applying experiments before the machining process.
References
[1] MASUDA M, TORRI M. The influence of cutting force on boundary failure of cutting tool [J]. Journal of Japan Society Precision Engineering, 1987, 53(10): 1596-1601. (in Japanese)
[2] YANG S, YUAN J, NI J. Real-time cutting force induced error compensation on a turning center [J]. International Journal of Machine Tools and Manufacture, 1997, 37(11): 1597-1610.
[3] LEVY E K, TSAI C L, GROOVER M P. Analytical investigation of the effect of tool wear on the temperature variations in a metal cutting tool [J]. Trans ASME, 1976, 98(1): 251-257.
[4] NG E G, ASPINWALL D K, BRAZIL D, MONAGHAN J. Modeling of temperature and force when orthogonally machining hardened steel [J]. International Journal of Machine Tools and Manufacture, 1999, 39(6): 885-903.
[5] KIM K W, SIN H C. Development of a thermo-viscoplastic cutting model using finite element method [J]. International Journal of Machine Tools and Manufacture, 1996, 36(3): 379-397.
[6] SHIH, ALBERT J. Finite element analysis of orthogonal metal cutting mechanics [J]. International Journal of Machine Tools and Manufacture, 1996, 36(2): 255-273.
[7] LEE M J, LEE C M. A study on the development of analysis model for prediction of relative deformation between cutting tool and workpiece [J]. Journal of Korean Society Precision Engineering, 2010, 27(4): 20-26. (in Korean)
[8] WU H Y, LEE W B, CHEUNG C F, TO S, CHEN Y P. Computer simulation of single-point diamond turning using finite element method [J]. Journal of Material Processing Technology, 2005, 167: 549-554.
[9] TOPAL E S, COGUN C. A cutting force induced error elimination method for turning operations [J]. Journal of Material Processing Technology, 2005, 170: 192-203.
[10] BENARDOS P G, MOSIALOS S, VONSNIAKOS G C. Prediction of workpiece elastic deflections under cutting forces in turning [J]. Robotics and Computer-Integrated Manufacturing, 2006, 22: 505-514.
[11] WANG X, DA Z J, BALAJI A K, JAWAHIR I S. Performance-based predictive models for turning operations and applications: Part III. Optimum cutting conditions and selection of cutting tools [J]. Journal of Manufacturing Processes, 2007, 9(1): 61-74.
[12] KUNDRAK J, KARPUSCHEWSKI B, GYANI K, BANA V. Accuracy of hard turning [J]. Journal of Materials Processing Technology, 2008, 202(1/2/3): 328-338.
[13] WANG X, DA Z J, BALAJI A J, JAWAHIR I S. Thermal error optimization modeling and real-time compensation on a CNC turning center [J]. Journal of Material Processing Technology, 2008, 207(1/3): 172-179.
[14] BENARDOS P G, MOSIALOS S, VOSNIAKOS G C. Prediction of workpiece elastic deflections under cutting forces in turning [J]. Robotics and Computer-Integrated Manufacturing, 2006, 22(5/6): 505-514.
[15] TZENG C J, LIN Y H, YANG Y K, JENG M C. Optimization of turning operations with multiple performance characteristics using the Taguchi method and Grey relational analysis [J]. Journal of Materials Processing Technology, 2009, 209(6): 2753-2759.
[16] TZENG Y F. Parameter design optimization of computerized numerical control turning tool steels for high dimensional precision and accuracy [J]. Materials and Design, 2006, 27(8): 665-675.
[17] KISHAWY H A, HANLUND A, BALAZINSKI M. Modelling of material side flow hard turning [J]. Annals of the CIRP, 2006, 55(1): 85-88.
[18] YAHYA I. Investigating the machinability of tool steels in turning operations [J]. Materials and Design, 2007, 28(5): 1417-1424.
(Edited by YANG Bing)
Foundation item: Project(RTI04-01-03) supported by the Regional Technology Innovation Program of the Ministry of Knowledge Economy (MKE), Korea
Received date: 2010-06-29; Accepted date: 2010-11-30
Corresponding author: LEE Choon-man, Professor, PhD; Tel: +82-55-213-3622; E-mail: cmlee@changwon.ac.kr