Nano-precision combined process of electrolytic in-process dressing grinding and magnetic assisted polishing on optics glass material
Tae-Soo KWAK, Yong-Chul LEE, Gyung-Nyun KIM, Dae-Bong CHOI,
Mikio YAMANOI, Hitoshi OHMORI
Department of Mechanical Engineering, Jinju National University, Jinju, Korea
Received 2 March 2009; accepted 30 May 2009
Abstract: This study is focused on the application of an effective fabrication method combining electrolytic in-process dressing(ELID) grinding and magnetic assisted polishing(MAP) to nano-precision mirror surface grinding on the optics glass-ceramic named Zerodure that is commonly used in precision optics components. The results show the variation of surface roughness after MAP processes utilizing Fe+CeO2, Fe+CeO2+diamond paste and Fe+diamond paste are applied to ELID ground surfaces. The MAP surface roughnesses for ELID ground surface roughnesses(Ra) of 52.1, 39.8 and 51.1 nm using #1200 grinding wheel are improved to 6.1, 4.6 and 1.9 nm, respectively. The surface roughness of MAP process using Fe+CeO2+diamond paste is superior to that using other processes. Moreover, it takes less than 10 min to conduct the MAP processes. The combined method suggested effectively reduces the working time to get the required surface qualities.
Key words: electrolytic in-process dressing; magnetic assisted polishing; nano-precision; mirror surface finishing
1 Introduction
This study is focused on the application of an effective fabrication method for combining electrolytic in-process dressing(ELID) and magnetic assisted polishing(MAP) in nano-precision mirror grinding of the optics glass-ceramic Zerodure (extensively used in precision optics components). The grinding and polishing process has been applied to achieving mirror surfaces on hard-to-machining materials. ELID grinding is an excellent technique for mirror grinding of various advanced metallic and nonmetallic materials[1-3]. A polishing process is occasionally required for the elimination of traces or residual stresses left by the grinding process. MAP has been used as a polishing method with high efficiency and superior quality[4-5]. In the grinding process, the grinding wheels must be changed several times to obtain a nano-precision mirror surface while using the same machine. These operations reduce working effectiveness.
Therefore, MAP combined with ELID grinding was suggested in order to improve the productivity and surface accuracy of mirror-grinding[6-7]. MAP was adopted as a final finishing process after ELID grinding was used to get the designed surface profiles accuracy.
2 Experimental
2.1 ELID grinding process
The ELID grinding system consists of a metal bonded diamond abrasive wheel, an electrolytic power supply, an electrode and electrolytic coolant. The metal bonded diamond abrasive wheel was connected to the positive terminal of a power supply via electrical contact and a fixed electrode was connected to the negative terminal. A clearance of approximately 0.1 mm was kept between the grinding wheel and the electrode.
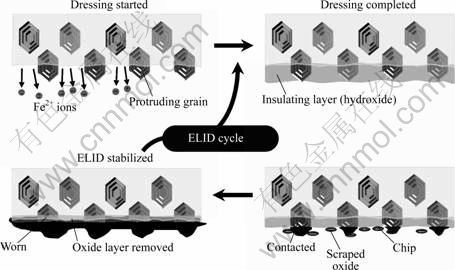
Fig.1 shows the schematic illustration of the ELID grinding process. The initial electrolytic process moves the metal matrix of the grinding wheel, forming oxide layers which allow the abrasive to protrude from the grinding wheel surface. As the protruding abrasives are worn down during the grinding process, the oxide layer also becomes thinner. The thinner oxide layer increases the electric-conductivity of the wheels, oxidizing the metal-bonded diamond wheel again. By this electrolytic process, the thickness of the oxide layer is maintained, giving stable abrasive protrusion.

Fig.1 Schematic illustration of ELID cycle
The work-pieces for the experiments were Zerodure (Ceram L001, OHARA), a non-magnetic substance mainly used as optical glass. Fig.2 shows the schematic illustration of the ELID grinding process using the rotary in-feed type grinding machine and its external view. Table 1 lists the experimental conditions for ELID grinding.

Fig.2 Schematic diagram of ELID grinding process at rotary infeed type grinding machine and its external view
Table 1 Experimental conditions for ELID grinding

The grinding wheels for the experiments were cast iron fiber-bonded diamond wheels with grit sizes of #1200, #2000 and #4000. The numbers of work-pieces per experiment was 6. A total of 18 experiments were conducted using grinding wheels #1200, #2000 and #4000.
2.2 MAP process
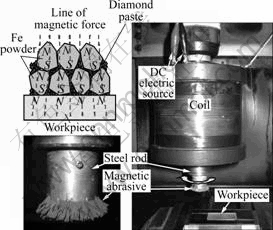
The basic principle of MAP is shown in Fig.3. The equipment for MAP consists of a MAP tool which is made of an electromagnet and steel rod, a DC power supply, and magnetic abrasives. The interval between the rod and the work-piece surface should be kept constant. The interval filled with magnetic abrasive is charged with electricity to arrange the abrasives in a brush shape from the tool end to the work-piece surface. The MAP tool can be worked as a flexible polishing tool. The MAP process devices were simple enough that they could be used on any kind of machine and the tool path in the MAP process could be controlled by a CNC program. The work-pieces ground in the ELID process have been polished by the MAP process. Three kinds of abrasives, CeO2, diamond paste and CeO2+diamond paste were used for the MAP process and they were named processes 1, 2 and 3, respectively. The polishing time was 2, 4, 6, 8 and 10 min for each process. Table 2 lists the experimental conditions for MAP process.

Fig.3 Schematic diagram of MAP tool and magnetic abrasives
Table 2 Experimental conditions for MAP process

3 Results and discussion
3.1 Surface roughness variation according to abrasives and polishing time
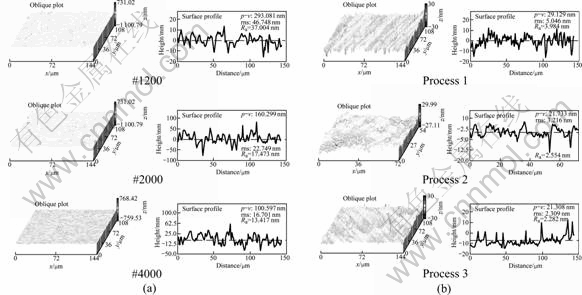
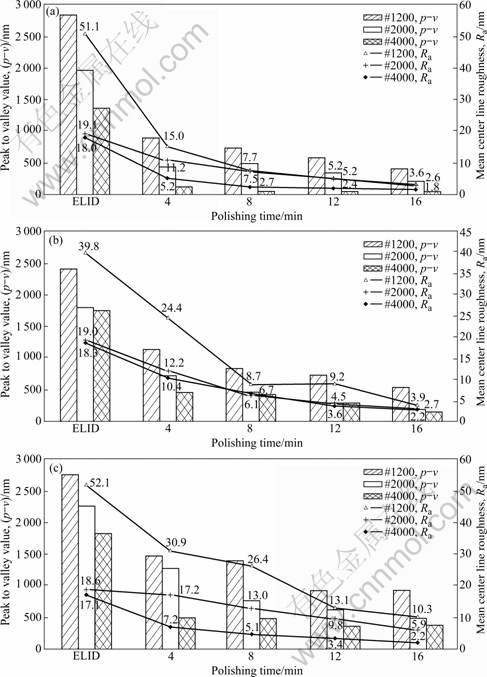
The surface of Zerodure ground by ELID with #1200, #2000 and #4000 grinding wheels, respectively, was polished by MAP using the three types of pastes (e.g. process 1, 2 and 3). The experimental results are presented in Fig.4. As shown in Fig.4, the surface rough- ness was influenced by the abrasive and the polishing time. The surface roughness was improved with increasing the polishing time. The initial maximum surface roughness decreased by almost 50% after 2 min. In the three cases, the best surface roughness was obtained by process 3, due to the high elimination rate of the diamond paste and the acidic corrosion of CeO2. Even though the grit size of the wheels was different, the polished surface roughness(Ra) could be obtained within 2 nm. Fig.5 shows oblique plots and surface profiles of the ground and polished surfaces.

Fig.4 Variation of surface roughness in MAP process 1 (a), process 2 (b) and process 3 (c)

Fig.5 Measured results for MAP surface on ELID ground surface: (a) ELID ground surface; (b) Magnetic assisted polished surface
3.2 Thickness of non-magnetic work-piece and polishing time
In these experiments, it was ascertained that the surface roughness varied according to the thickness of the work-piece and the polishing time. Process 3 was adopted because the best surface roughness could be obtained. The ELID ground work-pieces were polished by MAP in accordance with three kinds of work-piece thickness (e.g. 20, 40 and 60 mm). The work-piece thickness means the interval between the tool end and the work-piece because the work-piece is a non-magnetic material. The polishing time was selected as 4, 8, 12 and 16 min for each interval. For this study, magnetic flux density was measured according to the work-piece thickness. The magnetic flux densities were 0.39 T at a work-piece thickness of 20 mm, 0.32 T at a work-piece thickness of 40 mm and 0.29 T at a work-piece thickness of 60 mm. The thicker the work-piece, the weaker the magnetic flux density, as the work-piece material is not ferrous metal. Fig.6 shows the ELID ground and magnetic assisted polished surface roughness according to the work-piece thickness of 20, 40 and 60 mm, respectively. As shown in Fig.6, the surface roughness was influenced by the work-piece thickness and the polishing time. The surface roughness was also improved with increasing polishing time. Also, the initial maximum surface roughness was improved by 50% after polishing for 4 min. The best surface roughness was obtained with a thickness of 20 mm. These results mean that magnetic flux density is dependent on work-piece thickness when using non-magnetic materials. When the work-piece is too thick such as 60 mm, it is necessary to grind with a fine grit size wheel. It was very difficult to obtain a surface roughness(Ra) within 2 nm with grit sizes of #1200 and #2000; but with a grit size of #4000, a polished surface roughness within 2 nm could be obtained.

Fig.6 Measured results for surface roughness of non-magnetic work-piece thickness: (a) 20 mm; (b) 40 mm; (c) 60 mm
4 Conclusions
Based on ELID grinding and magnetic assisted polishing of the optics glass-ceramic Zerodure, the following conclusions can be deduced.
1) Diamond paste and CeO2 were appropriate to polish the optics glass materials. The initial surface roughness(Ra) of 51 nm for a #1200 wheel, 19 nm for a #2000 wheel and 18 nm for a #4000 wheel ground by ELID were reduced by the MAP process in 8 min to 1.9, 1.7 and 1.6 nm, respectively, with the abrasives.
2) The MAP characteristics change according to the thickness of non-magnetic materials such as Zerodure. The thicker the material, the lower the MAP efficiency, due to the magnetic flux density weakening.
3) The surface roughness of MAP process 3 using Fe+CeO2+diamond paste is superior to other processes. Also, it takes less than 10 min to conduct MAP processes.
4) It is possible to improve productivity and profile accuracy with combination of the ELID grinding method and the MAP method. It will play an integral role in industrial applications by combining the established technologies.
References
[1] OHMORI H, NAKAGAWA T. Mirror surface grinding of silicon wafer with electrolytic in process dressing [J]. Annals of the CIRP, Berlin, Germany, 1990, 39(1): 329-332.
[2] OHMORI H, KATAHIRA K, NAGATA J, MIZUTANI M, KOMOTORI J. Improvement of corrosion resistance in metallic biomaterials by a new electrical grinding technique [J]. Annals of the CIRP, San Sebastian, Spain, 2002, 51(1): 491-494.
[3] KATAHIRA K, OHMORI H, UEHARA Y, AZUMA M. ELID grinding characteristics and surface modifying effects of aluminum nitride(AlN) ceramics [J]. Int J of Machine Tools & Manufacture, 2005, 45(7/8): 891-896.
[4] MASAKI K, ANZAI M, NAKAGAWA T. Magnetic abrasive finishing using PPM magnetic abrasives [J]. J of the JSPE, 1990, 56(5): 159-164.
[5] LEE Y C, ANZAI M, NAKAGAWA T. A study on improving the efficiency of magnetic abrasive polishing for die and mold surface [J]. J of the KSPE, 1996, 13(6): 59-65.
[6] KWAK T S, LEE Y C, ANZAI M, OHMORI H. Study on nano-level mirror surface finishing using ELID grinding and magnetic abrasive finishing [J]. J of Japan Society for Abrasive Technology, 2005, 49(2): 95-97.
[7] KWAK T S, KIM G N, LEE Y C. Study on nano-level mirror surface finishing on mold core to glass lens molding [J]. J of KSPE, 2006, 23(1): 97-104.
Foundation item: Project supported by Research Program of Yonam Institute of Digital Technology, Korea
Corresponding author: Yong-Chul LEE; Tel: +82-55-7512071; E-mail: yclee@yc.ac.kr
(Edited by YANG Bing)