Finite element analysis of contact fatigue and bending fatigue of a theoretical assembling straight bevel gear pair
��Դ�ڿ������ϴ�ѧѧ��(Ӣ�İ�)2013���2��
�������ߣ����� HUA Lin(����) ���ǻ� ����
����ҳ�룺279 - 292
Key words��straight bevel gear; finite element method; contact fatigue; bending fatigue
Abstract: The aim of this work is to propose a 3D FE model of a theoretical assembling straight bevel gear pair to analyze the contact fatigue on the tooth surface and the bending fatigue in the tooth root. Based on the cumulative fatigue criterion and the stress-life equation, the key meshing states of the gear pair were investigated for the contact fatigue and the bending fatigue. Then, the reliability of the proposed model was proved by comparing the calculation result with the simulation result. further study was performed to analyze the variation of the contact fatigue stress and the bending fatigue stress under different loads. Furthermore, the roles of the driving pinion and the driven gear pair were evaluated in the fatigue life of the straight bevel gear pair and the main fatigue failure mode was determined for the significant gear. The results show that the fatigue failure of the driving pinion is the main fatigue failure for the straight bevel gear pair and the bending fatigue failure is the main fatigue failure for the driving pinion.
J. Cent. South Univ. (2013) 20: 279�C292
DOI: 10.1007/s11771-013-1486-y

DENG Song(����), HUA Lin(����), HAN Xing-hui(���ǻ�), HUANG Song(����)
School of Automotive Engineering, Hubei Key Laboratory of Advanced Technology of Automotive parts,
Wuhan University of Technology, Wuhan 430070, China
 Central South University Press and Springer-Verlag Berlin Heidelberg 2013
Abstract: The aim of this work is to propose a 3D FE model of a theoretical assembling straight bevel gear pair to analyze the contact fatigue on the tooth surface and the bending fatigue in the tooth root. Based on the cumulative fatigue criterion and the stress�Clife equation, the key meshing states of the gear pair were investigated for the contact fatigue and the bending fatigue. Then, the reliability of the proposed model was proved by comparing the calculation result with the simulation result. further study was performed to analyze the variation of the contact fatigue stress and the bending fatigue stress under different loads. Furthermore, the roles of the driving pinion and the driven gear pair were evaluated in the fatigue life of the straight bevel gear pair and the main fatigue failure mode was determined for the significant gear. The results show that the fatigue failure of the driving pinion is the main fatigue failure for the straight bevel gear pair and the bending fatigue failure is the main fatigue failure for the driving pinion.
Key words: straight bevel gear; finite element method; contact fatigue; bending fatigue
1 Introduction
Straight bevel gears are widely applied in automobiles and machine tools to transmit power and motion between intersecting shafts due to the advantages such as smooth transmission and high load-carrying capacity. But in modern industry, the designer is commonly restricted by the requirement that gears should carry high loads at high speed with both size and weight kept at a minimum. Therefore, it is crucial to investigate the contact fatigue and the bending fatigue to ensure the reliable design of gears. Usually, two kinds of teeth fatigue failure can occur under repeated loading, namely, the pitting on the tooth surface and tooth fracture in the tooth root. For the reason, it is of great importance to investigate the contact fatigue stress and the bending fatigue stress to predict the fatigue failure of gears.
At present, some scholars have investigated the contact fatigue and the bending fatigue of gears by using the analytical and experimental methods [1�C14]. All of these studies provided an important guide for exploring the rolling contact fatigue failure and the bending fatigue failure of gears. Especially, it should be noted that on one hand, the large majority of these research directly carried out chemical analysis, micro-hardness measurement and metallographic examination in the fatigue failure zones and investigated the effect of surface pitting, surface coating, grain size of material, toughness of material, initiation and propagation of crack, high accuracy of gear geometry, shaft misalignment and assembly deflection on the fatigue failure of gears using the experimental method. On the other hand, the existing research was mainly concentrated on an equivalent model of two cylinders to simulate the surface fatigue process in the contact area of gears, the analysis of the bending fatigue of gear tooth and the crack initiation and propagation of gears and the roles of residual stress, metal material properties and inclusion magnitude in the fatigue failure of gears using the analytical method. However, more attentions are paid to the investigation of the metal microstructure and the fatigue crack initiation and propagation so that the effect of fatigue stress on the service life of gears is ignored. Furthermore, an equivalent model of two cylinders does not correspond with the real model of gears. The stress distribution of the gear tooth based on the three-point bending loading method is also not consistent with the real stress distribution of gear teeth. Therefore, it is necessary to develop a real 3D FE model of gears to analyze the contact fatigue and the bending fatigue.
In this work, a real 3D FE model of a straight bevel gear pair was developed under the ANSYS software environment. According to the cumulative fatigue criterion, the significant meshing states of the straight bevel gear pair were investigated for the analysis of contact fatigue and bending fatigue and the reliability of the proposed 3D FE model was proved by comparing the calculation result with the simulation result. On the basis of the reliable 3D FE model, the contact fatigue stress and the bending fatigue stress of gear teeth were analyzed under different loads. The contact fatigue life and the bending fatigue life were also studied using the stress�Clife equation. The obtained results provide useful guidelines for better understanding the fatigue of gear teeth. Furthermore, it is also helpful for acknowledging the effect of fatigue stress on the fatigue life of gear tooth.
2 Computerized design of geometrical model
An accurate geometrical model is the fundamental starting point for carrying out a finite element analysis of a pair of straight bevel gears, which is of great significance in the precise result of FE analysis. In order to obtain high accuracy of geometrical model, the spherical involute equation was applied to draw the spherical involute profile and represented as follows [15]:
 (1)
(1)
where R is the initial radius of gear, namely the outer cone distance; ��a is the angle of face cone; ��f is the angle of root cone; ��b is the angle of base cone.
The basic geometrical data of the sample straight bevel gear pair, considered as the study object, are given in Table 1. The method for the gear geometry generation was based on the following procedure. Firstly, the mathematical model of gears was established according to the manufacturing process and the gear meshing theory [16�C18]. Then, the calculated surface data points were exported into the software PRO/E to construct the gear surface and substantiate them into tooth spaces, as shown in Fig. 1. Subsequently, the gear hub was cut to prevent the occurrence of broken surface in the ANSYS software by the tooth spaces based on the machining process [19�C20], as shown in Fig. 2. Through rotation copying the tooth spaces, the full gear geometry model was accomplished. Figure 3(a) shows an example of two full 3D straight bevel gears�� geometry and their assembly. The generated pitch lines on the surfaces of the driving pinion and the driven gear are shown in Figs. 3(b) and 3(c), respectively. Using the motion simulation function and the interference detection function of PRO/E software, the meshing rule of the sample straight bevel gear pair was obtained in the next section.
Table 1 Basic geometric data of example straight bevel gear pair
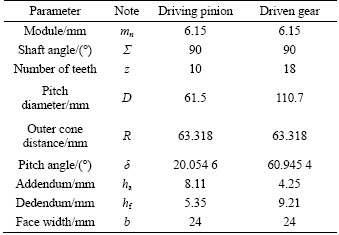
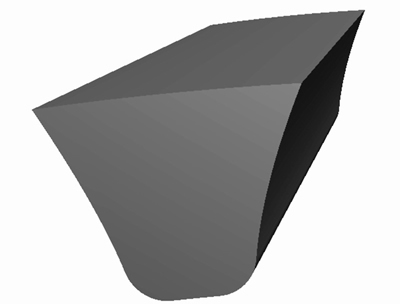
Fig. 1 Substantiation of tooth spaces
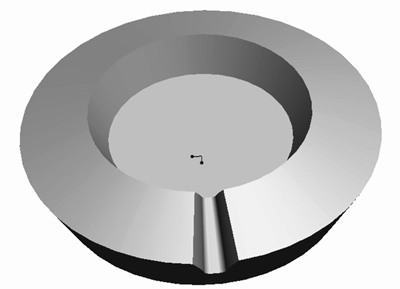
Fig. 2 Gear hub after generating tooth spaces
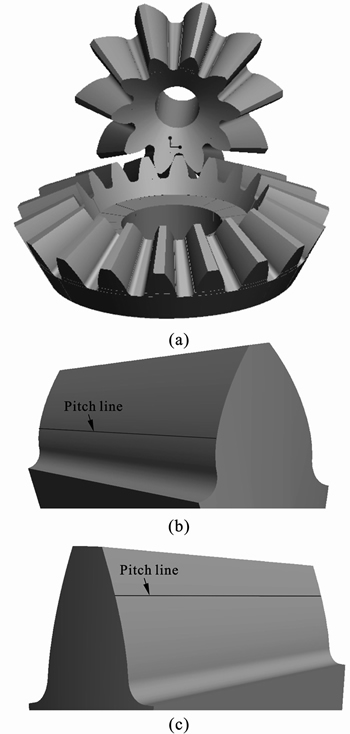
Fig. 3 illustration of generated full 3D straight bevel gears�� geometry and their assembly (a), pitch line on tooth surface of driving pinion (b), and pitch line on tooth surface of driven gear (c)
3 Determination of meshing interval for investigation
Under load, the basic meshing characteristic of straight bevel gears is the periodical change of the meshing tooth pairs. For the gear drive designed in this work, this kind of change is represented in Fig. 4.
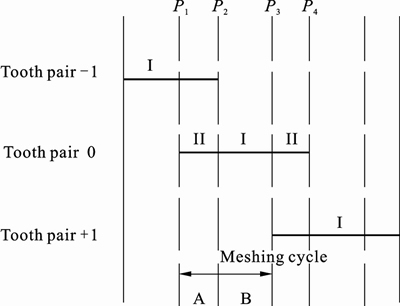
Fig. 4 Schematic illustration of engagement
As shown in Fig. 4, three pairs of teeth, named tooth pair �C1, 0, +1, respectively, were illustrated to describe the meshing process. At the beginning, tooth pair �C1 bore all the loads in the single pair tooth contact zone I. When transferring point P1 is reached, tooth pair 0 entered mesh so that the load was shared by both tooth pair �C1 and tooth pair 0 in the double pair tooth contact zone II. When transferring point P2 is reached, tooth pair �C1 exited out of mesh. Meanwhile, the total load was suddenly transmitted to tooth pair 0 and the single pair tooth contact zone I of tooth pair 0 begins. Similarly, the load and motion will be transmitted from tooth pair 0 to tooth pair +1. Here, the transferring point P3 and P4 represent the engaging-in of tooth pair +1 and engaging-out of tooth pair 0, respectively. Therefore, the double pair tooth contact zone II and the single pair tooth contact zone I exist alternately and periodically during the meshing process.
As a result, the interval of a meshing cycle which includes a double pair tooth contact zone II and a single pair tooth contact zone I (A and B in Fig. 4) was determined for investigation in this work. The transferring points P1 and P3 were chosen as the critical points at the beginning and the end of a meshing cycle in the analysis, respectively. Thus, a whole meshing cycle contains a single pair tooth contact zone I and a double pair tooth contact zone II .
4 Establishment of FE model for fatigue analysis
The model for fatigue analysis presented in this work was based on the assumption that the material is homogeneous and isotropic, i.e., without imperfections or damages of material and there is no surface finishing, scratch and machining marks on the tooth surface which could lead to the increase of additional stress for gear teeth.
The FE model of a straight bevel gear pair without installation error was performed with 8-node isoparametric hexahedron element. The material is quenched and tempered steel 40Cr with the properties of elastic modulus E=2.056 7��105 MPa, Poisson ratio m=0.3. The friction coefficient between gears is 0.15. The toque T, applied to the driving pinion, can be determined on the basis of the requirement of fatigue analysis.
The loaded tooth contact condition is a special class of discontinuous constraint, allowing forces to be transmitted from one entity to another only if the two surfaces are in contact. The contact pair function in commercial software ANSYS is able to detect when two surfaces are in contact and apply the contact constraints correspondingly. Through the FE analysis, the maximum contact stress on the tooth surface and the maximum bending stress in the root of the gear tooth were achieved.
There are five steps of developing approach for the FE models as follows [21�C24]:
1) The 3D geometrical models displayed in Fig. 3(a) with the format of IGES were imported into the ANSYS software, then each tooth was divided into four subvolumes by auxiliary intermediate surfaces to make the mesh-dividing easy in the next step. The model of a meshing tooth pair is represented in Fig. 5 and the full assembling model of straight bevel gear pair is shown in Fig. 6.
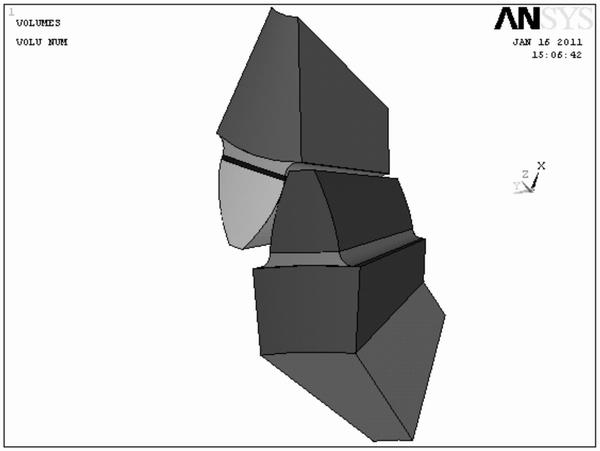
Fig. 5 Subvolumes of a meshing tooth pair
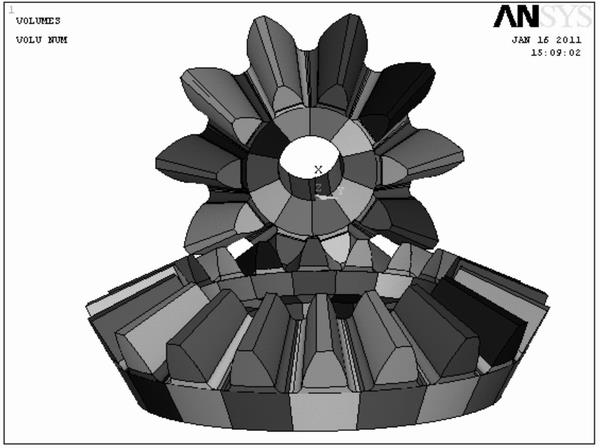
Fig. 6 Full assembling model of straight bevel gear pair
2) Input mesh-dividing parameters for the gears. Some appropriate parameters are used to control FE method mesh-dividing pattern of the straight bevel gears, that is to say, to determine where should be fine divided and where should be roughly divided. Consequently, tooth contact areas and tooth root were fine divided in this work. FE method mesh-dividing pattern of the gears can be changed simply through changing values of these FE method mesh-dividing parameters. In a word, some reasonable values of these FE method mesh-dividing parameters are beneficial to improve the accuracy of simulated results and reduce the calculation time. The mesh-dividing model of a meshing tooth pair was accomplished as shown in Fig. 7, and a full mesh- dividing model of the straight bevel gear pair was performed in ANSYS (Fig. 8).
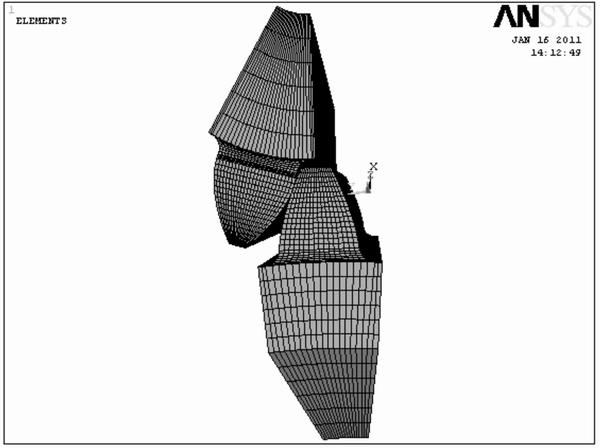
Fig. 7 Mesh-dividing model of a meshing tooth pair
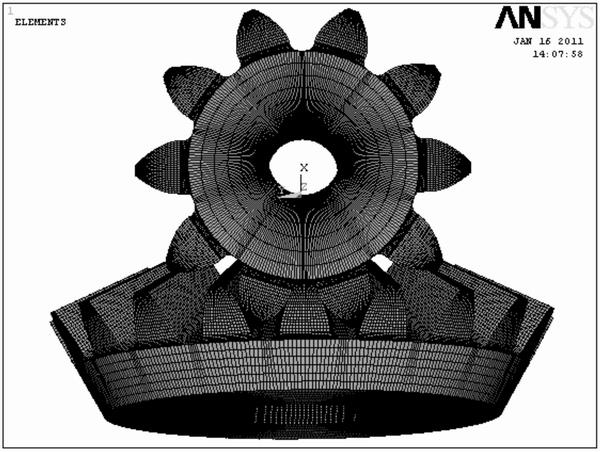
Fig. 8 Full mesh-dividing model of straight bevel gear pair
3) Set contact pairs for the gears. The assumption of load distribution is not required in the contact area since the contact algorithm [25] of the general computer program was employed to get the contact area and stresses by applying the torque to the driving gear while the driven gear was considered at rest. Therefore, contact pairs (a contact pair consists of a target surface and a contact surface) were defined in the contact position when tooth pairs are in the meshing state. Generally, the surface which has larger curvature will be chosen as the contact surface, thus the tooth surface of pinion was picked as contact surface and the tooth surface of gear was defined as target surface. For example, two contact pairs are shown in Fig. 9 when two pairs of teeth are in contact at the same time. By deleting or adding contact pair, the simulation of single-tooth pair meshing or multi-tooth pairs meshing can be achieved.
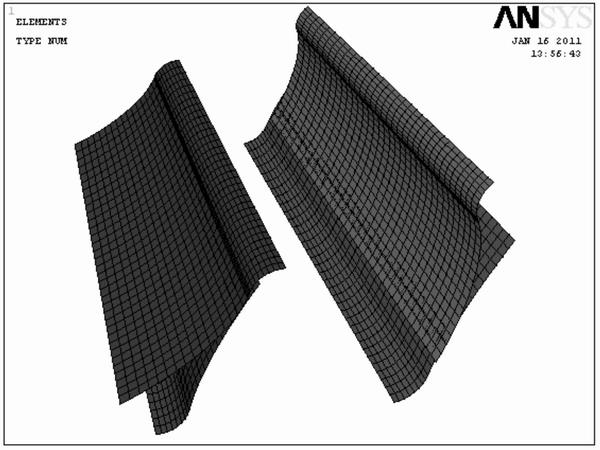
Fig. 9 Definition of contact pairs with two tooth pairs in contact
4) Define constraint conditions. The ideas were considered in the following:
(1) Nodes on the bottom rim of the driven gear are considered as fixed.
(2) For the nodes on the bottom rim of the driving pinion, the radial and axial degrees of freedom are fixed and only the rational degree of freedom is set as free.
The setting of constraint conditions, accomplished automatically in the cylindrical coordinate systems, is shown in Fig. 10.
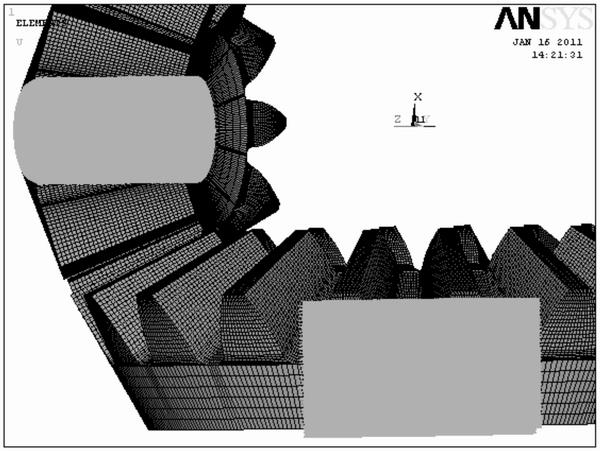
Fig. 10 Setting of constraint condition for driving gear and driven gear
5) Apply toque to the driving pinion. The force F at every node on the bottom rim of the driving pinion in the rotational direction is equivalent to working torque T apply to the driving pinion. The force F is defined as
 (2)
(2)
where n (=9 800) is the number of nodes on the bottom rim of the driving gear and rd (=8.095) mm is the radius of the bottom rim.
Loading of force F was achieved automatically, as shown in Fig. 11. Though there was only part of the FE models shown in Fig. 11, the whole gear models were used in the real FE analysis.

Fig. 11 Loading of force F at every node on bottom rim of driving gear in rotational direction
5 Fatigue analysis method of general post processing
The general post processing program of ANSYS software for fatigue stress analysis is based on the cumulative fatigue criterion (Palmgren-Mine hypothesis) [26] where it is pointed out that if cyclic stresses are a series of constant stress amplitudes Si and the fatigue lives with respect to these stress amplitudes are Nf, i, the percentage of used fatigue life is the ratio of the used fatigue lives ni to the fatigue lives Nf, i. The fatigue failure occurs when the damage of constant stress amplitude is cumulated to reach a critical value of fatigue failure. Thus, the cumulative fatigue criterion is expressed as follows:
 (3)
(3)
where x is the total number of the stress amplitudes, i is the serial number of stress amplitude from 1 to x, ni is the used fatigue life and Nf is the fatigue life.
The fatigue life analysis is dependent on the stress�Clife equation, namely the Basquin relation [27] which represents the variation of gear��s fatigue life with the change of fatigue stress in the limited life region. But this stress�Clife method usually evaluates the number of stress cycles requiring a crack initiation at the point where the maximum stress occurs. The Basquin relation is represented as follows:
 (4)
(4)
where m is the exponent in the equation, s is the fatigue stress in the limited life region for the sample gears, N is the fatigue life versus the fatigue stress and C is the constant in the equation.
The steps of fatigue analysis are described in the following:
(1) Determining the position of the maximum contact stress on the tooth surface and the maximum bending stress in the gear tooth root. Usually, the fatigue damage occurs at the maximum local stress��s point for gear tooth, which is attributed to the contact fatigue crack and the bending fatigue crack because of the effect of cyclic stress. And these cracks propagation finally causes the fatigue failure of gears. For this reason, it is significant for fatigue analysis to determinate the position of the maximum contact stress on the tooth surface and the maximum bending stress in the tooth root.
(2) Refining and saving the key nodal stress in the important position which has been determined in the previous step. Because of the pulsating cycle of the contact stress and the bending stress, they are responsible for the fatigue pitting on the tooth surface and the fatigue fracture in the tooth root, respectively. Consequently, the concentrated stresses on tooth surface and in tooth root provide significant evidence for the fatigue analysis of gear drive.
(3) Inputting the stress�Clife curve for the fatigue analysis in general post processing program. The stress�Clife curve can be obtained from the empirical data for the straight bevel gear pair which is made of quenched and tempered steel 40Cr with elastic modulus E=2.056 7��105 MPa and Poisson ratio m=0.3. In the light of the adoptive material for the FE analysis in this work, the fatigue experimental data were acquired from the handbook of gear design [28] and shown in Table 2.
(4) On the basis of the Basquin relation and the fatigue experimental data mentioned above, the contact fatigue life curve and the bending fatigue life curve can be obtained as shown in Figs. 12 and 13, respectively.
(5) After inputting the life curves of contact fatigue and bending fatigue to the general post processing program, the fatigue analysis can be performed to compute the contact fatigue stress on the tooth surface and the bending fatigue stress in the tooth root.
Moreover, the relative contact fatigue life and the bending fatigue life can be acquired based on the results of fatigue analysis.
6 Analysis of contact fatigue and bending fatigue
In this work, the FE analysis of the sample straight bevel gear pair is static, that is to say, the whole meshing cycle, determined in the third section, has been divided and analyzed in many instants. Furthermore, the FE model, established in the fourth section, is derived in each instant according to the transmission ratio of the straight bevel gear pair.
On the basis of the FE analysis, the maximum contact stress and the maximum bending stress were obtained in each instant. Figure 14 shows the distribution of contact stress and bending stress for the driving pinion and Fig. 15 represents the distribution of contact stress and bending stress for the driven gear. After determining the nodes of maximum contact stress and maximum bending stress, the variation of fatigue stress and fatigue life can be obtained with the change of working torque T based on the cumulative fatigue criterion and the Basquin relation. In order to analyze the variation rules of the contact fatigue stress and the bending fatigue stress in the whole meshing cycle, the working torque T, applied to the driving pinion, is proposed as 300 N��m.
6.1 Analysis of contact fatigue stress
In engineering machinery, the gear drive is widely used in transmission of power and motion, but the smaller contact area between the working gear teeth is usually responsible for the higher contact stress on the tooth surface under load. When gears undergo the pulsating cyclic stress numerously, gear teeth can suffer the contact fatigue as a result that the pitting occurs on the tooth surface. For this reason, it is necessary to analyze the contact fatigue stress and the contact fatigue life of the gear drive for the prevention of gear tooth fatigue failure.
The FE analysis of contact fatigue considers the theoretical assembling straight bevel gear pair as the fatigue research object. In the light of the simulated result, the variation of contact stress and contact fatigue stress is obtained in the meshing cycle, as shown in Fig. 16.
Table 2 Fatigue experimental data for quenched and tempered steel 40Cr gear material

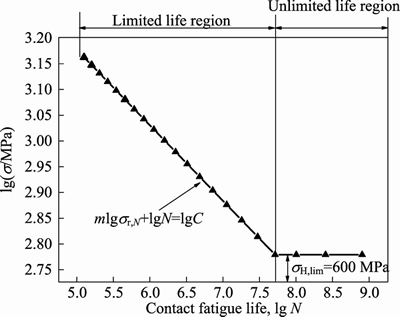
Fig. 12 Contact fatigue life curve of quenched and tempered steel 40Cr gear material
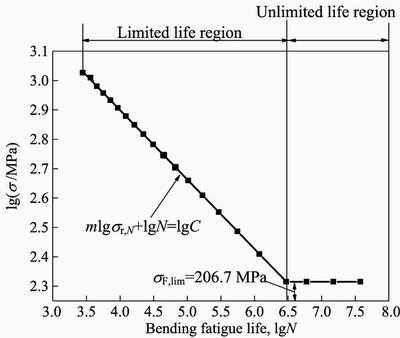
Fig. 13 Bending fatigue life curve of quenched and tempered steel 40Cr gear material
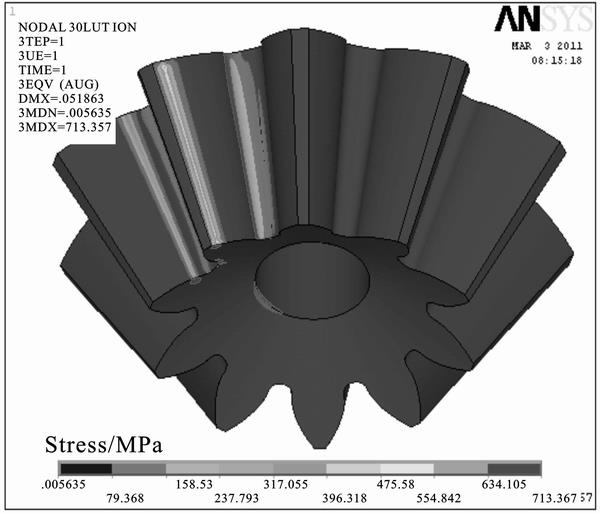
Fig. 14 Distribution of contact stress and bending stress (MPa) for driving pinion
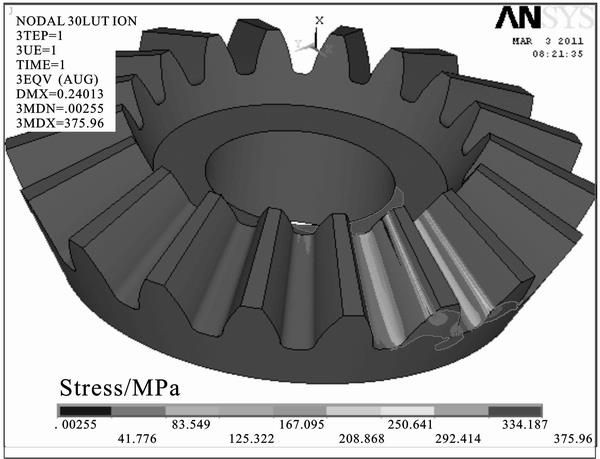
Fig. 15 Distribution of contact stress and bending stress (MPa) for driven gear
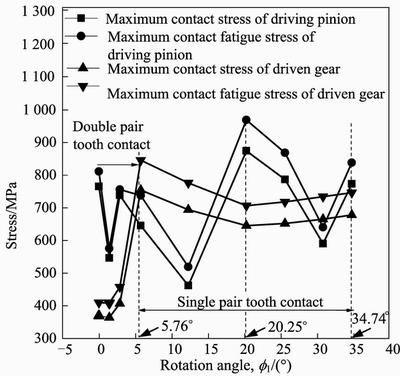
Fig. 16 Variation of maximum contact stress and maximum contact fatigue stress in a meshing cycle for driving pinion and driven gear
Figure16 presents the variation of maximum contact stress and maximum contact fatigue stress in a meshing cycle for driving pinion and driven gear. From Fig.16, it can be seen that the variation of maximum contact fatigue stress is irregular for the driving pinion, but it is conspicuous that the variation of maximum contact fatigue stress is similar to that of maximum contact stress of the driving pinion. Furthermore, the maximum contact fatigue stress is largest at the rotation angle of 20.25�� for the driving pinion in the meshing cycle. At this moment, the meshing state of the tooth pair is shown in Fig. 17 and the distribution of maximum contact fatigue stress on the tooth surface is shown in Fig. 18. By comparing Fig. 18 with Fig. 3(b), it can be seen that the maximum contact fatigue stress is in the vicinity of the pitch line, which is in accordance with Osman��s work [1] where he pointed out that gear teeth failed by fatigue with a fatigue crack initiation from destructive pitting and spalling region at one end of tooth in the vicinity of the pitch line. Therefore, the contact fatigue stress analysis of gear tooth is necessary at the rotation angle of 20.25�� for analyzing gear tooth contact fatigue failure.
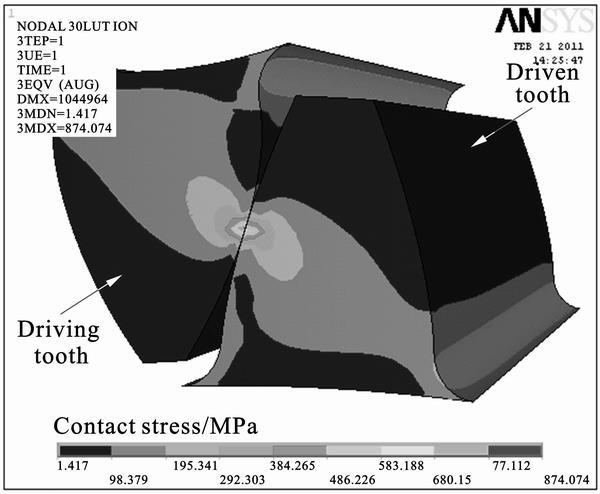
Fig. 17 Meshing state of working tooth pair at rotation angle of 20.25��
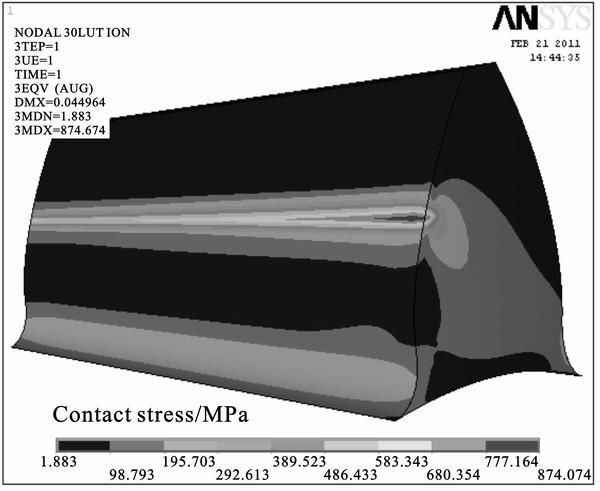
Fig. 18 Distribution of contact stress on tooth surface for driving pinion
For the driven gear, it can be seen from Fig. 16 that the maximum contact stress is small in the double pair tooth contact zone, but it increases sharply when the meshing tooth pair enters the single pair tooth contact zone and decreases gradually with the change of meshing state of tooth pair. At the rotation angle of 20.25��, the maximum contact stress increases gradually until the end of the meshing cycle. Furthermore, the variation of maximum contact fatigue stress is similar to that of the maximum contact stress, which is in consistent with that of the driving pinion. Based on this evidence, it is concluded that the maximum contact stress in the meshing cycle is one of factors leading to gear tooth fatigue failure. At the rotation angle of 5.76��, the maximum contact fatigue stress is the largest for the driven gear in the meshing cycle. At this moment, the meshing state of the tooth pair is shown in Fig. 19 and the distribution of the maximum contact stress on the tooth surface is shown in Fig. 20. From Fig. 20, it is also obtained that the maximum contact fatigue stress is in the vicinity of the pitch line for the driven gear. Therefore, particular attention for the study of fatigue failure should also be paid to the meshing state of working tooth pair at rotation angle of 5.76 �� for the driven gear.
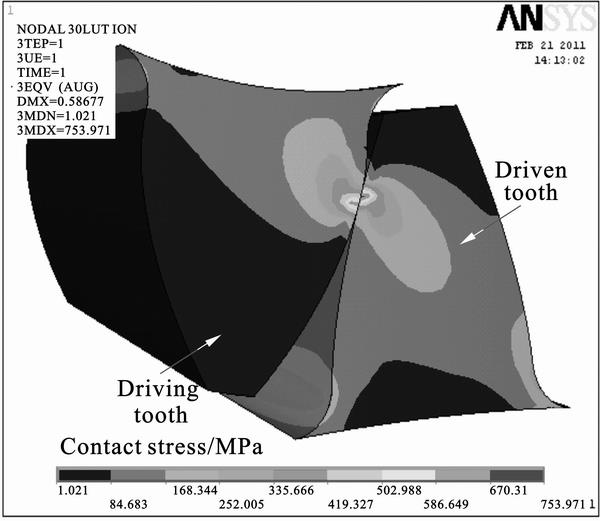
Fig. 19 Meshing state of working tooth pair at rotation angle of 5.76��
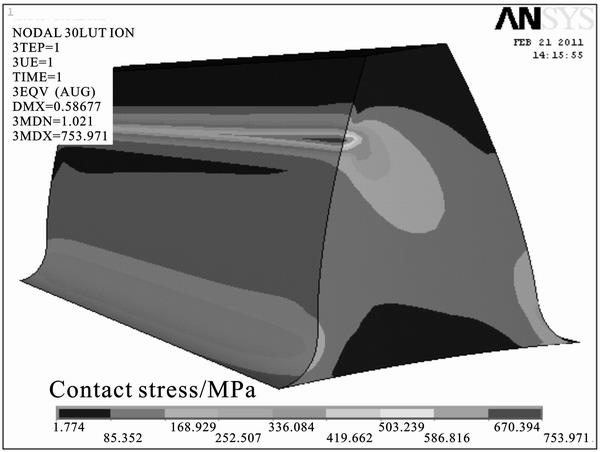
Fig. 20 Distribution of contact stress on tooth surface for driven gear
In the light of the analysis result mentioned above, the meshing states of working tooth pair at rotation angles of 5.76�� and 20.25�� are crucial for the contact fatigue failure analysis of gear teeth through the FE method.
6.2 Analysis of bending fatigue stress
Under load, the maximum bending stress occurs in the tooth root and the stress concentration usually appears in the tooth root fillet. When the alternating stress works on the tooth root numerously, the gear tooth can suffer the bending fatigue as a result that the tooth fracture occurs on the tensile side of the tooth root. One side of the tooth root is in tension and the other side is in compression when the single tooth side works. And the bending stress is zero when the tooth exit out of mesh. Therefore, the bending cyclic stress is identified as pulsating cyclic stress.
The maximum bending stress on the tensile side of the tooth root is considered as the study object for the fatigue analysis. Although the crack initiation due to the stress concentrations can appear on both sides of the tooth root, the tensile side of the tooth root is the most critical for bending fatigue failure. In the light of the simulated result, the variation of tensile bending stress and bending fatigue stress is obtained in the meshing cycle, as shown in Fig. 21.

Fig. 21 Variation of maximum tensile bending stress and maximum bending fatigue stress in a meshing cycle for driving pinion and driven gear
Figure 21 presents the variation of the maximum tensile bending stress and maximum bending fatigue stress in a meshing cycle for driving pinion and driven gear. From Fig. 21, it can be seen that the maximum bending fatigue stress increases gradually with the change of rotation angle f1 for the driving pinion and the variation of maximum bending fatigue stress is similar to that of maximum tensile bending stress. Furthermore, the maximum bending fatigue stress is the largest at the rotation angle of 34.74��, namely at the end of the single pair tooth contact zone for the driving pinion in the meshing cycle. At this moment, the meshing state of the tooth pair is shown in Fig. 22 and the contact area on the tooth surface for the driving pinion is shown in Fig. 23. From Fig. 23, it is conspicuous that the contact area on the tooth surface is the farthest away from the tooth root at the end of the single pair tooth contact zone, which is in consistent with Akata��s viewpoint [9] that the greatest bending stress occurs when the load is at a special point instead at the tip of the tooth, and the point is called the highest point of single tooth contact. Therefore, the maximum tensile bending stress at the rotation angle of 34.74�� plays an important role in the bending fatigue failure of gear tooth.
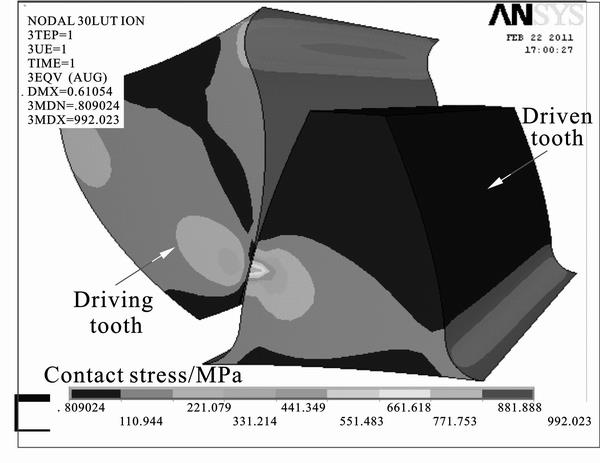
Fig. 22 Meshing state of working tooth pair at rotation angle of 34.74��
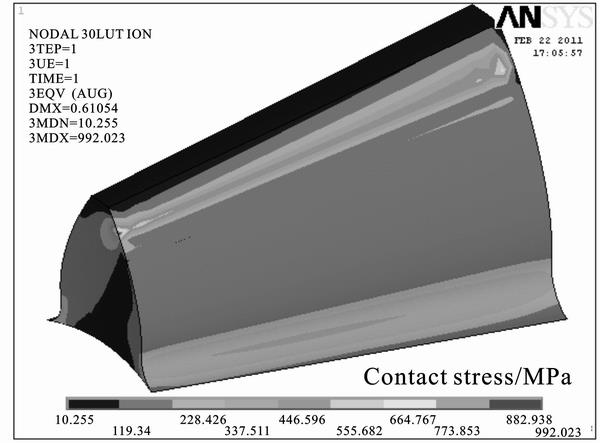
Fig. 23 Contact area on tooth surface for driving pinion at rotation angle of 34.74��
It can be seen from Fig. 21 that for the driven gear, the maximum tensile bending stress is smaller in the double pair tooth contact zone. When the meshing tooth pair enters the single pair tooth contact zone, it increases sharply up to its maximum value. With increasing the rotation angle f1, it decreases gradually until the end of the single pair tooth contact zone. Furthermore, the variation of the maximum bending fatigue stress is similar to that of the maximum tensile bending stress, which is consistent with that of the driving pinion. Based on the analysis above, it is concluded that the pulsating cyclic bending stress plays a significant effect on the bending fatigue failure of the gear tooth. At the rotation angle of 5.76��, the maximum bending fatigue stress is the largest in the meshing cycle for the driven gear. At this moment, the meshing state of the tooth pair is shown in Fig. 19 and the distribution of tensile bending stress in the tooth root is shown in Fig. 20. The contact area on the surface for the driven gear, shown in Fig. 20, also verified that the maximum bending stress occurs at the highest point of single tooth contact. Therefore, the emphasis on the study of fatigue failure should also be brought to the meshing state of working tooth pair at rotation angle of 5.76�� for the driven gear.
According to the analysis result mentioned above, the meshing states of working tooth pair at rotation angles of 5.76��, 20.25�� and 34.74�� are crucial for the contact fatigue analysis and the bending fatigue analysis of gear teeth through the FE method.
7 Verification of simulated result for fatigue analysis
After finishing the FE simulation for the gear tooth fatigue analysis, its accuracy and validity have to be evaluated using the fatigue check equation. the check equation of bending fatigue stress ��F is obtained referring the handbook of mechanical design [29] and expressed as:
 (5)
(5)
 (6)
(6)
where Dm1 is the mean pitch diameter, K is the load factor, b is the gear tooth width, mnm is the midpoint modulus, YFS is the gear form factor, Y�� is the coefficient of contact ratio, YK is the bevel gear coefficient and YLS is the load distribution factor.
The load factor K is determined to be 1 because the FE analysis is static for the proposed model of the theoretical assembling straight bevel gear pair. According to the calculation and the handbook of mechanical design, the parameter values are acquired as: mnm=4.984 5 mm, Dm1=49.846 mm, YFS=4, Y��=1, YK=1 and YLS=1. Thus, the bending fatigue stress for the driving pinion is calculated with the different working torque T, as shown in Fig. 24.
Figure 24 illustrates the comparison between simulated bending fatigue stress and calculated bending fatigue stress for the driving pinion under the different working torques T. It can be seen from Fig. 24 that the simulated bending fatigue stress is in good agreement with the calculated bending fatigue stress and the maximum relative error ( ) is 8.45%. Therefore,the simulation results were proved to be reliable by the check equation of bending fatigue stress and further investigation for the fatigue failure of gear tooth can be done using the developed 3D FE model.

Fig. 24 Comparison between simulated bending fatigue stress and calculated bending fatigue stress
8 Analysis of contact fatigue and bending fatigue under different loads
The proposed models in the key meshing states obtained in the sixth section are performed using the FE method. The variation of contact fatigue stress and bending fatigue stress can be obtained with different torque T.
8.1 Analysis of contact fatigue under different loads
The models at the rotation angles of 5.76�� and 20.25�� are simulated based on the FE method, and the simulation results are shown in Fig. 25.
Figure 25 illustrates the variation of the maximum contact stress and the maximum contact fatigue stress with the change of working torque T. From Fig. 25, it is obvious that the four curves have the same feature, namely they almost increase linearly with the increase of working torque T. The maximum contact fatigue stress is larger than the maximum contact stress in the meshing cycle. Moreover, the maximum contact stress and the maximum contact fatigue stress for the driving pinion are larger than those of the driven gear. And considering the transmission ratio of the straight bevel gear pair, the revolution number of the driving pinion is u times for that of the driven gear. According to the statement above, it is concluded that the contact fatigue life of the driving pinion plays a more significant role on the contact fatigue life of the straight bevel gear pair than that of the driven gear.
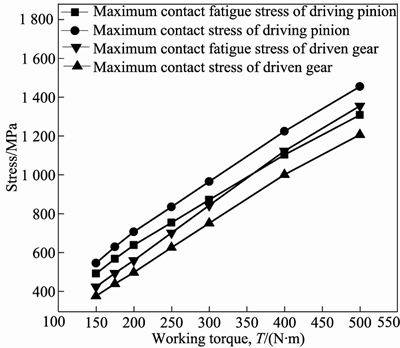
Fig. 25 Variation of maximum contact stress and maximum contact fatigue stress as change of working torque T
8.2 Analysis of bending fatigue under different loads
At the rotation angles of 5.76�� and 34.74��, the proposed model is performed using the FE method and the analysis results are shown in Fig. 26.
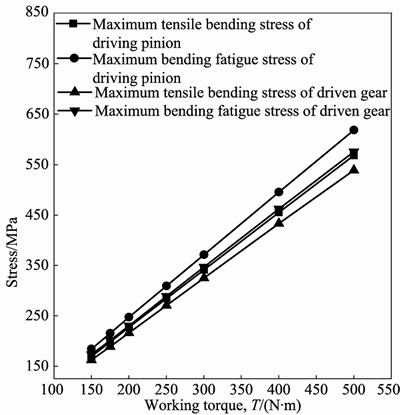
Fig. 26 Variation of maximum tensile bending stress and maximum bending fatigue stress with change of working torque T
Figure 26 shows the variation of the maximum tensile bending stress and the maximum bending fatigue stress with the change of working torque T. It can be found that the maximum tensile bending stress and the bending fatigue stress increase linearly with the increase of working torque T, and the maximum bending fatigue stress is always larger than that of the maximum tensile bending stress in the meshing cycle. Moreover, the maximum tensile bending stress and the maximum bending fatigue stress for the driving pinion are larger than those for the driven gear. Therefore, the bending fatigue life of the driving pinion also plays a more significant role in the bending fatigue life of the straight bevel gear pair than that of the driven gear.
From the analysis above, it is found that the fatigue stress of the driving pinion is always larger than that of the driven gear, so the fatigue failure of the driving pinion is the main fatigue failure for the straight bevel gear pair in engineering machinery. Therefore, it is valuable for engineers to improve appropriately the fatigue strength of the driving pinion to prolong fatigue life of the straight bevel gear pair.
9 Comparison between fatigue stress and fatigue limit
9.1 Comparison between fatigue stress and fatigue limit for driving pinion
The contact fatigue stress and the bending fatigue stress of the driving pinion are compared with the contact fatigue limit and the bending fatigue limit, respectively, which is shown in Fig. 27.
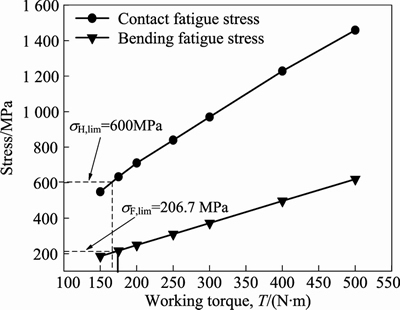
Fig. 27 Comparison between fatigue stress and fatigue limit for driving pinion
Figure 27 illustrates the comparison between fatigue stress and fatigue limit for the driving pinion. It can be found from Fig. 27 that the contact fatigue stress firstly reaches the contact fatigue limit when the working torque T is about 165 N��m, thus the service life of the driving pinion enters the contact fatigue limited life region. Then, the bending fatigue stress reaches the bending fatigue limit when the working torque T is about 175 N��m, thus the service life of the driving pinion enters the bending fatigue limited life region. When the working torque T increases continuously, the service life of the driving pinion is in the contact fatigue limited life region and the bending fatigue limited life region.
9.2 Comparison between fatigue stress and fatigue limit for driven gear
It is also important to recognize the fatigue failure of the driven gear in the mechanical engineering, thus the contact fatigue stress and the bending fatigue stress of the driven gear are compared with the contact fatigue limit and the bending fatigue limit, respectively, which is shown in Fig. 28.
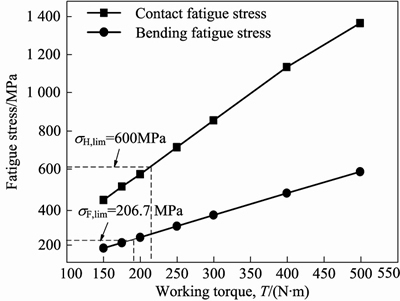
Fig. 28 Comparison between fatigue stress and fatigue limit for driven gear
Figure 28 illustrates the comparison between fatigue stress and fatigue limit for the driven gear. It can be found from Fig. 28 that the bending fatigue stress firstly reaches the bending fatigue limit with the increase of working torque T, thus the fatigue life of the driven gear enters the bending fatigue limited life region. When the working torque T increases continuously, the contact fatigue stress reaches the contact fatigue limit, thus the fatigue life of the driven gear enters the contact fatigue limited life region. Subsequently, the fatigue life of the driven gear is in the bending fatigue limited life region and the contact fatigue limited life region.
10 Analysis of fatigue life
10.1 Analysis of fatigue life of driving pinion
According to the cumulative fatigue criterion and the Basquin relation, the complete contact fatigue life and the complete bending fatigue life of the driving pinion are obtained in the limited life region, as shown in Fig. 29.

Fig. 29 Complete life of contact fatigue and bending fatigue in limited life region for driving pinion
Figure 29 illustrates the complete contact fatigue life and the complete bending fatigue life of the driving pinion in the limited life region. It is clear from Fig. 29 that the complete contact fatigue life and the complete bending fatigue life decrease with the increase of working torque T and the complete contact fatigue life is always larger than the complete bending fatigue life when the working torque T is larger than 175 N��m. Therefore, the service life of a theoretical assembling straight bevel gear pair is mainly dependent on the bending fatigue life of the driving pinion in the limited life region.
10.2 Analysis of fatigue life of driven gear
According to the transmission ratio u, the used contact fatigue life and the used bending fatigue life are calculated when contact fatigue failure or bending fatigue failure of the driving pinion occurs. Thus, for the driven gear, the complete fatigue life and the used fatigue life also are expressed in Fig. 30.
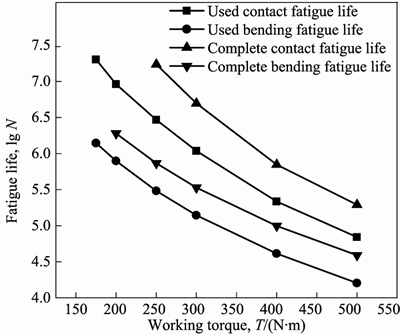
Fig. 30 Complete fatigue life and used fatigue life for driven gear
Figure 30 illustrates the complete fatigue life in the limited fatigue life and the used fatigue life obtained based on the transmission ratio u for the driven gear. It is conspicuous that the complete bending fatigue life is always smaller than the complete contact fatigue life under the different load. For this reason, the bending fatigue failure can be the main fatigue failure if the fatigue failure of driven gear occurs. Furthermore, the used contact fatigue life and the used bending fatigue life are smaller than the complete contact fatigue life and the complete bending fatigue life, respectively. Therefore, the probability of fatigue failure of the driven gear is very small based on the same gear material of the driving pinion.
11 Conclusions
1) The maximum contact fatigue stress is in the vicinity of the pitch line and the maximum bending stress occurs at the highest point of single tooth contact for gears. Furthermore, the meshing states of working tooth pair at rotation angle of 5.76��, 20.25�� and 34.74�� are crucial for the contact fatigue analysis and the bending fatigue analysis .
2) The maximum contact fatigue stress and the maximum bending fatigue stress of gear teeth increase linearly with increasing working torque T and the fatigue stress of the driving pinion is always larger than that of the driven gear.
3) The fatigue failure of the driving pinion is the main fatigue failure for the straight bevel gear pair in engineering machinery and the bending fatigue failure is the main fatigue failure for the driving pinion. Besides, the probability of fatigue failure of the driven gear is very small based on the same gear material of the driving pinion and the bending fatigue failure can be the main fatigue failure if the fatigue failure of driven gear occurs.
4) The service life of the driving pinion firstly enters the contact fatigue limited life region and subsequently enters the bending fatigue limited life region with the increase of working torque T. On the contrary, the service life of the driven gear firstly enters the bending fatigue limited life region and subsequently enters the contact fatigue limited life region.
5) The complete contact fatigue life and the complete bending fatigue life for the driving pinion decrease with the increase of working torque T and the service life of a theoretical assembling straight bevel gear pair is mainly dependent on the bending fatigue life of the driving pinion. Furthermore, for the driven gear, the used contact fatigue life and the used bending fatigue life are smaller than the complete contact fatigue life and the complete bending fatigue life, respectively.
Nomenclature
R
outer cone distance
��a
angle of face cone
��f
angle of root cone
��b
angle of base cone
T
working torque applied to driving pinion
Si
constant stress amplitude (i is from 1 to m)
m
total number of stress amplitudes
ni
used fatigue lives with respect to these stress amplitudes (i is from 1 to x)
Nf
fatigue lives with respect to these stress amplitudes
f1
rotation angular of driving pinion
��H, lim
contact fatigue limit
��F, lim
bending fatigue limit
u
transmission ratio of gear drive
��s
simulated bending fatigue stress
��c
calculated bending fatigue stress
References
[1] Asi O. Fatigue failure of a helical gear in a gearbox [J]. Engineering Failure Analysis, 2006, 13(7): 1116�C1125.
[2] Guagliano M, Riva E, Guidetti M. Contact fatigue failure analysis of shot-peened gears [J]. Engineering Failure Analysis, 2002, 9(2): 147�C158.
[3] DUzcUkoUlu H, Imrek H. A new method for preventing premature pitting formation on spur gears [J]. Engineering Fracture Mechanics, 2008, 75(15): 4431�C4438.
[4] FERNANDES P J L. Tooth bending fatigue failures in gears [J]. Engineering Failure Analysis, 1996, 3(3): 219�C225.
[5] Peng C h, Liu Z y, Zhu W h. Failure analysis of a gear tooth facture of a rolling mill decelerator [J]. Engineering Failure Analysis, 2011, 18(1): 25�C35.
[6] Fonte M, Reis L, Freitas M. Failure analysis of a gear wheel of a marine azimuth thruster [J]. Engineering Failure Analysis, 2011, 18(7): 1884�C1888.
[7] Donzella G, Faccoli M, MazzU A. Petrogalli C, Desimone H. Influence of inclusion content on rolling contact fatigue in a gear steel: Experimental analysis and predictive modeling [J]. Engineering Fracture Mechanics, 2011, 78(16): 2761�C74.
[8] Glodez S, Ren Z, Flasiker J. Surface fatigue of gear teeth flanks [J]. Computers and Structures, 1999, 73(1�C5): 475�C483.
[9] Akata E, Alt1nbal1k M T, Can Y. Three point load application in single tooth bending fatigue test for evaluation of gear blank manufacturing methods [J]. International Journal of Fatigue, 2004, 26(7): 785�C789.
[10] Kramberger J, Sraml M, Glodez S, Flasker J, Potrc I. Computational model for the analysis of bending fatigue in gears [J]. Computers and Structures, 2004, 82(23/24/25/26): 2261�C2269.
[11] Kramberger J, SSraml M, Potr I, Flasker J. Numerical calculation of bending fatigue life of thin-rim spur gears [J]. Engineering Fracture Mechanics, 2004, 71(4/5/6): 647�C656.
[12] Gear K M. tooth contact analysis and its application in the reduction of fatigue wear [J]. Wear, 2007, 262(11/12): 1281�C1288.
[13] Prasannavenkatesan R, Zhang J, McDowell D L, Olson G B, Jou H J. 3D modeling of subsurface fatigue crack nucleation potency of primary inclusions in heat treated and shot peened martensitic gear steels [J]. International Journal of Fatigue, 2009, 31(7): 1176�C89.
[14] Zhang J, Prasannavenkatesan R, Shenoy M m, McDowell D l. Modeling fatigue crack nucleation at primary inclusions in carburized and shot-peened martensitic steel [J]. Engineering Fracture Mechanics, 2009, 76(3): 315�C34.
[15] Wang Ben, Hua Lin. Accurate parametric modeling of spiral bevel gear based on CAD software Pro/ E [J]. Journal of Wuhan University of Technology, 2010, 32(10): 99�C103. (in Chinese)
[16] Fong Z, Tsay C. A mathematical model for the tooth geometry of circular-cut spiral bevel gears [J]. J Mech Des, 1991, 13(30): 174�C181.
[17] Tsay C B, Jeng J W, Feng H S. A mathematical model for ZK-type worm gear set [J]. Mech Mach Theor, 1995, 30(8): 777�C789.
[18] Bair B, Tsay C. ZK-type dual-lead worm and worm gear drives: contact teeth, contact ratios and kinematic errors [J]. J Mech Des, 1998, 120(10): 422�C428.
[19] Dudley D W. Handbook of practical gear design [M]. New York: McGraw-Hill Book Co, 1994: 215�C223.
[20] Litvin F L Gear Geometry and Applied Theory [M]. PTR Prentice Hall, 1994: 318�C324.
[21] Litvin F L, AlfonsoFuentes N, IgnacioGonzal- ez-Perez M. Modified involute helical gears: computerized design, simulation of meshing and stress analysis [J]. Computer Methods in Applied Mechanics and Engineering, 2003, 192(33/34): 3619�C3655.
[22] Litvin F L, Gonzalez-Perez I, Fuentes A, Hayasaka K, Yukishima K. Topology of modified surfaces of involute helical gears with line contact developed for improvement of bearing contact, reduction of transmission errors, and stress analysis [J]. Mathematical and Computer Modeling, 2005, 42(9/10): 1063�C1078.
[23] Lu J, Litvin F L, Chen J S. Load share and finite element stress analysis for double circular-arc helical gears [J]. Mathematical and Computer Modeling, 1995, 21(10): 13�C30.
[24] Zienkiewicz O C. The finite element Method [M]. London: McGraw-Hill, 1977: 124�C263.
[25] Ni D. Application of ANSYS to mechanics [M]. London: Publishing House of Electronics Industry; 2003: 241�C292.
[26] Wang Zhong-guang. Fatigue of Materials [M]. Beijing: National defense industry press, 1999: 162�C163. (in Chinese)
[27] Zeng Chun-hua, Guo Kang-min. fatigue [M]. Beijing: Science Press, 1984: 15�C16. (in Chinese)
[28] Zhu Xiao-lu. Handbook of gear design [M]. Beijing: Chemical Industry Press, 2004: 124�C125. (in Chinese)
[29] Mechanical design manual editorial committee. Gear transmission [M]. Machinerys Handbook. Beijing: Mechanic industry Press, 2007: 67�C68. (in Chinese)
(Edited by HE Yun-bin)
Foundation item: Project(51105287) supported by the National Natural Science Foundation of China; Project(2012BAA08003) supported by the Key Research and Development Project of New Products and New Technologies of Hubei Province, China; Project(2011-P05) supported by the State Key Laboratory of Materials Processing and Die & Mould Technology, Huazhong University of Science and Technology, China;
Received date: 2011�C09�C06; Accepted date: 2012�C10�C08
Corresponding author: HUA Lin, Professor, PhD; Tel./fax: +86�C27�C87168391; E-mail: lhuasvs@yahoo.com.cn

