2519-T87铝合金经速度为816 m/s弹丸斜侵后的显微组织演化
来源期刊:中国有色金属学报(英文版)2012年第6期
论文作者:梁霄鹏 李慧中 黄岚 洪涛 马冰 刘咏
文章页码:1270 - 1279
关键词:2519-T87 铝合金;斜侵;绝热剪切带;显微带;显微硬度
Key words:2519-T87 aluminum alloy; oblique impact; adiabatic shear bands; micro-bands; micro-hardness
摘 要:采用显微硬度测试、金相显微镜(OM)、透射电镜(TEM)、电子背散射衍射(EBSD)等手段,研究2519-T87铝合金板材经速度为816 m/s的WO-109C型燃烧弹斜侵后弹坑周围的硬度分布和显微组织演化。结果表明:在子弹的侵入阶段,组织中绝热剪切带的数量最多,同时析出相尺寸与原始靶材的相当,显微硬度则较其它阶段的高;在稳定侵彻阶段,绝热剪切带的数量减少,显微带数量增多,同时合金中的析出相粗化,这导致合金显微硬度降低;在子弹离开阶段,组织中存在大量的显微带,析出相细化,显微硬度较稳定侵彻阶段的高。显微硬度的演变是由加工硬化和析出相的粗化所致,而析出相的粗化是由绝热温升所引起的。
Abstract: Target made of 2519-T87 aluminum alloy was obliquely impacted by a projectile. Microstructural evolution around the crater was investigated by optical microscopy (OM), transmission electron microscopy (TEM), and electron backscattered diffraction (EBSD). The micro-hardness distribution near the crater after impact was studied. The results indicate that at the entering stage, the amount of adiabatic shear band (ASB) is the most, and the precipitates are as fine as those of the target material; the micro-hardness is higher than that at the other stages. At the stable-running stage, the amount of ASB reduces as the micro-bands increase; the precipitates tend to coarsen, which leads to the decrease of the micro-hardness. At the leaving stage, there is a large amount of micro-bands; the precipitates are refined, and the micro-hardness is higher than that at the stable-running stage. The difference in the micro-hardness of the impact stages is due to work hardening and precipitate coarsening, which is caused by adiabatic temperature rise in the alloy.

![]()

Trans. Nonferrous Met. Soc. China 22(2012) 1270-1279
LIANG Xiao-peng1,2, LI Hui-zhong2, HUANG Lan1, HONG Tao3, MA Bing3, LIU Yong1
1. State Key Laboratory of Powder Metallurgy, Central South University, Changsha 410083, China;
2. Key Laboratory of Nonferrous Metal Materials Science and Engineering, Ministry of Education,
Central South University, Changsha 410083, China;
3. Xinjiang Joinworld Co., Ltd., Urumqi 830013, China
Received 17 February 2012; accepted 28 May 2012
Abstract: Target made of 2519-T87 aluminum alloy was obliquely impacted by a projectile. Microstructural evolution around the crater was investigated by optical microscopy (OM), transmission electron microscopy (TEM), and electron backscattered diffraction (EBSD). The micro-hardness distribution near the crater after impact was studied. The results indicate that at the entering stage, the amount of adiabatic shear band (ASB) is the most, and the precipitates are as fine as those of the target material; the micro-hardness is higher than that at the other stages. At the stable-running stage, the amount of ASB reduces as the micro-bands increase; the precipitates tend to coarsen, which leads to the decrease of the micro-hardness. At the leaving stage, there is a large amount of micro-bands; the precipitates are refined, and the micro-hardness is higher than that at the stable-running stage. The difference in the micro-hardness of the impact stages is due to work hardening and precipitate coarsening, which is caused by adiabatic temperature rise in the alloy.
Key words: 2519-T87 aluminum alloy; oblique impact; adiabatic shear bands; micro-bands; micro-hardness
1 Introduction
The 2519-T87 aluminum alloy is a weldable material with higher mechanical properties than the Al-Mg alloys, and significantly better resistance to stress corrosion cracking (SCC) than Al-Zn-Mg armor alloys [1,2]. Due to its excellent properties, this alloy has been used as the primary material for the advanced amphibious assault vehicle (AAAV) in the USA [3,4]. During its applications, the material would suffer high-velocity penetrations.
The characterization of deformed microstructure in alloys under high-velocity impaction is a gateway to understand the deformation process. During the impact process, the plastic strain and strain rate of the target change gradually from the edge of the crater to the deep matrix. Through the study of deformed microstructure at different depth levels, the relationship between the microstructure and various stages of strain and strain rate can be obtained [5]. Thus, high-velocity impact is an important technique to understand microstructural evolution of Al alloy during deformation process. Many researchers have studied the deformed microstructure in many metals suffering high-velocity impact. MURR et al [6] discussed the micro-bands and shear-related microstructure phenomena associated with impact craters in 6061-T6 aluminum alloy. Micro-bands were observed below the crater wall, especially near the crater bottom, and there was no evidence for either dynamic recrystallization or crater melt-related phenomena at velocities ranging from 1.7 km/s to 5.2 km/s. ZHEN et al [7] investigated microstructure change of Al-6Mg alloy under projectiles impact with velocities of 1-3.2 km/s, and found that dynamic recrystallization was induced adjacent to the crater by hypervelocity impact; micro-cracks, micro-voids, and adiabatic shear bands were formed in the region just near the crater. ZOU et al [8] investigated the deformed microstructure and mechanical properties of AM60B magnesium alloy under hypervelocity impact at a velocity of 4 km/s, and found that the deformed microstructure below the crater can be classified as three zones, which are the dynamic recrystallization zone, high density deformation twin zone, and low density deformation twin zone. Equiaxed refined recrystallization grains were formed adjacent to the crater by twining-induced dynamic recrystallization. However, when the impact velocity was 5 km/s, the deformed microstructure below the crater can be classified as four zones, which are the ultrafine grain zone, ultrafine grain and deformation twin zone, high density deformation twin zone, and low density deformation twin zone [9].
In summary, the deformed microstructure under dynamic loading has received increasing interest in recent years. Various deformed microstructures under dynamic loading have been observed in different materials [10-16]. The characterization of microstructure in 2519 aluminum alloy under high-velocity impact was studied by split Hopkinson pressure bar (SHPB) test [17-20]. GAO et al [17] found the adiabatic shear lines, arc-like shearing bands, and DRX grains in samples at a strain rate ranging from 697 to 7030 s-1, at 573 K in 2519A aluminum alloy. Furthermore, GAO et al [18,19] discovered that the thickness of θ′ precipitate could be controlled by adjusting the strain rate of impacted specimens in 2519A alloy. The thickening of the precipitate became obvious as the strain rate went above (2400±100) s-1. Most of the semi-coherent plate-like θ′ precipitates were consequentially transformed to incoherent spherical θ′ precipitates only when the strain rate increases up to (7000±100) s-1. ZHANG et al [20] investigated the impact behavior of 2519A aluminum alloy at strain rates of 600-7000 s-1 and temperatures 20-450 °C by a split Hopkinson pressure bar, and found the existence of dynamic recrystallization. However, the deformed microstructure development in 2519 aluminum alloy under high-velocity obliquely impacted by a projectile has limited report [21].
In this work, the deformed microstructures character in 2519-T87 aluminum alloy under obliquely impacted by a projectile with a velocity of 816 m/s is investigated.
2 Experimental
The target material was 2519-T87 aluminum alloy, with the chemical composition of 5.8% Cu, 0.20% Mg, 0.30% Mn, 0.20% Zr, 0.06% Ti, 0.05% V, 0.20% Fe, 0.10% Si (mass fraction) and the balance Al. The thickness of the target was 20 mm. The target was obliquely impacted by a WO-109C type incendiary projectile of 7.62 mm diameter at an impact velocity of 816 m/s with an angle of 42°. The schematic diagram of the impact process is shown in Fig. 1, in which the dashed line represents the trajectory of the projectile.

Fig. 1 Schematic diagram of impact process
After the projectile impacted the target, the crater of the target was sectioned along longitudinal direction parallel to the penetration direction. Specimen was ground, polished, and etched by Keller solution (2.5 mL HNO3 + 1.5 mL HCl + 1.0 mL HF + 95 mL H2O), and examined by a Leica EC3 optical microscope (OM). Micro-hardness tests were conducted through HVS-100 Vickers micro-hardness tester, with a load of 9.8 N and loading time of 15 s. Thin sheets were cut parallel to the section specimen using linear cutting machine, followed by mechanical polishing to a thickness of about 80 μm. Final sample thinning to electron transparency was achieved by Strier TenuPol-5 double jet polishing in a solution containing 20 mL nitric acid + 75 mL methanol +5 mL ethylene glycol dibutyl ether. The polishing current was kept at 100 mA and temperature was kept at -35 °C. Samples were examined by a Tecnai G220 transmission electron microscope (TEM) operating at 200 kV. The electron back-scattered diffraction (EBSD) data were obtained on a Sirion200 field-emission scanning electron microscope (SEM) fitted with an EDAX/TSL XM4-Hikari, and the analysis software was TSL OIM 5.31. The specimens were electrolytically polished by 30 mL nitric acid + 70 mL methanol solution at -20 °C.
3 Result
3.1 Macroscopic observation
The top and cross section views of the crater in the 2519-T87 aluminum alloy target obliquely impacted by a projectile with a velocity of 816 m/s are shown in Fig. 2. The shape of the crater shows typical impacted features, with length, maximum depth and diameter of 50, 11.5 and 18 mm, respectively. As the projectile obliquely impacts and penetrates into the 2519-T87 aluminum alloy target, the metal suffers server plastic deformation especially at the rim of the material. Three stages of the impact can be classified as to characterize the crater pattern. The first stage, where the angle between the running direction of the projectile and the target plane reduces as the penetration depth increases, is called the entering stage (zone A shown in Fig. 2(b)); the second stage, when the running direction of the projectile is parallel to the target plane, is called the stable-running stage (zone B shown in Fig. 2(b)); and the third stage, where the angle between the running direction of the projectile and the target plane reduces during the running of the projectile, is called the leaving stage (zone C shown in Fig. 2(b)).
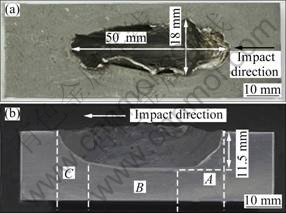
Fig. 2 Top (a) and cross-section (b) views of crater
3.2 Micro-hardness distribution
Figure 3 shows the micro-hardness distribution at the rim of the crater. The X axis represents the horizontal distance from the impacted point. The distance between the test point to the edge of the crater is 50 mm, and the initial point is 2 mm away from the surface of the target. The micro-hardness of the alloy shows a spoon-shape curve, which indicates that the micro-hardness of the entering stage A is higher than that of the stable-running stage B and leaving stage C. In addition, the micro- hardness of the 2519-T87 plate is about HV145 [22]. When the impact distance is less than 5 mm, the micro-hardness is higher than HV145, and when the distance is more than 5 mm the micro-hardness drops below HV145. At stable-running stage, the micro- hardness remains stable with the increase of distance. At the leaving stage, the micro-hardness value increases gradually.
3.3 Microstructure character
Figure 4 shows the microstructures of the 2519-T87 aluminum alloy target. The grains are elongated with an average grain size of 50-80 μm in width and 100-200 μm in length (Fig. 4(a)). The major precipitate is θ′ phase which can be demonstrated by selected area diffraction pattern (Fig. 4(b)). The θ′ phase has a thin plate morphology with fine grain size, which shows excellent mechanical properties. The EBSD image of the grain orientation map shows elongated grains with small grains generated along them (Fig. 4(c)), moreover, the grain boundary orientation is larger than 15° (Fig. 4(d)).
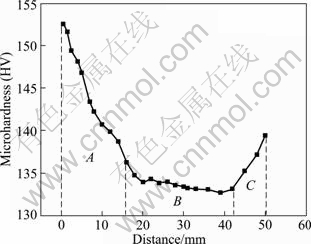
Fig. 3 Micro-hardness distribution at rim of crater
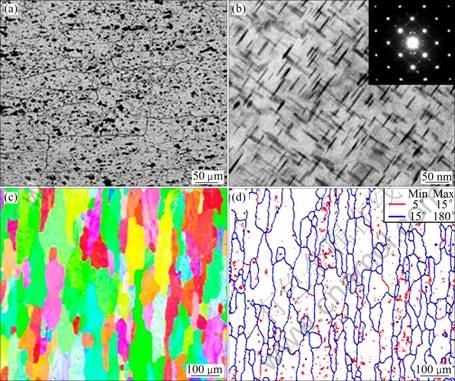
Fig. 4 Microstructures of 2519-T87 aluminum alloy target: (a) Optical micrograph; (b) TEM micrograph and selected area diffraction pattern; (c) Grain orientation map; (d) Grain boundary map
Figure 5 shows the optical micrographs of 2519- T87 alloy target near the crater wall at the entering stage. It can be seen that the crater wall undergoes a severe shear deformation. In Fig. 5(a), the grains are elongated and local grains are concentrated which shows deformation localization. In Figs. 5(b) and (c), narrow adiabatic shear bands and crooked grains are observed in the target near the crater wall. Whirlpool-like adiabatic shear band is observed in the target (Figs. 5(d) and (e)). Micro-cracks in adiabatic shear band and micro-bands aside the adiabatic shear band can be seen in Fig. 5(f). Cracks are formed at the center part of the whirlpool-like adiabatic shear band (Fig. 5(g)). Local dynamic recrystallization grains can be observed at the edge of the crater (Fig. 5(h)).
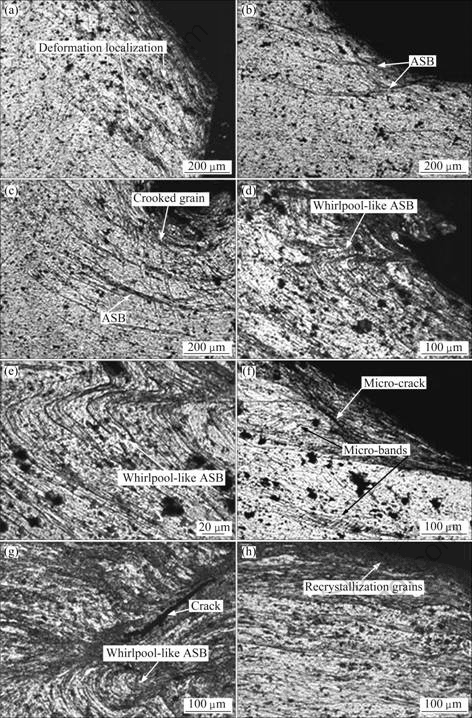
Fig. 5 Optical micrographs of 2519-T87 alloy near crater wall at entering stage: (a) Deformation localization; (b) Narrow adiabatic shear bands; (c) Crooked grain and adiabatic shear bands; (d) Wide adiabatic shear bands and whirlpool-like adiabatic shear bands; (e) Local enlargement of (d); (f) Wide adiabatic shear bands, micro-crack and micro-bands; (g) Whirlpool-like adiabatic shear bands and crack; (h) Local dynamic recrystallization grains
Figure 6 shows the TEM micrographs of structures and selected area diffraction pattern near the crater wall at the entering stage. Compared with Fig. 4(b), the size and density of the θ′ precipitate phases are identical, as shown in Fig. 6(a), indicating that the effect of oblique impact on the precipitate phase change is obscure at the entering stage. It can be seen that when closely compacted, narrow deformation dislocation cells with high density of dislocations are formed as micro-bands (Fig. 6(b)). Figure 6(c) shows the TEM micrograph of whirlpool-like adiabatic shear bands, which is also shown in Fig. 5(g). The dislocation density in grains is high, which leads to the refinement of grain size below 0.5 μm through dynamic recrystallization. The selected area diffraction pattern of ASB shows a ring pattern, as shown in Fig. 6(d), which indicates an unordered alignment of grains due to large orientation difference between grains.
Figure 7 shows the optical micrographs near the crater wall at the stable-running stage. Dynamic recrystallization grains can be obviously observed in the adiabatic shear bands, the angle between the adiabatic shear bands and the edge of crater is consistent with that at the entering stage (shown in Fig. 5), and the orientation of the adiabatic shear band is almost parallel to the edge of crater (shown in Fig. 7(a)). At this stage, the micro-bands are more obvious than those at the entering stage, and the density of the micro-bands is higher (Figs. 7(b) and (c)). The orientation of the micro-bands near the crater wall in the target is disorientated. From (Fig. 7(d)), obvious dynamic recrystallization grains can be observed at the edge of crater, and narrow adiabatic shear bands can be found in the target (Fig. 7(e)). Thus, during the stable-running stage adiabatic shear bands are narrower and less in amount as compared with the entering stage, while the micro-bands are more obvious.

Fig. 6 TEM micrographs of 2519-T87 alloy target near crater wall: (a) Precipitate; (b) Micro-bands; (c) Adiabatic shear bands; (d) Selected area diffraction pattern of (c)

Fig. 7 Optical micrographs of 2519-T87 alloy target near crater wall at stable-running stage: (a) Wide adiabatic shear bands and dynamic recrystallization grains; (b) Adiabatic shear bands and micro-bands; (c) Local enlargement of (b); (d) Dynamic recrystallization grains; (e) Narrow adiabatic shear bands and micro-bands
Figure 8 shows the EBSD micrographs near the crater wall at the stable-running stage. It can be seen in Fig. 8(a) that, the grains are elongated more seriously than those in the base target, and at the edge of the crater dynamic recrystallization can be observed. The recrystallization grains are very fine with an equiaxed shape, indicating that the recrystallization process is fully completed. Moreover, micro-bands can be seen in some grains (Fig. 8(b)). The grain boundaries of these micro-bands are low angle grain boundaries, and the angle between these micro-bands and base grains is lower than 15° (Fig. 8(c)).
Figure 9 shows the optical micrographs near the crater wall at the leaving stage. There are a large amount of micro-bands and some dynamic recrystallization grains near the crater wall (Figs. 9(a) and (b)). The amount of adiabatic shear bands is less than that at entering stage and stable-running stage. Some grains are elongated in this stage (Fig. 9(c)) and micro-bands can be found in these elongated grains (Fig. 9(d)). Figure 9(e) shows the deformation localization, inferring that the adiabatic shear is incomplete.
Figure 10 shows the TEM micrograph and selected area diffraction pattern near the crater wall at the stable-running stage and leaving stage. It can be observed that the alloy contains only θ′ phase at the stable-running stage and leaving stage, but the sizes are thicker than those of the 2519-T87 target or those at entering stage. At the stable-running stage, the θ′ phase is ellipsoidal with an aspect ratio of near 2 (Fig. 10(a)). At the leaving stage, the θ′ phase is of thin-plate shape, but still thicker than that at the entering stage.

Fig. 8 EBSD micrographs near crater wall at stable-running stage: (a) Grain orientation map of recrystallization; (b) Grain orientation map of micro-bands; (c) Grain boundary map of (b)
4 Discussion
It is a short-time process for the bullet to penetrate through the target. From invasion to leaving, it generally takes only a few microseconds to several microseconds [21]. During the penetration process, the deformation strain rate of the material is very high and the temperature of the target rises. The effect of temperature plays an important role in the micro-hardness variation, precipitate phase coarsening and dynamic recrystallization degree of the target around the crater. Thus, measuring the temperature rise of the target during penetration is very important for the understanding of the microstructural development mechanism of the Al alloy.
Assuming that all the plastic deformation work is transformed into heat, the temperature changing rate (dT/dt) during high speed plastic deformation can be calculated by [7]:
![]() (1)
(1)
where Sij is a stress component, and is assumed to be equal to the tensile strength (σb) of the material; dγ/dt is the deformation strain rate of the materials; ρ is the density; and Cv is the specific heat capacity of the material. As for the 2519-T87 alloy, Sij=σb=485 MPa, dγ/dt can be assumed to be 106-108 s-1, ρ=2820 kg/m3, Cv=902 J/(kg・K). Inserting the data into Eq. (1), dT/dt= 1.89×10⁸-1.89×10¹⁰ K/s. This value shows that the rising rate of temperature caused by plastic deformation during high velocity impact is very high. The temperature rise can reach several hundred centigrade in one microsecond.
It is well known that, θ′ phase is the major strengthening precipitate in the 2519-T87 aluminum alloy target. The θ′ phase dissolves at 520-540 °C based on the Al-Cu phase diagram. Since θ′ phase remains near the crater wall in the 2519-T87 aluminum alloy after being obliquely impacted by a projectile with a velocity of 816 m/s (Fig. 6(a) and Fig. 10), the temperature rise during the penetration process is lower than 520 °C. On the other hand, recrystallization can be observed in the target (Fig. 8(a)), indicating that the temperature has risen higher than 350 °C, which is the recrystallization temperature of the 2519-T87 aluminum alloy. Therefore, the temperature rise of the target during impact is between 350-520 °C. Affected by the high plastic deformation strain rate and temperature, the microstructure and micro-hardness of the target show different characters.
At the entering stage, when the projectile impacts the target, the kinetic energy of the projectile is highly concentrated in the local target area. Since the instant impact pressure is far beyond the yield strength of the target, impact flange is formed during the plastic flow stage. When the projectile penetrates into the target, high velocity induced shear deformation has work-hardening effect on the target material. However, at the entering stage, the time is short while the temperature rise is low, the precipitate phases remain fine (Fig. 6(a)), mostly the same as the 2519-T87 target plate (Fig. 4(b)). 2519-T87 aluminum alloy is a typical age-hardening alloy which is strengthened by the θ′ phase. The θ′ precipitate is semi-coherent with the Al matrix [23]. Its morphology, size and volume fraction are related to the mechanical properties of the 2519-T87 alloy plate. The finer the θ′ precipitate phases are, the higher the strength and micro-hardness of the 2519-T87 alloy [18]. Thus, the micro-hardness of the alloy at the entering stage is higher than that at the stable-running stage and leaving stage. However, temperature is the main reason for θ′ phase coarsening. The higher the temperature is, the coarser the θ′ phase is. Thus, at the entering stage, the high micro-hardness of the alloy is mainly related to the work-hardening process, rather than the refinement of the θ′ phase. When the material is deformed under high strain rate, micro-bands with high density of dislocations are formed in the target near the crater wall (Fig. 6(b)). These FCC metal related micro-bands have been identified and discussed in the past years [24]. Study showed these micro-bands tend to orient along the (110) direction of the {111} planes. Since these micro-bands have inhomogeneous deformation microstructure, they can cause material failure. When the shear deformation is high enough and the shear heat triggers recrystallization at local regions, adiabatic shear band can be formed (Fig. 6(c)). It is well known that the adiabatic shear bands are by-products of mechanical deformation and thermal effects. The non-homogenous deformation and concentration of stress and strain in the adiabatic shear bands can cause the formation of micro-cracks in the alloy (Fig. 5(g)), which can lead to the fracture failure of the target.
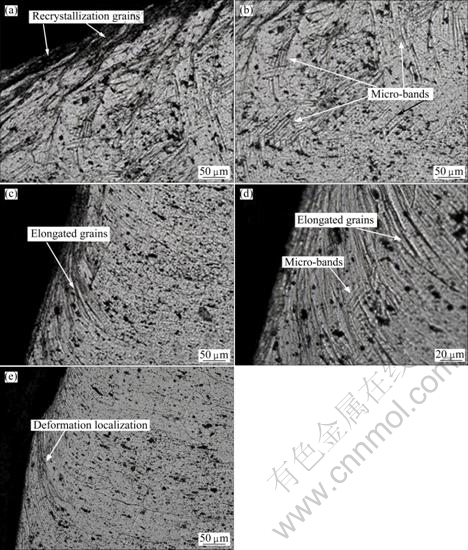
Fig. 9 Optical micrographs near crater wall at leaving stage: (a) Dynamic recrystallization grains and micro-bands; (b) Micro-bands; (c) Severe elongated grain; (d) Local enlargement of (c); (e) Deformation localization
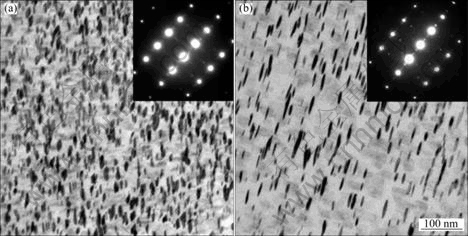
Fig. 10 TEM micrographs and selected area diffraction patterns near crater wall: (a) Stable-running stage; (b) Leaving stage
At the stable-running stage, as the contact area between the projectile and the target increases, the friction heat increases, and the θ′ phase coarsens (Fig. 10(a)). The increase of temperature reduces the effect of work-hardening. Due to these effects, the micro-hardness of the target is lower than that at the entering stage (Fig. 3). Comparing Fig. 7 and Fig. 5, more micro-bands and less adiabatic shear bands can be found at the stable-running stage than at the entering stage. This is due to the recovery and recrystallization of the material (Fig. 8(a)).
At the leaving stage, the velocity of the projectile is reduced, and the temperature increase of the target is lower than that at the stable-running stage, thus the θ′ phase is finer than at the stable-running stage, and the recrystallization of the grains is not obvious. A large amount of micro-bands can be observed in the target, indicating the remaining of high strain rate and work-hardening of the alloy, which leads to higher micro-hardness of the alloy than at the stable-running stage.
5 Conclusions
The microstructural evolution and micro-hardness of the 2519-T87 aluminum alloy obliquely impacted by a WO-109C type incendiary projectile with a velocity of 816 m/s were studied.
1) At the entering stage of the projectile penetrating into the 2519-T87 aluminum alloy target, the amount of adiabatic shear bands are more while micro-bands are less as compared with the stable-running stage and the leaving stage; the precipitates are as fine as those of the target material; and the micro-hardness is higher than that at the other stages.
2) At the stable-running stage, the amount of adiabatic shear bands decreases as the amount of micro-bands increases; dynamic recrystallization is obvious and the precipitates are coarsened; the micro-hardness is the lowest among the three stages.
3) At the leaving stage, there is a large amount of micro-bands and small amount of adiabatic shear bands; the dynamic recrystallization is less obvious than that at the stable-running stage; the precipitates are refined and the micro-hardness is higher than that at the stable-running stage.
References
[1] SANDER R E Jr, PETIT J I. High strength weldable aluminum base alloy product and method for making same: USA 4610733.9 [P]. 1989-10-17.
[2] DYMEKA S, DOLLARB M. TEM investigation of age-hardenable Al 2519 alloy subjected to stress corrosion cracking tests [J]. Materials Chemistry and Physics, 2003, 81(2-3): 286-288.
[3] FISHER J J Jr, KRAMER L S, PICKENS J R. Aluminum alloy 2519 in military vehicles [J]. Advanced Materials and Processes, 2002, 160(9): 43-46.
[4] KRAMER L S, BLAIR T P, BLOUGH S D, FISHER J I Jr, PICKENS J R. Stress-corrosion cracking susceptibility of various product forms of aluminum alloy 2519 [J]. Journal of Materials Engineering and Performance, 2002, 11(6): 645-650.
[5] ZHEN L, ZOU D L, XU C Y, SHAO W Z. Microstructure evolution of adiabatic shear bands in AM60B magnesium alloy under ballistic impact [J]. Materials Science and Engineering A, 2010, 527(21-22): 5728-5733.
[6] MURR L E, AYALA A, NIOU C S. Microbands and shear-related microstructural phenomena associated with impact craters in 6061-T6 aluminum [J]. Materials Science and Engineering A, 1996, 216(1-2): 69-79.
[7] ZHEN L, LI G A, ZHOU J S, YANG D Z. Micro-damage behaviors of Al-6Mg alloy impacted by projectiles with velocities of 1-3.2 km/s [J]. Materials Science and Engineering A, 2005, 391(1-2): 354-366.
[8] ZOU D L, ZHEN L, ZHU Y, XU C Y, SHAO W Z, PANG B J. Deformed microstructure and mechanical properties of AM60B magnesium alloy under hypervelocity impact at a velocity of 4 km s-1 [J]. Materials Science and Engineering A, 2010, 527(15): 3323-3328.
[9] ZOU D L, ZHEN L, ZHU Y, XU C Y, SHAO W Z, PANG B J. Deformed microstructure evolution in AM60B Mg alloy under hypervelocity impact at a velocity of 5 kms-1 [J]. Materials Design, 2010, 31(8): 3708-3715.
[10] LEE C G, PARK W J, LEE S, SHIN K S. Microstructural development of adiabatic shear bands formed by ballistic impact in a WELDALITE 049 alloy [J]. Metallurgical and Materials Transactions A, 1998, 29(2): 477-483.
[11] LI G A, ZHEN L, LIN C, GAO R S, TAN X, XU C Y. Deformation localization and recrystallization in TC4 alloy under impact condition [J]. Materials Science and Engineering A, 2005, 395(1-2): 98-101.
[12] XUE Q, GRAY G T III. Development of adiabatic shear bands in annealed 316L stainless steel. Part I: Correlation between evolving microstructure and mechanical behavior [J]. Metallurgical and Materials Transactions A, 2006, 37(8): 2435-2446.
[13] XUE Q, GRAY G T III. Development of adiabatic shear bands in annealed 316L stainless steel: Part II. TEM studies of the evolution of microstructure during deformation localization [J]. Metallurgical and Materials Transactions A, 2006, 37(8): 2447-2458.
[14] P?REZ-PRADO M T, HINES J A, VECCHIO K S. Microstructural evolution in adiabatic shear bands in Ta and Ta-W alloys [J]. Acta Materialia, 2001, 49(15): 2905-2917.
[15] MEYERS M A, CAO B Y, NESTERENKO V F, BENSON D J, XU Y B. Shear localization-martensitic transformation interactions in Fe-Cr-Ni monocrystal [J]. Metallurgical and Materials Transactions A, 2004, 35(9): 2575-2586.
[16] WANG Bing-feng, YANG Yang. Microstructure evolution in adiabatic shear band in fine-grain-sized Ti-3Al-5Mo-4.5V alloy [J]. Materials Science and Engineering A, 2008, 473(1-2): 306-311.
[17] GAO Zhi-guo, ZHANG Xin-ming, ZHAO Yi-sheng, CHEN Ming-an, LI Hui-jie. The effect of strain rate on the microstructure of 2519A aluminium alloy plate impacted at 573 K [J]. Journal of Alloys and Compounds, 2009, 481(1-2): 422-426.
[18] GAO Zhi-guo, ZHANG Xin-ming, CHEN Ming-an. Influence of strain rate on the precipitate microstructure in impacted aluminum alloy [J]. Scripta Materialia, 2008, 59(9): 983-986.
[19] GAO Zhi-guo, ZHANG Xin-ming, CHEN Ming-an. Investigation on θ′ precipitate thickening in 2519A-T87 aluminum alloy plate impacted [J]. Journal of Alloys and Compounds, 2009, 476(1-2): L1-L3.
[20] ZHANG Xin-ming, LI Hui-jie, LI Hui-zhong, GAO Hui, GAO Zhi-guo, LIU Ying, LIU Bo. Dynamic property evaluation of aluminum alloy 2519A by split Hopkinson pressure bar [J]. Transactions of Nonferrous Metals Society of China, 2008, 18(1): 1-5.
[21] GAO Hui, ZHANG Xin-ming, LI Hui-zhong, LIU Ying. Microstructure inhomogeneities in 2519A aluminum plate penetrated by an incendiary projectile [J]. Materials Science Forum, 2007, 546-549(2): 1048-1054.
[22] LI Hui-zhong, ZHANG Xin-ming, CHEN Ming-an, GONG Min-ru, ZHOU Zhuo-ping. Microstructures and properties of welded joint of 2519 aluminum alloy [J]. The Chinese Journal of Nonferrous Metals, 2004, 14(6): 956-960. (in Chinese)
[23] VAITHYANATHAN V, WOLVERTON C, CHEN L Q. Multiscale modeling of θ′ precipitation in Al-Cu binary alloys [J]. Acta Materialia, 2004, 52(10): 2973-2987.
[24] ANANTHAN V S, LEFFERS T, HANSEN N. Characteristics of second generation microbands in cold-rolled copper [J]. Scripta Metallurgica et Materialia, 1991, 25(1): 137-142.
梁霄鹏1,2, 李慧中2, 黄 岚1, 洪 涛3, 马 冰3, 刘 咏1
1. 中南大学 粉末冶金国家重点实验室,长沙 410083;
2. 中南大学 有色金属材料科学与工程教育部重点实验室,长沙 410083;
3. 新疆众和股份有限公司,乌鲁木齐 830013
摘 要:采用显微硬度测试、金相显微镜(OM)、透射电镜(TEM)、电子背散射衍射(EBSD)等手段,研究2519-T87铝合金板材经速度为816 m/s的WO-109C型燃烧弹斜侵后弹坑周围的硬度分布和显微组织演化。结果表明:在子弹的侵入阶段,组织中绝热剪切带的数量最多,同时析出相尺寸与原始靶材的相当,显微硬度则较其它阶段的高;在稳定侵彻阶段,绝热剪切带的数量减少,显微带数量增多,同时合金中的析出相粗化,这导致合金显微硬度降低;在子弹离开阶段,组织中存在大量的显微带,析出相细化,显微硬度较稳定侵彻阶段的高。显微硬度的演变是由加工硬化和析出相的粗化所致,而析出相的粗化是由绝热温升所引起的。
关键词:2519-T87 铝合金;斜侵;绝热剪切带;显微带;显微硬度
(Edited by YUAN Sai-qian)
Foundation item: Project (201191107) supported by Science and Technology Plan of Xinjiang, China
Corresponding author: HUANG Lan; Tel: +86-15973118718; Fax: +86-731-88830116; E-mail: hazefog31@yahoo.cn
DOI: 10.1016/S1003-6326(11)61315-0

