热成形TA32钛合金薄壁件的形状控制与性能优化
来源期刊:中国有色金属学报(英文版)2021年第8期
论文作者:武永 范荣磊 秦中环 陈明和
文章页码:2336 - 2357
关键词:TA32钛合金;本构方程;热变形;显微组织演变;有限元方法
Key words:TA32 titanium alloy; constitutive equation; hot deformation; microstructure evolution; finite element method
摘 要:为了优化TA32钛合金薄壁件的热成形工艺,对其热流动行为、显微组织演变和断口形貌进行研究。根据实验数据建立一套基于合金显微组织的本构方程,描述高温流动应力与相体积分数、位错密度、晶粒尺寸和损伤演化之间的关系。将本构模型嵌入ABAQUS 6.14中模拟典型薄壁件的热成形过程,预测不同工艺参数下成形件的等效应变、位错密度、损伤分布以及成形缺陷。在变形温度为800 °C、加载速度为5 mm/s的条件下,采用改进形状尺寸后的毛坯成功模拟出无起皱和破裂缺陷的合格零件,且其最大损伤值仅为18.3%。通过显微硬度实验验证本构模型和有限元模拟的准确性,表明基于物理内变量的有限元模型能够有效地优化TA32钛合金复杂零件的热成形过程。
Abstract: The hot flow behaviors, microstructure evolution and fractographs were studied to optimize the hot forming process of the TA32 titanium alloy thin-walled part. A set of microstructure-based constitutive equations were developed based on the experimental data, which described the relationships among the hot flow stresses and the evolution of phase volume fraction, dislocation density, grain size and damage. The constitutive model was imported into ABAQUS 6.14 to simulate the hot forming process for a typical thin-walled part. The effective strain, dislocation density and damage distribution as well as forming defects of formed parts under different process parameters were predicted. A qualified part without wrinkling and fracture defects was produced at a loading speed of 5 mm/s at 800 °C by the modified blank shape, where the maximum damage value was only 18.3%. The accuracy of constitutive model and finite element (FE) simulation was verified by the microhardness tests, which indicates that the FE model based on physical internal-state variables can well optimize the hot forming process of TA32 titanium alloy complex parts.
Trans. Nonferrous Met. Soc. China 31(2021) 2336-2357
Yong WU1, Rong-lei FAN1, Zhong-huan QIN2, Ming-he CHEN1
1. College of Mechanical and Electrical Engineering, Nanjing University of Aeronautics and Astronautics, Nanjing 210016, China;
2. Beijing Hangxing Machinery Manufacturing Co., Ltd., Beijing 100013, China
Received 11 August 2020; accepted 28 January 2021
Abstract: The hot flow behaviors, microstructure evolution and fractographs were studied to optimize the hot forming process of the TA32 titanium alloy thin-walled part. A set of microstructure-based constitutive equations were developed based on the experimental data, which described the relationships among the hot flow stresses and the evolution of phase volume fraction, dislocation density, grain size and damage. The constitutive model was imported into ABAQUS 6.14 to simulate the hot forming process for a typical thin-walled part. The effective strain, dislocation density and damage distribution as well as forming defects of formed parts under different process parameters were predicted. A qualified part without wrinkling and fracture defects was produced at a loading speed of 5 mm/s at 800 °C by the modified blank shape, where the maximum damage value was only 18.3%. The accuracy of constitutive model and finite element (FE) simulation was verified by the microhardness tests, which indicates that the FE model based on physical internal-state variables can well optimize the hot forming process of TA32 titanium alloy complex parts.
Key words: TA32 titanium alloy; constitutive equation; hot deformation; microstructure evolution; finite element method
1 Introduction
TA32 alloy is a near-α titanium alloy that can long time work at 550 °C, and has wide application prospects in the craft and aeroengine due to its good performance of high temperature strength, specific strength, thermal stability, creep resistance and weldability [1,2]. Because of the low plasticity, large deformation resistance and high springback at room temperature, most of the thin-walled titanium alloy parts are produced by hot forming process [3]. The part shape and mechanical properties of the formed parts are sensitive to the forming parameters [4-7]. The qualified complex parts can only be formed by the correct forming process parameters. If the forming process parameters are not optimum, some defects, such as wrinkle, crack, grain coarsening or deformation damage, will appear [8,9]. The shape controlling and mechanical property optimization are both important for the hot forming process.
The forming parameter optimization was very important for the hot forming process. The pre-forming process [10], loading path [11], die design [12], and blank shape design [3] were adopted to avoid the defects. In studies of the hot gas forming for Ti-3Al-2.5V tubular parts, the thickness distribution, microstructure and mechanical properties were significantly improved by the forming parameters optimization, i.e. the feed speed, gas pressure and temperature distribution [13,14]. For the hot stamping of 22MnB5 steel, good microstructure and mechanical properties were only gotten followed the suitable forming process parameters [15]. The acceptable forged TA15 titanium alloy parts were also only obtained by the specific forging process and cooling mode [16]. To get suitable hot forming parameters, it is necessary to develop a reliable constitutive equation coupled with microstructure evolution and mechanical properties. In recent years, some physically-based constitutive equations have been developed, which quantificationally described the relationship between the mechanical properties and microstructure evolution during the hot deformation [17,18]. They provide a feasible way to describe the evolution of the internal state variables, including dislocation density, grain size, phase volume fraction, dynamic recrystallization (DRX) and damage. YANG et al [19] and LI et al [20] set up a set of reliable mechanism-based unified constitutive equations to model the flow softening and ductile damage evolution of TA15 and TC6 alloys, respectively. XIAO et al [21] developed a dislocation density-based model associated with dynamic recovery, work hardening mechanisms and spheroidization of α-phase to describe the thermal compression behavior of the Ti-55511 alloy. The damage and grain size distributions of the Ti-6Al-4V parts were accurately predicted by the FE simulation combining with the physically-based constitutive equations during the superplastic forming [22]. The service performance of the 22MnB5 steel part prepared by hot forming and quenching process was also predicted by the physically-based constitutive equations [23].
To form the complex thin-walled TA32 alloy parts with good shape and mechanical properties, the hot deformation and microstructure evolution were studied. A series of microstructure-based constitutive equations were established to optimize the hot forming process parameters. The constitutive equations were imported into the ABAQUS 6.14 simulation modeling to optimize the hot forming parameters. This study will provide the references to the hot forming for the complex TA32 alloy parts.
2 Experimental
2.1 Materials
The rolled TA32 alloy sheet with the nominal composition of Ti-5.5Al-3.5Sn-3.0Zr-0.7Mo- 0.3Si-0.4Nb-0.4Ta and a thickness of 1.5 mm was utilized. The transformation temperature of α to β phase was (1000±10) °C [24].
2.2 Uniaxial tensile test
Uniaxial tensile tests were conducted firstly to characterize the flow behavior of the material in the temperature range of 750-900 °C and the strain rate of 0.0001-0.1 s-1 by using a UTM 5504X uniaxial tensile testing machine. During the uniaxial tensile tests, the tensile speeds of the jig were controlled by the equation:  , to obtain the constant strain rate, where v is the cross head velocity,
  is the strain rate, L0 is the gauge length of the specimen, and t is the tensile time. The tensile specimens with a gauge length of 25 mm and a width of 6 mm were cut using a wire-electrode machine. The 400# and 1000# emery papers were used to polish the specimens. The uniaxial tensile direction was the same to the rolling direction. Before the tests, the specimens were coated with the layer of glass slurry. Then, the tensile specimens were put into the furnace and thermally insulated for 10 min to the testing temperature. The specimens were tested with a constant strain rate. After the tests, the specimens were taken out and water- quenched quickly.
2.3 FE simulation model
Figure 1(a) shows the geometric model of the complex thin-wall TA32 titanium alloy part, which is a typical aircraft skin component. The length, width and height of the part are about 492, 238 and 125 mm, respectively. In order to keep the size accuracy of the final part, the side scraps were designed around the final complex thin-wall part. The dimension of blank was obtained by using CATIA software to expand the digital model of the part, as shown in Fig. 1(b). The dynamic explicit algorithm in ABAQUS 6.14 was adopted to simulate the hot forming process. Figure 1(c) shows the FE simulation model. The dies were defined as rigid surfaces and meshed with R3D4 elements. The sheet blank was defined as the elastoplastic deformable shell. The eight-node C3D8T solid element coupled with temperature and displacement was used to mesh the blank, and 5-layer mesh was set in the thickness direction to prevent the mesh distortion during plastic deformation. The element number of sheet blank was about 66000. The lower die was fixed. The hot forming process was realized by controlling the movement of the top die. Because two same complex pieces were formed together during the production experiment, the nodes in the symmetrical plane were restrained in Ux direction. The general friction was adopted in the FE simulation. The coefficient of coulomb frication was 0.3. The VUMAT subroutine based on the unified viscoplastic constitutive equations was selected as a material model, which was compiled by FORTRAN language. Table 1 shows the forming conditions of the simulation scheme.

Fig. 1 Schematic diagrams of part and FE models of hot forming
2.4 Hot metal forming
Figure 2 shows the dies and hot metal forming machine. A method of forming two parts in one die was adopted, and the two parts were arranged symmetrically along the x-axis direction. The sheet blanks were sprayed by a high temperature lubricant on both sides. Three K-type thermo- couples were used to test the die temperatures. Before the hot metal forming, the dies were heated to the forming temperature by the electric resistance furnace. The TA32 titanium alloy sheet was put into the heated dies quickly and thermally insulated about 30 min to get a uniform temperature distribution. Then, the sheet blank was pressed by the top die. The press pressure was kept 15 min to reduce residual stress. At last, the formed part was taken out and air-cooled to room temperature.
Table 1 Forming conditions of FE simulation scheme

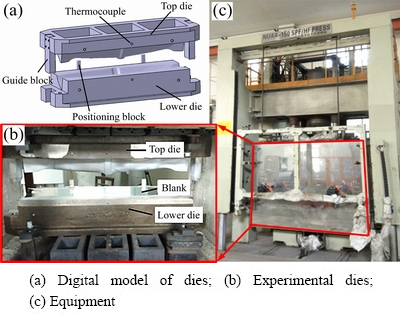
Fig. 2 Dies and equipment for hot metal forming
2.5 Microstructure characterization and micro- hardness test
The microstructure was observed by the optical microscope (OM) and electron backscatter diffractometer (EBSD). The fracture surface was observed by the scanning electron microscope (SEM). The specimens for microhardness test and EBSD were electro-polished with a solution of 60 vol.% methanol, 34 vol.% butanol and 6 vol.% perchloric acid at -40 °C and 30 V. The SEM and EBSD specimens were tested by the ZEISS Supra 55 SAPPHIRE. The EBSD data were analyzed by the HKL-Channel 5. The OM specimens were corroded with the Kroll reagent (5% HF, 10% HNO3 and 85% H2O, volume fraction). The volume fraction and grain size of the β-phase were obtained from the OM images by Image Pro Plus 6.0. In order to reduce the sampling error, more than three images were used in the analysis procedure. The Vickers microhardness test was performed using an HVS-1000A machine at a load of 100 g and a holding time of 10 s. Each sample was measured for five points.
3 Results and discussion
3.1 Hot deformation behavior
Figure 3 shows the true stress-strain curves of the TA32 alloy sheet. The stress-strain curves were strongly affected by the temperature and strain rate. In the early stage of deformation, the flow stress sharply reached the peak stress. Subsequently, the flow stress exhibited a softening state or stable state. Analyzed from the results of the stress-strain curves, TA32 titanium alloy presented well formability at 750-900 °C. The elongations (δ) at different temperatures with a strain rate of 0.001 s-1 were 141.8%, 203.9%, 248.4% and 417.6%, respectively. The flow stress decreased with increasing deformation temperature and decreasing strain rate. The peak stress range and elongation range of TA32 alloy when deformed at 800 °C were 50-370 MPa and 58.8%-310.6%, respectively, which were suitable for hot forming experiments.
3.2 Microstructure evolution
3.2.1 Initial microstructure
Figure 4 shows the initial microstructure of the as-received TA32 sheet, where the black lines are the high angle grain boundaries (HAGBs, θ>15°), the blue lines are the low angle grain boundaries (LAGBs, 2°<θ<15°). The black region is the β phase. It mainly consists of equiaxed α phase and intergranular β phase. According to the study of FAN et al [25], the fraction of the β phase was <5%, the average grain size of α phase was 2.23 μm and the fraction of LAGBs was 58.9%. The abundant LAGBs indicated that there were plenty of deformed substructures in the as-received sheet.
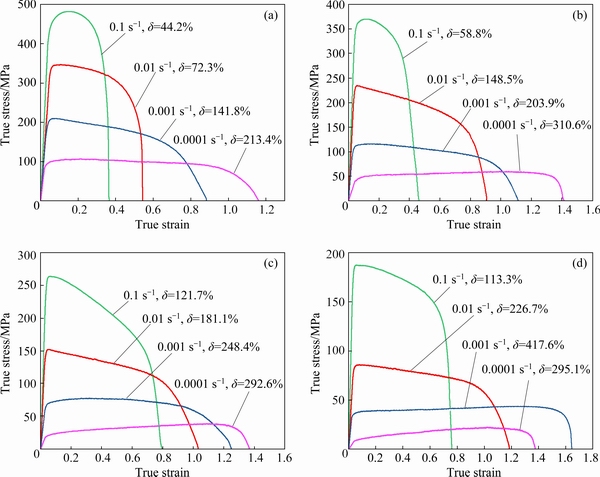
Fig. 3 True stress-strain curves of TA32 alloy sheet at 750 °C (a), 800 °C (b), 850 °C (c) and 900 °C (d)
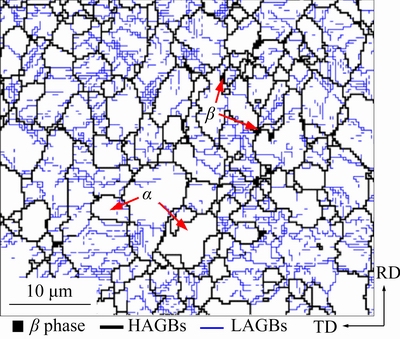
Fig. 4 Microstructure of as-received TA32 titanium alloy sheet
3.2.2 Microstructure evolution during hot tensile test
To study the microstructure evolution of TA32 alloy during the hot deformation, some tensile specimens were tested at 800 °C with a strain rate of 0.001 s-1. The elongations of the tested specimens were 0%, 16.2%, 35.0%, 56.8%, 82.2%, and 146.0%, i.e. the effective strains were 0, 0.15, 0.3, 0.45, 0.6, and 0.9, respectively. The OM pictures and GBs & local misorientation (LM) images of the tested specimens are shown in Fig. 5. As shown in OM results, the β phase volume fractions had no obvious change. This means that the effect of deformation degree on the volume fractions of α and β phases can be ignored at a fixed temperature. From the EBSD results, the residual stress distribution can be represented by the local misorientation distribution, where the dark region means high residual stress. The geometric necessary dislocations (GNDs) distribution can be calculated by the LM images [26].
The flow stresses were closely related to the grain size at elevated temperatures [27]. The fine grains were favorable for grain boundary sliding, which reduced the flow stress and enhanced the plastic deformation ability [28]. Considering the low volume fraction and well formability of β phase, the β phase grains and LM value distributions were ignored. Figure 6 shows the α phase average grain size and LM value distribution of the tested specimens. At the early stage of deformation (true strain 0-0.45), the α phase average grain size and the LM values increased. This was the competition among grains growing, dynamic recovery (DRV) and DRX during the hot deformation [29,30]. Some fine DRX grains without LAGBs can be found in Figs. 5(b), (d), (f) and (h). Meanwhile, there were also some coarse grains. With an increase of the true strain from 0 to 0.45, the fraction of the LAGBs gradually reduced. With further increase of the strain, plenty of deformation dislocations were produced. The dislocation density reached a critical value and provided a driving force for plenty of DRX nucleation, which resulted in the decrease of α phase average grain size. For the specimen with a true strain of 0.6, the average grain size was reduced to 2.24 μm. With further increase of the deformation, the grain size and LM value kept relatively stable. Plenty of fine equiaxed α phase and β phase equiaxial grains uniformly were distributed in the tested specimen with a true strain of 0.9.
3.2.3 Effect of deformation temperature on micro- structure
Figure 7 shows the OM micrographs and GBs & LM images of the tested specimens at different temperatures. The strain rate was 0.001 s-1 and the true strain was 0.45. Calculated from the OM images by Image pro plus 6.0 software, the β-phase volume fractions of the tested specimens at 750, 800, 850 and 900 °C were 8.7%, 10.4%, 12.3% and 23.7%, respectively. Figure 8 shows the average grain size of α-phase and LM value distribution at different temperatures. With the increase of the deformation temperature, the average grain size increased. The α phase grains of the tested specimens at 900 °C were obviously coarser than the others. The frequencies of low LM values (smaller than 1°) of tested specimens at 750, 800, 850 and 900 °C were 54.8%, 69.1%, 77.6% and 91.1%, respectively. With an increase in the deformation temperature, the ability of dynamic recovery and grain growth increased significantly.
3.2.4 Effect of strain rate on microstructure
As shown in Fig. 3, the flow stress and formability were significantly affected by the strain rates. The flow stress decreased rapidly after the peak stress with high strain rates (0.01-0.1 s-1). The material showed softening behavior. At low strain rates (0.0001-0.001 s-1), the flow stress kept stable or slightly decreased after the peak stress. In order to explain these results, the microstructures of the tested specimens with different strain rates were observed, as shown in Fig. 9. The deformation temperature was 800 °C and the true strain was 0.45. Figure 10 shows the average grain size and LM value distribution of the tested specimens with various strain rates at 800 °C. In Fig. 9(a), most of the β phase grains were elongated along the tensile direction and even broken. The typical necklace DRX microstructure can be found in Fig. 9(b). Plenty of fine α phase grains existed together around the coarse grain. The α-phase average grain size was only 1.98 μm. There were also many sub-gains in Fig. 9(b). The fraction of high local misorientation value was obviously higher than that of the specimen without deformation in Fig. 5(b). Obviously, the dislocation density of the tested specimen with a strain rate 0.1 s-1 was very high. With the decrease of strain rate, the grain size increased and the LM value reduced (Fig. 10). When the strain rate reduced to 0.0001 s-1, most of the α-phase grains were the equiaxed grains without substructure, as shown in Fig. 9(f). The average grain size was about 2.87 μm.
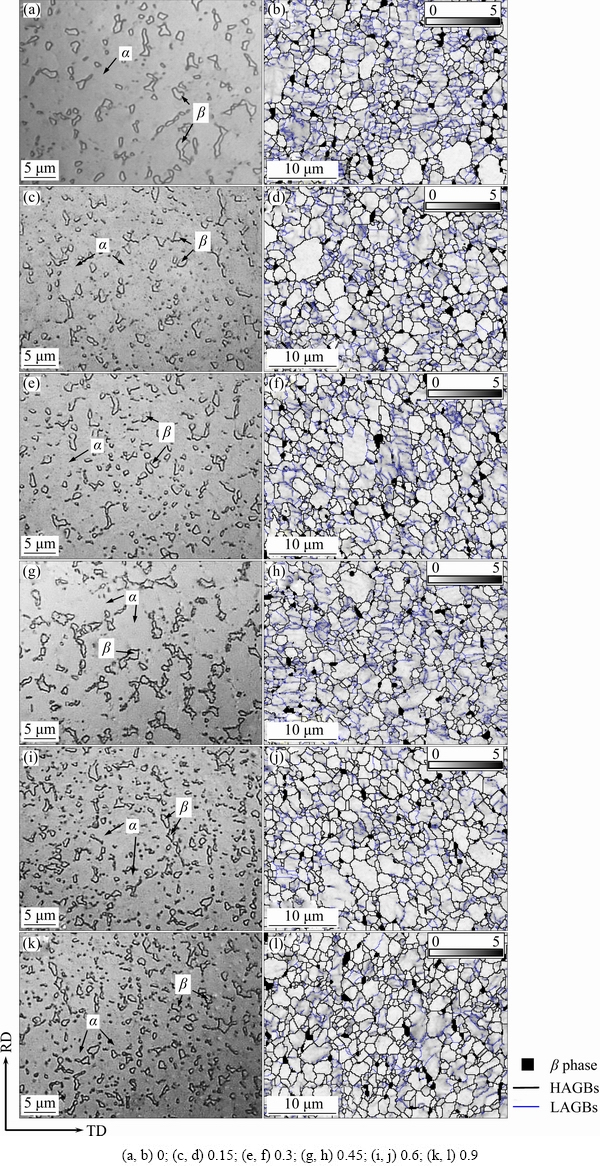
Fig. 5 OM micrographs (a, c, e, g, i, k) and GBs & LM images (b, d, f, h, j, l) of tested specimens at 800 °C, 0.001 s-1 and different true strains
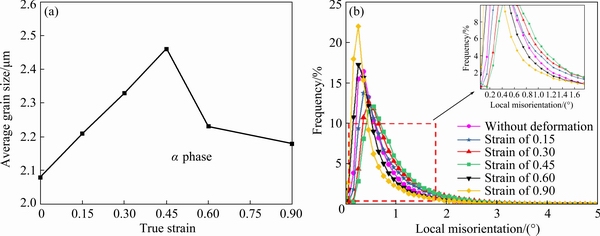
Fig. 6 Average grain size of α phase (a), and LM value distribution (b) of tested specimens at 800 °C and strain rate of 0.001 s-1
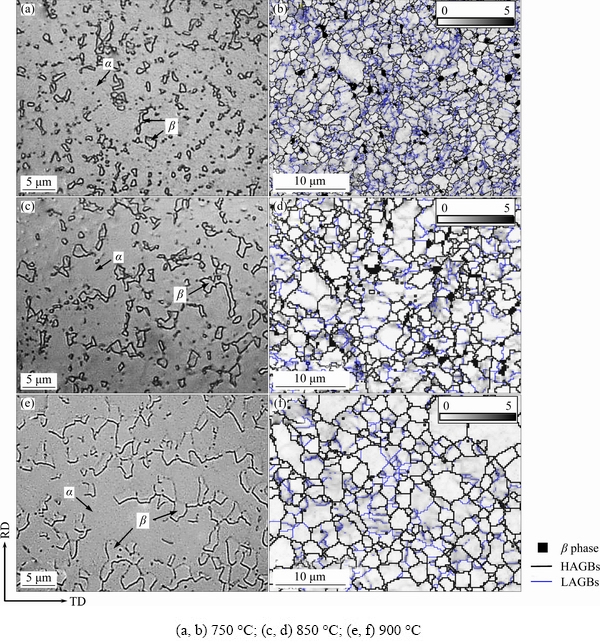
Fig. 7 OM micrographs (a, c, e) and GBs & LM images (b, d, f) of tested specimens at true strain of 0.45, strain rate of 0.001 s-1 and different temperatures
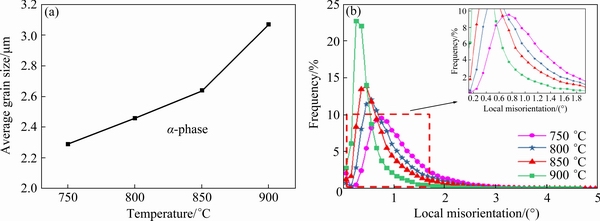
Fig. 8 Average grain size of α phase (a) and LM value distribution (b) at various deformation temperatures

Fig. 9 OM micrographs (a, c, e) and GBs & LM images (b, d, f) of tested specimens at true strain of 0.45, 800 °C and different strain rates
3.2.5 Microstructure of cavitation and fracture
Figure 11 shows the OM micrographs of the cavities for the tested specimens with the strain rate of 0.1 s-1 at 750 °C and 900 °C. The majority of the microscopic cavities appeared at the interface of the grain boundary of the equiaxed α phase and intergranular β phase, which were caused by inhomogeneity of material deformation [31,32]. During the hot deformation, compared with the β phase with body-centered cubic (BCC) lattice structure that can easily activate more slip systems, the deformation of α phase with low symmetry hexagonal close-packed (HCP) lattice structure was more difficult. The inconsistent plastic strain and slip direction between the two phases led to the stress concentration at the phase interface, which resulted in the cracks and cavities were gradually generated at the interface. Meanwhile, the number of cavities decreased significantly with increasing deformation temperature, which indicated that the damage evolution of specimen deformed at higher temperatures was relatively slow.

Fig. 10 Average grain size of α phase (a) and LM value distribution (b) at various strain rates
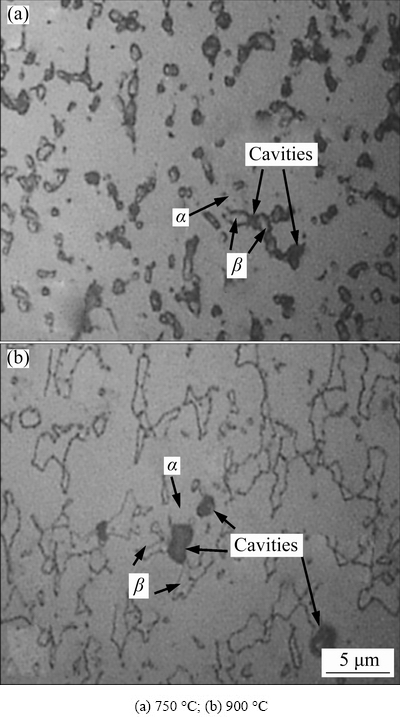
Fig. 11 OM micrographs of cavities on deformed specimens at strain rate of 0.1 s-1 and different temperatures
Figure 12 shows fracture surface morphologies of the tensile specimens deformed at 800 °C. It could be seen that the fracture surfaces were fully covered with a large number of dimples and cavities, which were the typical characteristics of ductile damage [33]. When the strain rate was high, there were a high density of tearing edges and a small number of serpentine slidings distributed on the edges of the dimples; when the strain rate was low, a large number of serpentine slidings were distributed on the edges of the dimples, the edges of dimples were almost covered with serpentine sliding, and several small dimples were distributed at the bottom of big dimples. These features were due to the more sufficient deformation of the material at low strain rates, and the cross-slip of many interlaced slip surfaces led to the formation of undulating serpentine slip on the dimple surface. Moreover, with the decrease of strain rate, the number of dimples and cavities decreased, and their size and depth increased, which indicated that the deformation ability of the material increased at a lower strain rate, and fewer voids existed at lower strain rates than those at higher strain rates.
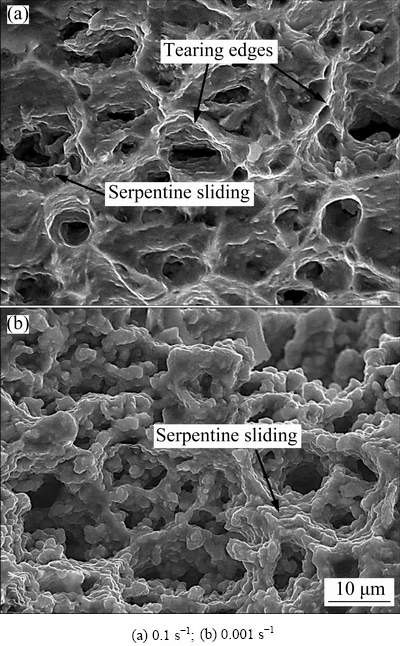
Fig. 12 Fracture surface morphologies of deformed specimens at 800 °C and different strain rates
3.3 Constitutive modeling of TA32 titanium alloy sheet
3.3.1 Viscoplastic flow rule
During the high temperature deformation processes, the plastic strain rate equation for steady- state flow of the material can be described as [34]
 (1)
(1)
where  is the steady-state strain rate, A is a material constant, D0 is the diffusion coefficient, G is the shear modulus, b is the Burgers vector component, kb is the Boltzmann constant, T is the thermodynamic temperature, σ is the flow stress, d is the grain size, n and μ are the stress and grain size exponents, respectively. LIN et al [35] consider that the overall flow stress can be divided into viscoplastic stress, initial yield stress and hardening stress. By simplifying the coefficients and introducing the relative grain size into Eq. (1), Eq. (1) can be modified as follows:
 (2)
(2)
where k is the initial stress, H is the isotropic hardening stress, K is a temperature dependent constant.  (=d/d0) is the relative grain size, and d0 is the initial grain size.
There were some β phase grains in TA32 alloy at high temperatures. The strain contribution of α- and β phase should be different. The total plastic strain rate can be calculated by the isostress model [36], which can be written as
 (3)
(3)
where fβ is the volume fraction of β-phase,  and
and  are the strain rates of α and β phases, respectively.
 (4)
(4)
where kα and kβ are the initial yield stresses of α and β phases, respectively. Kα and Kβ are strength coefficients of α and β phases, respectively.  and
and  are relative grain sizes of α and β phases, respectively. Based on the study of BAI et al [36], the relationship between α and β phases can be defined as kα=1.25kβ and Kα=1.11Kβ.
The volume fraction of β phase (fβ) can be expressed by the JMAK equation [37]:
fβ=ψ1exp[-ψ2(Tβ-T)] (5)
where ψ1 and ψ2 are the material constants. Tβ is the transformation temperature of α→β, which is defined as 1273 K in this work.
3.3.2 Modeling of isotropic hardening
The isotropic hardening stress H is closely related to the accumulation and annihilation of dislocations [38]. Therefore, its evolution equation is given by
 (6)
(6)
where B is a material constant,  represents the normalized dislocation density formulated as
  , where ρ0 is the initial dislocation density, and ρ is the dislocation density during the deformation process.
3.3.3 Evolution of dislocation density
During the hot deformation, the creation and multiplication of dislocations induced by plastic deformation result in work hardening, meanwhile the stored energy of the material increases and provides a driving force for the occurrence of statics and dynamics recovery, which results in the annihilation of dislocation. Since the absolute density of dislocations in a material is difficult to determine, the normalized dislocation density  is introduced into Eq. (7), and the evolution of dislocation density can be expressed as [39]
 (7)
(7)
where k1, k2, k3 and δ0 are the temperature- dependent material constants. The first term on the right of Eq. (7) is related to the generation of new dislocation, the second and third terms represent the reduction of dislocation density due to dynamic and statics recovery, respectively. The normalized dislocation density  can vary from 0 to 1.
Recrystallization also results in the variation of the dislocation density, and the DRX rate is affected by the grain size and strain rate. In the study of ALABORT et al [22], the critical value of dislocation density for the start of DRX was defined. Besides, LIN [39] considered that there is a need of an incubation period for the onset of recrystallization, and the incubation period varies with the change of dislocation density. Therefore, the evolution of recrystallized volume fraction is described as
 (8)
(8)
where  is the recrystallization rate, S is the recrystallization volume fraction, x is the percentage of recrystallization induction, q1, q2, q3, q4, q5 and q6 are the temperature-dependent material constants,
  is the critical value of normalized dislocation density, and
  is the recrystallization incubation rate.
The effect of DRX on the evolution of dislocation density  can be expressed as
 (9)
(9)
where k4 is the temperature-dependent material constant.
Under high temperature deformation at different strain rates, the accumulation and annihilation of dislocation density are different. Thus, to adjust for the effect of the strain rate, two controlled coefficients  and
and  are introduced into Eq. (7), and a constitutive equation for normalized dislocation density evolution is proposed [40]:
 (10)
(10)
where δ1, δ2 and δ3 are the temperature-dependent material constants.
3.3.4 Modeling of grain size
Considering the static grain growth, the dynamic grain growth and the effect of DRX on grain growth, and the grain size d is translated into relative grain size  , the grain growth rate
  can be described as

 (11)
(11)
where α1, α2, α3, γ1, γ2, γ3 and γ4 are the temperature-dependent material constants.
3.3.5 Modeling of damage evolution
During the hot deformation, the damage mechanism of metal materials involves void nucleation, growth and coalescence to form micro-voids and micro-cracks [41,42]. In addition, some cavities are restored in the process of hot deformation due to the thermal effect [43]. Hence, the evolution of damage can be described as
 (12)
(12)
where  is the damage rate, D is the damage volume fraction, εp is the plastic strain, and η1, η2, η3, η4, d1 and d2 are the temperature-dependent material constants.
According to Hook’s law, considering the effect of damage on flow stress, the stress-strain relationship of material can be expressed as
σ=E(1-D)(εT-εp) (13)
where E is the elastic modulus and εT the is total strain.
3.3.6 Formulation of unified viscoplastic constitutive equations
From all the above discussion, the mechanism- based unified viscoplastic constitutive equations for TA32 titanium alloy sheet during hot forming are obtained as
 (14)
(14)
The aforementioned temperature-dependent material constants are summarized in Table 2, and all of them are defined using the classic Arrhenius relationships. In Table 2, Q is the activation energy (J/mol), R is the mole gas constant (8.3145 J/(mol・K)), and T is the thermodynamic temperature (K).
3.3.7 Determination of material constants
The material constants in the constitutive equations were determined from the experimental data by using an optimization method based on the genetic algorithms (GA). This research used the GA toolbox in the MATLAB software to optimize the material constants by minimizing the residuals between the computed target values and the corresponding experimental values. The details of the optimization process refer to the studies of LIN and YANG [44] and CAO and LIN [45]. The determined material constants are listed in Table 3.
3.3.8 Computed results of equations
Figure 13 shows the comparison between the experimental (symbol) and computed (line) results at different deformation temperatures and strain rates. It can be seen that the constitutive equations can be used to correctly predict the deformation behavior of TA32 alloy under hot uniaxial tension, such as the hardening and softening trend of the material. The predicted curves agree well with the experimental results, indicating that the unified viscoplastic constitutive model is valid to predict the flow stress of TA32 alloy during hot forming. A statistical analysis was carried out to quantitatively judge the accuracy of the proposed unified constitutive model, which includes the correlation coefficient (R1), the average absolute relative error (AARE) and the root mean square error (RMSE). They can be expressed as follows:
 (15)
(15)
 (16)
(16)
 (17)
(17)
where N is the number of the data points used for the comparison, Ei denotes the experimental stress and Pi denotes the computed stress using Eq. (14).  and
and  are the mean values of the experimental and computed stress, respectively.
Figure 14 shows the correlation between the experimental and computed stresses at different temperatures. It can be seen that most of the data points are very close to the σE=σP line. The values of R1 are between 0.9711 and 0.9912, and the maximum values of AARE and RMSE are 21.4% and 24.5 MPa, respectively, which manifests that the proposed constitutive model has a good forecasting capability.
Based on the experimental data, the comparison of experimental and predicted β phase volume fraction at different temperatures is shown in Fig. 15. The predicted curve is consistent with the experimental results, which suggests that the proposed phase transformation equation is equivalent.
Table 2 Material constants in unified viscoplastic constitutive model
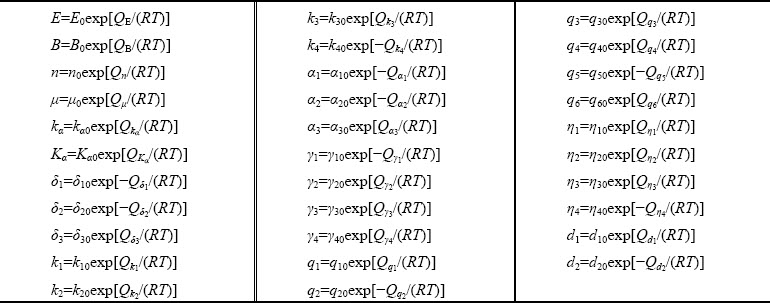
Table 3 Determined material constants in constitutive equations

Figure 16 shows the evolution of the computed relative grain size. During the hot deformation, the grain growth and grain refinement were affected by thermal effect and recrystallization, respectively. The competition process in the evolution of grain size was accurately predicted. When the strain rate was high, the relatively short deformation time weakened the effect of thermal effect on grain growth, thus the grain size decreased with the increase of strain. When the strain rate was low (0.0001 s-1), the effect of thermal effect was stronger than that of recrystallization in the early stage of deformation, which caused the grain size to gradually increase with the development of deformation. As the deformation process proceeded, the growth rate of grain size decreased due to the increase of recrystallization degree after a period of incubation. Moreover, the grain size increased with the rise of deformation temperature, which was attributed to the enhancement of thermal effect.
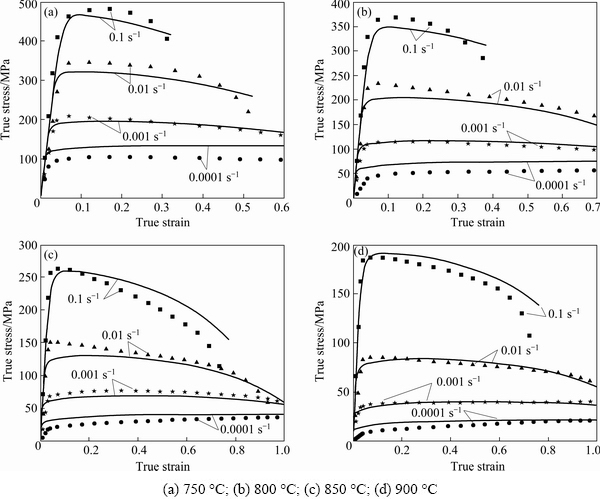
Fig. 13 Comparison results of true stress-strain curves between experimental (symbol) and computed (line) results at different temperatures

Fig. 14 Correlation between experimental and computed stresses at different temperatures
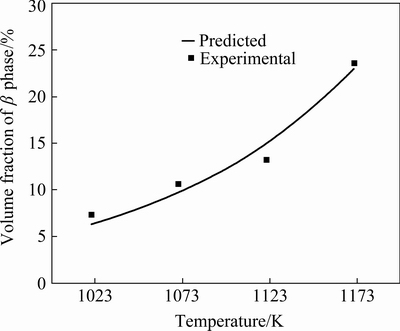
Fig. 15 Comparison of experimental and predicted volume fraction of β phase at different temperatures
Figure 17 shows the evolution of the computed normalized dislocation density. It can be seen that the normalized dislocation density decreased with decreasing strain rate and increasing temperature. In the early stage of deformation, dislocation density increased rapidly due to the generation and accumulation of dislocations induced by plastic deformation, which led to the work hardening. Subsequently, the occurrence of the statics and dynamics recovery as well as the dynamic recrystallization resulted in the rearrangement and annihilation of dislocations, which was the reason for the stable dislocation density after reaching the peak.
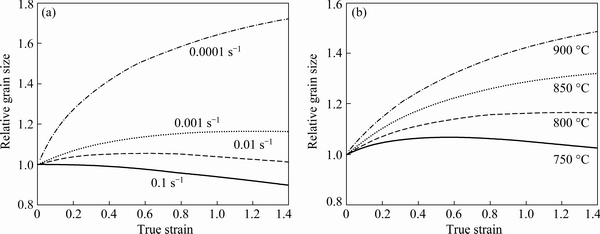
Fig. 16 Evolution of predicted relative grain size at 800 °C (a) and 0.001 s-1 (b)
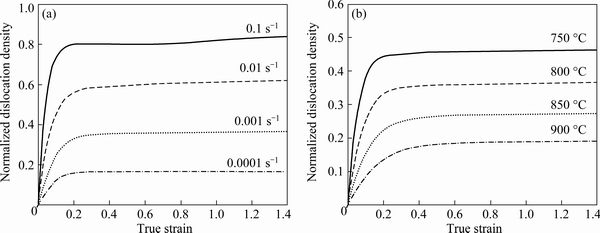
Fig. 17 Evolution of normalized dislocation density at 800 °C (a) and 0.001 s-1 (b)
Figure 18 shows the evolution of computed damage under different conditions. Obviously, the material damage increased with decreasing deformation temperature and increasing strain rate, which was consistent with the micrographic observation as shown in Fig. 11 and Fig. 12, respectively. The damage increased relatively slow in the initial stage of deformation because the material was considered to be flawless and the initial damage value was zero before the deformation. With the increase of deformation degree, the local inhomogeneous deformation led to the increase of the nucleation rate of cavities and micro-cracks, and the growth and interconnection of micro-defects caused the damage to increase sharply until the material failed.
3.4 FEA simulation and hot forming for TA32 complex parts
The microstructure-based constitutive model was imported into Abaqus/explicit through the material user subroutine VUMAT. The VUMAT subroutine began with the assumption that the strain increment was purely elastic, and based on this assumption trial stress was calculated before the plastic deformation was checked. If the current state was elastic, it was necessary to update the stress and state variables, and returned to the main routine; if the current state was plastic, the increment of plastic strain should be determined. Figure 19 shows the VUMAT subroutine flow chart for the FE model implementation.
Figure 20 shows the effective strain, normalized dislocation density and damage distribution of the formed skin parts with different process parameters. Figures 20(a), (d), (g), (j) and (m) demonstrate that the strain is concentrated at the sharp angle of the part. The effective strain decreases with increasing deformation temperature and decreasing loading speed, which indicates that the formability of the material is improved and the overall deformation is more uniform. Figures 20(b), (e), (h), (k) and (n) illustrate the distribution of dislocation density. The normalized dislocation density is positively correlated with strain, and the maximum dislocation density is mainly displayed in the large deformation area. This is because the plastic deformation is always accompanied with the tremendous generation and accumulation of dislocations. The dislocation density of material decreases significantly with the increase of deformation temperature and the decrease of loading speed, which is due to the rearrangement and annihilation of dislocations by recovery and recrystallization. Figures 20(c), (f), (i), (l) and (o) reveal the distribution of damage, and the material is considered to be fracture when the value of damage reaches 0.7. As can be seen, when the temperature is 750 °C or the loading speed is 10 mm/s, fracture occurs at the sharp angle of the formed part, which is due to the uneven material flow during the hot forming. According to the simulation results of Part-800-10, Part-850-5 and Part-800-1, the damage decreases with increasing deformation temperature and decreasing loading speed. However, a slight wrinkling appears near the sharp angle area due to the pile up of surrounding material.
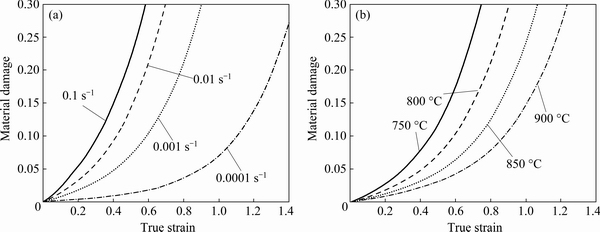
Fig. 18 Evolution of predicted material damage at 800 °C (a) and 0.001 s-1 (b)

Fig. 19 VUMAT subroutine flow chart for FE model implementation
In order to reduce the flow of material to the sharp angle area and avoid the occurrence of wrinkling defects, the overall dimension of the blank was optimized. Under the premise that the formed part meets the dimensional precision demand, the excess material near the fillet of blank was removed, as shown in Fig. 21. The optimized Blank B was obtained through the trial and error method. Meanwhile, according to Fig. 20(f), the fracture did not occur in the formed part obtained by the processing with a deformation temperature of 800 °C and a loading speed of 5 mm/s. Therefore, the forming efficiency and energy saving of the process conditions are relatively optimal.
Figure 22 shows the effective strain, normalized dislocation density, relative grain size and damage distribution of the optimized blank. Figure 22(a) shows the maximum effective strain of the formed part is about 0.3415, indicating that the deformation of the material is homogeneous. Figure 22(b) shows that the overall level of normalized dislocation density is low due to the rearrangement and annihilation of dislocations caused by recovery and recrystallization. Figure 22(c) shows the relative grain size of the formed part ranges from 0.9387 to 1.046, in which grain growth caused by thermal effect appears in the small deformation area and grain refinement results from DRX appears in the large deformation area. Figure 22(d) shows the maximum damage of the formed part is approximately 0.1825, which demonstrates that the formed part is in the safe range of deformation. Meantime, the wrinkling defects are effectively suppressed and the quality of the predicted result is satisfactory.
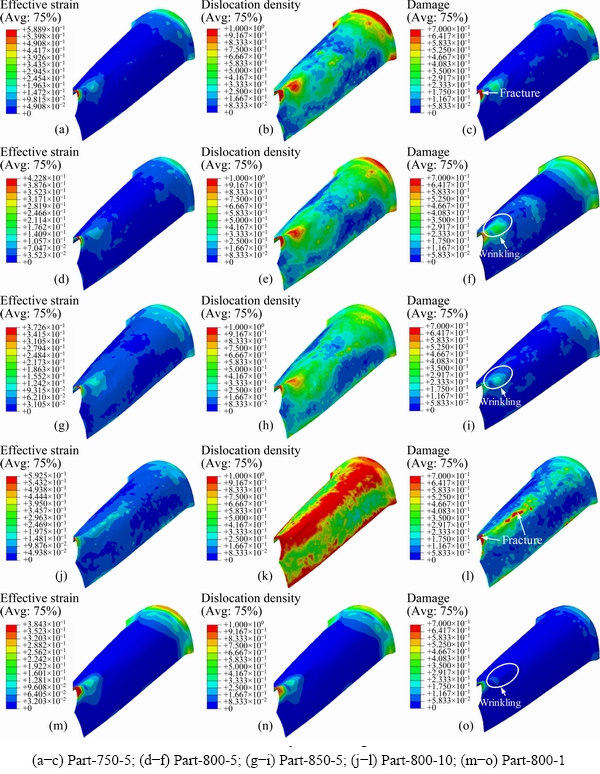
Fig. 20 Effective strain, normalized dislocation density and damage distribution of simulations with different process parameters
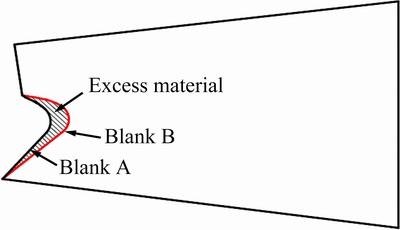
Fig. 21 Optimized blank shape
The thermoforming experiments were carried out to validate the FE simulation results. Figure 23 shows the actual parts formed by Blanks A and B at a deformation temperature of 800 °C and loading speed of 5 mm/s, respectively. It can be seen that fracture occurred at the sharp angle of the un-optimized formed part, which showed a good agreement with numerical simulation results, and a qualified part without fracture was obtained by optimizing the blank shape. In order to further evaluate the accuracy of the prediction results and mechanical properties of the formed part, the microhardness of the maximum and minimum strain positions (marked in Fig. 23(b)) on the qualified part was measured. The measurements were done at five points and repeated three times at each location. The mean measured values of the un-deformed and deformed regions were HV 368.3 and HV 297.5, respectively. The decrease in micro- hardness indirectly indicated that the damage at the sharp angle of the part reached approximately 20%, which was consistent with the prediction result shown in Fig. 22(d). Based on these results, it can be demonstrated that the proposed model can accurately predict the plastic deformation and microstructure evolution of TA32 alloy during the thermoforming process.

Fig. 22 Predicted results of the optimized blank
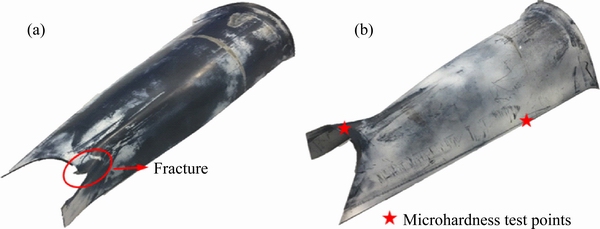
Fig. 23 Actual parts formed from Blank A (a) and Blank B (b)
4 Conclusions
(1) With the increase of true strain, the average grain size of α phase in TA32 titanium alloy and dislocation density increased. As the deformation process proceeded, the occurrence of DRX led to the grain refinement and decrease of dislocation density. Besides, with the increase of deformation temperature and the decrease of strain rate, the number of cavities and dimples decreased significantly, and their size and depth increased, which indicated the decrease in material damage.
(2) The predictions of flow stress, the volume fraction of β phase and grain size of α phase agreed well with the experimental results, which indicated that the deformation behavior and microstructure evolution of TA32 alloy in hot tension test can be predicted reasonably using the proposed constitutive equations. Statistical analysis also showed the reliability of the developed constitutive equations.
(3) The simulation imported with the proposed constitutive equations validly predicted the wrinkling and fracture defects of the formed parts. The optimal combination of deformation temperature and loading speed was 800 °C and 5 mm/s, respectively, and a qualified part was produced by optimizing the process parameters and blank shape. Microhardness test results showed that the final formed part had good mechanical properties and was consistent with the predicted results, which indicated that the FE model based on physical internal-state variables can well optimize the hot forming process of TA32 titanium alloy complex parts.
Acknowledgments
This work was financially supported by the National Natural Science Foundation of China (No. 51805256).
References
[1] LIU Zhang-guang, LI Pei-jie, GENG Lin-lin, LIU Tai-ying, GAO Hai-tao. Microstructure and texture evolution of TA32 titanium alloy during superplastic deformation [J]. Materials Science and Engineering A, 2017, 699: 71-80.
[2] FAN Rong-lei, CHEN Ming-he, WU Yong, XIE Lan-sheng. Prediction and experiment of fracture behavior in hot press forming of a TA32 titanium alloy rolled sheet [J]. Metals, 2018, 8: 985-999.
[3] CHEN Can, CHEN Ming-he, XIE Lan-sheng, GONG Zong-hui, YE Jian-hua. Numerical and experimental investigations of the hot stamping process for complex aircraft skin parts composed of TA32 high-temperature titanium alloy using an Arrhenius-type constitutive model [J]. The International Journal of Advanced Manufacturing Technology, 2019, 103: 807-817.
[4] LIU Zhang-guang, LI Pei-jie, YI Xi-yue, WU Feng-yong, XIONG Liang-tong, GAO Hai-tao. Effects of deformation parameters on the microstructure evolution and superplastic behavior of TA32 alloy [J]. Rare Metal Materials and Engineering, 2018, 11: 3473-3481. (in Chinese)
[5] PALUMBO G, PICCININNI A, GUGLIELMI P, MICHELE G D. Warm hydroforming of the heat treatable aluminium alloy AC170PX [J]. Journal of Manufacturing Processes, 2015, 20: 24-32.
[6] TRZEPIECINSKI T, MALINOWSKI T, PIEJA T. Experimental and numerical analysis of industrial warm forming of stainless steel sheet [J]. Journal of Manufacturing Processes, 2017, 30: 532-540.
[7] SIRVIN Q, VELAY V, BONNAIRE R, PENAZZI L. Mechanical behaviour modelling and finite element simulation of simple part of Ti-6Al-4V sheet under hot/warm stamping conditions [J]. Journal of Manufacturing Processes, 2019, 38: 472-482.
[8] LEI Jun-xiang. Prediction and control of wrinkle and fracture for stamping regular polygonal box [J]. Journal of Iron and Steel Research, 2004, 11: 44-49.
[9] MA B L, WAN M, WU X D, CAI Z Y, DIAO K, HAN J Q. Investigation on forming limit of advanced high strength steels (AHSS) under hot stamping conditions [J]. Journal of Manufacturing Processes, 2017, 30: 320-327.
[10] WU Feng-yong, XU Wen-chen, YANG Zhong-ze, GUO Bin, SHAN De-bin. Study on hot press forming process of large curvilinear generatrix workpiece of Ti55 high-temperature titanium alloy [J]. Metals, 2018, 8: 827-840.
[11] WANG Peng-yi, WANG Zhong-jin, XIANG Nan, CAI Shu-peng, LI Ze-xin. Investigation on changing loading path in sheet metal forming by applying a property-adjustable flexible-die [J]. Journal of Manufacturing Processes, 2020, 53: 364-375.
[12] ZHANG Qian, LUO Zheng-zhi, QUAN Gao-feng. Optimization design of die cavity and numerical simulation of superplastic forming for complicated part of magnesium alloy [J]. Hot Working Technology, 2016, 45: 113-116. (in Chinese)
[13] WU Yong, LIU Gang, WANG Kai, LIU Zhi-qiang, YUAN Shi-jian. The deformation and microstructure of Ti-3Al-2.5V tubular component for non-uniform temperature hot gas forming [J]. International Journal of Advanced Manufacturing Technology, 2017, 88: 2143-2153.
[14] WU Yong, LIU Gang, WANG Kai, LIU Zhi-qiang, YUAN Shi-jian. Loading path and microstructure study of Ti-3Al-2.5V tubular components within hot gas forming at 800°C [J]. International Journal of Advanced Manufacturing Technology, 2016, 87: 1823-1833.
[15] MERKLEIN M, LECHLER J. Investigation of the thermo-mechanical properties of hot stamping steels [J]. Journal of Materials Processing Technology, 2006, 177: 452-455.
[16] SUN Zhi-chao, YANG He. Microstructure and mechanical properties of TA15 titanium alloy under multi-step local loading forming [J]. Materials Science and Engineering A, 2009, 523: 184-192.
[17] FAN X G, JIANG X Q, ZENG X, SHI Y G, GAO P F, ZHAN M. Modeling the anisotropy of hot plastic deformation of two-phase titanium alloys with a colony microstructure [J]. International Journal of Plasticity, 2018, 104: 173-195.
[18] WANG Ke-huan, LIU Gang, ZHAO Jie, HUANG Ke, WANG Li-liang. Experimental and modelling study of an approach to enhance gas bulging formability of TA15 titanium alloy tube based on dynamic recrystallization [J]. Journal of Materials Processing Technology, 2018, 259: 387-396.
[19] YANG Lei, WANG Bao-yu, LIU Gang, ZHAO Hui-jun, XIAO Wen-chao. Behavior and modeling of flow softening and ductile damage evolution in hot forming of TA15 alloy sheets [J]. Materials and Design, 2015, 85: 135-148.
[20] LI Jun-ling, WANG Bao-yu, HUANG He, FANG Shuang, CHEN Ping, ZHAO Jie, QIN Yi. Behaviour and constitutive modelling of ductile damage of Ti-6Al-1.5Cr-2.5Mo- 0.5Fe-0.3Si alloy under hot tensile deformation [J]. Journal of Alloys and Compounds, 2019, 780: 284-292.
[21] XIAO Y W, LIN Y C, JIANG Y Q, ZHANG X Y, PANG G D, WANG D, ZHOU K C. A dislocation density-based model and processing maps of Ti-55511 alloy with bimodal microstructures during hot compression in α+β region [J]. Materials Science and Engineering A, 2020, 790: 139692.
[22] ALABORT E, PUTMAN D, REED R C. Superplasticity in Ti-6Al-4V: Characterisation, modelling and applications [J]. Acta Materialia, 2015, 95: 428-42.
[23] ZHUANG Wei-min, WANG Peng-yue, XIE Dong-xuan, SHI Hong-da. Experimental study and a damage model approach to determine the effect of hot forming deformation on the service performance of 22MnB5 steel [J]. Journal of Manufacturing Processes, 2019, 47: 10-21.
[24] WANG Qing-jiang, LIU Jian-rong, YANG Rui. High temperature titanium alloys: Status and perspective [J]. Journal of Aeronautical Materials, 2014, 34: 1-26. (in Chinese)
[25] FAN Rong-lei, WU Yong, CHEN Ming-he, XIE Lan-sheng. Relationship among microstructure, mechanical properties and texture of TA32 titanium alloy sheets during hot tensile deformation [J]. Transactions of Nonferrous Metals Society of China, 2020, 30: 928-943.
[26] KUMAR S S S, PAVITHRA B, SINGH V, GHOSAL P, RAGHU T. Tensile anisotropy associated microstructural and microstructural evolution in a metastable beta titanium alloy [J]. Materials Science and Engineering A, 2019, 747: 1-16.
[27] ZHANG Z X, QU S J, FENG A H, SHEN J, CHEN D L. Hot deformation behavior of Ti-6Al-4V alloy: Effect of initial microstructure [J]. Journal of Alloys and Compounds, 2017, 718: 170-181.
[28] ZONG Y Y, SHAN D B, XU M, LV Y F. Flow softening and microstructural evolution of TC11 titanium alloy during hot deformation [J]. Journal of Materials Processing Technology, 2009, 209: 1988-1994.
[29] LIN Y C, HUANG J, LI H B, CHEN D D. Phase transformation and constitutive models of a hot compressed TC18 titanium alloy in the α+β regime [J]. Vacuum, 2018, 157: 83-91.
[30] LIN Y C, HUANG J, HE D G, ZHANG X Y, WU Q, WANG L H, CHEN C, ZHOU K C. Phase transformation and dynamic recrystallization behaviors in a Ti55511 titanium alloy during hot compression [J]. Journal of Alloys and Compounds, 2019, 795: 471-482.
[31] XIA Qi-fan, LIANG Yi-long, YANG Chun-lin, ZHANG Song, OU Mei-gui. Tensile deformation behavior of TC4 titanium alloy [J]. Chinese Journal of Rare Metals, 2019, 43: 765-773. (in Chinese)
[32] DONG Xian-juan, LU Shi-qiang, ZHENG Hai-zhong, LI Xin, OUYANG De-lai. Cavity nucleation during hot forging of Ti-6Al-2Zr-1Mo-1V alloy with colony alpha microstructure [J]. Transactions of Nonferrous Metals Society of China, 2010, 20: 2259-2264.
[33] DENG J, LIN Y C, LI S S, CHEN J, DING Y. Hot tensile deformation and fracture behaviors of AZ31 magnesium alloy [J]. Materials and Design, 2013, 49: 209-219.
[34] MUKHERJEE A K. An examination of the constitutive equation for elevated temperature plasticity [J]. Materials Science and Engineering A, 2002, 322: 1-22.
[35] LIN J, LIU Y, FARRUGIA D C J, ZHOU M. Development of dislocation-based unified material model for simulating microstructure evolution in multipass hot rolling [J]. Philosophical Magazine, 2005, 85: 1967-1987.
[36] BAI Q, LIN J, DEAN T A, BALINT D S, GAO T, ZHANG Z. Modelling of dominant softening mechanisms for Ti-6Al-4V in steady state hot forming conditions [J]. Materials Science and Engineering A, 2013, 559: 352-358.
[37] JIANG Yi-lan, LIU Hui-qun, YI Dan-qing, LIN Gao-yong, DAI Xun, ZHANG Rui-qian, SUN Yong-duo, LIU Shao-qiang. Microstructure evolution and recrystallization behavior of cold-rolled Zr-1Sn-0.3Nb-0.3Fe-0.1Cr alloy during annealing [J]. Transactions of Nonferrous Metals Society of China, 2018, 28: 651-661.
[38] HUO Yuan-ming, LIN Jian-guo, BAI Qian, WANG Bao-yu, TANG Xue-feng, JI Hong-chao. Prediction of microstructure and ductile damage of a high-speed railway axle steel during cross wedge rolling [J]. Journal of Materials Processing Technology, 2017, 239: 359-369.
[39] LIN J. Fundamentals of materials modelling for metals processing technologies: Theories and applications [M]. Iondon: Imperial College Press, 2015.
[40] WU Yong, WANG Dong-jun, LIU Zhi-qiang, LIU Gang. A unified internal state variable material model for Ti2AlNb-alloy and its applications in hot gas forming [J]. International Journal of Mechanical Sciences, 2019, 164: 105-126.
[41] LIN J, LIU Y, DEAN T A. A review on damage mechanisms, models and calibration methods under various deformation conditions [J]. International Journal of Damage Mechanics, 2005, 14: 299-319.
[42] JIA Zhe, MU Lei, ZANG Yong. Research progress on the micro-mechanism and prediction models of ductile fracture in metal forming [J]. Chinese Journal of Engineering, 2018, 40: 1454-1467. (in Chinese)
[43] WANG Zhong-jin, SONG Hui, CAI Shu-peng, DUAN Jie, FANG Xiao, REN Xiu-wen. Research advancements on self-healing of cracks and evolution of microstructures of titanium alloy sheets induced by electropulsing [J]. Journal of Plasticity Engineering, 2019, 26: 1-14.
[44] LIN J, YANG J. GA-based multiple objective optimisation for determining viscoplastic constitutive equations for superplastic alloys [J]. International Journal of Plasticity, 1999, 15: 1181-1196.
[45] CAO J, LIN J. A study on formulation of objective functions for determining material models [J]. International Journal of Mechanical Sciences, 2008, 50: 193-204.
武 永1,范荣磊1,秦中环2,陈明和1
1. 南京航空航天大学 机电学院,南京 210016;
2. 北京航星机器制造有限公司,北京 100013
摘 要:为了优化TA32钛合金薄壁件的热成形工艺,对其热流动行为、显微组织演变和断口形貌进行研究。根据实验数据建立一套基于合金显微组织的本构方程,描述高温流动应力与相体积分数、位错密度、晶粒尺寸和损伤演化之间的关系。将本构模型嵌入ABAQUS 6.14中模拟典型薄壁件的热成形过程,预测不同工艺参数下成形件的等效应变、位错密度、损伤分布以及成形缺陷。在变形温度为800 °C、加载速度为5 mm/s的条件下,采用改进形状尺寸后的毛坯成功模拟出无起皱和破裂缺陷的合格零件,且其最大损伤值仅为18.3%。通过显微硬度实验验证本构模型和有限元模拟的准确性,表明基于物理内变量的有限元模型能够有效地优化TA32钛合金复杂零件的热成形过程。
关键词:TA32钛合金;本构方程;热变形;显微组织演变;有限元方法
(Edited by Wei-ping CHEN)
Corresponding author: Yong WU, Tel: +86-17826026738, E-mail: wuyong@nuaa.edu.cn
DOI: 10.1016/S1003-6326(21)65658-3
1003-6326/ 2021 The Nonferrous Metals Society of China. Published by Elsevier Ltd & Science Press

