Trans. Nonferrous Met. Soc. China 26(2016) 729-735
Formation, microstructure and mechanical properties of double-sided laser beam welded Ti-6Al-4V T-joint
Xu-yi MA1,2, Shui-li GONG2, Jiu-xing ZHANG1, Wei LU2, Jing YANG2
1. College of Materials Science and Engineering, Beijing University of Technology, Beijing 100124, China;
2. Science and Technology on Power Beam Processes Laboratory, Beijing Aeronautical Manufacturing Technology Research Institute, Beijing 100024, China
Received 1 June 2015; accepted 10 November 2015
Abstract: The T-joints of Ti-6Al-4V alloy were manufactured by double-sided synchronized laser beam welding with the homologous filler wire. The formation, microstructure and mechanical properties of welded joints as well as the correlations of each other were investigated. The results indicate that the quality of weld seams is good without defects such as discontinuity, beading, visible cracks or porosity, which is linked to the steady molten pool behavior and droplet transition. The morphologies of the heat affected zone (HAZ) located on the skin and stringer are disparate. The microstructure of the HAZ and fusion zone (FZ) is mainly comprised of acicular martensitic ���� phases. The microhardness of the HAZ and FZ is higher than that of the base metal (BM) and reaches a maximum value at the HAZ near FZ on the stringer. The tensile specimens along the skin and stringer fractured at the BM with ductile fracture surfaces.
Key words: Ti-6Al-4V alloy; double-sided laser beam welding; T-joint; high-speed photography; microstructure; mechanical property
1 Introduction
The thin-walled structure is the most common structure in the field of aviation, spaceflight, navigation and automobile [1-3]. In order to enhance the intensity and rigidity of this type of structure, the stiffeners are generally employed which are traditionally manufactured by riveting and resistance spot welding. However, these methods may increase the mass of the stiffened thin-walled structure, and the failures always occur at the rivet or spot welded position due to stress concentration [4]. In recent years, with the increasing demand of light weight and high reliability for the stiffened thin-walled structure, the laser beam welding has been gradually employed to manufacture the T-joints structures because of high welding speed, low distortions and light weight comparing with the traditionally methods [5-8].
For the past few years, many works have been conducted on laser beam welded T-joints. OLIVEIRA et al [9] fabricated the T-joints by one-sided laser beam welding and obtained the optimized welding parameters including the shielding gas, seam angle, beam focal position, and beam position. In regard to double-sided laser beam welded T-joints, YANG et al [10] concluded that the morphology and the tensile properties of the welded T-joints were closely related to welding parameters such as incident beam position, beam angle, and beam separation distance. SQUILLACE and PRISCO [11] found that the composition of filler wire influenced the micro and macro-mechanical behavior of T-joints of aluminium alloy, and the filler wire with high melting latent heat contributed to the strengthening of HAZ. According to the study of TAO et al [12], it was found that the wire feeding posture was one of the most important parameters for welding, which strongly influenced the wire melting behavior, process stability, and porosity defects. In recent years, the double-sided laser beam welding has been applied to the manufacturing of aluminum fuselage panels for the Airbus A318 and A380, and for C919 in China [13,14]. However, up to now, very limited works have been reported on the double-sided laser beam welded T-joints for titanium alloy in terms of welding procedure and properties of the joints, which restricts the application of double-sided laser beam welding on the manufacturing of titanium alloy fuselage panel with skin-stringer construction.
In the present work, the T-joints of Ti-6Al-4V alloy were manufactured by double-sided synchronized laser beam welding with the homologous filler wire. The formation of weld joints was analyzed with the help of monitoring the welding process by high-speed camera. Meanwhile, the microstructure, mechanical properties, and the correlation of each other of the Ti-6Al-4V alloy welded T-joints were investigated.
2 Experimental
2.1 Materials and experimental set-up
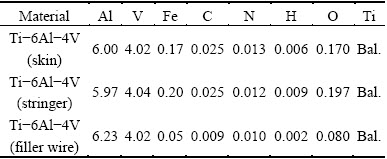
In this study, the rolled sheets of Ti-6Al-4V alloy with the thickness of 1.5 mm and 2 mm were used as the stringer and the skin materials, respectively. The filler wire of homologous alloy with a diameter of 1.0 mm was chosen. The chemical compositions of the present materials are listed in Table 1. Before welding, the surfaces of sheets and filler wire were treated by degreasing and pickling in order to remove the oil and the oxide film.
Table 1 Chemical compositions of Ti-6Al-4V alloy (mass fraction, %)
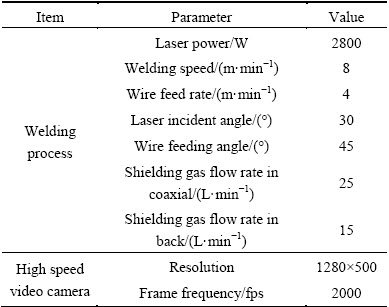
The T-joints with skin-stringer construction were fabricated by double-sided synchronized laser beam welding system. The schematic illustration of the welding system is shown in Fig. 1. Two TRUMPF 3 kW Nd: YAG laser beams were located symmetrically on the two sides of the stringer, which were controlled by robot system to ensure synchronism and obtain a combined weld molten pool during the welding process. The focus length of laser beam is 200 mm, and the spot is 0.6 mm in diameter. The ultrahigh purity argon gas (99.999%) was used as shielding gas, which was delivered to the coaxial and back position with the laser beam, respectively. In order to acquire stable weld formation, the filler wire was fixed on the same plane of the laser beam, and fed into the molten pool in the leading direction. The welding parameters were carried out with a set of parameter experiments, such as laser power, welding speed, wire feed rate, laser incident angle, wire feeding angle, and shielding gas flow rate, as listed in Table 2. Meanwhile, a Mega high-speed B/W & Color CMOS camera was fixed on the worktable to record the characteristics of molten pool, filler wire and plasma/ metal vapor during the welding process. The high speed video camera parameters used in this experiment are described in Table 2.
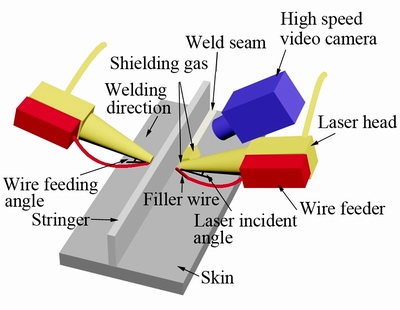
Fig. 1 Schematic illustration of double-sided synchronized laser beam welding system
Table 2 Welding and high speed video camera parameters used in this experiment
2.2 Analysis of joints
The inner quality was identified by X-ray radiography with an angle of 45�� between the X-ray and skin, then the X-ray films were photographed. The appearance of weld cross section and microstructure of welded joints were observed by an optical microscopy (OM; Leica, DM6000M) and a scanning electron microscopy (SEM; FEI, Quanta 200) after mechanical polishing and etching in a solution comprising of 2% hydrofluoric acid, 2% nitric acid, and 96% distilled water. The sizes of the weld cross-section were measured by using the commercial Image-Pro Plus (IPP) software. In addition, the element composition of different positions in the weld was analyzed by the energy dispersive X-ray analysis system (EDS) with SEM. The concentration of Al element shows the �� phase, and the concentration of V element suggests the �� phase of the Ti-6Al-4V alloy [15].
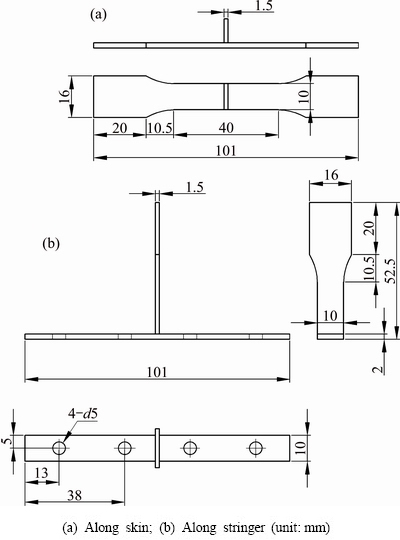
Fig. 2 Schematic illustration of tensile specimens in dimensions with different directions
The microhardness was measured using a hardness tester (SOI, HXD1000) across the center line of the welded T-joint with the load of 1.96 N, and the dwell time of 15 s. The interval distance was 0.2 mm. Two types of tensile specimens were prepared to evaluate the tensile properties of the T-joints along the skin and stringer. The dimensions of tensile specimens were designed referring to GB/T 228-2002 specification as shown in Fig. 2 [16]. Tensile tests were performed with a displacement rate of 5 mm/min at room temperature using a tensile tester (Zwick Roell, Z100), and then fracture morphology of the tensile test specimens was evaluated by SEM. Three specimens for the same condition were tested in this work.
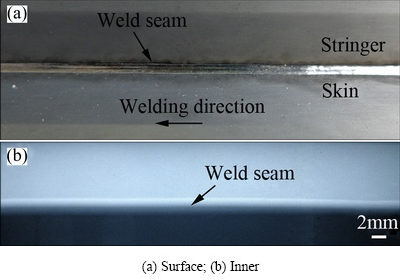
Fig. 3 Formation of weld seam
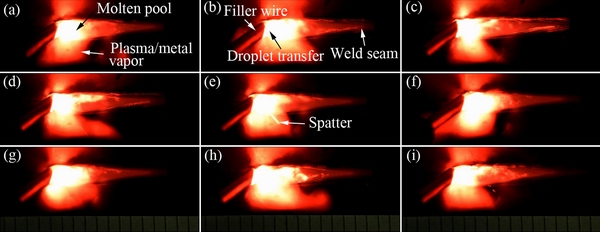
Fig. 4 Photographs of molten pool behavior during welding process at t ms (a), t+1 ms (b), t+2 ms (c), t+3 ms (d), t+4 ms (e), t+5 ms (f), t+6 ms (g), t+7 ms (h), and t+8 ms (i)
3 Results and discussion
3.1 Formation of double-sided laser beam welded T-joint
The appearance of the welded joint is shown in Fig. 3(a). It can be seen that the surface quality of the weld seam is good without the existence of discontinuity and beading defects, and the inner quality is also good without visible cracks and porosity defects (Fig. 3(b)). As is known to all, the quality of welding seam is mainly dependent on the stability of welding process. The behavior of the molten pool during welding process was studied by high-speed camera, and the high-speed camera photographs of molten pool at different positions and time during welding process are shown in Fig. 4. As shown in Fig. 4(a), it can be seen that the morphology of molten pool appears as a spindle-like shape which is symmetric along welding direction, but asymmetric along the direction vertical to welding direction. The width and length of the molten pool are about 2.5 mm and 6.0 mm, respectively. The degree of asymmetry in welding direction is associated to the temperature gradient from the central line to the boundary of the molten pool due to the locally fast heating process of laser welding and the poor thermal conductivity of Ti-6Al-4V alloy [17]. With further comparative analysis of the high-speed camera photograph at different time, it is found that the plasma/metal vapor is generated sustainedly and steadily. Meanwhile, the droplets between filler wire and molten pool transit smoothly under this welding condition, which is contributed to the stable welding process and good appearance of weld seams.
3.2 Microstructure of double-sided laser beam welded T-joint
The cross-sectional macrograph of welded T-joint is shown in Fig. 5, and it can be seen that the weld seam is located between the stringer and the skin. The welded T-joint consists of three zones: base metal (BM), fusion zone (FZ), and heat affected zone (HAZ). As shown in the high magnification image of welded T-joint (Fig. 6(a)), the BM is composed of equiaxed �� phase and the granular �� phase.
The FZ is formed by the melted materials of stringer, skin and filler wires, which has the typical T-type characteristics as shown in Fig. 5. As shown in the high magnification image of welded T-joint (Fig. 6(b)), the FZ is composed of acicular phase with a basket-weave structure. According to the result of EDS in Fig. 7(a), it is found that the composition of the acicular phase is similar to that of the base metal. Therefore, the acicular phase is martensitic ���� phase. The microstructure of Ti-6Al-4V alloy T-joint is dependent on the heating rate, maximum heating temperature, dwelling time over high temperature, and cooling rate [18,19]. With respect to the present double-sized laser beam welding, the FZ metal is completely melted due to the high power density of the laser beam, and the �� phase is totally transformed to �� phase when heated. During the following cooling process, as a result of the fast cooling rate, the acicular martensitic ���� phase is formed from solidified �� phase by shear deformation [2,20].
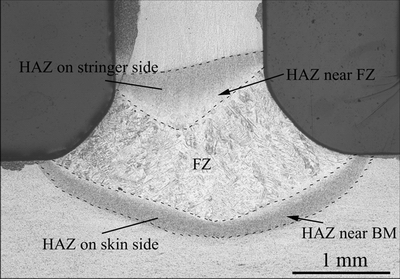
Fig. 5 Cross-sectional macrograph of welded T-joint
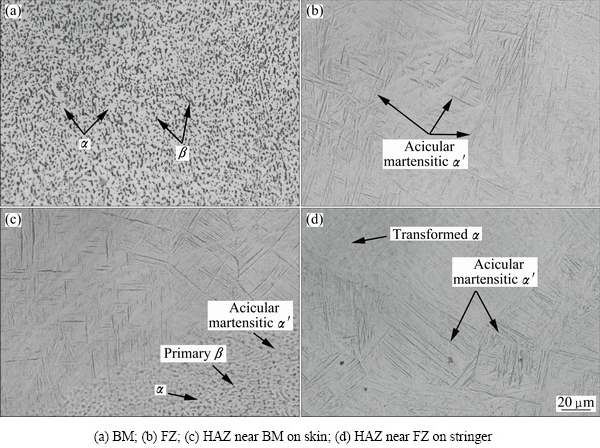
Fig. 6 Microstructures of different zones by OM
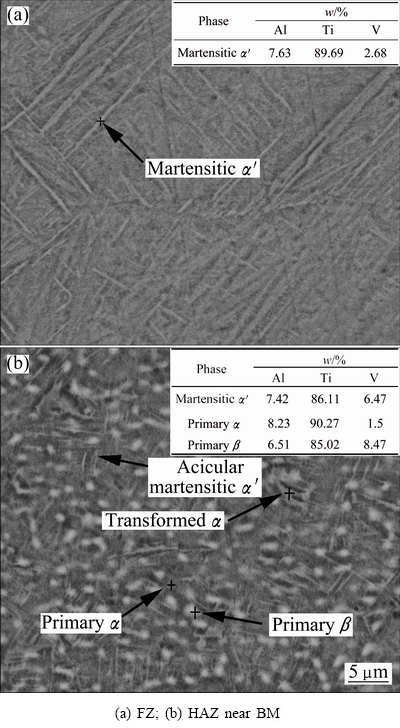
Fig. 7 SEM images of different zones
With regard to HAZ, it can be seen that there are two parts located at stringer and skin, and the morphologies of the two HAZs are disparate, which is distinct from the conventional butt joint. In addition, it is found that the HAZ on the stringer is in the shape of inverted triangle with the largest width of 0.7 mm, while the HAZ on the skin is in the shape of circular arc with the width of 0.2 mm approximately. However, the width of the HAZ on the stringer gradually increases from the edge to center part of the HAZ. The morphology of the HAZ on the stringer is not in the shape of circular arc mainly owing to the special welding process of T-joint structure and the cooling characteristic of titanium alloy. During the welding process of T-joints, two molten pools appear on the stringer due to the double-side heating by laser beam, and the distance between them is small, which causes the heat accumulation in the middle region of the thin stringer. Moreover, owing to the poor ability of heat conductivity of titanium alloy, the heat accumulation makes the temperature of the middle region higher than the phase transition temperature because of the heat accumulation, so that the microstructure in this region is affected. The microstructures of HAZ are shown in Figs. 6(c), (d), and Fig. 7(b), which exhibit clearly difference in shape between the regions near the BM and the regions near the FZ. Considering the EDS results, it is indicated that acicular martensitic ���� phase and few �� phase are formed in the HAZ near the FZ, while the HAZ near the BM consists of �� phase, a small amount of primary �� phase and acicular martensitic ���� phase. It can also be seen that size of martensite ���� in the HAZ near the FZ on the stringer is larger than that on the skin because the dwell time over the �� phase transformed temperature is longer than that on the skin due to the heat accumulation on the stringer.
3.3 Mechanical properties of double-sided laser beam welded T-joints
3.3.1 Microhardness
The microhardness distribution of the weld cross-section is presented in Fig. 8. It can be seen that the microhardness gradually increases with the measurement position moving from BM to HAZ across the center line, and reaches the maximum value in the HAZ near the FZ on the stringer (HV 412). Although the hardness decreases slightly in the FZ, the average microhardness of weld seam is about HV 381, which is still higher than that of BM (HV 319). It is well known that the hardness strengthening in the HAZ and FZ of Ti-6Al-4V alloy is attributed to the formation of martensite [21]. The hardness in the HAZ is higher than that in the FZ, which is relevant to the smaller size and higher density of martensite in the HAZ. Comparing with the microhardness in the HAZ on the skin (HV 382), the microhardness is higher on the stringer (HV 404). The HAZ on the stringer with the largest hardness is closely related to the higher content and smaller size of martensite than those of the HAZ and FZ on the skin. The results of microhardness measurements and microstructure are consistent with each other.
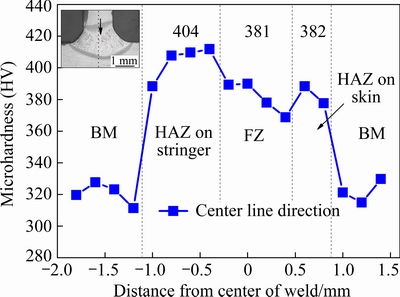
Fig. 8 Microhardness distribution across center line of weld cross-section
3.3.2 Tensile mechanical properties
The tensile strengths of the BM and the T-joints along the skin and stringer are given in Table 3. The average tensile strength of the T-joints along the skin is comparable to that of the BM, and the average tensile strength along the stringer is slightly higher than that of the BM. The strength values of the BM and the T-joints along the skin and stringer are approximately 1049, 1037 and 1066 MPa, respectively. The fractures of the tensile specimens along the skin and stringer of the welded T-joints are located in the BM. The HAZ and FZ are strengthened by the martensite compared with the BM, so that the deformation and fracture occur on the BM, and the results are consistent with the microhardness distribution of the welded T-joints. In addition, fracture morphology in typical position of the fractured samples is presented in Fig. 9. A typical dimple fracture appearance is observed, which is considered as the evidence of ductile failure mode.
Table 3 Average tensile strength, fracture position, and photograph of different tested specimens
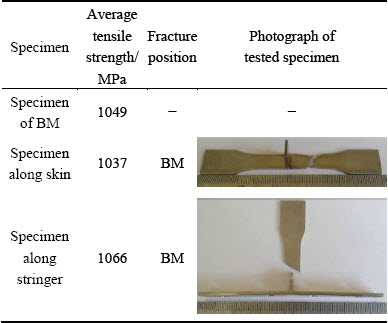
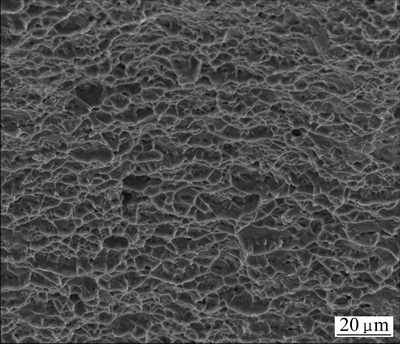
Fig. 9 Fracture morphology in typical tensile positions of fractured sample
4 Conclusions
1) The quality of the weld seam is good without the surface defects of discontinuity and beading, and inner defects of visible cracks and porosity, which is dependent on the stability of welding process monitored by high-speed camera.
2) With the shape of inverted triangle and circular arc respectively, the HAZs on the stringer and skin are disparate. Microstructure of the HAZ near the BM consists of �� phase, a small amount of primary �� phase and acicular martensitic ���� phase. With regard to the HAZ near the FZ, acicular martensitic ���� phase and few �� phase are observed. The size of martensite ���� in the HAZ near the FZ on the stringer is larger than that on the skin. The FZ is composed of acicular martensitic ���� phase.
3) Microhardness reaches the maximum value in the HAZ near the FZ on the stringer. The average microhardness of weld seam is higher than that in BM, which is attributed to the strengthening of martensite.
4) The tensile specimens along the stringer and skin are fractured in the BM, which is correlated with the strengthening effect of the martensite in the HAZ and FZ, and failure mode is in the form of ductile failure.
References
[1] BOYER R R. An overview on the use of titanium in the aerospace industry [J]. Materials Science and Engineering A, 1996, 213(1-2): 103-114.
[2] LEYENS C, PETERS M. Titanium and titanium alloys: Fundamentals and applications [M]. Weinheim: Wiley-VCH Verlag GmbH & Co. KGaA, 2005.
[3] SCHUBERT E, KLASSEN M, ZERNER I, WALZ C, SEPOLD G. Light-weight structures produced by laser beam joining for future applications in automobile and aerospace industry [J]. Journal of Materials Processing Technology, 2001, 115(1): 2-8.
[4] BRISKHAM P, BLUNDELL N, HAN L, HEWITT R, YOUNG K. Comparison of self-pierce riveting, resistance spot welding and spot friction joining for aluminium automotive sheet [R]. Warrendale, PA: SAE International, 2006.
[5] SCHUMACHER J, ZERNER I, NEYE G, THORMANN K. Laser beam welding of aircraft fuselage panels [C]//Proceedings of the 21st International Congress on Applications of Laser and Electro-Optics. Scottsdale, USA: : Laser Institute of America, 2002.
[6] DITTRICH D, BRENNER B, WINDERLICH B, BEYER E, HACKIUS J. Progress in laser beam welding of aircraft fuselage panels [C]//Proceedings of the 27th International Congress on Applications of Lasers and Electro-Optics. Temecula, USA: Laser Institute of America, 2008: 863-871.
[7] BRENNER B, STANDFUSS J, DITTRICH D, WINDERLICH B, LIEBSCHER J, HACKIUS J. Laser beam welding of aircraft fuselage structures [C]//Proceedings of the 27th International Congress on Applications of Lasers and Electro-Optics. Temecula, USA: Laser Institute of America, 2008: 838-845.
[8] CHEN Yan-bin, LI Li-qun, TAO Wang, YANG Zhi-bin. Laser welding technologies for aircraft fuselage panels [C]//Laser and Tera-Hertz Science and Technology. Washington DC, USA: Optical Society of American, 2012.
[9] OLIVEIRA A C, SIQUEIRA R H M, RIVA R, LIMA M S F. One-sided laser beam welding of autogenous T-joints for 6013-T4 aluminium alloy [J]. Materials & Design, 2015, 65: 726-736.
[10] YANG Z B, TAO W, LI L Q, CHEN Y B, LI F Z, ZHANG Y L. Double-sided laser beam welded T-joints for aluminum aircraft fuselage panels: Process, microstructure, and mechanical properties [J]. Materials & Design, 2012, 33: 652-658.
[11] SQUILLACE A, PRISCO U. Influence of filler material on micro- and macro-mechanical behaviour of laser-beam-welded T-joint for aerospace applications [J]. Journal of Materials: Design and Applications, 2009, 223(L3): 103-115.
[12] TAO W, YANG Z B, CHEN Y B, LI L Q, JIANG Z G, ZHANG Y L. Double-sided fiber laser beam welding process of T-joints for aluminum aircraft fuselage panels: Filler wire melting behavior, process stability, and their effects on porosity defects [J]. Optics and Laser Technology, 2013, 52: 1-9.
[13] MUELLER-HUMMEL P, FERSTL S, SENGOTTA M, LANG R. Laser beam welding of high stressed, complex aircraft structural parts [C]//Proceedings of the First International Symposium on High-Power laser Macroprocessing. Osaka, Japan: SPIE, 2002: 438-441.
[14] FOURNIER P. New developments of aluminium alloys on airbus aircraft [J]. Aluminium International Today, 2005, 6(17): 16-18.
[15] LIU H, NAKATA K, YAMAMOTO N, LIAO J. Microstructural characteristics and mechanical properties in laser beam welds of Ti6Al4V alloy [J]. Journal of Materials Science, 2012, 47(3): 1460-1470.
[16] GB/T 228-2002 Metallic materials��Tensile testing at ambient temperature [S]. (in Chinese)
[17] KOU S. Welding metallurgy [M]. 2nd ed. Hoboken, NJ: John Wiley & Sons, Inc., 2002.
[18] ZHANG Zhu. Metallurgy and heat treatment of Ti alloy [M]. Beijing: Metallurgical Industry Press, 2009. (in Chinese)
[19] XU Pei-quan. Microstructure characterization of Ti-6Al-4V titanium laser weld and its deformation [J]. Transactions of Nonferrous Metals Society of China, 2012, 22(9): 2118-2123.
[20] LU W, SHI Y W, LEI Y P, LI X Y. Effect of electron beam welding on the microstructures and mechanical properties of thick TC4-DT alloy [J]. Materials & Design, 2012, 34: 509-515.
[21] BALASUBRAMANIAN T S, BALAKRISHNAN M, BALASUBRAMANIAN V, MANICKAM M. Influence of welding processes on microstructure, tensile and impact properties of Ti-6Al-4V alloy joints [J]. Transactions of Nonferrous Metals Society of China, 2011, 21(6): 1253-1262.
Ti-6Al-4V�Ͻ�T�ͽ�ͷ˫�������⺸�Ӻ�����Ρ���֯����ѧ����
������1,2����ˮ��2���ž���1��« ΰ2���� �Z2
1. ������ҵ��ѧ ���Ͽ�ѧ�빤��ѧԺ������ 100124��
2. �����������칤���о��� ���������ӹ������ص�ʵ���ң����� 100024
ժ Ҫ������˫����˫��ͬ����˿���ӵķ����Ʊ�Ti-6Al-4V�Ͻ�T�ͽ�ͷ�����Ժ�����Ρ���֯����ѧ���ܼ������ϵ�����о���������������������������õĺ��죬δ���ֲ��������������ɼ������Ƽ�����ȱ�ݣ�ͬʱ�������뺸�ӹ������ȶ����۳���Ϊ�����õ��۵ι����йء��ӽ�ͷ������Է��֣���Ƥ����������Ӱ��������״��ȫ��ͬ����Ӱ�������ۺ�������֯������״����������ࡣ��Ӱ�������ۺ�������Ӳ�Ⱦ�����ĸ�ģ����ڽ�������ں�������Ӱ��������Ӳ���������Ƥ���������������������������ĸ�Ĵ�������ѷ�ʽΪ���Զ��ѡ�
�ؼ��ʣ�Ti-6Al-4V�Ͻ�˫�༤�⺸�ӣ�T�ͽ�ͷ������������֯����ѧ����
(Edited by Xiang-qun LI)
Foundation item: Project supported by Science and Technology on Power Beam Processes Laboratory at Beijing Aeronautical Manufacturing Technology Research Institute, China
Corresponding author: Xu-yi MA; Tel: +86-10-85701577; Fax: +86-10-85701588; E-mail: maxuyi@emails.bjut.edu.cn
DOI: 10.1016/S1003-6326(16)64163-8