ת�ٶ�6061-T6���Ͻ����Ħ�� ��Ӻ���ͷ��ѧ���ܵ�Ӱ��
��Դ�ڿ����й���ɫ����ѧ��(Ӣ�İ�)2014���4��
�������ߣ�Firouz FADAEIFARD Khamirul Amin MATORI Meysam TOOZANDEHJANI Abdul Razak DAUD Mohd Khairol Anuar Mohd ARIFFIN Norinsan Kamil OTHMAN Farhad GHARAVI Abdul Hadi RAMZANI Farhad OSTOVAN
����ҳ�룺1004 - 1011
�ؼ��ʣ����Ͻ𣻽���Ħ��������ѧ����
Key words��aluminum alloy; friction stir lap welding; mechanical properties
ժ Ҫ�����ó�����ɨ���������(FE-SEM)���о�ת�ٶԺ��Ϊ5 mm��6061-T6���Ͻ����Ħ����Ӻ���ͷ�ĺ�ۺ�����֯��Ӳ�ȡ����ͷ�������ܺ�ʧЧģʽ��Ӱ�졣�������������͵�ת�ٶ��£���ģ�����ģ�����ʮ�����Ƶ�Ӳ�ȷֲ�������EDX�������֣��������Ķ������к���Fe�Ļ����
Abstract: The effect of rotational speed on macro and microstructures, hardness, lap shear performance and failure mode of friction stir lap welding on AA6061-T6 Al alloy with 5 mm in thickness was studied by field-emission scanning electron microscopy (FE-SEM). The results represent much closer hardness distribution in the upper and lower plates at the lowest rotational speed. It indicates the Fe-compounds in the fracture surface of the nugget zone by EDX.
Trans. Nonferrous Met. Soc. China 24(2014) 1004-1011
Firouz FADAEIFARD1, Khamirul Amin MATORI1,2, Meysam TOOZANDEHJANI3,
Abdul Razak DAUD4, Mohd Khairol Anuar Mohd ARIFFIN3, Norinsan Kamil OTHMAN4,
Farhad GHARAVI1, Abdul Hadi RAMZANI2, Farhad OSTOVAN3
1. Materials Synthesis and Characterization Laboratory, Institute of Advanced Technology, Universiti Putra Malaysia, 43400 UPM Serdang, Selangor, Malaysia;
2. Department of Physics, Faculty of Science, Universiti Putra Malaysia, 43400 UPM Serdang, Selangor, Malaysia;
3. Department of Mechanical and Manufacturing, Faculty of Engineering, Universiti Putra Malaysia, 43400 UPM Serdang, Selangor, Malaysia;
4. School of Applied Physics, Faculty of Science and Technology, Universiti Kebangsaan Malaysia, 43400 UPM Serdang, Selangor, Malaysia
Received 29 July 2013; accepted 18 December 2013
Abstract: The effect of rotational speed on macro and microstructures, hardness, lap shear performance and failure mode of friction stir lap welding on AA6061-T6 Al alloy with 5 mm in thickness was studied by field-emission scanning electron microscopy (FE-SEM). The results represent much closer hardness distribution in the upper and lower plates at the lowest rotational speed. It indicates the Fe-compounds in the fracture surface of the nugget zone by EDX.
Key words: aluminum alloy; friction stir lap welding; mechanical properties
1 Introduction
Since 1991, friction stir welding (FSW) was introduced to the industry. This solid-state joining method is used to aluminum alloys since it can be accomplished without any toxic fumes production and can remove some welding defects related to solidification. Among these alloys, AA6061-T6 Al alloy is increasingly used in many industries [1,2] such as automotive, aerospace and shipbuilding. Unlike butt-joint focused more in previous researches, friction stir welding is widely used in lap-joint design in industries. But there are restricted efforts in realm of the friction stir welding of lap joints [2,3]. Figure 1 depicts both a lap joint design in location of advancing side (AS) on paralleling of welding speed and rotation in the same direction and retreating side (RS) on paralleling of welding speed and rotation in opposite direction.
In this welding, a rotational tool with a stable speed, which is plunged into the material for pre-arranged depth when the tool shoulder has a complete adjust with the upper plate, is traversed along the centerline of the overlap with certain welding speed.
In friction stir lap welding, plastic flows over the two sides of the welding tool are asymmetric. On the AS, the tool rotation and translation produce compatible forces for the mentioned flowing along the same direction (both are the driving forces), whereas on the RS, the tool rotation and translation prepare the forces in opposite directions. The microstructure, macrostructure and mechanical properties of weld zone all are influenced by the mentioned process [2,3].
In addition to this asymmetric flowing, there is another specified alternation in frictions stir lap welding (FSLW). CANTIN et al [4] found that the hooking effect was caused by the tool penetration into the lower plate in a certain depth, in which the original plate interface on either sides of the weld slightly bended upwards or downwards depending on tool geometry and welding parameters. This wavy flaw in advancing side is called as hooking, whilst the retreating side is called as thinning.
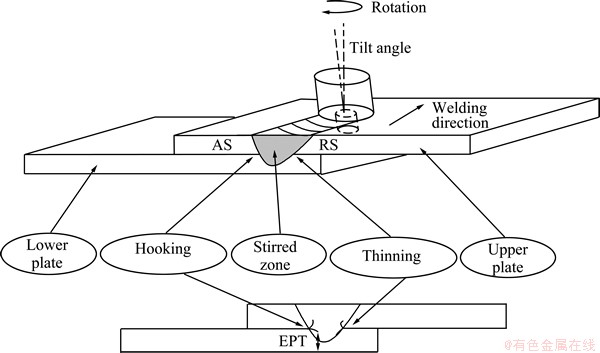
Fig. 1 Schematic of friction stir lap welding
Moreover, the hook and plate thinning geometries on these two sides display heterogeneity. Hooking height and size alteration will change the effective plate thickness (EPT) which has a clear effect on welding strength [5,6]. The EPT is the distance between the top of the upper plate and hooking flaw if the flaw moves up, and/or between the bottom of the lower plate and hooking flaw if the flaw moves down [3]. Moreover, decrease of EPT shows that the load carrying capacity is reduced (see Fig. 1).
The existence of different area in the macrostructure of weldment can be seen in Fig. 2. Common zones in friction stir lap welded samples of AA6061-T6 Al alloy, consisting of nugget weld zone (NZ) in upper and bottom, thermomechanically affected zone (TMAZ), heat affected zone (HAZ) and base metal (BM), could be included different grain sizes and altered distribution of elements and precipitations due to the different rotational speeds. Novelty of this study refers to the high utilization of lap joint in various industries and the speed rotational crucial effect in friction stir welding. In this study, the effects of various rotational speed on macro and microstructure, mechanical and metallurgical properties were investigated.
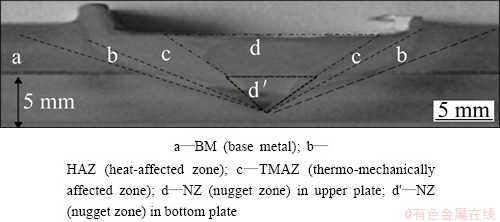
Fig. 2 Cross-section macrostructure of lap joint of AA6061-T6 at 1000 r/min in different regions
2 Experimental
In the present study, 6061-T6 Al alloys (UNS A96061) plates with dimensions of 220 mm��140 mm��5 mm were prepared for the lap configuration. The nominal chemical compositions of this alloy were 1.0 Mg, 0.66 Si, 0.27 Cu, 0.30 Fe, 0.03 Mn, 0.02 Ti, 0.05 Zn, 0.18 Cr and balance of Al (mass fraction, %). The mechanical properties of this alloy are listed in Table 1.
Table 1 Mechanical properties of AA6061-T6

Schematic of FSLW process including joint design, hook and plate thinning geometries is shown in Fig. 1. In the joint configuration, the longitudinal direction of the plates was parallel to the plate rolling direction. The designed tool pin was a left handed screw cylinder (d8 mm��5 mm) with a sub-conical headpin (d8 mm��3 mm) and a cylindrical shoulder (d20 mm). The tool pin was made of hardened high-speed tool steel (AISI H13) which was designed based on multi-stage pins (cylindrical shape for top plate, conical for bottom plate).
FSLW was carried out at a constant welding speed of 40 mm/min in various rotation speeds (900, 1000 and 1200 r/min). The rotation direction of tool pin was chosen in clockwise. The tool was tilted at 3�� in the backward of driving tool direction during welding. In addition, the tool shoulder was plunged into the upper work-piece by a depth of around 0.15 mm. For instance, sample of friction stir welding was obtained according to the welding procedure at 900 r/min and 40 mm/min welding speed, as shown in Fig. 3.

Fig. 3 Sample of friction stir welding in 900 r/min
As-welded samples were cut perpendicular to welding direction. Macrostructural and microstructural investigations were conducted on the cross-section of the as-welded samples. For metallographic study, samples were exposed to mechanical grinding using abrasive papers and then polished with 1 ��m diamond paste. The samples were then etched with Keller��s reagent. A Lecia light microscope joined with a Qwin image analyzer was employed to observe the microstructure. Samples were investigated by field-emission scanning electron microscope (FE-SEM, FEI, Nova NanoSEM 230). Grain sizes of samples were measured by Heyn method. Vickers hardness (HV) of the FSW region was measured on cross-section perpendicular to welding direction of the mid-thickness of the plate using a load of 100 g and a dwell time of 10 s.
Strength of welds loaded technically in lap shear test was inspected. The dimensions of lap shear test��s samples were according to AWS D17.3 which is an American National Standard for FSW of aluminum alloys for aerospace hardware. Due to the asymmetric feature of FSLW, two welding locations were considered, thus resulting in two different loading forms. Figure 4 shows a schematic of shear testing arrangement; type A is when the advancing side of a lap weld was loaded on the upper workpiece, while in type B, the retreating side of a lap joint was loaded on the upper workpiece. Room temperature lap shear tests were done using a 100 kN Instron mechanical testing machine with the cross-head speed of 2.0 mm/min. The average of three test specimens is taken to find average weld strength in each particular rotational speed. For each tensile shear-testing specimen, fracture locations were recorded. The fracture surfaces were examined using FE-SEM by selecting the condition of 20 kV and 15 mm work-distance and energy-dispersive X-ray spectroscopy (EDX).

Fig. 4 Schematic of FSLW (a) and affected area (b) by shoulder and pin used in this study
3 Results and discussion
3.1 Macrostructure study
Figure 2 illustrates a macrograph from a cross section of weld samples. Region d and d�� indicate the upper and lower part of nugget zone (NZ), respectively. Other regions of weld including parent metal, HAZ and TMAZ are also shown. The results reveal that a wider area of NZ appears near the top of the upper plate than the lower plate like a semi-taper shape. It suggests that the upper plate undergoes to a maximum deformation due to directly contacting the upper plates with the shoulder. Macroscopic observation of the weld zone shows a non-symmetric nugget zone associated to the tilt angle applied between the direction of tool rotation and welding direction [2,7]. It was clear that the weld did not exhibit any discontinuity and porosity.
FSLW joint and corresponding pin used in this study are schematically shown in Fig. 4. The triangle (ARC) shown here encompasses the area between shoulder and pin tip, which is a representatives of mechanical work and thermomechanical reaction. According to Figs. 1 and 2, HAZ and TMAZ zones are located around the AC and CR. Any alteration in size as well as macro- and micro-structures of these two zones can influence the mechanical and metallurgical properties of weldments [8,9]. It means that quality of welds with close integration to HAZ in conventional and non-conventional welding is a function of deviation of AC and CR from their theoretical situation. This deviation is indicated by �� in retreating side (thinning) and by �� in advancing side.
Figure 5 illustrates the deviations mentioned in previous two paragraphs, in 900 and 1200 r/min welded samples in the forms of �� and ��. Table 2 indicates that by increasing the rotational speed from 900 to 1200 r/min, �� is also growing from 9�� to 11�� while �� approximately remained constant. The reasons for all these alternations back to asymmetric feature of FSW in micro- and macro- structure distribution are related to advancing and retreating sides around the pin [5,10].
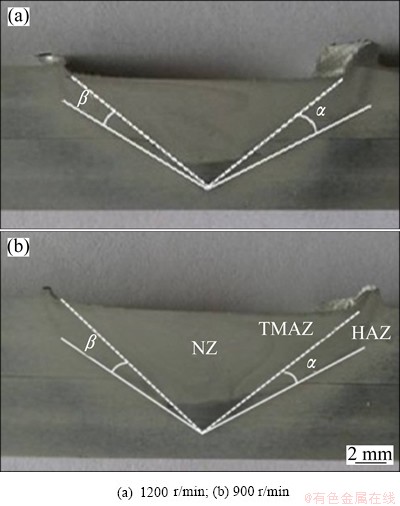
Fig. 5 Cross-section macrostructure of lap joint section AA6061-T6 Al alloy at different rotational speeds
Table 2 �� and �� deviations for different welds and rotational speeds

The variations of rotational speed and �� were positively proportional, meaning that the sizes of HAZ and TMAZ zones include �� and �� which are affected by welding parameters.
3.2 Microstructural study
The microstructure of base metal is shown in Fig. 6. Nugget zones in upper and bottom plates are shown in Figs. 7 and 8, respectively. Nugget zone contains fine and equiaxed grains with the smaller grain size compared with the base metal. This structure of NZ is the result of the dynamic recrystallization due to the frictional heat produced by shoulder contact and plastic deformation of stirring [2,11,12]. Due to higher pressure on the upper plate than that on the bottom plate, the grain size in upper nugget was a bit smaller than that in lower nugget.

Fig. 6 Microstructure of base metal

Fig. 7 SEM image of NZ in upper plate at 1000 r/min and welding speed of 40 mm/min
The grain sizes measured by the Heyn method (standard test method for determining average grain size: E112, 2012) are listed in Table 3. It can be noted that by decreasing the rotational speed from 1200 to 900 r/min, the grain size increases by 4.9 ��m in upper nugget and by 5.6 ��m in the lower nugget zone, respectively. However, the grain size remains a bit bigger in the lower nugget than that in the upper nugget zone for all samples. A comparison between images of NZ in bottom plate for 1000 and 1200 r/min rotational speeds in Fig. 8 proves the presence of finer grains in 1200 r/min. Higher rotational speed causes more plastic deformation and further fracture of grains in NZ. It is the reason that the sizes of grains obtained from 1200 r/min are smaller [2,11].
The directly elongated grains and dynamic recovered grain structure observed in TMAZ (Fig. 9) are formed due to the lack of thermal and deformation condition to create the recrystallized grain structure.
However, a transient microstructure between NZ and HAZ (Fig. 10) was achieved in the TMAZ. The HAZ has a coarser grain size than the unaffected BM [1,7,13].

Fig. 8 SEM images of NZ of bottom plate at different rotational speeds
Table 3 Grain sizes of NZs and HAZs
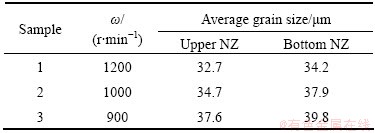
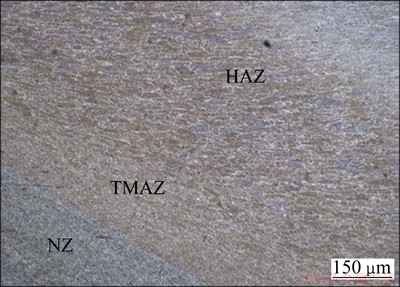
Fig. 9 SEM image of TMAZ at 1200 r/min
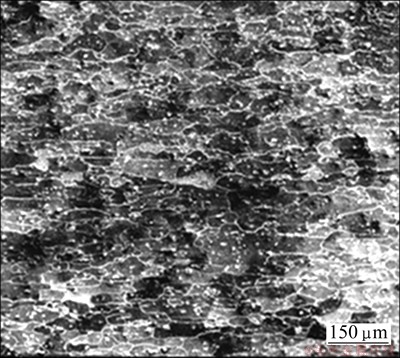
Fig. 10 SEM image of HAZ at 1200 r/min
3.3 Hardness evaluation
The microhardness was measured in the middle of the upper and bottom plates thickness in order to determine the hardness distributions (7 d after welding). Figure 11 shows the variation of microhardness with rotational speeds of 900 and 1200 r/min. Regardless of the process parameters, the values of hardness reveal a softened region in all samples. The softened region includes the weld nugget and HAZ regions which have lower values of hardness [2] compared with parent material. It was reported that the precipitates dissolve during FLSW due to high mechanical work and string which reduces the hardness of weld zones [14]. From Fig. 11 and Table 4, it can be seen that the average hardness of NZ decreases from HV65.95 to HV59.85 when rotational speed increases from 900 to 1200 r/min. While the reported hardness for base metal is HV105. Higher hardness values of NZ in contrast of HAZ are governed by finer grain in NZ regions. The HAZ regions at both advancing and retreating sides are found to have the minimum hardness among the other regions of weld zone due to grain coarsening. Because of different rotational speeds (900, 1000 and 1200 r/min), hardness values in HAZ regions reported are 48%-58% less than those of base metal, whilst they are about 35%-40% less than those of base metal. It is clear that rotational speed has stronger effect on the hardness of HAZ regions than NZ regions.
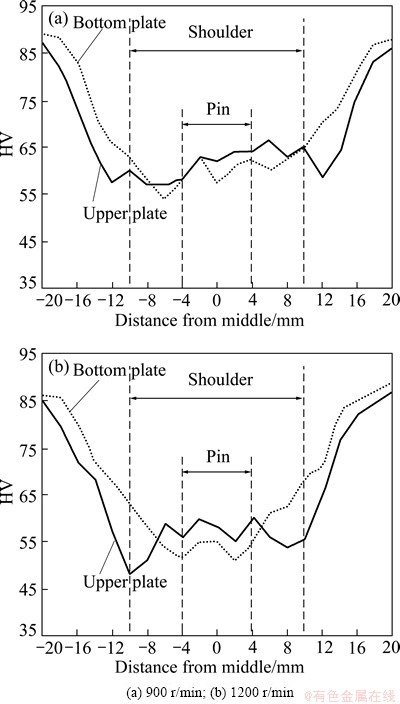
Fig. 11 Hardness distribution at different rotational speeds
Table 4 Average hardness of NZs and HAZs

Meanwhile, much closer hardness distribution in the upper and lower plates is observed at the lowest rotational speed (900 r/min). However, an obvious difference in higher rotational speed is clear. These occurrences are imposed by grain size variation in different weld regions (SZ, HAZ and TMAZ) as well as the different microstructures of NZ in the upper and bottom plates [7].
3.4 Weld flaws
As described above, the strength of FSLW samples is affected by hooking and thinning [15]. They are known as an initial break point in tensile and shear loading. Moreover, variations in height of hooking and thinning can change the effective plate thickness (EPT). In this study, due to conical shape of the tool pin in the interface of pin and plates, the hooking and thinning are placed in the lower plate. By reducing the rotational speed from 1200 to 900 r/min, hooking and thinning heights are reduced and move up toward the original interface of two plates. The hooking and thinning experience approximately the same reduction. However, the height of thinning to the original plate interface is larger than the height of hooking for all samples. EPT of all samples are listed in Table 5. Therefore, the rotational speed increases from 900 to 1200 r/min, leading to 1.68 mm reduction in EPT. Since sample at 900 r/min has higher EPT, it is expected that they carry higher tensile and shear load before the break.
Table 5 Effective plate thickness (EPT)

3.5 Overlap shear test and fractography
Shear tensile test specimens were prepared perpendicular to welding line. The interval time between welding and shear testing was 5 d. Due to the asymmetric feature of the weld and adjacent zones of FSLW, joint were tested under two conditions of type A and type B, as shown in Fig. 12.

Fig. 12 Overlap shear test results at different rotational speeds
By increasing rotational speed from 900 to 1200 r/min, at least 7% reduction in strength can be seen. Moreover, the results show the higher shear strength in type A than in type B as reported in Refs [3,16]. During tensile shear tests, fracture path occurs at thinning and propagates toward the bottom plate (Fig. 13).

Fig. 13 Photograph of fracture in lap shear test from retreating side
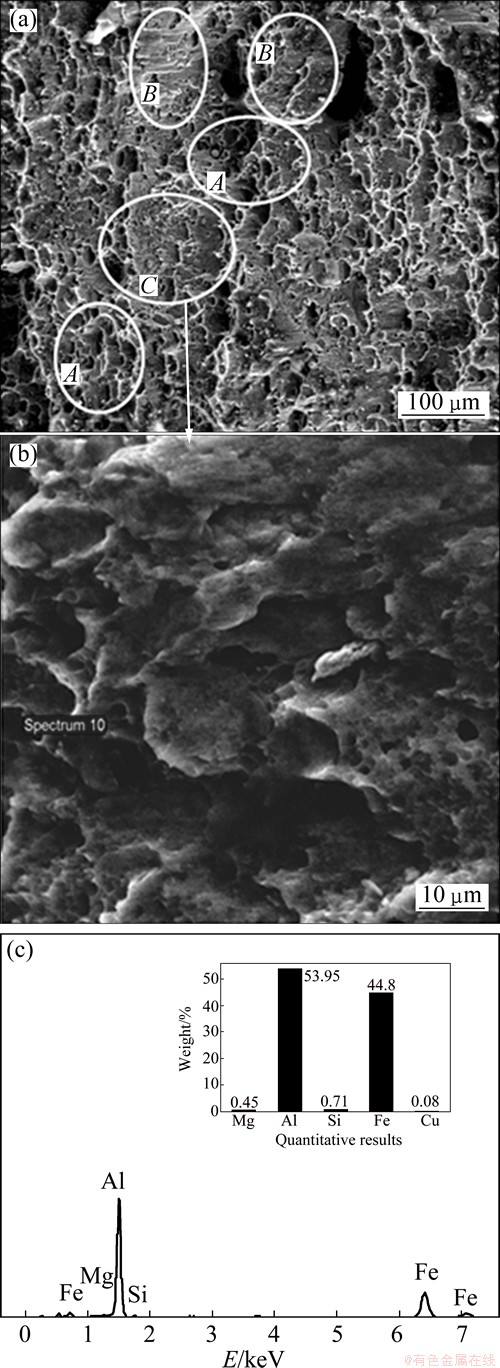
Fig. 14 SEM image of fracture surface of overlap shear test at 1000 r/min (a), magnification image of zone C (b) and EDX of a point in zone C (c)
The surfaces of fractures were investigated by FE-SEM and EDX. Figure 14 shows the fracture surface of the sample with rotational speed of 1000 r/min. The majority of fracture surface consists of deep dimples which exhibit the features of a ductile fracture (zone A). In zone B, the sheared cleavages are observed which introduce the brittle fracture [17], and zone C consists of brittle and ductile fracture (see Fig. 14(b)).
EDX analysis of fracture surface in zones C and B emphasizes the existing of Fe/Al compound in some of shallow deeps and cleavage area. Figure 14(c) depicts an EDX analysis of a point in zone C. Large plastic deformation and raising temperature to 550 ��C in AA6061 Al alloy can dissolve majority of precipitations except Al/Fe compounds [18]. Indeed dissolving process starts around 300 ��C to 550 ��C and even more [15]. During FSW of AA6061-T6 Al alloy, temperature under tool shoulder rises from 400 ��C up to 500 ��C [13,2] and due to higher plastic deformation in NZ [2,14], the majority of precipitates are dissolved and Al/Fe compounds are more stable.
4 Conclusions
1) The sizes of different weld zones (NZ, HAZ and TMAZ) are proportional well to the welding parameters particularly (rotational speed). Increasing the rotational speed leads to the increase in the nugget zone macro deviation in retreating side.
2) By increasing rotational speed, microstructure of NZ becomes finer, which is attributed to increasing the hardness in comparison to HAZ. Due to shoulder pressuring, grains in the top plate are smaller than those in the bottom plate. The minimum hardnesses in HAZ and NZ belong to the higher rotational speed. Much closer hardness distribution in the upper and lower plates is observed in the lowest rotational speed (900 r/min). However, an obvious difference in higher rotational speed is clear. These occurrences are imposed by grain size variation in different weld regions (SZ, HAZ and TMAZ) as well as the different microstructures of NZ in the upper and bottom plates.
3) The result of overlap shear testing shows that the motivation of hooking effect in fracture is related to the size and orientation of them. In this way, the maximum EPT-Effective plate thickness forms at a minimum rotational speed (900 r/min), showing the highest amount of shear tensile strength among samples. The height of hooking and plate thinning (in analogy with interface line) is decreased with decreasing the rotational speed.
4) FE-SEM study of fracture surface indicates mainly ductile fracture while brittle fracture is obviously clear in some areas. Existence of Al/Fe compounds is proved via EDX of fracture zone.
Acknowledgment
The authors wish to place sincere special thanks to Tajul Ariffin Md. TAJUDDIN Senior Technician of Engineering Faculty in Universiti Putra Malaysia, who is a mentor and great thanks go to Reza KHAKSHOURI, Parivash BAIBORDIANI and Zarifah Hj Nadakkavil ALASSAN to their assistance in this work.
References
[1] LIU G, MURR L E, NIOU C S, MC CLURE J C. Microstructural aspects of the friction stir welding of 6061-T6 aluminium [J]. Scripta Mater, 1997, 37: 355-361.
[2] MISHRA R S, MA Z Y. Friction stir welding and processing [J]. Mater Sci Eng R, 2005, 50: 1-78.
[3] CEDERQVIST L, REYNOLDS A P. Factor affecting the properties of friction stir welded aluminium lap joints [J]. Weld J, 2001, 80(12): 281-287.
[4] CANTIN G M D, DAVID S A, THOMAS W M, LARA-CURZIO E, BABU S S. Friction skew-stir welding of lap joints in 5083-0 aluminium [J]. Sci Technol Weld Joi, 2005, 10(3): 268-280.
[5] BABU S, JANAKI RAM G D, VENKITAKRISHNAN P V, MADHUSUDHAN REDDY G, PRASAD RAO K. Microstructure and mechanical properties of friction stir lap welded aluminium alloy AA2014 [J]. J Mater Sci Technol, 2012, 28(5): 414-426.
[6] YAZDANIAN S, CHEN Z W, LITTLEFAIR G. Effects of friction stir lap welding parameters on weld features on advancing side and fracture strength of AA6060-T5 welds [J]. J Mater Sci, 2012, 47: 1251-1261.
[7] LIU L, NAKAYAMA H, FUKUMOTO S, YAMAMOTO A, TSUBAKINO H. Microscopic observation of friction stir welded 6061 aluminium alloy [J]. Materials Transactions, 2004, 45(2): 288-291.
[8] MAHONEY M W, RODES C G, FLINTOFF J G, SPURLING R A, BINGEL W H. Properties of friction-stir-welded 7075 T651 aluminum. [J]. Metall Mater Trans A, 1998, 29: 1955-1964.
[9] REN S R, MA Z Y, CHEN L Q. Effect of welding parameters on tensile properties and fracture behavior of friction stir welded Al-Mg-Si alloy [J]. Scripta Materialia, 2007, 56: 69-72.
[10] YANG Q, LI X, CHEN K, SHI Y J. Effect of tool geometry and process condition on static strength of a magnesium friction stir lap linear weld [J]. Materials Science and Engineering A, 2011, 528: 2463-2478.
[11] MA Z Y. Friction stir processing technology: A review [J]. Metallu and Mater Trans A, 2008, 39(3): 642-658.
[12] RAJAKUMAR S, MURALIDHARAN C, BALASUBRAMANIAN V. Establishing empirical relationships to predict grain size and tensile strength of friction stir welded AA6061-T6 aluminum alloy joints [J]. Transactions of Nonferrous Metals Society of China, 2010, 20: 1863-1872.
[13] NANDAN R, DEBROY T, BHADESHIA H K D H. Recent advances in friction stir welding�Cprocess, weldment structure and properties [J]. Progress in Mater Sci, 2008, 53: 980-1023.
[14] SATO Y S, KOKAWA H, IKEDA K, ENOMOTO M, JOGON S, HASHIMOTO T. Microtexture in the friction-stir weld ofan aluminum alloy [J]. Metall Mater Trans A, 2001, 32: 941-948.
[15] ZHANG G, SU W, ZHANG J, WEI Z, ZHANG J. Effects of shoulder on interfacial bonding during friction stir lap welding of aluminum thin sheets using tool without pin [J]. Transactions of Nonferrous Metals Society of China, 2010, 20: 2223-2228.
[16] FRATINI L. FSW of lap and T-joints [J]. Advanced Structural Mater, 2012, 8: 125-149.
[17] ZADPOOR A A, SINKE J, BENEDICTUS R. Fracture mechanism of aluminium friction stir welded blanks [J]. Int J Mater Form, 2009, 2(l): 319-322.
[18] NIRANJANI V L, HARI KUMAR K C, SUBRAMANYASARMA V. Development of high strength Al-Mg-Si AA6061 alloy through cold rolling and ageing [J]. Materials Science and Engineering A, 2009, 515: 169-174.
Firouz FADAEIFARD1, Khamirul Amin MATORI1,2, Meysam TOOZANDEHJANI3,
Abdul Razak DAUD4, Mohd Khairol Anuar Mohd ARIFFIN3, Norinsan Kamil OTHMAN4,
Farhad GHARAVI1, Abdul Hadi RAMZANI2, Farhad OSTOVAN3
1. Materials Synthesis and Characterization Laboratory, Institute of Advanced Technology, Universiti Putra Malaysia, 43400 UPM Serdang, Selangor, Malaysia;
2. Department of Physics, Faculty of Science, Universiti Putra Malaysia, 43400 UPM Serdang, Selangor, Malaysia;
3. Department of Mechanical and Manufacturing, Faculty of Engineering, Universiti Putra Malaysia, 43400 UPM Serdang, Selangor, Malaysia;
4. School of Applied Physics, Faculty of Science and Technology, Universiti Kebangsaan Malaysia, 43400 UPM Serdang, Selangor, Malaysia
ժ Ҫ�����ó�����ɨ���������(FE-SEM)���о�ת�ٶԺ��Ϊ5 mm��6061-T6���Ͻ����Ħ����Ӻ���ͷ�ĺ�ۺ�����֯��Ӳ�ȡ����ͷ�������ܺ�ʧЧģʽ��Ӱ�졣�������������͵�ת�ٶ��£���ģ�����ģ�����ʮ�����Ƶ�Ӳ�ȷֲ�������EDX�������֣��������Ķ������к���Fe�Ļ����
�ؼ��ʣ����Ͻ𣻽���Ħ��������ѧ����
(Edited by Chao WANG)
Corresponding author: Khamirul Amin MATORI; Tel: +006-03-89466653; Fax: +006-03-89454454; E-mail: Khamirul@upm.edu.my
DOI: 10.1016/S1003-6326(14)63155-1

