New method for calculating face gear tooth surface involving worm wheel installation errors
来源期刊:中南大学学报(英文版)2017年第8期
论文作者:唐进元 崔伟
文章页码:1767 - 1778
Key words:face gear; grinding; worm wheel installation errors; VERICUT; error analysis
Abstract: The machining principle and realization method for the continuous generative grinding face gear by a worm wheel are introduced. Based on a five-axis linked CNC grinding machine, a new method is presented to deprive the equation of face gear error tooth surface by assuming the tool surface as the error surface, where actual tool installation position error is introduced into the equation of virtual shaper cutter. Surface equations and 3-D models for the face gear and the worm wheel involving four kinds of tool installation errors are established. When compared, the face gear tooth surface machined in VERICUT software for simulation based on this new method and the one obtained based on real process (grinding face gear by using a theoretical worm wheel with actual position errors) are found to be coincident, which proves the validity and feasibility of this new method. By using mesh planning for the rotating projection plane of the face gear work tooth surface, the deviation values of the tooth surface and the difference surface are acquired, and the influence of four kinds of errors on the face gear tooth surface is analyzed. Accordingly, this work provides a theoretical reference for assembly craft of worm wheel, improvement of face gear machining accuracy and modification of error tooth surface.
Cite this article as: CUI Wei, TANG Jin-yuan. New method for calculating face gear tooth surface involving worm wheel installation errors [J]. Journal of Central South University, 2017, 24(8): 1767-1778. DOI: https://doi.org/ 10.1007/s11771-017-3585-7.
J. Cent. South Univ. (2017) 24: 1767-1778
DOI: https://doi.org/10.1007/s11771-017-3585-7

CUI Wei(崔伟), TANG Jin-yuan(唐进元)
State Key Laboratory of High Performance Complex Manufacturing (Central South University),Changsha 410083, China
 Central South University Press and Springer-Verlag GmbH Germany 2017
Abstract: The machining principle and realization method for the continuous generative grinding face gear by a worm wheel are introduced. Based on a five-axis linked CNC grinding machine, a new method is presented to deprive the equation of face gear error tooth surface by assuming the tool surface as the error surface, where actual tool installation position error is introduced into the equation of virtual shaper cutter. Surface equations and 3-D models for the face gear and the worm wheel involving four kinds of tool installation errors are established. When compared, the face gear tooth surface machined in VERICUT software for simulation based on this new method and the one obtained based on real process (grinding face gear by using a theoretical worm wheel with actual position errors) are found to be coincident, which proves the validity and feasibility of this new method. By using mesh planning for the rotating projection plane of the face gear work tooth surface, the deviation values of the tooth surface and the difference surface are acquired, and the influence of four kinds of errors on the face gear tooth surface is analyzed. Accordingly, this work provides a theoretical reference for assembly craft of worm wheel, improvement of face gear machining accuracy and modification of error tooth surface.
Key words: face gear; grinding; worm wheel installation errors; VERICUT; error analysis
1 Introduction
The face gear drive, in meshing with the cylindrical gear is a new kind of transmission which can achieve torque and motion of cross shafts or intersection shafts, and has a compact structure, a large coincidence degree, smooth transmission and other advantages [1-3]. The unique superiority of the face gear deputy has been fully demonstrated by its application in the main reducer shunt-confluence drive of helicopters by American NASA [4, 5].
Face gear machining technology is the basis of face gear transmission technology, and the grinding method is an effective way to achieve high precision and high efficiency in face gear machining. Presently, there are three types of face gear grinding methods, including disk-shaped wheel grinding, the new CONIFACE method and worm wheel grinding [6]. Disk-shaped wheel grinding is a progressive grinding method with a simple principle, which is easy to implement but low in machining efficiency. The new CONIFACE method which utilizes the involute gear cutter with a tilt angle has a high machining efficiency as there is no need for radial feeding, but there exists local interference and certain transmission error. Worm wheel grinding has high grinding efficiency and accuracy, but there is difficulty in dressing the worm wheel tool and controlling its motion. Strictly speaking, every kind of machining method can cause processing errors, which inevitably produces deviation in the face gear tooth surface [7]. Although many researchers have studied the solution to error tooth surface and the deviation modification of the spiral bevel gear tooth surface [8-12], research on the face gear is seldom conducted as its construction theory and deviation formation mechanism are different from those of the spiral bevel gear. Among current studies, LI et al [13] investigated the influence of setting error of tool on tooth profile and the contact point of face gear drive, drawing the conclusion that the tooth profile and position of contact points of the face gear are little sensitive to the processing error. HE et al [14] conducted the simulation and experiment of meshing performance after shaping and grinding the face gear and analyzed the influence of error tooth surface by testing the transmission errors. MING et al [15] represented the analysis of the error sensitive direction and establishment of the equation of face gear tooth surface with error, which can show that the feeding axis concerning the machine tool bed moving has a larger effect on the tooth profile of face gear. GUO et al [16] analyzed and explored through experiments the progressive generative grinding machining errors of the face gear based on a disk-shaped wheel. They investigated the influence laws of the installation errors between the grinding wheel and the machine on the tooth surface deviation of the face gear and made modifications to the machine tool settings through experiments. However, the error tooth surface of face gear based on worm wheel grinding and the deviation value of error tooth surface and theoretical one were not discussed in their papers. Therefore, in this work, based on the continuous generative grinding face gear by a worm wheel, the tooth surface equation involving tool installation errors is established. The deviation value and difference surface of the tooth surface are obtained and the influence of tool installation errors on the tooth surface is analyzed. The research results are of great significance for both improvement in the accuracy of the grinding face gear and modification of the error tooth surface.
2 Machining principle of continuous generative grinding face gear by worm wheel
According to the meshing principle [17] of the face gear, the shaper cutter and the worm wheel, the shaper cutter has a virtual meshing relationship with the face gear and the worm wheel, respectively, as shown in Fig. 1. Accordingly, the face gear and the worm wheel can be generated by the shaper cutter tooth surface. In other words, the face gear tooth surface can be generated by controlling the motion of the worm wheel. Figure 2(a) represents the machining principle of the continuous generative grinding face gear by the worm wheel, showing different grinding positions of the worm wheel at different moments. Here, two relative independent motions are required to complete the whole process of face gear grinding: 1) the face gear and the worm wheel need to make a generating motion around their own axis with a certain gear ratio for enveloping the teeth height profile of the face gear; 2) the worm wheel makes linear feed motion along the radial direction of the face gear to envelope the teeth length profile. The entire process of the continuous generative grinding of the face gear can be completed by superimposing the above-mentioned two movements. According to this machining principle, the face gear needs to be processed in the five-axis grinding machine, and five axes (X, Y, Z and A, C axis) require to be linked, as shown in Fig. 2(b). Besides, it is necessary for the tool spindle (A axis) and the stock spindle (C axis) to have optical gratings in order to realize accurate rotation at a certain ratio.
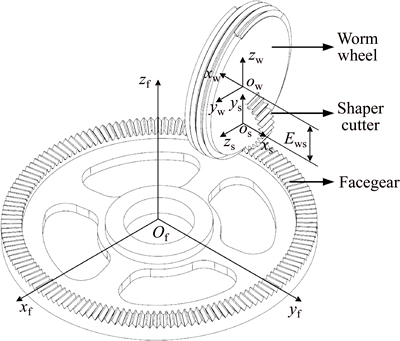
Fig. 1 Meshing principle of face gear, shaper cutter and worm wheel

Fig. 2 Machining process of continuous generative grinding of face gear by worm wheel:
3 Face gear tooth surface equation involving tool installation errors
3.1 Analysis of installation errors of worm wheel
Worm wheel installation errors mainly include worm wheel calculation error, worm wheel shaft thermal distortion error, fixture error, etc. When these errors exist, deviation and misalignment may appear for the rotation center of the worm wheel (axis of rotation), resulting in errors of the tooth surface during the grinding. The rotational axis of the worm wheel has three linear and three rotational degrees of freedom, and its spatial error model is shown in Fig. 3.
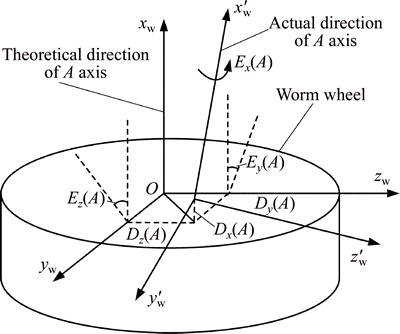
Fig. 3 Spatial error model of worm wheel rotation axis
As shown in Fig. 3, in the theoretical case, A-axis is the worm wheel rotation axis which coincides with X-axis of the coordinate system. Then, the angles between the actual rotation axis and the theoretical one of the worm wheel are defined in the x-z and x-y planes as yaw angle error Ey(A) and pitch angle error Ez(A) of A-axis, respectively. The rotating angle error of A-axis is called angular error Ex(A). The deviation between the actual rotation axis and the theoretical one is defined as linear position error. That is to say, Dx(A), Dy(A) and Dz(A) represent axial linear position error, Y-axis and Z-axis tangential linear position error, respectively.
In the analysis of the six errors, the rotating angle error caused by the tool spindle (A-axis) is very small as the grinding process of the face gear by the worm wheel is a continuous generative motion and the tool spindle has optical gratings which can strictly control the rotating angle, as shown in Fig. 2. Therefore, the angular error Ex(A) will not be considered in this work. Furthermore, Y-axis linear position error Dy(A) will also be ignored in this work for the reason that the erroneous location in Y-axis direction will not influence the final tooth surface of the face gear since the feed direction of the worm wheel is Y-axis.
In conclusion, for tool installation errors of the worm wheel, four key errors including yaw angle error Ey(A), pitch angle error Ez(A), axis linear position error Dx(A) and tangential linear position error Dz(A) will be synthesized and analyzed in the present work. For brevity of description, the tangential linear position error here is equal to Z-axis tangential linear position error, and the same goes for the rest of the content.
3.2 New method for introducing worm wheel installation errors
In general, the derivation of the gear error tooth surface equation is made by directly introducing errors into the tool equation. Following this method, if errors are also directly introduced into the surface equation of the worm wheel which is a kind of quite complex cutting tool itself, there will be more difficulties in solving the equation and a very complicated process will arise, which is not conductive to follow-up analysis. To solve this problem, a relatively simple and effective solution is adopted in this work. That is, there exists a virtual shaper cutter which has a meshing relationship with the face gear and the worm wheel respectively when the face gear surface is generated by the worm wheel. Accordingly, the virtual shaper cutter can be taken as an intermediate surface. Firstly, the worm wheel installation errors are introduced into the shaper cutter coordinate system. Then the surface equation of the worm wheel which is taken as an error surface, derived by the shaper cutter, is obtained. Finally, the face gear surface equation involving the errors can be derived by the worm wheel error surface equation. With this method, the derivation process is greatly simplified, and the solution of the equation becomes relatively easier.
As shown in Fig. 4, the spatial error model of the shaper cutter is built according to the meshing principle of the face gear, the shaper cutter and the worm wheel. Fixed coordinate systems Ss(xs, ys, zs) and Sf(xf, yf, zf) are rigidly connected to the shaper cutter and the face gear, and fixed coordinate systems of the shaper cutter with errors are Ss1(xs1, ys1, zs1), Ss2(xs2, ys2, zs2), Ss3(xs3, ys3, zs3) and Ss4(xs4, ys4, zs4). The parameter d is the location datum of the shaper cutter from the face gear, and Ews is the distance from the axis of the face gear to the worm wheel. In Fig. 4(a), Ex and Ey represent, respectively, the errors produced by the shaper cutter along the tangential and axial directions of the face gear, which are equivalent to axial linear position error Dx(A) and tangential linear position error Dz(A) in the spatial error model of the worm wheel(see Fig. 3). In Fig. 4(b), Ex and Ez represent the respective angles between the actual rotation axis and the theoretical one of the shaper cutter in the y-z and x-y planes, which are equivalent to yaw angle error Ey(A) and pitch angle error Ez(A). Therefore, the effect is equivalent through introducing the errors into the shaper cutter coordinate system and into theworm wheel coordinate system to derive the error tooth surface of the face gear.

Fig. 4 Spatial error model of shaper cutter:
3.3 Worm wheel surface equation derived by shaper cutter
The relative position coordinate systems of the face gear and the worm wheel enveloped by the shaper cutter are established, as shown in Fig. 5. Sf0(xf0, yf0, zf0), Ss0(xs0, ys0, zs0) and Sw0(xw0, yw0, zw0) represent the fixed coordinate systems of the face gear, the shaper cutter and the worm wheel, respectively, while Sf(xf, yf, zf), Ss(xs, ys, zs) and Sw(xw, yw, zw) represent their respective movable coordinate systems. Rotational angles of the face gear, the shaper cutter and the worm wheel are represented as φf, φs and φw, respectively. λw expresses the axis intersection angle parameter between the worm wheel and the shaper cutter; rps is the pitch radius of the shaper cutter; rpw is the radius of the worm wheel, and Ews is the distance from the axis of the face gear to the worm wheel, satisfying  Accordingly, the matrix Mw,s representing the coordinate transformation from Ss to Sw can be given by
 (1)
(1)
where the matrix Mw,w0 describes the coordinate transformation from Sw0 to Sw, and the matrices Mw,w0 and Ms0,s describe the coordinate transformations from Ss0 to Sw0 and from Ss to Ss0, respectively.
As represented in Fig. 5, the matrices Ms0,s, Mw0,s0 and Mw,w0 can be acquired.
 (2)
(2)
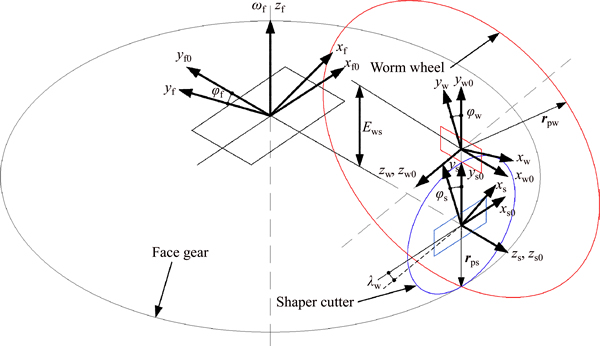
Fig. 5 Coordinate systems applied for generation of worm wheel
 (3)
(3)
 (4)
(4)
As shown in Fig. 4, introducing the worm wheel installation errors into the shaper cutter coordinate system means that there exists error in the above matrix Mw0,s0. Then, the error coordinate transformation is defined as Merror and expressed as follows:


 (5)
(5)
Thus, the matrix  representing the coordinate transformation with the worm wheel installation errors from Ss to Sw can be obtained when Eqs.(2)-(5) are substituted into Eq.(1).
 (6)
(6)
The tooth surface equation of the shaper cutter in the coordinate Ss is defined as Rs(θs, us), where θs and us describe the tooth surface parameters of the shaper cutter, and Xs-axis is its symmetry axis. Thence, the rotational angular velocity of the shaper cutter is represented as
 (7)
(7)
With the existence of the errors, the velocity of a point in the tooth surface of the shaper cutter is obtained as
 (8)
(8)
Thus, the velocity of a point in the surface of the worm wheel is represented as
 (9)
(9)
where Nws describes the gear ratio between the shaper cutter and the worm wheel, satisfying 
Therefore, the surface of the worm wheel generated by the shaper cutter can be represented as
 (10)
(10)
where  describes the meshing equation between the worm wheel and the shaper cutter;
  is the normal vector of the shaper cutter tooth surface.
 (11)
(11)
After equation  is solved, the surface equation and corresponding normal vector of the worm wheel by vector functions can be represented into:
 (12)
(12)
 (13)
(13)
where the matrix  is the 3×3 order sub-matrix of matrix
3.4 Face gear surface equation derived by worm wheel
According to the theories of differential geometry and gear mesh [18], the shaper cutter surface is in line contact with the face gear surface and the worm wheel surface. However, the two contact lines do not coincide but intersect with each other at any point of meshing. Thus, in order to completely envelop the whole surface of the face gear, a two-parameter method has to be utilized to grind the face gear by the worm wheel wherein two independent sets of parameters are provided: 1) a set of angles of rotation  of the worm wheel and the face gear, and 2) a radial feed motion lw of the worm wheel. Parameters φw and φf, which are the angles of rotation of the worm wheel and the face gear, need to satisfy the following relation:
 (14)
(14)
where Nf and Nw are the number of teeth of the face gear and that of the worm wheel, respectively. Parameter lw of the radial feed motion is provided as collinear to the axis of the worm wheel.
The face gear tooth surface is calculated as the envelope to the worm wheel surface, as shown in Fig. 6. Coordinate systems Sw and Sf are rigidly connected to the worm wheel and the face gear, respectively. Moreover, Sw0 and Sf0 are fixed coordinate systems. Ews is the distance from the axis of the face gear to the worm wheel. Therefore, the position of the face gear surface is determined as
 (15)
(15)
where the matrix  describes the coordinate transformation from Sw to Sf; the equation
  represents the meshing equation in the case that the radial feed parameter lw is constant and the rotation parameter φw is changeable. Similarly, the equation
 describes the meshing equation in the case with a constant rotation parameter φw and a changeable radial feed parameter lw.
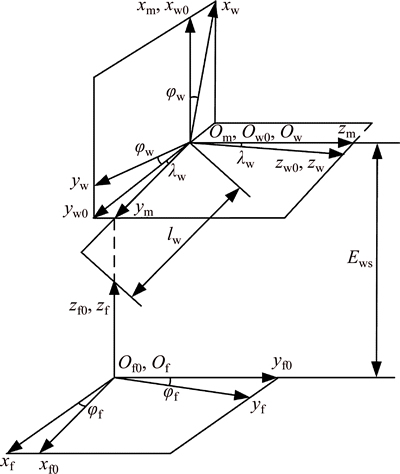
Fig. 6 Machining coordinate systems applied for face gear generation by worm wheel
4 Simulation processing verification
This section will verify the validity and feasibility of the above mentioned new method concerning the solution to solve the face gear error tooth surface by using VERICUT software to simulate the process. Two groups of simulations are provided for comparison: 1) face gear blank ground by a worm wheel involving errors (the actual installation position of the worm wheel is errorless); 2) face gear blank ground by a theoretical worm wheel with actual installation position errors. For convenience, one of the four kinds of errors is taken as an example. That is, there only presumptively exists tangential linear position error. Then, the two face gear tooth surfaces obtained by the above simulation process can be compared. If the two tooth surfaces are coincident (within a certain error range), the above two methods are equivalent in machining the face gear error tooth surface, that is, the new method proposed by the paper is correct. Further, comparison can be made between the theoretical face gear tooth surface involving errors and the tooth surface acquired by one of the above mentioned simulation process (here the simulation result of the first group is taken), which completely verifies that the results of both theoretical derivation and simulation process are identical.
4.1 Theoretical models
Taking tangential linear position error as 1 mm and using the parameters listed in Table 1, the error surface discrete points of the face gear and the worm wheel can be calculated. Then, the separate theoretical model can also be obtained by importing those discrete points into CATIA software, as shown in Fig. 7.
Table 1 Design parameters of face gear transmission
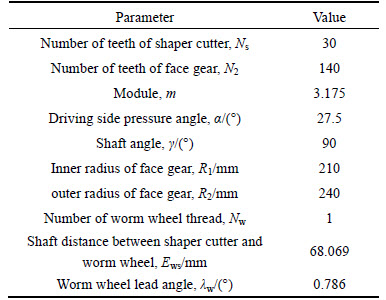

Fig. 7 Theoretical models of face gear and worm wheel involving errors:
4.2 Face gear ground in VERICUT for simulation
4.2.1 Simulation I
The method adopted in simulation I is to grind the face gear by a worm wheel involving errors. The Qin Chuan YK2050A Gear Grinding Machine is chosen as the processing equipment, which can meet the requirements of face gear grinding movement based on the worm wheel as mentioned above. The complete simulation environment (see Fig. 8) can be constructed by establishing a machine along with a face gear blank and taking the 3-D model of worm wheel involving errors obtained in section 4.1 as the processing tool imported into VEERICUT software [19] which is developed by CGTECH Corporation of America. Finally, by editing NC programs and implementing the simulation process, the outcome can be obtained as shown in Fig. 9.
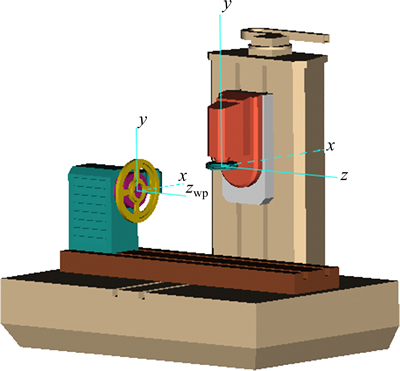
Fig. 8 Simulation environment I in VERICUT
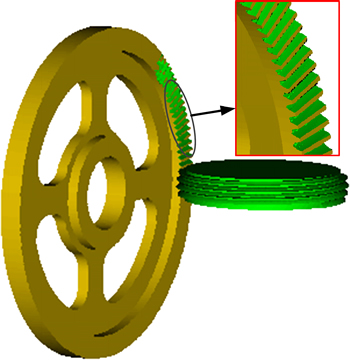
Fig. 9 Result of simulation I in VERICUT
4.2.2 Simulation II
The method employed in simulation II is to grind the face gear by a theoretical worm wheel with actual installation position errors. The way to construct VERICUT simulation environment (see Fig. 10) is similar to the way presented in 4.2.1 section, and the differences are: the processing tool is a theoretical worm wheel without errors which is easy to get; the actual installation position error (tangential linear position error) of the worm wheel is increased, that is, the actual axis of the worm wheel offsets the theoretical axis 1 mm along the Z-axis direction (based on the coordinate of the machine in Fig. 10). The result is shown in Fig. 11.
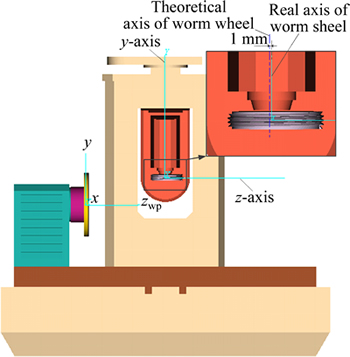
Fig. 10 Simulation environment II in VERICUT
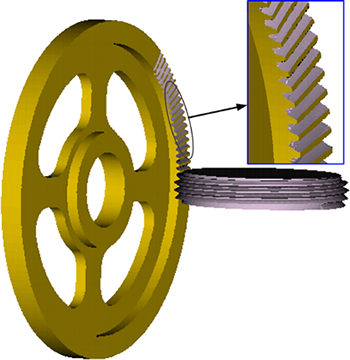
Fig. 11 Result of simulation II in VERICUT
4.3 Comparison and analysis of results of two simulations
The result of overlapping two face gear tooth surfaces obtained by the above two simulations is depicted in Fig. 12(a), where green areas represent the tooth surface processed in simulation I and light pink areas represent the tooth surface in simulation II. It is found that the maximum error between the two tooth surfaces is 0.082 mm (as shown in Fig. 12(b)), which is within the range of allowable error. Therefore, this result indicates that grinding the face gear blank by a worm wheel involving errors is equivalent to grinding the face gear blank by a theoretical worm wheel with actual installation position errors, which proves in turn that this new method to solve the face gear error tooth surface is correct and practicable.
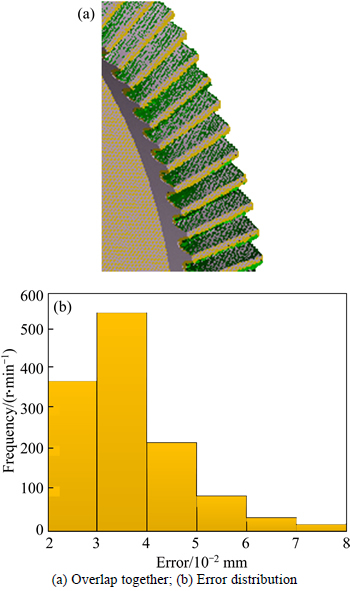
Fig. 12 One error analysis of two tooth surfaces:
Further, comparison can be made for errors between the theoretical face gear tooth surface involving errors (as shown in Fig. 7(a)) and the tooth surface obtained in one of the simulations (the result of simulation I is taken). Similarly, Fig. 13(a) shows the result of overlapping two face gear tooth surfaces, where green areas represent the tooth surface processed in simulation I and brown areas represent the theoretical tooth surface. It is found that the maximum error between two tooth surfaces is 0.104 mm (as shown in Fig. 13(b)), which is also within the range of allowable error, indicating that the results between theoretical derivation and simulation process are identical.
5 Mesh planning and deviation calculation of tooth surface
5.1 Mesh planning of tooth surface
As a kind of space complex surface, the tooth surface of face gear needs to be discretized in order to make accurate measurements and calculate the deviation between the theoretical tooth surface and the actual one. To this end, a usual practice is to plan mesh on the rotating projection plane of the tooth surface [20].
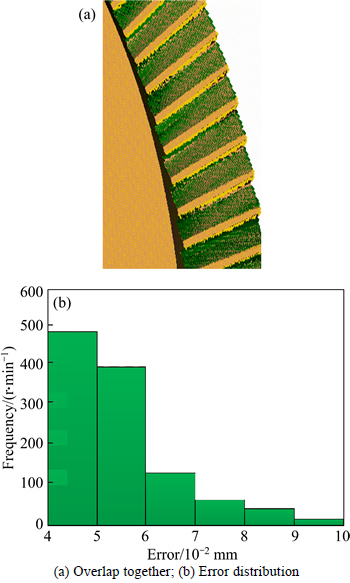
Fig. 13 Another analysis error of two tooth surfaces:
To provide an accurate sample of the teeth and achieve a fast measurement time, there must be an adequate number of mesh points, and the measuring point area should be large enough, but neither too close to the tooth addendum and tooth dedendum transition surfaces, nor too close to the inner and outer diameter ends. Following the general measurement method for spiral bevel gears, 9 columns in the tooth length direction and 5 rows in the tooth height direction are chosen in the rotating projection plane of the tooth surface, namely, a total number of 45 discrete points are selected as tooth points to be researched, as depicted in Fig. 14. The top of the mesh is located in the 5% midpoint work tooth surface below the tooth addendum, and the bottom of the mesh is located in the 5% midpoint work tooth surface above the lower boundary line of work tooth surface. The distance from the left or right boundary of the mesh to the inner or outer diameter end is less than 10% tooth width. Generally speaking, the main contact area is located within this range.
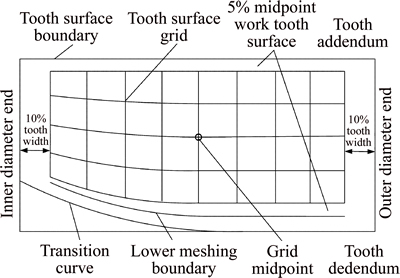
Fig. 14 Mesh planning of face gear tooth surface
5.2 Deviation calculation of tooth surface
Radius vector  and normal vector
  (i=1-5, j=1-9) of each mesh point can be obtained based on the tooth surface mesh planning. Firstly, radius vector rw1(i, j) and normal vector nw1(i, j) of each mesh point of the theoretical face gear tooth surface (without worm wheel installation errors) can be obtained. Then, radius vector rw2(i, j) of each mesh point of the face gear tooth surface with errors can also be obtained. As the tooth surface deviation is the projection distance of tooth surface points which deviate from the theoretical one along the normal direction, the deviation of each mesh point e(i, j) will be calculated with the following equation [21].
 (16)
(16)
6 Analysis of error tooth surface of face gear
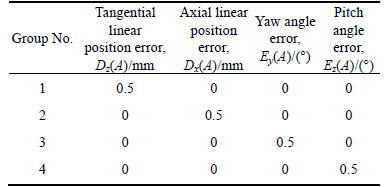
This section will exploit the single parameter method to analyze the error tooth surface of the face gear based on the established error tooth surface model and the determined calculating method for the deviation of the tooth surface, in view of the design parameters of the face gear listed in Table 1 and the tool installation error values given in Table 2.
Table 2 Tool installation error values
6.1 Influence laws of tangential linear position error
As shown in Fig. 15, the tooth surface equation of the face gear involving the tangential linear position error Dz(A) has been solved by substituting the error value of group 1 given in Table 2 into the corresponding equation. Take the right tooth surface as example for further study in Fig. 16. The deviation value between the error tooth surface and the theoretical one which is generally represented by the difference surface and the contour plot can be obtained by solving Eq. (16).
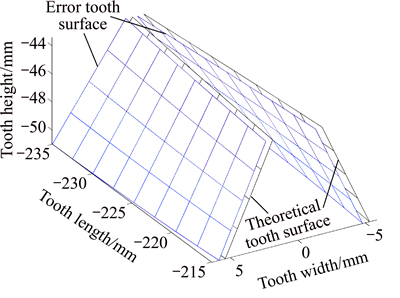
Fig. 15 Comparison of error tooth surface of face gear involving Dz(A) and theoretical one

Fig. 16 Deviation of right tooth surface of face gear involving Dz(A):
From a numerical point of view, it can be known from Figs. 15 and 16 that the tangential linear position error Dz(A) causes the tooth surface to deviate along the tooth width direction, but the tooth surface appears asymmetric. The error value changes in a zigzag style along the tooth length direction, reaching the maximum in the middle position of the tooth surface.
6.2 Influence laws of axial linear position error
As shown in Fig. 17, the tooth surface equation of the face gear involving the axial linear position error Dx(A) has been solved by taking the error value of group 2 given in Table 2 into the relevant equation. Similarly, the right tooth surface is taken as an example for further study in Fig. 18. The deviation value between the error tooth surface and the theoretical one can be obtained by solving Eq. (16).

Fig. 17 Comparison of error tooth surface of face gear involving Dx(A) and theoretical one

Fig. 18 Deviation of right tooth surface of face gear involving Dx(A):
From the numerical result in Figs. 17 and 18, it can be seen that the axial linear position error Dx(A) causes the tooth surface to deviate along the tooth height direction, and the tooth surface remains symmetric. The error value changes in a zigzag style along the tooth width direction and the maximum value is reached in the tooth dedendum and addendum.
6.3 Influence laws of yaw angle error
As shown in Fig. 19, the tooth surface equation of the face gear involving the yaw angle error Ey(A) has been solved by substituting the error value of group 3 given in Table 2 into the corresponding equation. Similarly, the right tooth surface is taken as an example for further study in Fig. 20, where the deviation value between the error tooth surface and the theoretical one can be obtained by solving Eq. (16).

Fig. 19 Comparison of error tooth surface of face gear involving Ey(A) and theoretical one
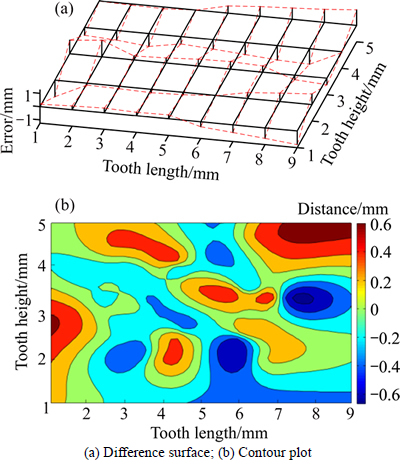
Fig. 20 Deviation of right tooth surface of face gear involving Ey(A):
From Figs. 19 and 20 it can be observed that the yaw angle error Dx(A) leads the tooth surface to incline along the tooth length direction, and the tooth surface remains symmetric. The error value reaches the maximum either at the outer diameter end or the inner diameter end along the tooth length direction, and there is no obvious difference at the tooth addendum and dedendum.
6.4 Influence laws of pitch angle error
As shown in Fig. 21, the tooth surface equation of the face gear involving the pitch angle error Ez(A) has been solved by taking the error value of group 4 given in Table 2 into the relevant equation. Similarly, the right tooth surface is taken as an example for further study in Fig. 22, where the deviation value between the error tooth surface and the theoretical one can be obtained by solving Eq. (16).

Fig. 21 Comparison of error tooth surface of face gear involving Ez(A) and theoretical one
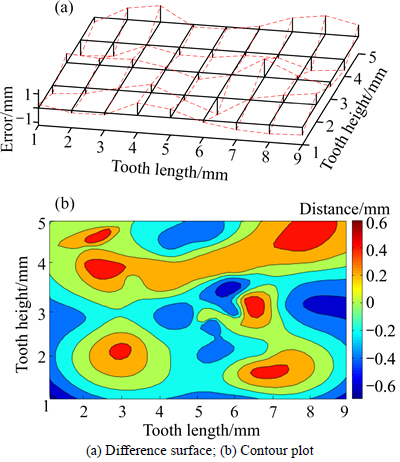
Fig. 22 Deviation of right tooth surface of face gear involving Ez(A):
It can be indicated in Figs. 21 and 22 that the pitch angle error Ez(A) causes the tooth surface to incline along the tooth width direction, but the tooth surface appears asymmetric. The error value reaches the maximum both at the outer and inner diameter ends along the tooth length direction, and influence is greater for the tooth addendum when compared with the tooth dedendum.
7 Conclusions
1) A new method for the derivation of the face gear error tooth surface is proposed where actual tool installation position errors are introduced into the equation of virtual shaper cutter, and the validity of this method is verified by simulation process.
2) Tangential linear position error and axial linear position error can cause the tooth surface deviated along the tooth width and tooth height directions, making a greater impact on the middle position of the tooth surface, as well as on the tooth dedendum and the tooth addendum. Yaw angle error and pitch angle error will cause the tooth surface to incline along the tooth length and tooth width directions, having a stronger influence on the outer diameter end and the inner diameter end of the tooth surface.
3) Axial linear position error and yaw angle error have little influence on the symmetry of the tooth surface, while tangential linear position error and pitch angle error will lead the tooth surface to appear asymmetrical.
4) The research results provide a significant theoretical basis for assembly craft of worm wheel and investigation into the influence of tooth surface generation concerning tool installation errors.
References
[1] DAVID B D, ROBERTO A S. Gear parameters for specified deflections department of mechanical engineering [J]. Journal of Mechanical Design, 2001, 123: 416-421.
[2] LITVIN F L. Application of face gear drives in helicopter transmissions [J]. Transaction of the ASME, Journal of Mechanical Design, 1994, 116: 672-676.
[3] HEALTH G F, FILLER R R, TAN J. Development of face gear technology for industrial and aerospace power transmission [R]. NASA Contactor Report 211320, 2002.
[4] FILLER R R, HEALTH G F, SLAUGHTER S C, LEWICKI D G. Torque splitting by a concentric face gear transmission [C]// The American Helicopter Society 58th Annual Forum. Montreal, Canada, 2002: 11-22.
[5] LI Zheng-min-qing, ZHU Ru-peng. Research on pointing of face gear by enveloping method [J]. China Mechanical Engineering, 2008, 19(9): 1029-1033. (in Chinese)
[6] STADTFELD H J. CONIFACE face gear cutting and grinding [J]. GEAR Solutions, 2010(9): 38-47.
[7] SU Jin-zhan, FANG Zong-de, GU Jian-gong. Tooth surface correction for spiral bevel gears [J]. Transactions of the Chinese Society of Agricultural Machinery, 2010, 41(3): 201-203. (in Chinese)
[8] CHEN Shu-han, YAN Hong-zhi, MING Xing-zu, ZHONG Jue, XIE Yan-dong. Establishment and analysis of error and difference surfaces in spiral bevel gear [J]. China Mechanical Engineering, 2008, 19(18): 2156-2161. (in Chinese)
[9] TANG Jin-yuan, LI You-yuan, ZHOU Chao, LU Yan-feng. Relation between CNC bevel gear generator spatial errors and machine setting errors [J]. Chinese Journal of Mechanical Engineering, 2009, 45(4): 148-154. (in Chinese)
[10] ZHOU Chao, TANG Jin-yuan, ZENG Tao, LU Yan-feng. Relationship between grinding wheel and tooth surface error [J]. Chinese Journal of Mechanical Engineering, 2008, 44(2): 94-101. (in Chinese)
[11] WANG Xiao-chun, WANG Jun, JIANG Hong, LIN Run-fang, FENG Wen-jun. Tooth surface measurement and machine-settings correction of spiral bevel gear [J]. Journal of Mechanical Engineering, 2003, 39(8): 125-128. (in Chinese)
[12] LI Jing-cai, WANG Tai-yong, FAN Sheng-bo, HE Gai-yun, XING Yuan. Error corrections of spiral bevel gear tooth surface based on digitized manufacturing [J]. Transactions of the Chinese Society of Agricultural Machinery, 2008, 39(5): 174-177. (in Chinese)
[13] LI Xiao-zhen, ZHU Ru-peng, LI Zheng-min-qing, LI Fa-jia. Influence of setting error of tool on tooth profile and contact point of face gear drive [J]. Transactions of Nanjing University of Aeronautics and Astronautics, 2014, 31(4): 370-376
[14] HE Guo-qi, YAN Hong-zhi, HE Ying, SHU Tao-liang, REN Xing-li. Face-gear grinding simulation and tooth surface error snalysis [J]. Journal of Central South University: Science and Technology, 2014, 45(7): 2193-2200. (in Chinese)
[15] MING Xing-zu, LI Man-de, WANG Wei, ZHAO Lei. Analysis of the error sensitive direction and establishment of the equation of face gear tooth surface with error [J]. Journal of Mechanical Transmission, 2015, 39(5): 1-10. (in Chinese)
[16] GUO Hui, ZHAO Ning, HOU Sheng-wen. Machine error analysis and experimental study of grinding face gear based on disk wheel [J]. Journal of Northwestern Polytechnical University, 2013, 31(6): 915-920. (in Chinese)
[17] LITVIN F L. Development of gear technology and theory of gearing [R]. Cleveland, Ohio, USA: National Aeronautics and Space Administration, 1991.
[18] LITVIN F L, FUENTES A, ZANZI C, PONTIGGIA M, HANDSCHUH R F. Face gear drive with spur involute pinion: Geometry, generation by a worm, stress analysis [J]. Computer Method in Applied Mechanics and Engineering, 2002, 191(25, 26): 2785-2813.
[19] YANG Sheng-qun. VERICUT NC machining simulation technology [M]. Beijing, China: Tsinghua University Press, 2010. (in Chinese)
[20] GUO Hui. Research on method of hobbing face-gear and gearing performance [D]. Xi’an: Northwestern Polytechnical University, 2009. (in Chinese)
[21] WANG Jun, WANG Xiao-chun, JIANG Hong, LI Run-fang, FENG Wen-jun. Coordinate measurement of tooth surface of spiral gear [J]. Journal of Mechanical Engineering, 2003, 39(6): 151-154. (in Chinese)
(Edited by FANG Jing-hua)
Cite this article as: CUI Wei, TANG Jin-yuan. New method for calculating face gear tooth surface involving worm wheel installation errors [J]. Journal of Central South University, 2017, 24(8): 1767-1778. DOI: https://doi.org/ 10.1007/s11771-017-3585-7.
Foundation item: Projects(51535012, U1604255) supported by the National Natural Science Foundation of China; Project(2016JC2001) supported by the Key Research and Development Project of Hunan Province, China
Received date: 2015-12-27; Accepted date: 2016-08-30
Corresponding author: TANG Jin-yuan, Professor; Tel: +86-731-88877746; E-mail: jytangcsu312@163.com

