Trans. Nonferrous Met. Soc. China 24(2014) 1750-1757
Formability of aluminum-silicon coated boron steel in hot stamping process
Zhong-xiang GUI1,2, Wei-kang LIANG1,2, Yi-sheng ZHANG1,2
1. State Key Laboratory of Material Processing and Die and Mould Technology, Huazhong University of Science and Technology, Wuhan 430074, China;
2. College of Materials Science and Engineering, Huazhong University of Science and Technology, Wuhan 430074, China
Received 27 June 2013; accepted 3 October 2013
Abstract: Flow behavior of the Al-Si coated boron steel was investigated with Gleeble-3500, in comparison with the uncoated one. Effect of deformation conditions on the coating integrity was characterized by optical microscopy. Facture surfaces of the coated steels were inspected under SEM. Experimental results indicate that the ultimate tensile strength and ductility of the Al-Si coated boron steel are lower than those of the uncoated steel under test conditions. Extensive cracks occur in the coating after tensile tests; the width and density of cracks are sensitive to the deformation temperatures and strain rates. The bare substrate exposed between the separate coating segments is oxidized. Appearance of the oxide degrades the Al-Si coating adhesion. Remarkable difference between formability of the coating layer and the substrate is confirmed. The formability of the Al-Si coating could be optimized by controlling the phase transformation of the ductile Fe-rich intermetallic compounds within it during the austenization.
Key words: hot stamping; boron steel; oxidation; Al-Si coating; crack; formability
1 Introduction
Hot stamping of the boron steel has proved a success for automotive manufacturers, owing to its ability to achieve the purpose of reduction of both the vehicle weight and fuel consumption, while improves the safety and crashworthiness qualities at the same time [1,2]. And today, it is an important technology as far as the crash-relevant components in mass produced models are concerned [3,4]. However, because of the high temperature and inevitable contact with air during transport and forming, the surface of the hot blank is subjected to oxidation and decarburization [5,6]. In order to avoid that unfavorable phenomenon, an aluminum- silicon (Al-Si) coating has been applied for steel protection in hot stamping process. The Al-Si coating usually contains 7%-11% silicon (mass fraction) and offers good protection against scaling, as well as satisfying anti-corrosive properties [7,8].
JENNER [9] and WINDMANN et al [10] focused on the microstructure evolution of the hot-dipped Al-Si coating during austenization prior to hot stamping operation. AZUSHIMA et al [11] investigated the friction behavior of the Al-Si coated boron steels in hot stamping under dry and lubricated conditions. HARDELL et al [12,13] studied the high-temperature friction and wear on different tool steels sliding against the Al�CSi coated boron steel. TIAN et al [14] determined the friction coefficient of the uncoated boron steel in hot strip drawing tests. The flow behaviors of the aluminum coated and uncoated boron steels in press hardening were reported in Refs. [15,16].
But it should be noted that, no effort made on investigation concerning the effect of the Al-Si coating on thermo-mechanical behavior of the boron steel has been reported. The thermo-mechanical response to loading affects significantly the protection efficiency of the coatings and the formability of coated steels. Cracking and delamination of the coatings during forming decrease corrosion resistance by exposing the substrate to corrosive environment. Therefore, in addition to the substrate ductility, the formability of the coating is significant. The importance of hot stamping and its application to Al-Si coated boron alloyed steels underline the great interest.
2 Experimental
2.1 Materials
Two groups of samples were prepared. One group was boron steel with a thickness of 1.8 mm without the Al-Si coating (Table 1). The other group was the Al-Si coated samples using the first group as the substrate. The coating was hot-dipped on the substrate in a molten bath containing Al-10%Si. The average coating mass for the top surface of the coated steel sheets was about 84 g/m2, while for the bottom surface was 77.6 g/m2.
Table 1 Chemical composition of steel substrate (mass fraction, %)

2.2 Test conditions
Uniaxial tensile tests carried out by Gleeble-3500 were performed to evaluate the thermo-mechanical behavior of the Al-Si coated and uncoated boron steels under different deformation conditions. Dimension properties of the tested samples are shown in Fig. 1. The thermal�Cmechanical procedure is illustrated Fig. 2. Each sample was heated to 920 ��C with a heating rate of 10 ��C/s, and austenitized for 5 min. Then the samples were cooled down to 850, 800, 750 and 700 ��C at a speed of 30 ��C/s, kept at the temperature for 3 s to attain a uniform temperature region. Strain rates of 0.01, 0.1 and 1 s-1 were selected as the forming process parameters.
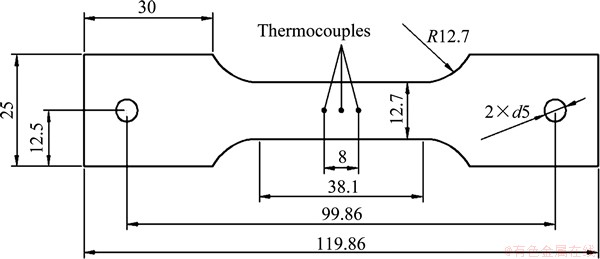
Fig. 1 Dimension properties of tensile test sample (unit: mm)
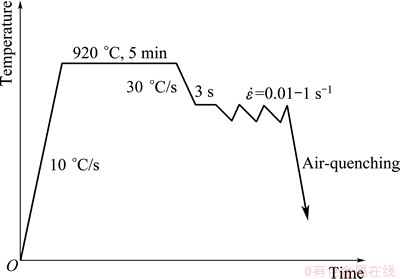
Fig. 2 Illustration of heat treatment and deformation process
Investigation on the surface morphology of the coating layer before and after tests was performed by a 3D ultra- depth optical microscope (KEYENCE VHX-1000C). The fracture surfaces of the cracked coatings were inspected by scanning electron microscopy (SEM, FEI/QUANYA 200).
2.3 Calculation of true stress-strain curve
There is an uneven temperature distribution along the length of sample since the Gleeble system adopts an electric resistance heating method to control the temperature [17]. The length of uniform temperature region may be different for different samples, so the determination work needs to be done. In addition, through heating and keeping temperature, it is able to attain the uniform temperature region. The length is more than 8 mm in the central region of sample (Fig. 1), and the hot deformation will locally produce in this portion. Thus the length of 8 mm is used to revise the stress-strain value to keep the uniformity for different samples [18].
According to the definition, the true stress and true strain can be expressed as
 (1)
(1)
 (2)
(2)
where F is the instantaneous load; ��t is the true stress; ��t is the true strain; A is the instantaneous cross section; A0 is the original cross section; l is the instantaneous length; l0 is the original length of sample; ��l is the instantaneous variation of length during tension testing.
The method of revising the stress-strain value can be expressed as
 (3)
(3)
 (4)
(4)
where ��m is the revised true stress; ��m is the revised true strain; Am is the revised cross section of tested sample; lm is the revised length of tested sample; ��lm is the distance variation between two datum points at the end of test; ��lt is the whole length variation of sample at the end of test; �� is the revise coefficient and can be expressed as
 (5)
(5)
3 Results and discussion
3.1 Hot tensile test results
Examples of the true strain�Cstress curves of the coated and uncoated boron steels obtained from the hot tensile tests are shown in Fig. 3. It could be found that the effect of the deformation temperature on the flow stress is significant. The flow stress exhibits a dynamic flow softening behavior at higher deformation temperatures, whereas with the decreasing deformation temperature, a work hardening behavior is obviously observed for the flow stress. During the tensile test, it is also seen that the flow stress and the maximum stress increase with the decreasing temperature at a constant strain rate. Moreover, the maximum stress value also increases with the strain rate increasing from 0.01 to 1 s-1.
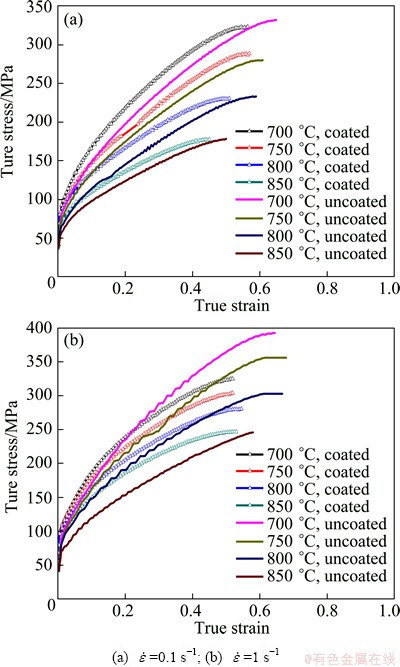
Fig. 3 Influence of deformation temperature on flow stress of uncoated and coated boron steels
Figure 4 shows the comparison of thermo- mechanical behavior between the Al-Si coated and the uncoated boron steels. The ultimate tensile strength (UTS) and uniform elongation (UE) were selected as evaluation indexes. The differences were calculated by subtracting the index values of the uncoated samples from the coated one, and the positive value means that the index of the uncoated sample is higher than that of the coated one.
It can be seen that the UTS difference between the coated and uncoated samples are very small under low stain rates of 0.01 s-1 and 0.1 s-1 (Fig. 4(a)), thus the two could be regarded as having similar ultimate tensile strength. A glimpse of this phenomenon can also be caught from the test results of JANG et al [15]. However, no attentions were put on it. PANAGOPOULOS et al [19] also found a drop in mechanical behavior of the Zn-Fe alloy coated mild steel in cold forming operation with a strain rate of 1.1��10-3 s-1. As the strain rate comes up to 1 s-1, the difference becomes remarkable. Especially under a lower deformation temperature, it comes up to 67.7 MPa at 700 ��C. Moreover, the UTS difference decreases with the increasing temperature given a constant strain rate. Another observation can be found that the Al-Si coated samples have a significantly lower ductility than the uncoated ones (Fig. 4(b)). The difference of UE increases with the decreasing temperature at a constant strain rate. In addition, it also increases with the strain rate from 0.01 to 1 s-1.
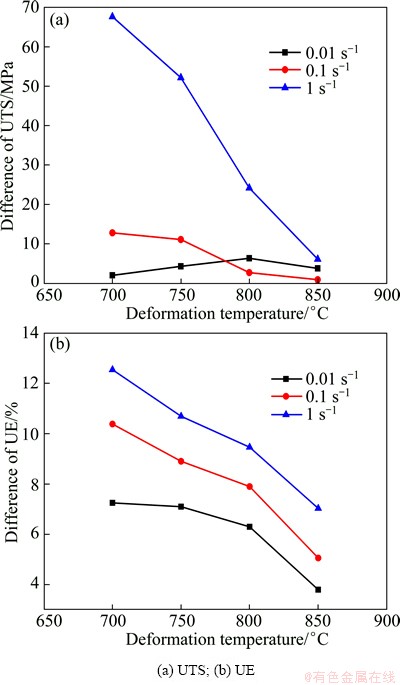
Fig. 4 Comparisons of indexes of coated and uncoated boron steels
The above results indicate that the Al-Si coating gives a small but significant influence on the tensile properties of the coated samples. According to the linear rule of mixture, the tensile properties of the composite laminate coating system (substrate and coating) can be given by the equation [19,20]:
Pt=PsVs+PcVc (6)
where Pt is the tensile property of the whole coating system; Ps and Pc are the tensile properties of the substrate and coating, respectively; Vs, Vc are the volume fractions of substrate and coating compared with the coating system, respectively. Therefore, it could be suggested that the Al-Si coating on the boron steel substrate will possibly lead to lower tensile properties, compared with the uncoated ones.
By defining a thickness ratio t (coating thickness /substrate), the difference of the thermo-mechanical properties of the boron steels with or without coating can be expressed as
 (7)
(7)
With a relatively small thickness of the coating system compared with the substrate, the t is close proximity to zero, namely, the difference comes to be negligible. Due to its small thickness, the coating shares only a tiny volume fraction of the load carrying cross-section of the tensile sample, thus having a minor role in the determination of the tensile properties of the coating system. Hence, for the sake of tensile properties, a thinner alloy coating system is more favorable. In addition, the system is less susceptible to cracking [9]. The high stress concentration when the crack tip reaches the interface has been determined by GEORGE et al [21]. The works of BEUTH and KLINGBEIL [22]confirms that cracking of the coating induces yielding in the steel substrate.
It has been shown that the presence of the coating layers blocks the egress of dislocations from the metallic substrate to the coating layer [19,20]. Thus, the lower movement and multiplication of dislocation in the bulk substrate results in the decrease of ductility of the Al-Si coated sample. This phenomenon might be due to the presence of the brittle and hard intermetallic phases (FeAl2 or Fe2Al5) in the coating under press-hardened state [10,23]. These phases are believed to hinder the egress of dislocations from the substrate to the coating during the tensile deformation of the coated sample via dislocation pinning mechanisms. The decreased movement of dislocation brings about a decrease in the ductility of the coated sample.
3.2 Surface morphology of coated samples after hot tensile test
The forming process can induce crack initiation and propagation in the coatings. Once cracks advance, their openings provide passages for air and moisture that lead to adverse oxidation reactions and corrosion in both the coatings and the steel substrate. The sections next to the fracture surface of the coated samples after tensile deformation are shown in Figs. 5 and 6.
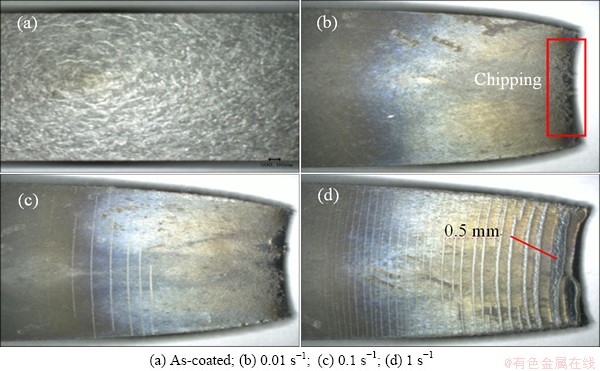
Fig. 5 Optical graphs of surface morphology of coated samples under different stain rates (tforming=850 ��C)
It is found that at the strain rate of 0.01 s-1, only partial chipping of the coating occurs near the fracture (Fig. 5(b)). The coating cracks obviously when the strain rate reaches 0.1 s-1, but the width and density of the crack are relatively narrow and small (Fig. 5(c)). A sharp increase in the crack width and density is found as the strain rate comes up to 1 s-1, and the maximum crack width about 0.5 mm occurs near the fracture (Fig. 5(d)). The crack width and density of the coatings have been boosted significantly with the increasing strain rate. The cracks formed in all Al-Si coatings propagate nearly perpendicular to the tensile axial. The cracks observed on the surface of the coatings are believed to form due to the inability of the brittle coating to accommodate the strain generated in the ductile substrate [22,24]. At a lower strain rate, there is more time for the coating to coordinate with the substrate, but not vice versa. The above results indicate that the strain rate should be lowered in hot stamping of the Al-Si coated boron steel, which is declared by punching speed in the actual forming process. The higher punch speed will lead to ascending crack tendency of the coating. However, it facilitates the production efficiency. Considering practical efficiency and final properties of the hot-stamped components [25], the punch speed needs to be optimized.
Another observation is that the crack width and density of the coatings have been increased significantly with the decreasing deformation temperature (Fig. 6). The orientation of the crack propagation in relation to the tensile axial still holds. Cracking of the coating occurs at the deformation temperature of 800 ��C, but the density of cracks is samll, and almost no pieces of the coating are delaminated from the substrate. However, as the deformation temperature drops to 700 ��C, the density of the cracks increases substantially. The cracks are wider and deeper. This could be attributed to the influence of temperature on the mechanical properties of both the coating system and the steel substrate. It is suggested the lower the temperature is, the wider and the denser the cracks are. A high crack density is favorable for the partial fracture and delamination of the coated components, and decreases weldability, paintability and corrosion resistance of the hot-stamped components during post operations and service. It is of great interest to avoid such a high crack density in the Al-Si coating. Consequently, a higher deformation temperature should be applied to the hot stamping of Al-Si coated steel. Moreover, it is benefit for an enhancement in the tensile strength of the hot-stamped components [26].
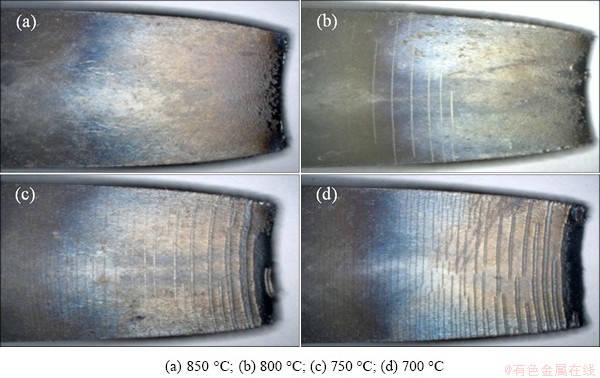
Fig. 6 Optical graphs of surface morphology of coated samples under different deformation temperatures ( =0.01 s-1)
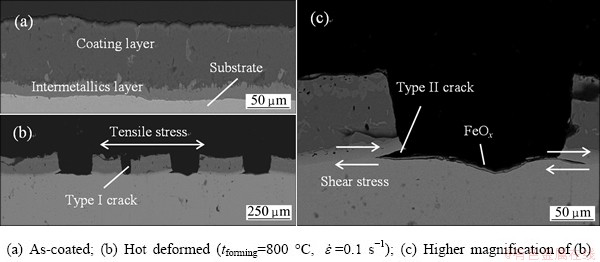
Fig. 7 Cross-sectional morphology of coated samples
Figure 7 shows the cross sectional surfaces of the coated samples before and after hot tensile tests. It could be seen that the Al-Si coating after hot dipping keeps dense, integrated and continuous (Fig. 7(a)). During the deformation at a elevated temperature, the coating heavily cracked and broke into segments but still adhered to the substrate (Fig. 7(b)). The forming process causes large deformation in steel substrate, and elastic mismatch of the coating and the substrate induces the crack initiation and propagation in the coatings [22]. Moreover, the microcracks occurring in the coating due to austenitizing heat treatment act as nucleation sites for coating cracking and propagate under tensile stress [27]. The cracks propagate in direction perpendicular to the coating/substrate interface and form Type I crack due to the tensile stress (Fig. 7(b)). Since the interfacial bonding strength between the coating and the substrate is lower than the substrate yield strength, as the crack reaches the interface, the propagation is hindered by the substrate, and turns to parallel the coating/substrate interface. In addition with the shear stress, Type II crack forms (Fig. 7(c)). The cracked coating peels off from the steel substrate. The cracks become wider following the increasing strain. Bare steel is exposed between the separate segments of the coating. The opening provides passages for air and leads to appearance of a thin FeOx layer on the steel surface. Apparently, delamination also occurs along the interface between the oxides and the Al-Si coating. So, it is reasonable to conclude that the existence of the oxide decreases adhesion of the Al-Si coating.
3.3 Fracture surface morphology of coated samples
Figure 8 shows the facture surfaces of the coated samples. The cracked coating surface is faceted due to brittle fracture and microcracks are found to initiate from the coating surface, and go through the coating layer (Fig. 8(a)). The brittleness and thermal expansion mismatch of the FexAly intermetallic compounds result in coating microcracks. The Al-rich intermetallic compounds exhibiting low fracture toughness promote formation and propagation of cracks in the coating microstructure [28]. While the facture surface of the steel substrate shows nearly equiaxed dimples, which indicate the ductile fracture. It is confirmed that there is a remarkable difference between the formability of the coating layer and the substrate. The coating is expected to be more compatible to the deformation of the substrate and fully deform plastically without brittle fracture.
The microstructure of the hot-dipped Al-Si coating austenized at typical conditions used in hot stamping process was identified as the brittle and hard FexAly intermetallic phases [8-10]. There are five types of intermetallic compounds (Fe3Al, FeAl, FeAl2, Fe2Al5 and FeAl3) shown in the Fe-Al phase diagram. The FeAl2, Fe2Al5 and FeAl3 compounds, which have a high aluminum composition, are problematic due to their brittleness. Conversely, the Fe3Al and FeAl, which have a high iron composition, have good wear resistance,
oxidation resistance, corrosion resistance and specific strength properties. KOBAYASHI and YAKOU [28] identified that the formation and growth of Fe-Al intermetallic compounds is controlled by the diffusion of Fe atoms into the coating layer. As a result of the diffusion processes, the Al-rich intermetallic compounds in the coating transform to more Fe-rich intermetallic compounds, supporting the formation of the ductile FeAl intermetallic compounds [9,10]. Therefore, a longer dwell time or higher austenitizing temperature will promote the Fe diffusion into the Al-Si coating. Figure 9 shows the experimental results. The cracked coating presents the ductile fracture surface. This therefore suggests that the austenization, which influences the phase transformation in the coating layer, can serve as an important parameter for tailoring the formability of the Al-Si coatings.
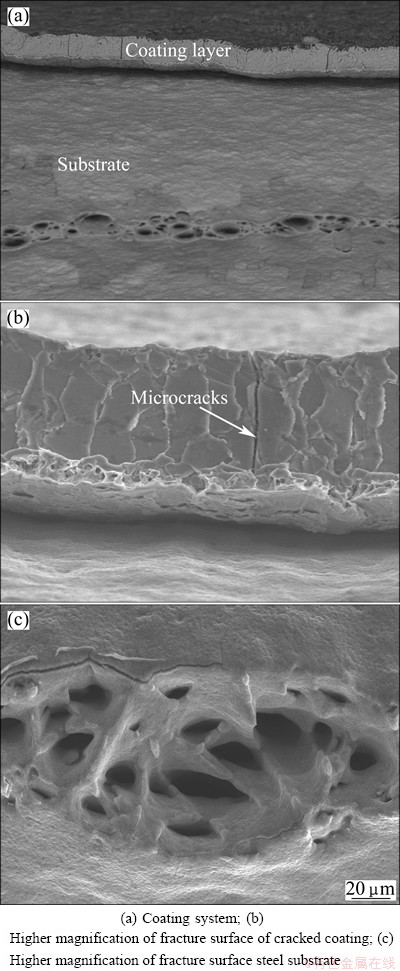
Fig. 8 SEM images of coated sample
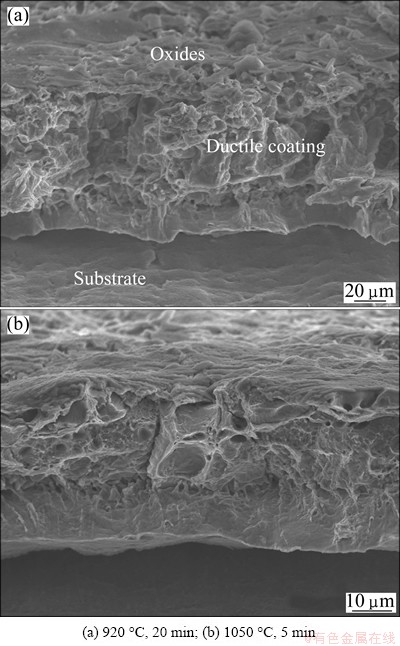
Fig. 9 SEM images of optimized cracked coating (tforming=800 ��C,  = 0.1 s-1)
4 Conclusions
1) The ultimate tensile strength and ductility of the Al-Si coated boron steel are lower than those of the uncoated steel under test conditions.
2) Extensive cracks occur in the Al-Si coating after tensile deformation. The cracks firstly propagate in direction perpendicular to the coating/substrate interface and lead to Type I crack, then turn to parallel the coating/substrate interface due to the lower interfacial bonding strength than the substrate yield strength. In addition with the shear stress, Type II crack forms. The width and density of cracks are sensitive to the deformation temperatures and strain rates.
3) The bare steel exposed between the separate segments of the coating is oxidized and covered with a thin FeOx layer. Existence of the oxides decreases adhesion of the Al-Si coating.
4) Formability of the coating layer could be optimized by control of the Fe-rich phase transformation in it during the austenization process. The deformation temperature higher than 750 ��C and the strain rate lower than 0.1 s-1 would be more suitable for hot stamping of the coated steel.
Acknowledgements
The authors would like to acknowledge the Analytic and Testing Center of Huazhong University of Science and Technology and the State Key Laboratory of Materials Processing and Die and Mould Technology for their assists in Gleebel tensile tests, optical and SEM characterizations.
References
[1] KARBASIAN H, TEKKAYA A E. A review on hot stamping [J]. Journal of Materials Processing Technology, 2010, 210: 2103-2118.
[2] MORI K. Smart hot stamping of ultra-high strength steel parts [J]. Transactions of Nonferrous Metals Society of China, 2012, 22: s496-s503.
[3] GUI Z X, ZHANG Y S, LI H Q, MA M T. Hot stamping and blank designing for a vehicle bumper using ultra high strength steel (UHSS) [J]. Advanced Materials Research, 2013, 690-693: 2240-2244.
[4] WANG C, ZHU B, ZHANG Y S, SHI J, DONG H. Stamping process simulation and optimize research for collision beam of automobile door [J]. Advanced Materials Research, 2011, 201-203: 3-8.
[5] MORI K, ITO D. Prevention of oxidation in hot stamping of quenchable steel sheet by oxidation preventive oil [J]. CIRP Annals-Manufacturing Technology, 2009, 58: 267-270.
[6] HU P, YING L, LI Y, LIAO I N. Effect of oxide scale on temperature-dependent interfacial heat transfer in hot stamping process [J]. Journal of Materials Processing Technology, 2013, 213: 1475-1483.
[7] CHENG W J, WANG C J. Microstructural evolution of intermetallic layer in hot-dipped aluminide mild steel with silicon addition [J]. Surface & Coatings Technology 2011, 205: 4726-4731.
[8] SUEHIRO M, KUSUMI K, MIYAKOSHI T, MAKI J, OHGAMT M. Properties of aluminum-coated steels for hot stamping [R]. Tokyo: Nippon Steel, 2003.
[9] JENNER F, WALTER M E, IYENGAR R M, HUGHES R. Evolution of phases, microstructure, and surface roughness during heat treatment of aluminized low carbon steel [J]. Metallurgical and Materials Transactions A, 2010, 41: 1554-1563.
[10] WINDMANN M,  A, THEISEN W. Phase formation at the interface between a boron alloyed steel substrate and an Al-rich coating [J]. Surface & Coatings Technology, 2013, 226: 130-139.
[11] AZUSHIMA A, UDA K, YANAGIDA A. Friction behavior of aluminum-coated 22MnB5 in hot stamping under dry and lubricated conditions [J]. Journal of Materials Processing Technology, 2012, 212: 1014-1021.
[12] HARDELL J, PRAKASH B. High-temperature friction and wear behavior of different tool steels during sliding against Al-Si-coated high-strength steel [J]. Tribology International, 2008, 41: 663-671.
[13] HARDELL J, KASSFELDT E, PRAKASH B. Friction and wear behaviour of high boron steel at elevated temperatures of up to 800 ��C [J]. Wear, 2008, 264: 788-799.
[14] TIAN X W, ZHANG Y S, LI J. Investigation on tribological behavior of advanced high strength steels: influence of hot stamping process parameters [J]. Tribology Letters, 2012, 45: 489-495.
[15] JANG J H, LEE J H, JOO B D, MOON Y H. Flow characteristics of aluminum coated boron steel in hot press forming [J]. Transactions of Nonferrous Metals Society of China, 2009, 19: 913-916.
[16] SHI Z M, LIU K, WANG M Q, SHI J, DONG H, PU J, CHI B, ZHANG Y S, LI J. Thermo-mechanical properties of ultra high strength steel 22SiM2TiB at elevated temperature [J]. Materials Science and Engineering A, 2010, 528: 3681-3688.
[17] BOK H H, LEE M G, KIM H D, MOON M D. Thermo-mechanical finite element analysis incorporating the temperature dependent stress-strain response of low alloy steel for practical application to the hot stamped part [J]. Metals and Materials International, 2010, 16(2): 185-195.
[18] LI H P, ZHAO G Q, HE L F, ZHANG L. Research on the constitutive relationship of hot stamping boron steel B1500HS at high temperature [J]. Chinese Journal of Mechanical Engineering, 2012; 48(4): 21-27.
[19] PANAGOPOULOS C N, GEORGIOU E P, AGATHOCLEOUS P Z, GIANNAKOPOULOS K. Mechanical behavior of Zn-Fe alloy coated mild steel [J]. Materials and Design, 2009, 30: 4267-4272.
[20] PANAGOPOULOS C N, PELEGRI A A. Tensile properties of zinc coated aluminium [J]. Surface & Coating Technology, 1993, 57: 203-206.
[21] GEORGE M, COUPEAU C, COLIN J, GRILHE J. Atomic force microscopy observations of successive damaging mechanisms of thin films on substrates under tensile stress [J]. Thin Solid Films, 2003, 429: 267-272.
[22] BEUTH J L, KLINGBEIL N W. Cracking of thin films bonded to elastic-plastic substrates [J]. Journal of the Mechanics and Physics of Solids, 1996, 44(9): 1411-1428.
[23] MAITRA T, GUPTA S P. Intermetallic compound formation in Fe�CAl�CSi ternary system: Part II [J]. Materials Characterization, 2003, 49: 293-311.
[24] PANAGOPOULOS C N, PAPACHRISTOS V D. Tensile behavior of as deposited and heat-treated electroless Ni-P deposits [J]. Journal of Materials Science, 1999, 34: 2587-2600.
[25] LIU W, LIU H S, XING Z W, LIU G , BAO J. Effect of tool temperature and punch speed on hot stamping of ultra high strength steel [J]. Transactions of Nonferrous Metals Society of China, 2012, 22: s534-s541.
[26] LIU H S, XING Z W, LEI C X. Hot formation quality of high strength steel BR1500HS for hot stamping without cooling system [J]. Transactions of Nonferrous Metals Society of China, 2012, 22(S): s542-s547.
[27] CHEN Z T, LI G, WU Z Q, XIA Y. The crack propagating behavior of composite coatings prepared by PEO on aluminized steel during in situ tensile processing [J]. Materials Science and Engineering A, 2011, 528: 1409-1414.
[28] KOBAYASHI A, YAKOU T. Control of intermetallic compound layers at interface between steel and aluminum by diffusion- treatment [J]. Materials Science and Engineering A, 2002, 338: 44-53.
������Ʋ���ְ���ȳ�ѹ������
������1,2��������1,2, ������1,2
1. ���пƼ���ѧ ���ϳ�����ģ���������ص�ʵ���ң��人 430074��
2. ���пƼ���ѧ ���Ͽ�ѧ�빤��ѧԺ���人 430074
ժ Ҫ������Gleeble-3500����˴�Al-Si�Ʋ���ְ��������Ϊ�������Ʋ����бȽϣ��ڹ�ѧ�����¹۲���������Ա���Ʋ������Ե�Ӱ�죻��SEM�¹۲��˴�Al-Si�Ʋ���ְ������ĶϿ���ò�������������Al-Si�Ʋ���ְ�Ŀ���ǿ�Ⱥ��쳤�������������¾������Ʋ��ġ���������κ���ֱ���Al-Si�Ʋ�����˴��������ƣ�����Ⱥ��ܶȶԱ����¶Ⱥ�Ӧ�����ʽ����С��Ʋ�Ŀ��ѵ��»�����¶�������������˶Ʋ��ճ�������Ͽ���ò�۲���ʾ�Ʋ��������н����Եij����Բ��졣����ͨ�������廯����Al-Si�Ʋ��и������������ת������ǿ������ԡ�
�ؼ��ʣ��ȳ�ѹ���Σ���ְ壻������Al-Si�Ʋ㣻���ƣ�������
(Edited by Hua YANG)
Foundation item: Project (51275185) supported by the National Natural Science Foundation of China
Corresponding author: Yi-sheng ZHANG; Tel: +86-27-87544457; Fax: +86-27-87547935; E-mail: zhangys@mail.hust.edu.cn
DOI: 10.1016/S1003-6326(14)63249-0